[SWIFT] How to create Sound Visualizer
Bài đăng này đã không được cập nhật trong 5 năm
Môi trường phát triển:
- Swift Language Version: Swift 5.0
- Xcode: Version 11.1
- Deployment Target: 12.0
Ý tưởng:
Bài viết hôm nay mình sẽ chia sẻ về cách sử dụng microphone tích hợp để lấy mẫu mức âm thanh theo dB, từ đó trực quan hóa nó trong Swift.
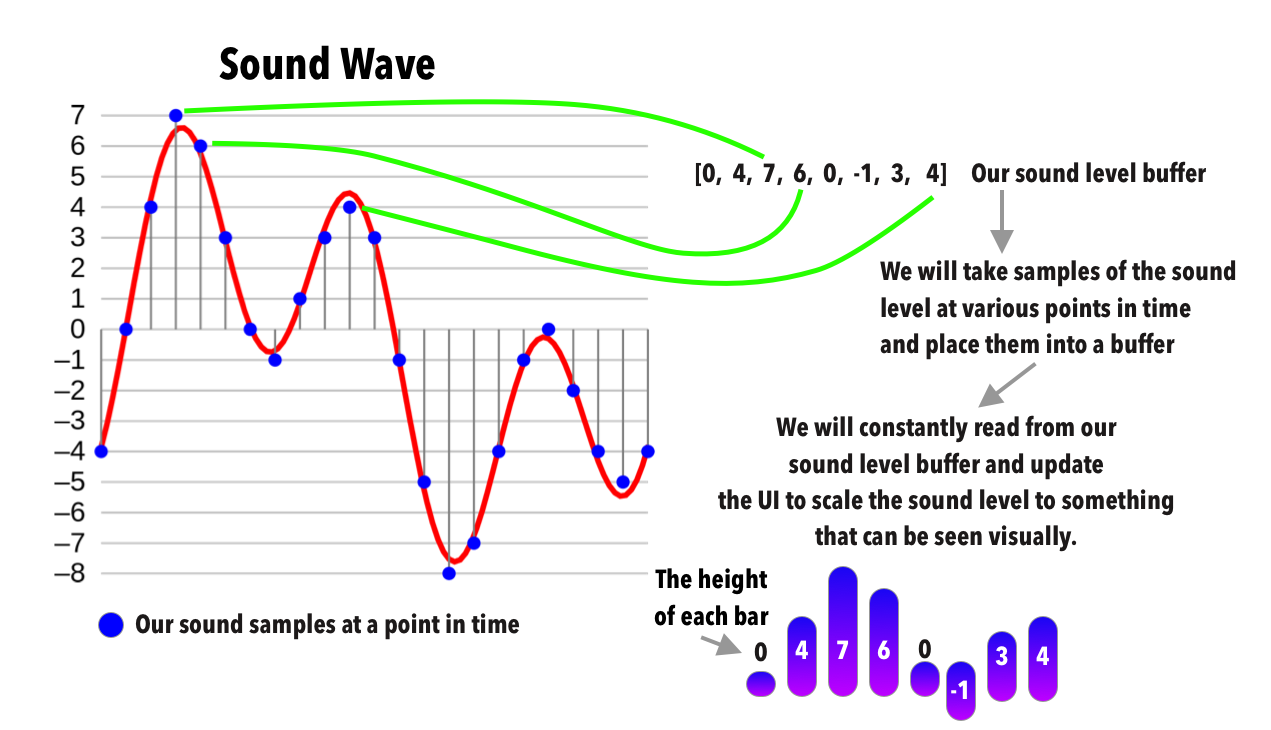
Biểu đồ trên chính là sóng âm thanh. Sử dụng Swift, ta có thể bắt mức độ của âm thanh ở bất kỳ thời điểm nào. Ta có thể lấy nhiều mẫu âm thanh khác nhau và lưu trữ chúng vào 1 buffer. Sử dụng buffer này, ta có thể ánh xạ nó đến bar chart - chiều cao của các cột sẽ biểu thị tương quan với âm thanh nhận được từ microphone.
Bước 1: Bắt âm thanh từ microphone
Ta tạo file MicrophoneMonitor.swift để xử lý logic về bắt âm thanh từ microphone. Trong file này, ta sẽ phải thực hiện ghi âm audio từ thiết bị người dùng cũng như cập nhật khi buffer chứa các mức âm thanh thay đổi. Ta sẽ khởi tạo object AVAudioSession và config nó để bắt mức âm thanh mỗi 0.01 giây.
enum NotificationKey {
    static let microNotificationKey = "microphone.recording"
}

final class MicrophoneMonitor {

    let notificationCenter = MyNotificationCenter()

    // 1
    private var audioRecorder: AVAudioRecorder
    private var timer: Timer?

    private var currentSample: Int
    private let numberOfSamples: Int

    // 2
    var soundSamples: [Float] {
        didSet {
            self.notificationCenter.postNotification(forName: NotificationKey.microNotificationKey, forData: self.soundSamples)
        }
    }

    init(numberOfSamples: Int) {
        self.numberOfSamples = numberOfSamples
        self.soundSamples = [Float](repeating: .zero, count: numberOfSamples)
        self.currentSample = 0

        // 3
        let audioSession = AVAudioSession.sharedInstance()
        if audioSession.recordPermission != .granted {
            audioSession.requestRecordPermission { (isGranted) in
                if !isGranted {
                    fatalError("You must allow audio recording for this demo to work")
                }
            }
        }

        // 4
        let url = URL(fileURLWithPath: "/dev/null", isDirectory: true)
        let recorderSettings: [String:Any] = [
            AVFormatIDKey: NSNumber(value: kAudioFormatAppleLossless),
            AVSampleRateKey: 44100.0,
            AVNumberOfChannelsKey: 1,
            AVEncoderAudioQualityKey: AVAudioQuality.min.rawValue
        ]

        // 5
        do {
            audioRecorder = try AVAudioRecorder(url: url, settings: recorderSettings)
            try audioSession.setCategory(.playAndRecord, mode: .default, options: [.defaultToSpeaker])

            startMonitoring()

        } catch {
            fatalError(error.localizedDescription)
        }
    }

    // 6
    private func startMonitoring() {
        audioRecorder.isMeteringEnabled = true
        audioRecorder.record()
        timer = Timer.scheduledTimer(withTimeInterval: 0.01, repeats: true, block: { (timer) in
            // 7
            self.audioRecorder.updateMeters()
            self.soundSamples[self.currentSample] = self.audioRecorder.averagePower(forChannel: 0)
            self.currentSample = (self.currentSample + 1) % self.numberOfSamples

            if (timer.timeInterval == 2.0) {
                timer.invalidate()
                self.audioRecorder.stop()
            }
        })
    }

    // 8
    deinit {
        timer?.invalidate()
        audioRecorder.stop()
    }
}
- Ta khai báo đối tượng audio recorder và một optional timer
- Khi soundSamples thay đổi thì ta sẽ sử dụng notification để gửi đi thông báo yêu cầu cập nhật lại UI.
- Ta setup audio session và check xem users đã cấp quyền truy cập micro chưa. Nếu chưa được chấp nhận, ta sẽ yêu cầu sự cho phép từ users. Nếu users từ chối, ta sẽ ném một fatalError().
- Tạo url cho nơi mà audio khi thực hiện recording xong sẽ được lưu trữ. Trong trường hợp này, ta chỉ set url như một ví dụ mà thôi. Đồng thời, ta sẽ setup những cài đặt cần thiết để ghi âm audio.
- Ta khởi tạo đối tượng audioRecorder với url và những cài đặt recorder, cho phép ghi âm audio từ thiết bị người dùng.
- Ta bắt đầu giám sát ngay khi đối tượng này được khởi tạo. Ta cần phải set thuộc tính isMeteringEnabled = true bởi vì mặc định audio-level metering đang ở chế độ off cho một audio recorder. Trong trường hợp này, ta cần sử dụng audio-level metering để có được mức độ âm thanh.
- Bằng việc gọi hàm updateMeter(), ta sẽ làm mới các giá trị công suất trung bình và cực đại cho toàn bộ các channels của audio recorder. Điều này cho phép ta có được công suất trung bình cho channel âm thanh. Ta cũng cần update giá trị soundSamples tại bất cứ thời điểm nào mà ta nhận được. Liên quan đến biểu đồ ở trên, đây chính là lúc ta đưa những "blue dot" mẫu vào buffer. Tiếp theo, ta sẽ tăng mẫu hiện tại đến giá trị tiếp theo, và khi ta qua hết numberOfSamples hiện tại thì ta sẽ lặp lại về 0.
- Hãy đảm bảo rằng ta clean up tài nguyên khi đối tượng này được khởi tạo lại.
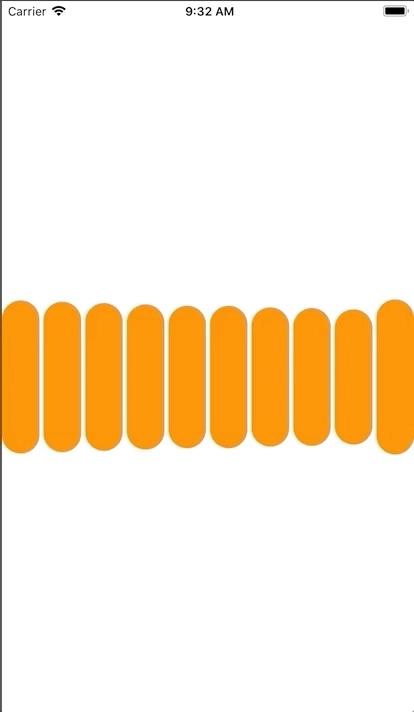
Bước 2: Tạo bar chart UI
Sau khi ta thu được buffer, ta sẽ tạo một bar chart đơn giản và chiều cao của mỗi thanh bar sẽ biểu thị giá trị mà ta thu được.
final class MainViewController: UIViewController {
    // 1
    @IBOutlet private weak var containerView: UIStackView!

    private let numberOfSamples: Int = 10
    private var arrConstraints: [NSLayoutConstraint] = []

    override func viewDidLoad() {
        super.viewDidLoad()

        // 2
        // Setting containerView
        containerView.spacing = 4
        containerView.axis = .horizontal
        containerView.distribution = .equalSpacing
        containerView.alignment = .center

        // Add barView to containerView
        for _ in 1...numberOfSamples {
            setupView()
        }

        // 3
        // Create object of microphone monitor and add observer
        let mic = MicrophoneMonitor(numberOfSamples: self.numberOfSamples)

        mic.notificationCenter.addObserver(forName: NotificationKey.microNotificationKey, usingBlock: { (name, data) in
            guard let data = data as? [Float] else { return }
            self.config(data)
        })
    }

    @objc
    private func config(_ soundSamples: [Float]) {
        for (index, level) in soundSamples.enumerated() {
            print(self.normalizeSoundLevel(level: level))
            arrConstraints[index].constant = self.normalizeSoundLevel(level: level)
        }
        self.containerView.layoutIfNeeded()
    }

    // 4
    private func setupView() {
        let barView = UIView()
        let width = (UIScreen.main.bounds.width - CGFloat(numberOfSamples - 1) * 4) / CGFloat(numberOfSamples)
        barView.backgroundColor = UIColor.orange
        barView.layer.cornerRadius = width / 2
        barView.translatesAutoresizingMaskIntoConstraints = false
        let widthConstraint = NSLayoutConstraint(item: barView, attribute: NSLayoutConstraint.Attribute.width, relatedBy: NSLayoutConstraint.Relation.equal, toItem: nil, attribute: NSLayoutConstraint.Attribute.notAnAttribute, multiplier: 1, constant: width)
        let heightConstraint = NSLayoutConstraint(item: barView, attribute: NSLayoutConstraint.Attribute.height, relatedBy: NSLayoutConstraint.Relation.equal, toItem: nil, attribute: NSLayoutConstraint.Attribute.notAnAttribute, multiplier: 1, constant: 0)

        containerView.addArrangedSubview(barView)
        containerView.addConstraints([widthConstraint,heightConstraint])
        arrConstraints.append(heightConstraint)
    }

    // 5
    private func normalizeSoundLevel(level: Float) -> CGFloat {
        guard level < 0 else { return CGFloat(0.1 * 300 / 25) } // Check if level start
        let level = max(0.2, CGFloat(level) + 50) / 2 // between 0.1 and 25
        return CGFloat(level * (300 / 25)) // scaled to max at 300 (our height of our bar)
    }
}
- Ta tạo 1 stackview và đặt tên là containerView - sẽ chứa những view là các thanh bar. numberOfSamples là số lượng mẫu âm thanh mà ta muốn biểu thị. arrConstraints là một array chứa các heightConstraint của các thanh bar.
- Ta cài đặt các thuộc tính của containerView và thêm các thanh bar vào containerView với số lượng bằng số lượng mẫu âm thanh muốn hiển thị.
- Ta tạo object MicrophoneMonitor và thêm observer để thực thi hàm config() mỗi khi giá trị của soundSamples thay đổi. Hàm config() sẽ update lại các giá trị heightConstraint của arrConstraints theo giá trị mức âm thanh mẫu.
- Hàm setupView() sẽ tạo các thanh bar với chiều rộng cố định dựa theo chiều rộng containerView và chiều cao ban đầu là 0.
- Hàm normalizeSoundLevel() sẽ chuyển các giá trị mức mẫu âm thanh thu được thành giá trị chiều cao của thanh bar, với giá trị mức âm thanh thu được trong khoảng từ -160dB đến 0dB. Trong đó, -160dB là mức âm yên tĩnh nhất và 0dB là mức ồn nhất có thể của âm thanh. Ta sẽ convert sang giá trị tương ứng nằm trong khoảng 0.1 đến 25. Và từ các giá trị convert đó sẽ tương ứng với khoảng chiều cao của thanh bar từ 1.2 đến 300.
Bước 3: Thêm key trong Info.plist
Ta cần thêm privacy setting trong Info.plist:

Kết quả:
Tài liệu tham khảo:
https://medium.com/swlh/swiftui-create-a-sound-visualizer-cadee0b6ad37
Link github:
All rights reserved
