Swift design patterns - Part 1
Bài đăng này đã không được cập nhật trong 4 năm
Design patterns là những giải pháp cho việc tái sử dụng những vấn đề chung trong thiết kế phần mềm. Nó là những thiết kế mẫu giúp code dễ hiểu và dễ tái sử dụng hơn. Nó cũng giúp ta tạo ra những đoạn code có liên kết "lỏng", nhờ đó, việc thay đổi hay thay thế các components trong code sẽ không gây ra nhiều khó khăn. Nếu bạn vẫn chưa biết nhiều về design patterns thì đừng lo, vì thực sự bạn đã sử dụng rất nhiều loại patterns này nhờ Cocoa đã build sẵn trong các thư viện. Chúng ta sẽ cùng lần lượt đi qua các loại design pattern phổ biến đang sử dụng trong Swift.
1. Chain Of Responsibility
Pattern này chứa một tập hợp các đối tượng chỉ huy và một tập hợp các đối tượng xử lý. Mỗi đối tượng xử lý chứa một tập các logic định nghĩa những loại đối tượng chỉ huy nào nó có thể xử lý được. Những thứ còn lại sẽ được truyền cho đối tượng xử lý tiếp theo trong chuỗi công việc. Ngoài ra có cơ chế cho việc thêm mới đối tượng xử lý ở phía cuối của chuỗi này.
Ta cùng tìm hiểu về bài toán ATM để hiểu rõ hơn thế nào là chain of responsibility. Cây ATM sẽ cung cấp các loại tiền mười, hai mươi, năm mươi và một trăm. Khi người rút tiền nhập vào một con số, ATM sẽ tính toán và cho ra mệnh giá một trăm trước, nếu chưa đủ nhưng tờ một trăm không đáp ứng được nữa thì nó sẽ lấy tiếp tờ năm mươi, cứ tiếp tục như vậy đến tờ mười cho đến khi đạt đủ số tiền cần rút. Để tính toán được, đối với mỗi loại tiền, ta cần định nghĩa giá trị, số lượng, và loại tiền tiếp theo trong chuỗi để có thể chuyển tiếp khi không đáp ứng được.
final class MoneyPile {

    let value: Int
    var quantity: Int
    var nextPile: MoneyPile?

    init(value: Int, quantity: Int, nextPile: MoneyPile?) {
        self.value = value
        self.quantity = quantity
        self.nextPile = nextPile
    }

    func canWithdraw(amount: Int) -> Bool {

        var amount = amount

        func canTakeSomeBill(want: Int) -> Bool {
            return (want / self.value) > 0
        }

        var quantity = self.quantity

        while canTakeSomeBill(want: amount) {

            if quantity == 0 {
                break
            }

            amount -= self.value
            quantity -= 1
        }

        guard amount > 0 else {
            return true
        }

        if let next = self.nextPile {
            return next.canWithdraw(amount: amount)
        }

        return false
    }
}
Function canWithdraw(amount:) sẽ kiểm tra xem pile hiện tại có thể cung cấp được bao nhiêu tiền cho giá trị amount, chừng nào còn đáp ứng được, quantity của pile này sẽ giảm xuống cho đến khi đạt đủ số tiền mong muốn, nếu không nó sẽ chuyển sang pile tiếp theo để kiểm tra.
final class ATM {
    private var hundred: MoneyPile
    private var fifty: MoneyPile
    private var twenty: MoneyPile
    private var ten: MoneyPile

    private var startPile: MoneyPile {
        return self.hundred
    }

    init(hundred: MoneyPile,
           fifty: MoneyPile,
          twenty: MoneyPile,
             ten: MoneyPile) {

        self.hundred = hundred
        self.fifty = fifty
        self.twenty = twenty
        self.ten = ten
    }

    func canWithdraw(amount: Int) -> String {
        return "Can withdraw: \(self.startPile.canWithdraw(amount: amount))"
    }
}
Class ATM được định nghĩa với bốn loại tiền và bắt đầu với pile có mệnh giá lớn nhất là một trăm. Nó cung cấp function canWithdraw(amount:) để kiểm tra xem có thể rút lượng tiền mà người dùng nhập vào hay không. Hãy cùng khởi tạo cây ATM và xem thử nó rút được những mệnh giá nào nhé.
// Create piles of money and link them together 10 < 20 < 50 < 100.
let ten = MoneyPile(value: 10, quantity: 6, nextPile: nil)
let twenty = MoneyPile(value: 20, quantity: 2, nextPile: ten)
let fifty = MoneyPile(value: 50, quantity: 2, nextPile: twenty)
let hundred = MoneyPile(value: 100, quantity: 1, nextPile: fifty)

// Build ATM.
var atm = ATM(hundred: hundred, fifty: fifty, twenty: twenty, ten: ten)
atm.canWithdraw(amount: 310) // Cannot because ATM has only 300
atm.canWithdraw(amount: 100) // Can withdraw - 1x100
atm.canWithdraw(amount: 165) // Cannot withdraw because ATM doesn't has bill with value of 5
atm.canWithdraw(amount: 30)  // Can withdraw - 1x20, 1x10
2. Command
Trong lập trình hướng đối tượng, command pattern là một behavioral design pattern, trong đó một đối tượng được sử dụng để đóng gói tất cả những thông tin cần thiết cho việc thực hiện một hành động hoặc kích hoạt một sự kiện sau này. Những thông tin này bao gồm tên phương thức, đối tượng sở hữu phương thức và giá trị cho các tham số của phương thức.
Bốn khái niệm luôn đi cùng với command pattern là command, receiver, invoker và client. Sử dụng command objects giúp ta dễ dàng xây dựng những thành phần chung cần delegate, trình tự hoặc phương pháp thực hiện gọi vào thời điểm được chọn mà không cần biết class của phương thức hay tham số của phương thức. Sử dụng invoker object cho phép lưu lại sự thực thi lệnh để tiện thực hiện, cũng như thực thi những chế độ khác của câu lệnh (được quản lý bởi invoker object), mà không cần client biết đến sự tồn tại của nó.
Dưới đây là UML diagram của command pattern:
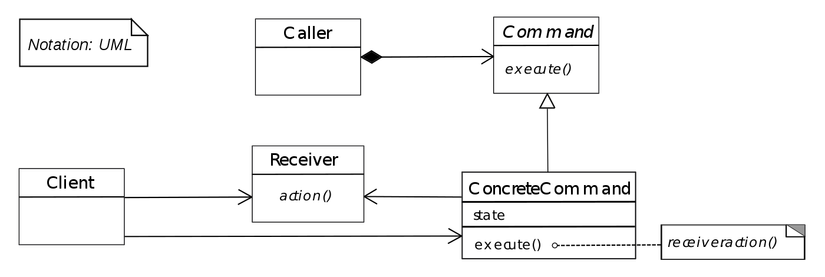
Hãy cũng xem qua ví dụ sau đây để hiểu rõ hơn về pattern này:
protocol DoorCommand {
    func execute() -> String
}

class OpenCommand : DoorCommand {
    let doors:String

    required init(doors: String) {
        self.doors = doors
    }

    func execute() -> String {
        return "Opened \(doors)"
    }
}

class CloseCommand : DoorCommand {
    let doors:String

    required init(doors: String) {
        self.doors = doors
    }

    func execute() -> String {
        return "Closed \(doors)"
    }
}

class DoorsOperations {
    let openCommand: DoorCommand
    let closeCommand: DoorCommand

    init(doors: String) {
        self.openCommand = OpenCommand(doors:doors)
        self.closeCommand = CloseCommand(doors:doors)
    }

    func close() -> String {
        return closeCommand.execute()
    }

    func open() -> String {
        return openCommand.execute()
    }
}
Cách sử dụng:
let podBayDoors = "Pod Bay Doors"
let doorModule = DoorsOperations(doors:podBayDoors)

doorModule.open()
doorModule.close()
3. Interpreter
Interpreter pattern là một design pattern định nghĩa cách thức để đánh giá câu trong một ngôn ngữ. Ý tưởng chính là có một lớp cho mỗi biểu tượng trong một ngôn ngữ máy tính chuyên dụng. Cây cú pháp của một câu trong ngôn ngữ là một đối tượng của pattern hỗn hợp và được sử dụng để đánh giá (phiên dịch) câu văn cho một client.
Pattern này được sử dụng trong các trường hợp sau:
- Chuyên ngành cơ sở dữ liệu truy vấn ngôn ngữ như SQL
- Các ngôn ngữ máy tính đặc biệt thường được sử dụng để mô tả các giao thức truyền thông
- Những ngôn ngữ máy tính chứa các mục đích chung nhất thật sự kết hợp với một số ngôn ngữ chuyên ngành
Dưới đây là UML diagram của interpreter pattern:
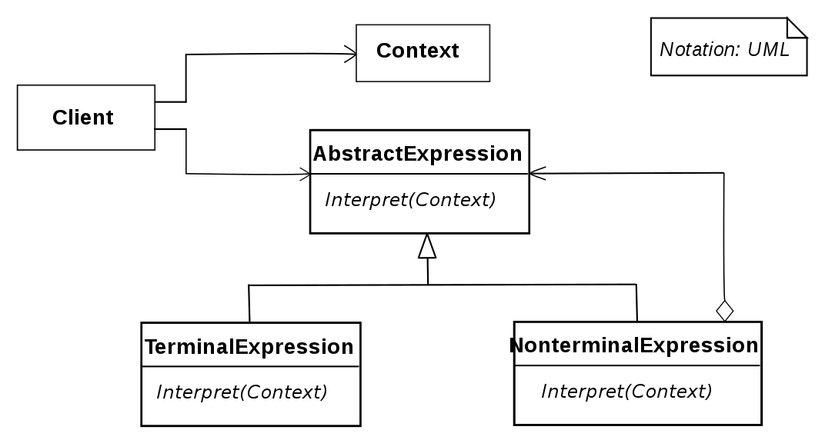
Ví dụ về interpreter pattern:
protocol IntegerExpression {
    func evaluate(_ context: IntegerContext) -> Int
    func replace(character: Character, integerExpression: IntegerExpression) -> IntegerExpression
    func copied() -> IntegerExpression
}

final class IntegerContext {
    private var data: [Character:Int] = [:]

    func lookup(name: Character) -> Int {
        return self.data[name]!
    }

    func assign(expression: IntegerVariableExpression, value: Int) {
        self.data[expression.name] = value
    }
}

final class IntegerVariableExpression: IntegerExpression {
    let name: Character

    init(name: Character) {
        self.name = name
    }

    func evaluate(_ context: IntegerContext) -> Int {
        return context.lookup(name: self.name)
    }

    func replace(character name: Character, integerExpression: IntegerExpression) -> IntegerExpression {
        if name == self.name {
            return integerExpression.copied()
        } else {
            return IntegerVariableExpression(name: self.name)
        }
    }

    func copied() -> IntegerExpression {
        return IntegerVariableExpression(name: self.name)
    }
}

final class AddExpression: IntegerExpression {
    private var operand1: IntegerExpression
    private var operand2: IntegerExpression

    init(op1: IntegerExpression, op2: IntegerExpression) {
        self.operand1 = op1
        self.operand2 = op2
    }

    func evaluate(_ context: IntegerContext) -> Int {
        return self.operand1.evaluate(context) + self.operand2.evaluate(context)
    }

    func replace(character: Character, integerExpression: IntegerExpression) -> IntegerExpression {
        return AddExpression(op1: operand1.replace(character: character, integerExpression: integerExpression),
                             op2: operand2.replace(character: character, integerExpression: integerExpression))
    }

    func copied() -> IntegerExpression {
        return AddExpression(op1: self.operand1, op2: self.operand2)
    }
}
Cách sử dụng:
var context = IntegerContext()

var a = IntegerVariableExpression(name: "A")
var b = IntegerVariableExpression(name: "B")
var c = IntegerVariableExpression(name: "C")

var expression = AddExpression(op1: a, op2: AddExpression(op1: b, op2: c)) // a + (b + c)

context.assign(expression: a, value: 2)
context.assign(expression: b, value: 1)
context.assign(expression: c, value: 3)

var result = expression.evaluate(context) // Result is 6
Trên đây là một trong những pattern phổ biến mà ta thường sử dụng, các pattern khác sẽ được lần lượt giới thiệu trong những bài tiếp theo.
All rights reserved
