Svelte có gì?
Bài đăng này đã không được cập nhật trong 5 năm
Sau khi làm việc với React và Vue thì cá nhân mình thích Vue hơn. Mặc dù thư viện của React nhiều hơn nhưng mà flow của Vue được tinh gọn hơn React khá nhiều. Vậy Svelte thì sao, code và flow có gọn gàng hơn không? Cùng mình tìm hiểu nhé 
Đầu tiên, đây là một ví dụ code kinh điển cho thấy sự gọn gàng của Svelte so với Vue và React
Giả sử chúng ta có bài toán: Tính tổng 2 số a và b
- Input: a, b
- Output: Tổng của a và b
Đây là code với React
import React, { useState } from 'react';

export default () => {
  const [a, setA] = useState(1);
  const [b, setB] = useState(2);

  function handleChangeA(event) {
    setA(+event.target.value);
  }

  function handleChangeB(event) {
    setB(+event.target.value);
  }

  return (
    <div>
      <input type="number" value={a} onChange={handleChangeA}/>
      <input type="number" value={b} onChange={handleChangeB}/>

      <p>{a} + {b} = {a + b}</p>
    </div>
  );
};
Còn đây là với Vue
<template>
  <div>
    <input type="number" v-model.number="a">
    <input type="number" v-model.number="b">

    <p>{{a}} + {{b}} = {{a + b}}</p>
  </div>
</template>

<script>
  export default {
    data: function() {
      return {
        a: 1,
        b: 2
      };
    }
  };
</script>
và với Svelte, chúng ta chỉ cần như vậy
<script>
	let a = 1;
	let b = 2;
</script>

<input type="number" bind:value={a}>
<input type="number" bind:value={b}>

<p>{a} + {b} = {a + b}</p>
Có vẻ là khá gọn gàng đó, nhưng đừng vội kết luận, vì thực tế phần lớn ứng dụng của chúng ta sẽ dựng riêng Fronend (FE) và Backend (BE). Vue, React hay Svelte thì cũng chủ yếu là hỗ trợ FE, và với những đoạn code như thế này, thì chưa thể nói lên điều gì, vì phần lớn logic sẽ được xử lý phía BA.
Giờ thì đi sâu hơn nào, và chúng ta sẽ cùng tìm hiểu một số systax để phân tích nhiều hơn nhé
1. Props
Tương tự React nhưng việc khai báo props của Svelte được tối ưu rất đơn giản
<script>
	import Nested from './Nested.svelte';
</script>

<Nested answer={42}/>
<script>
	let answer = 0;
</script>

We have {answer} answer(s).
2. Logic
If-else
<script>
    let user = { loggedIn: false };

    function toggle() {
        user.loggedIn = !user.loggedIn;
    }
</script>

{#if <condition>}
    //code
[
{:else if <condition>}
    // code
]
[
{:else}
    //code
]
{/if}
Ví dụ:
<script>
    let user = { loggedIn: false };

    function toggle() {
        user.loggedIn = !user.loggedIn;
    }
</script>

{#if user.loggedIn}
    <button on:click={toggle}>
        Log out
    </button>
{:else}
    <button on:click={toggle}>
        Log in
    </button>
{/if}
Loop
{#each list_name as key_name [, index]}
    //
{/each}
Wait Block
Về systax logic thì wait block là phần hay ho nhất. Tương tự như cấu trúc try-catch. Wait Block cho phép chúng ta xây dựng logic xử lý một promise. Điều này là rất cần thiết khi FE tương tác với phía BA.
{#await promise_name}
	//code
{:then params}
	//code
{:catch error}
	// code
{/await}
Thực tế thì những đoạn code như này có vẻ hơi dài dòng so với systax rút gon :? nhỉ?
3. Event
DOM Events
Svelte sử dụng keyword on, systax
<Component on:event_name|modifier={function_name} />
Các modifiers được hỗ trợ bao gồm:
- preventDefault — calls event.preventDefault() before running the handler. Useful for client-side form handling, for example.
- stopPropagation — calls event.stopPropagation(), preventing the event reaching the next element
- passive — improves scrolling performance on touch/wheel events (Svelte will add it automatically where it's safe to do so)
- nonpassive — explicitly set passive: false
- capture — fires the handler during the capture phase instead of the bubbling phase ()
- once — remove the handler after the first time it runs
- self — only trigger handler if event.target is the element itself
Ví dụ:
<button on:click|once={handleClick}>Click</button>
Cái này thì cũng tương tự như Vue rồi
Event forwarding
Nếu Vue hỗ trợ $emit thì Svelte hỗ trợ event forwarding.
Dưới đây là một ví dụ, chúng ta có thể định nghĩa 1 dispatch event và gọi đến nó bằng cách sử dụng systax on:event_name
<script>
	import Inner from './Inner.svelte';

	function handleMessage(event) {
		alert(event.detail.text);
	}
</script>

<Inner on:sendMessage={handleMessage}/>
<script>
	import { createEventDispatcher } from 'svelte';

	const dispatch = createEventDispatcher();

	function sayHello() {
		dispatch('sendMessage', {
			text: 'Hello!'
		});
	}
</script>

<button on:click={sayHello}>
	Click to say hello
</button>
4. Binding
Thay vì dùng :binding_name= rút gọn như Vue, ở đây chúng ta có cú pháp bind:binding_name
<input bind:value={name}>
Lại một cú pháp tương tự Vue, nhưng Svelte không có hỗ trợ cú pháp rút gọn.
5. Lifecycle
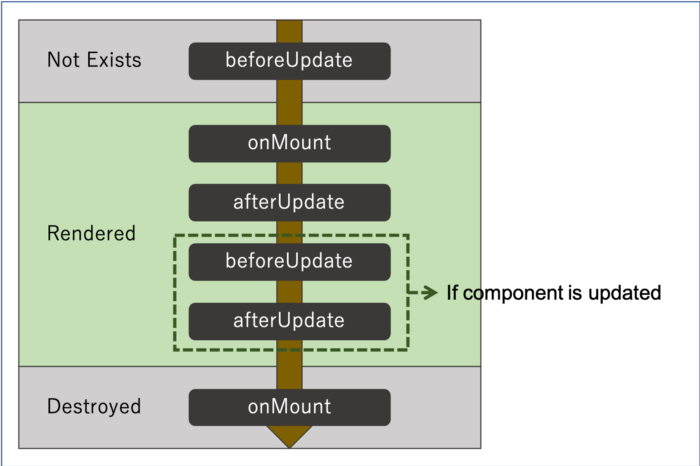
Svelte hỗ trợ một số function cho lifecycle như:
- onMount: run sau khi conponent đầu tiên được rendered
- onDestroy: runs khi component bị hủy
- beforeUpdate: runs trước khi DOM updated.
- afterUpdate: runs sau khi DOM has been updated(nó là 1 phần của beforeUpdate).
onMount
Đây là 1 trong những function hay được sử dụng nhất của Svelte. Tương tự như useEffect của React hay mounted của Vue.
<script>
	import { onMount } from 'svelte';
	let photos = [];

	onMount(async () => {
		const res = await fetch(`https://jsonplaceholder.typicode.com/photos?_limit=20`);
		photos = await res.json();
	});
</script>

<h1>Photo album</h1>

<div class="photos">
	{#each photos as photo}
		<figure>
			<img src={photo.thumbnailUrl} alt={photo.title}>
			<figcaption>{photo.title}</figcaption>
		</figure>
	{:else}
		<!-- this block renders when photos.length === 0 -->
		<p>loading...</p>
	{/each}
</div>
Cái này có vẻ giống React hơn, với Vue thì bạn chẳng cần import cái gì cả
onDestroy
Tương tự destroyed của Vue
<script>
	import { onDestroy } from 'svelte';

	function onInterval(callback, milliseconds) {
		const interval = setInterval(callback, milliseconds);

		onDestroy(() => {
			clearInterval(interval);
		});
	}

	let seconds = 0;
	onInterval(() => seconds += 1, 1000);
</script>

<p>
	The page has been open for
	{seconds} {seconds === 1 ? 'second' : 'seconds'}
</p>
beforeUpdate và afterUpdate
Khác với Vue, chia thành beforeMount, beforeUpdate và updated thì Svelte chỉ có beforeUpdate và afterUpdate.
beforeUpdate được thực thi ngay trước khi DOM được updated. afterUpdate thì là ngược lại, nó được sủ dụng để run 1 lần khi DOM đã đồng bộ data.
<script>
	import Eliza from 'elizabot';
	import { beforeUpdate, afterUpdate } from 'svelte';

	let div;
	let autoscroll;

	beforeUpdate(() => {
		autoscroll = div && (div.offsetHeight + div.scrollTop) > (div.scrollHeight - 20);
	});

	afterUpdate(() => {
		if (autoscroll) div.scrollTo(0, div.scrollHeight);
	});

	const eliza = new Eliza();

	let comments = [
		{ author: 'eliza', text: eliza.getInitial() }
	];

	function handleKeydown(event) {
		if (event.key === 'Enter') {
			const text = event.target.value;
			if (!text) return;

			comments = comments.concat({
				author: 'user',
				text
			});

			event.target.value = '';

			const reply = eliza.transform(text);

			setTimeout(() => {
				comments = comments.concat({
					author: 'eliza',
					text: '...',
					placeholder: true
				});

				setTimeout(() => {
					comments = comments.filter(comment => !comment.placeholder).concat({
						author: 'eliza',
						text: reply
					});
				}, 500 + Math.random() * 500);
			}, 200 + Math.random() * 200);
		}
	}
</script>

<div class="chat">
	<h1>Eliza</h1>

	<div class="scrollable" bind:this={div}>
		{#each comments as comment}
			<article class={comment.author}>
				<span>{comment.text}</span>
			</article>
		{/each}
	</div>

	<input on:keydown={handleKeydown}>
</div>
6. Store
writable
import { writable } from 'svelte/store';

export const count = writable(0);
Sau đó, để sử dụng, chúng ta import chúng vào các file svelte.
import { count } from './stores.js';
Đây thực chất là cú pháp khai báo function js dùng chung và đây không hẳn là state, hay mutation như Vue. Mình nghĩ đây là mutation, nhưng Svelte cũng có readable cho phép thay đổi data export.
readable
import { readable } from 'svelte/store';

export const time = readable(new Date(), function start(set) {
	const interval = setInterval(() => {
		set(new Date());
	}, 1000);

	return function stop() {
		clearInterval(interval);
	};
});
Một cú pháp khác cho phép bạn khai báo 1 function.
derived
derived thì hỗ trợ export data
export const elapsed = derived(
	time,
	$time => Math.round(($time - start) / 1000)
);
7. Component Action
<script>
	import { spring } from 'svelte/motion';
	import { pannable } from './pannable.js';

	const coords = spring({ x: 0, y: 0 }, {
		stiffness: 0.2,
		damping: 0.4
	});

	function handlePanStart() {
		coords.stiffness = coords.damping = 1;
	}
</script>

<div class="box"
	use:pannable
	on:panstart={handlePanStart}
	style="transform:
		translate({$coords.x}px,{$coords.y}px)
		rotate({$coords.x * 0.2}deg)"
></div>
Bạn có thể thấy, action của Svelte được khai báo bằng cú pháp
on:<eventName>={functionName}
Store của Svelte không rõ ràng và chặt chẽ như flow của Nuxt hay Redux Saga mà thiên về js thuần. Cũng dễ hiểu vì Svelte render theo hướng tối ưu code thành js thuần và không sử dụng DOM ảo.
8. Component composition
slots
Tương tự như slots trong Vue
<div>
	<slot name="name"></slot>
</div>
<script>
	import ParentComponent from './ParentComponent.svelte';
</script>

<ParentComponent>
    <div slot="name">
        <h2>Hello!</h2>
        <p>This is an elment. It can contain anything.</p>
    </div>
</ParentComponent>
slot fallbacks - <em>
Thẻ <em> cho phép bạn chèn element con mặc định cho slot.
<div>
	<slot name="name">
		<em>no content was provided</em>
	</slot>
</div>
9. Special elements
Một sự khác biệt của Svelte là một số element khá đặc biệt như:
<svelte:self><svelte:component><svelte:window><svelte:body><svelte:head><svelte:options>
<svelte:self>
Thay vì viết
{#if file.type === 'folder'}
	<Folder {...file}/>
{/if}
bạn có thể đổi thành
{#if file.type === 'folder'}
	<svelte:self {...file}/>
{/if}
<svelte:component>
<script>
	import RedThing from './RedThing.svelte';
	import GreenThing from './GreenThing.svelte';
	import BlueThing from './BlueThing.svelte';

	const options = [
		{ color: 'red',   component: RedThing   },
		{ color: 'green', component: GreenThing },
		{ color: 'blue',  component: BlueThing  },
	];

	let selected = options[0];
</script>

<select bind:value={selected}>
	{#each options as option}
		<option value={option}>{option.color}</option>
	{/each}
</select>

<svelte:component this={selected.component}/>
Bạn có thể thấy, thay vì phải check component được chọn như vậy
{#if selected.color === 'red'}
	<RedThing/>
{:else if selected.color === 'green'}
	<GreenThing/>
{:else if selected.color === 'blue'}
	<BlueThing/>
{/if}
thì bạn chỉ cần dùng <svelte:component>.
<svelte:window>
Element này cho phép bạn add 1 số event cho window như:
- innerWidth
- innerHeight
- outerWidth
- outerHeight
- scrollX
- scrollY
- online — an alias for window.navigator.onLine
Ví dụ
<svelte:window bind:scrollY={y}/>
<svelte:body>
Tương tự như <svelte:window>, <svelte:body> cho phép bạn set listen event cho documment.body
<svelte:body
	on:mouseenter={handleMouseenter}
	on:mouseleave={handleMouseleave}
/>
<svelte:head>
Element này cho phép bạn insert các elements vào <head>
<svelte:head>
	<link rel="stylesheet" href="tutorial/dark-theme.css">
</svelte:head>

<h1>Hello world!</h1>
<svelte:options>
Tương tự Vue và React, Svelte cho bạn khai báo tắt options Thay vì
<MyComponent immutable={true}/>
<MyOtherComponent immutable={true} name='name' type='basic'/>
bạn có thể viết như vậy
attrs = {
    name: 'name',
    type: 'basic'
};
<MyComponent immutable/>
<MyOtherComponent {attrs} />
Qua những phần mình tìm hiểu về Svelte trong tutorial, có vẻ Svelte cũng ổn, khá giống Vue.
Điểm cộng:
- Code gọn gàng
- Hiệu năng được đảm bảo là cao bằng việc run tại thời điểm build time và convert các components thành mã mệnh lệnh tối ưu giúp cập nhật DOM một cách nhanh hơn.
- Thích hợp để học trước khi học Vue và React vì cú pháp ngắn gọn và tương đối dễ hiểu.
Điểm trừ:
- Flow Store không chặt chẽ và rõ ràng
- Thư viện hỗ trợ còn ít
Tài liệu tham khảo: https://svelte.dev/tutorial
All rights reserved
