Sử dụng UIAlertView với Blocks
Bài đăng này đã không được cập nhật trong 4 năm
Trong quá trình phát triển ứng dụng trên iOS, chắc chắn hầu hết chúng ta đều từng trải qua yêu cầu hiển thị một alertView với các button tuỳ chọn YES/NO. Nếu vậy, tôi đoán rằng một trong số các bạn có lẽ sẽ có suy nghĩ giống tôi, đó là cảm thấy phiền phức khi phải implement các delegate protocol của UIAlertView mặc dù chúng ta chỉ thực hiện những nhiệm vụ đơn giản.
Vậy có cách nào tốt hơn không?
Trước khi trả lời câu hỏi đó, có lẽ chúng ta nên nhìn lại một chút vấn đề và ý tưởng giải quyết nó.
Vấn đề với UIAlertView
Việc xử lý các sự kiện user chọn không được liền mạch mà phải viết riêng ở chỗ khác, điều này dẫn tới việc phát triển không được liền mạch.
- (void)presentAlertView {
    UIAlertView *alertView = [[UIAlertView alloc] init…
    alertView.delegate = self;
    [alertView show];
}

#pragma mark - UIAlertViewDelegate

// Called when a button is clicked. The view will be automatically dismissed after this call returns
- (void)alertView:(UIAlertView *)alertView clickedButtonAtIndex:(NSInteger)buttonIndex {
    // handle the button click
}
Ý tưởng giải quyết vấn dề
Khai báo, khởi tạo UIAlertView và implement các phương thức trực tiếp với alertView được khởi tạo đó. Điều này sẽ khiến cho việc phát triển liền mạch và việc đọc lại code cũng sẽ dễ dàng hơn rất nhiều.
Blocks
Nếu UIAlertView có thể nhận một block code như là một parameter để thực thi khi user lựa chọn option/button đối với alertView thì chúng ta sẽ giải quyết được vấn đề. Đoạn code sẽ giống như sau:
- (void)presentAlertView {
    UIAlertView *alertView = [[UIAlertView alloc] init…
    [alertView showWithCompletion:^(UIAlertView *alertView, NSInteger buttonIndex) {
        // handle the button click
    }];
}
Thực hiện ý tưởng
- Chúng ta sẽ bắt đầu bằng cách tạo một project iOS mới với Single View Application.
- Tạo một category cho UIAlertView, tạm đặt tên là JVBlocks. Xcode sẽ tự động tạo ra 2 file là
UIAlertView+JVBlocks.hvàUIAlertView+JVBlocks.m - Mở file
UIAlertView+JVBlocks.hvà thay bằng đoạn code sau:
#import <UIKit/UIKit.h>

@interface UIAlertView (JVBlocks)

- (void)showWithCompletion:(void(^)(UIAlertView *alertView, NSInteger buttonIndex))completion;

@end
- Tiếp theo mở file
UIAlertView+JVBlocks.m, trước tiên chúng ta sẽ tạo một private class để implement UIAlertViewDelegate protocol và chứa comletion block. Chúng ta sẽ đặt tên class này là JVBAlertWrapper và đặt nó ở phía trên của fileUIAlertView+JVBlocks.mtrước phần implement chính của category.
#import <objc/runtime.h>
#import "UIAlertView+JVBlocks.h"

@interface JVBAlertWrapper : NSObject

@property (copy) void(^completionBlock)(UIAlertView *alertView, NSInteger buttonIndex);

@end

@implementation JVBAlertWrapper

#pragma mark - UIAlertViewDelegate

// Called when a button is clicked. The view will be automatically dismissed after this call returns
- (void)alertView:(UIAlertView *)alertView clickedButtonAtIndex:(NSInteger)buttonIndex {
    if (self.completionBlock) {
        self.completionBlock(alertView, buttonIndex);
    }
}

// Called when we cancel a view (eg. the user clicks the Home button). This is not called when the user clicks the cancel button.
// If not defined in the delegate, we simulate a click in the cancel button
- (void)alertViewCancel:(UIAlertView *)alertView {
    // Just simulate a cancel button click
    if (self.completionBlock) {
        self.completionBlock(alertView, alertView.cancelButtonIndex);
    }
}

@end

static const char kJVBAlertWrapper;

@implementation UIAlertView (JVBlocks)

#pragma mark - Class Public

- (void)showWithCompletion:(void(^)(UIAlertView *alertView, NSInteger buttonIndex))completion {
    JVBAlertWrapper *alertWrapper = [[JVBAlertWrapper alloc] init];
    alertWrapper.completionBlock = completion;
    self.delegate = alertWrapper;

    // Set the wrapper as an associated object
    objc_setAssociatedObject(self, &kJVBAlertWrapper, alertWrapper, OBJC_ASSOCIATION_RETAIN_NONATOMIC);

    // Show the alert as normal
    [self show];
}

@end
Hoàn thiện ứng dụng demo
Ở trong file Main.storyboard, kéo một button vào và tạo IBAction showAlert trong file ViewController.h
#import <UIKit/UIKit.h>

@interface ViewController : UIViewController

- (IBAction)showAlert:(id)sender;

@end
Mở file ViewController.m và thực hiện method showAlert. Tất nhiên trước đó bạn cần import UIAlertView+JVBlocks.h
@interface ViewController ()
@end
@implementation ViewController
- (void)viewDidLoad {
[super viewDidLoad];
// Do any additional setup after loading the view, typically from a nib.
}
- (void)didReceiveMemoryWarning {
[super didReceiveMemoryWarning];
// Dispose of any resources that can be recreated.
}
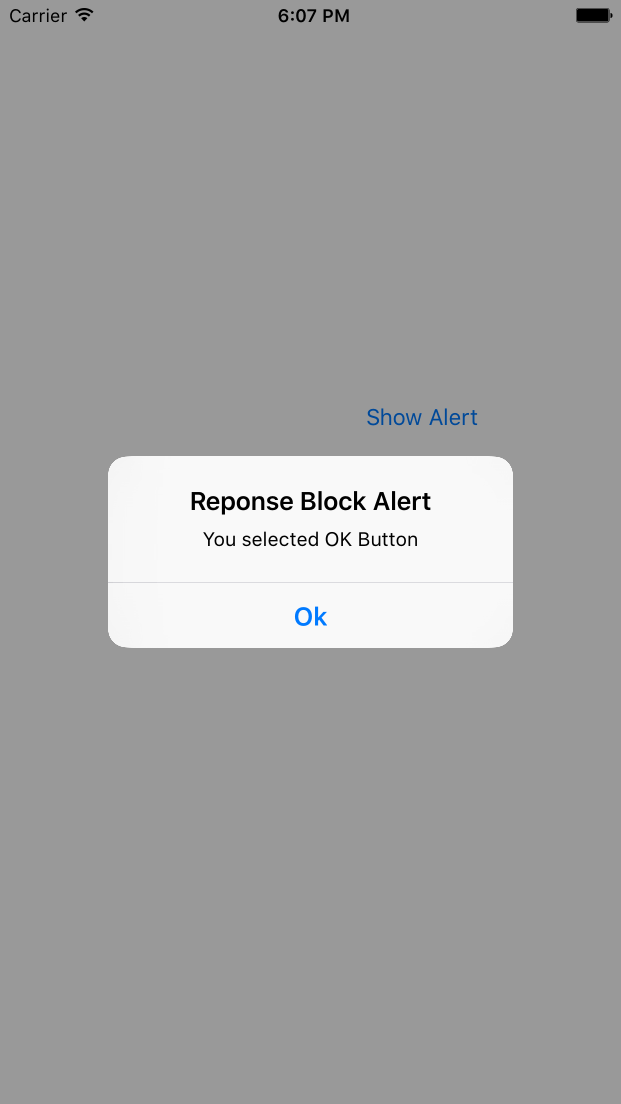
- (IBAction)showAlert:(id)sender {
UIAlertView *alertView = [[UIAlertView alloc] initWithTitle:@"Block Alert"
message:@"This is demo for alert with block" delegate:nil cancelButtonTitle:@"Cancel"
otherButtonTitles:@"OK", nil];
[alertView showWithCompletion:^(UIAlertView *alertView, NSInteger buttonIndex) {
UIAlertView *responseAlert = [[UIAlertView alloc] initWithTitle:@"Reponse Block Alert"
message:[NSString stringWithFormat:@"You selected %@", buttonIndex ? @"OK Button" : @"Cancel Button"]
delegate:nil cancelButtonTitle:@"Ok" otherButtonTitles:nil];
[responseAlert showWithCompletion:NULL];
}];
}
@end
Chạy ứng dụng và tự trải nghiệm thành quả nhé.
Bạn có thể download source về tham khảo tại đây
All rights reserved
