Sử dụng thành phần kiến trúc Navigation trong Jetpack Android (Kotlin)
Bài đăng này đã không được cập nhật trong 6 năm
1. Giới thiệu
Android Jetpack là một tập hợp các components, tools giúp bạn nhanh chóng tạo ra các ứng dụng Android. Các components này kết hợp giữa Support Library và Architecture Components.
Có thể phân loại Android Jetpack thành 4 thành phần chính :
- Foumdation (Ví dụ: ktx, appcompat, multidex, test)
- Architecture (Ví dụ: Data Binding, Lifecycles, ViewModel, Livedata, Room, Paging, Navigation, WorkManager)
- Behavior (Ví dụ: Download manager, Media, Notifications, Permissions, Sharing, Slices)
- UI (Ví dụ: Animations, Auto, Emoji, Fragment, Layout, Palette, TV, Wear OS )
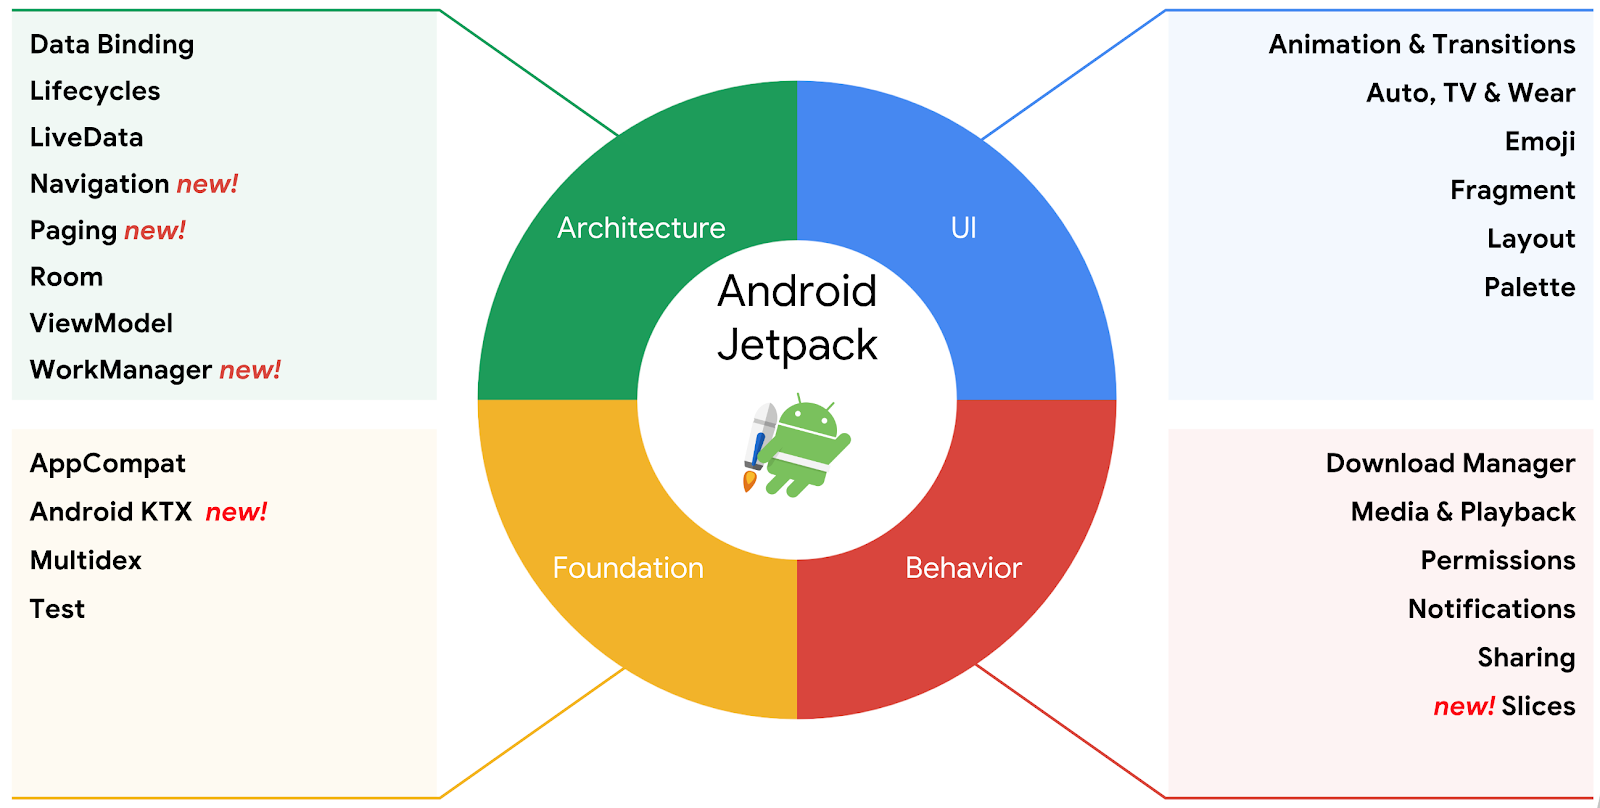
Các thành phần của Android Jetpack.
Trong bài viết này, chúng ta sẽ tìm hiểu về Navigation.
Navigation đề cập đến các tương tác cho phép người dùng điều hướng qua, vào và thoát ra khỏi các phần nội dung khác nhau trong ứng dụng của bạn.
Navigation trong Android Jetpack giúp bạn triển khai việc điều hướng, từ việc click vào Button đơn giản cho đến các thành phần điều hướng phức tạp hơn như app bar và navigation drawer.
Thành phần Navigation cũng đảm bảo trải nghiệm người dùng nhất quán và có thể dự đoán được bằng cách tuân thủ các nguyên tắc đã được thiết lập.
Thành phần Navigation bao gồm ba phần chính được mô tả dưới đây:
-
Navigation graph: File XML chứa tất cả thông tin liên quan đến điều hướng trong một vị trí tập trung. Nó bao gồm tất cả các khu vực nội dung riêng lẻ trong ứng dụng của bạn, được gọi là destinations (đích đến), cũng như các đường dẫn mà người dùng có thể đi thông qua ứng dụng của bạn.
-
Navhost: Một khung chứa rỗng hiển thị các đích đến từ navigation graph của bạn. Navigation bao gồm một khai báo Navhost mặc định, NavhostFragment, hiển thị các Fragment đích đến .
-
NavController: Một đối tượng quản lý điều hướng ứng dụng trong Navhost. NavControll phối hợp hoán đổi nội dung đích đến trong Navhost khi người dùng di chuyển trong ứng dụng của bạn.
2. Thiết lập
Bạn cần có Android Studio 3.2 RC trở lên để sử dụng Android Jetpack bao gồm Navigation. Ngoài ra, với phạm vi của bài viết này, kiến thức về Kotlin là bắt buộc.
Bước 1 : Tạo mới Android project, thêm blank activity.
Bước 2: Thêm các dependencies sau vào file app/build.gradle và sync project :
def nav_version = "1.0.0-alpha05"
    implementation "android.arch.navigation:navigation-fragment-ktx:$nav_version"
    implementation "android.arch.navigation:navigation-ui-ktx:$nav_version"
Thêm vào đó, để hỗ trợ việc truyền các giá trị giữa các view trong một navigation, chúng ta cần sử dụng thêm plugin typesafe.
Thêm navigation-safe-args-gradle-plugin vào file build.gradle của project như sau :
buildscript {
    ext.kotlin_version = '1.2.61'
    repositories {
        google()
        jcenter()
    }
    dependencies {
        classpath 'com.android.tools.build:gradle:3.2.0-rc02'
        classpath "org.jetbrains.kotlin:kotlin-gradle-plugin:$kotlin_version"
        classpath 'android.arch.navigation:navigation-safe-args-gradle-plugin:1.0.0-alpha05'

        // NOTE: Do not place your application dependencies here; they belong
        // in the individual module build.gradle files
    }
}

allprojects {
    repositories {
        google()
        jcenter()
    }
}

task clean(type: Delete) {
    delete rootProject.buildDir
}
Trong app/build.gradle , chúng ta sẽ thêm plugin như sau :
apply plugin: 'androidx.navigation.safeargs'
Bước 3:
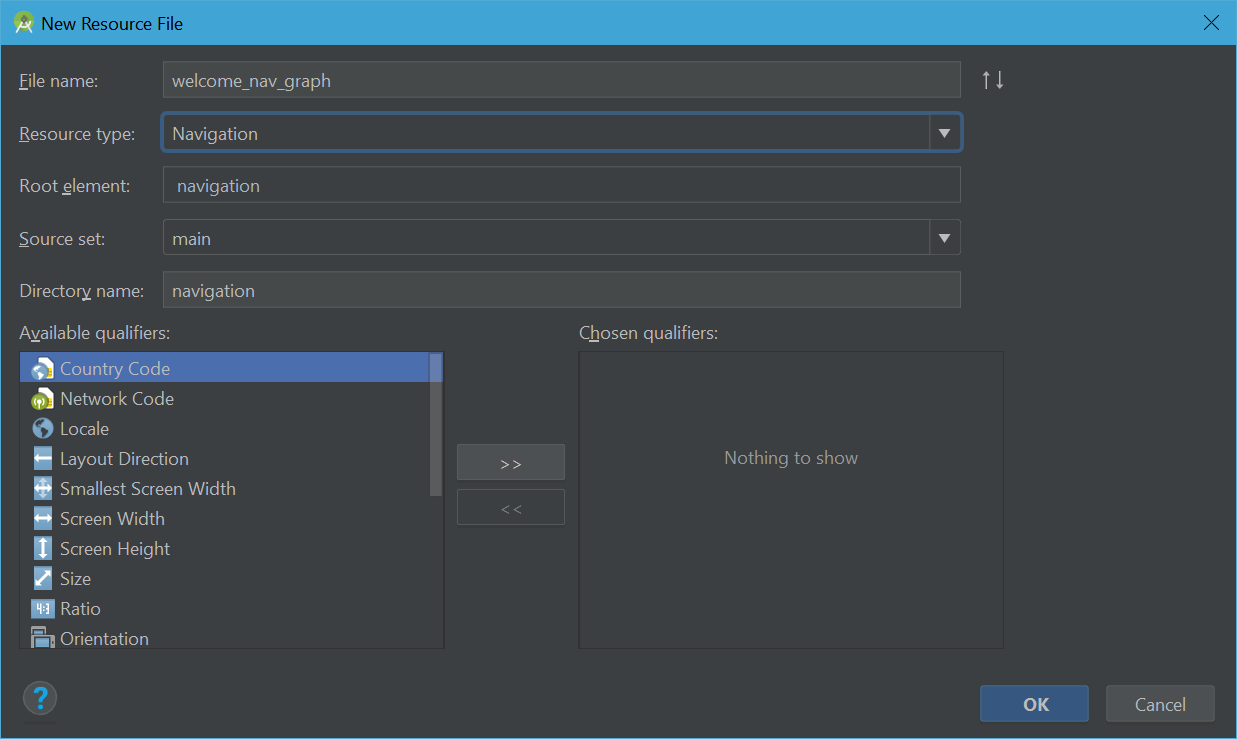
Để implement Navigation, Android giới thiệu một kiểu resource mới gọi là Navigation. Click chuột phải vào res => New => Android resource file. Chọn title và chọn Navigation
File navigation sau khi tạo xong sẽ như sau :
<?xml version="1.0" encoding="utf-8"?>
<navigation xmlns:android="http://schemas.android.com/apk/res/android"
    xmlns:app="http://schemas.android.com/apk/res-auto" android:id="@+id/welcome_nav_graph">

</navigation>
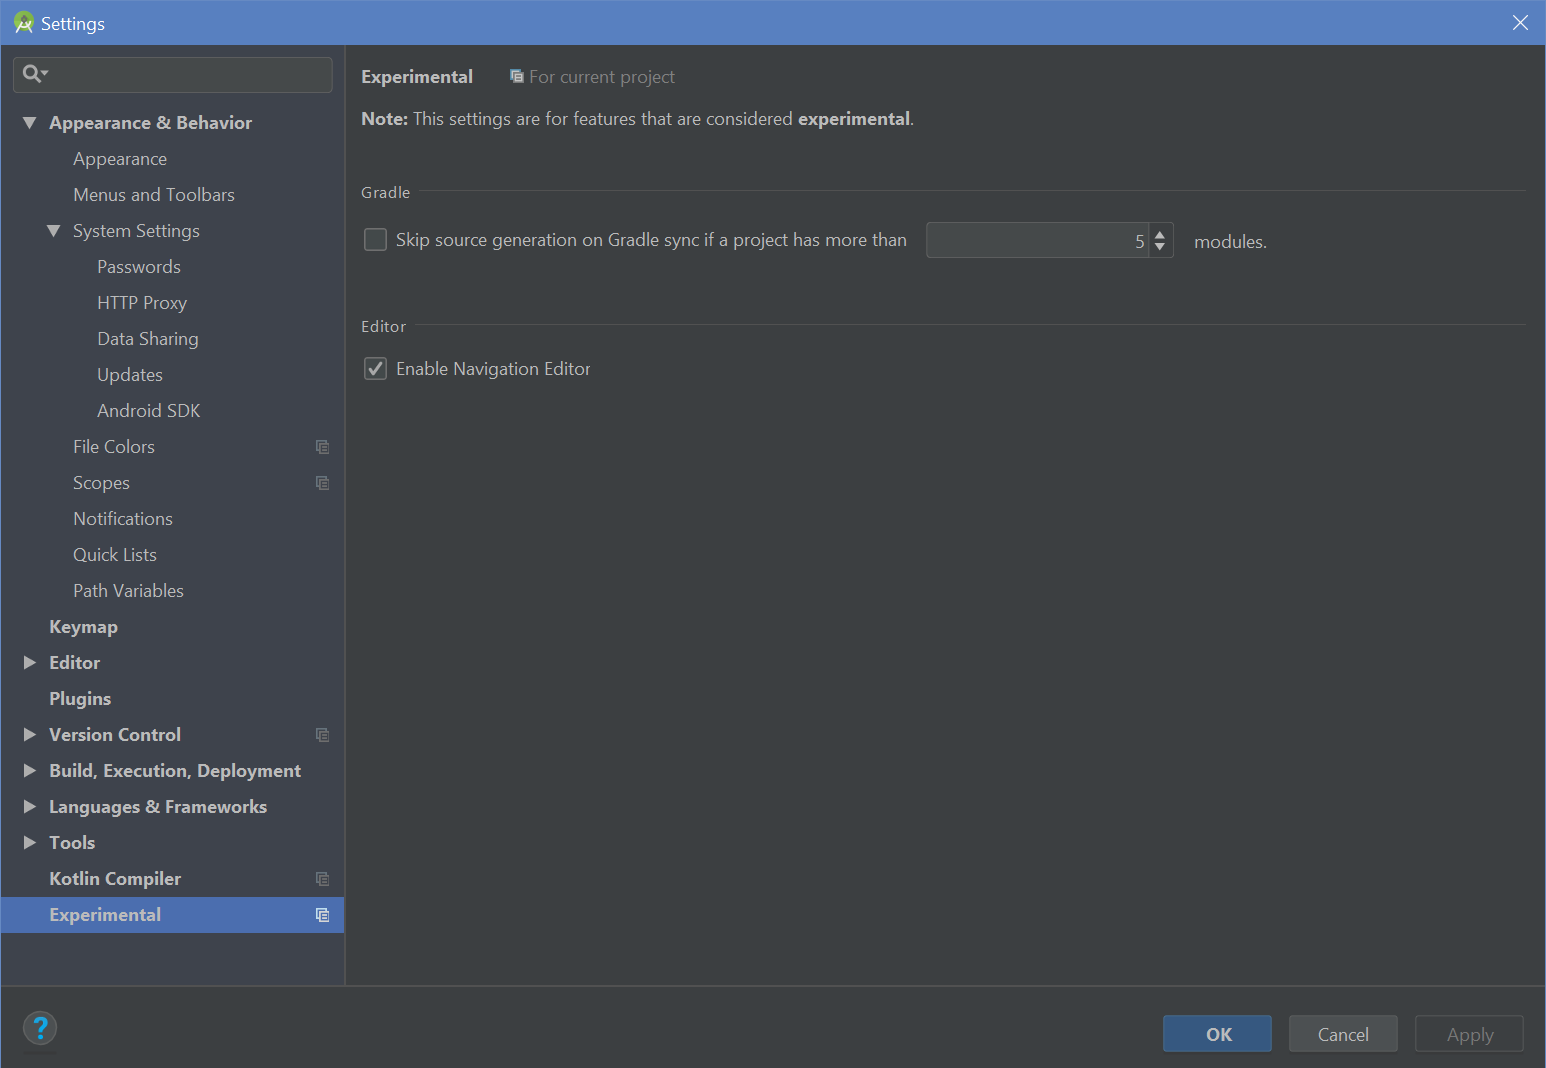
Bước 4: Nếu ko tạo được Navigation, bạn hãy chọn Enable Navigation Editor
Bước 5:
Trong navigation graph xml file, tìm đến Design và click vào icon New Destination như sau :
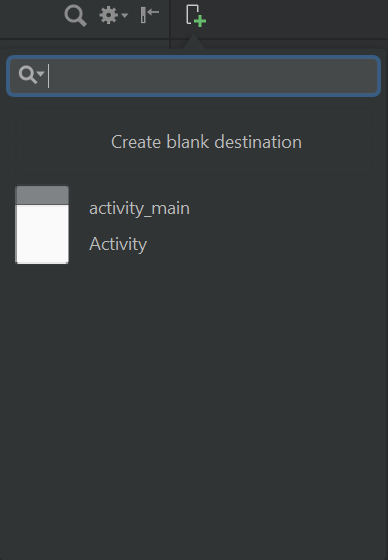
Chúng ta sẽ tạo 2 fragment bằng cách click vào Create Blank Destination. Tạo MainFragment và DestinationFragment Khi tạo xong 2 fragment, file navigation xml sẽ như sau :
<?xml version="1.0" encoding="utf-8"?>
<navigation xmlns:android="http://schemas.android.com/apk/res/android"
    xmlns:app="http://schemas.android.com/apk/res-auto"
    xmlns:tools="http://schemas.android.com/tools"
    android:id="@+id/welcome_nav_graph"
    app:startDestination="@id/mainFragment">

    <fragment
        android:id="@+id/mainFragment"
        android:name="com.praszapps.mysamplenavapp.MainFragment"
        android:label="fragment_main"
        tools:layout="@layout/fragment_main" />
    <fragment
        android:id="@+id/destinationFragment"
        android:name="com.praszapps.mysamplenavapp.DestinationFragment"
        android:label="fragment_destination"
        tools:layout="@layout/fragment_destination" />
</navigation>
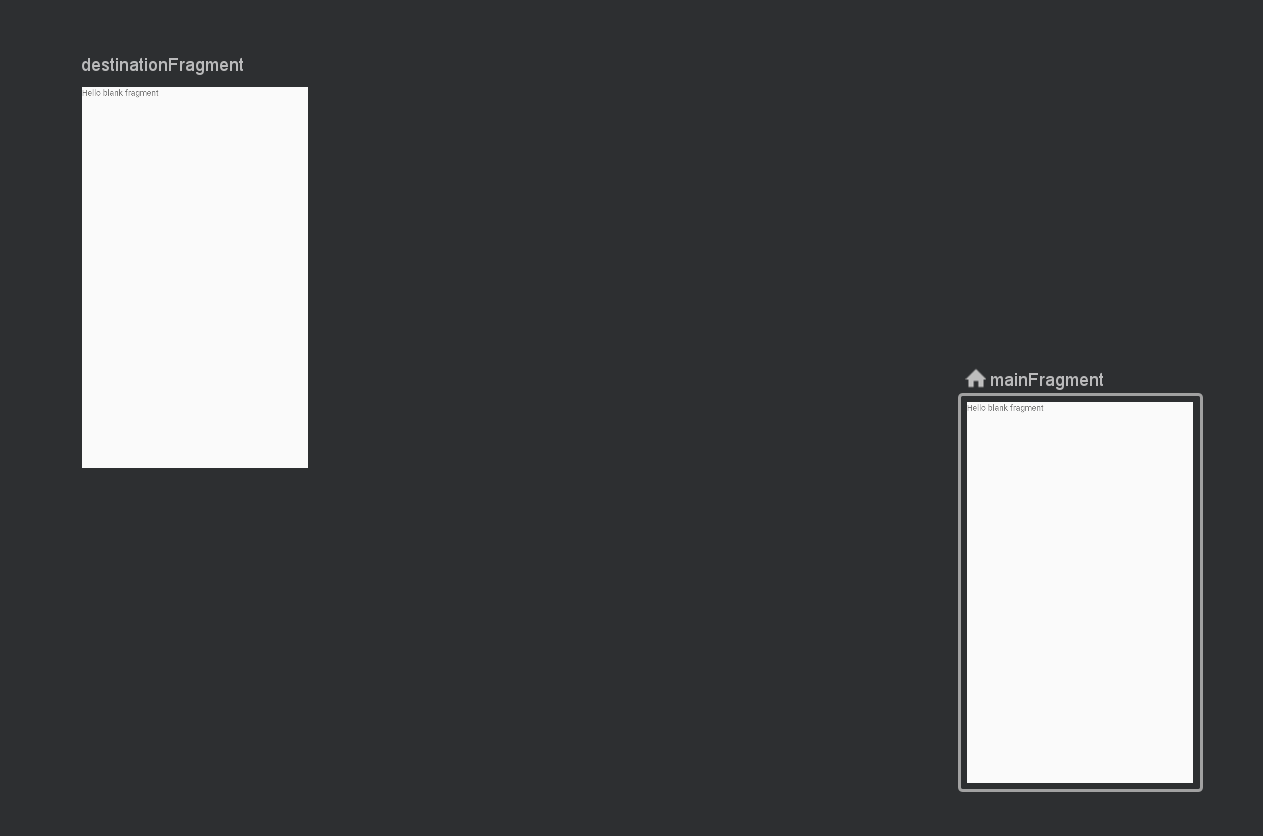
Design view sẽ hiển thị như sau :
3. Thêm Action
Để framework hiểu được đích đến cần đến từ nguồn nào, bạn phải chỉ định một action. Bạn phải thêm action tag bên trong source/home fragment
<?xml version="1.0" encoding="utf-8"?>
<navigation xmlns:android="http://schemas.android.com/apk/res/android"
    xmlns:app="http://schemas.android.com/apk/res-auto"
    xmlns:tools="http://schemas.android.com/tools"
    android:id="@+id/welcome_nav_graph"
    app:startDestination="@id/mainFragment">

    <fragment
        android:id="@+id/mainFragment"
        android:name="com.praszapps.mysamplenavapp.MainFragment"
        android:label="fragment_main"
        tools:layout="@layout/fragment_main" >
        <action
                   android:id="@+id/action_mainFragment_to_destinationFragment"
            app:destination="@id/destinationFragment" />
    </fragment>
    <fragment
        android:id="@+id/destinationFragment"
        android:name="com.praszapps.mysamplenavapp.DestinationFragment"
        android:label="fragment_destination"
        tools:layout="@layout/fragment_destination" />
</navigation>
4. Thêm Arguments
Ví dụ, bạn sẽ truyền một giá trị "name" từ MainFragment vào DestinationFragment, sau đó bạn sẽ hiển thị “Welcome $name”. Bạn có thể truyền nhiều tham số như vậy.
Trong file navigation xml, thêm thẻ <argument/> vào destination fragment.
- android:name - Id của tham số.
- app:argType - Kiểu dữ liệu là gì. Hiện tại đang support inferred, integer, string, reference
- android:defaultValue ( tùy chọn) - Giá trị mặc định mà fragment nhận được trong trường hợp ko source fragment ko truyền vào giá trị nào.
Hoàn tất, file navigation XML sẽ như sau :
**welcome_nav_graph.xml **
<?xml version="1.0" encoding="utf-8"?>
<navigation xmlns:android="http://schemas.android.com/apk/res/android"
    xmlns:app="http://schemas.android.com/apk/res-auto"
    xmlns:tools="http://schemas.android.com/tools"
    android:id="@+id/welcome_nav_graph"
    app:startDestination="@id/mainFragment">

    <fragment
        android:id="@+id/mainFragment"
        android:name="com.praszapps.mysamplenavapp.MainFragment"
        android:label="fragment_main"
        tools:layout="@layout/fragment_main" >
        <action
            android:id="@+id/action_mainFragment_to_destinationFragment"
            app:destination="@id/destinationFragment" />
    </fragment>
    <fragment
        android:id="@+id/destinationFragment"
        android:name="com.praszapps.mysamplenavapp.DestinationFragment"
        android:label="fragment_destination"
        tools:layout="@layout/fragment_destination" />
    <argument
    android:name="nameToShow"
    android:defaultValue="Andy"
    app:argType="string" />
</navigation>
5. Tạo XML layout
fragment_main.xml
<?xml version="1.0" encoding="utf-8"?>
<android.support.constraint.ConstraintLayout xmlns:android="http://schemas.android.com/apk/res/android"
    xmlns:app="http://schemas.android.com/apk/res-auto"
    xmlns:tools="http://schemas.android.com/tools"
    android:id="@+id/frameLayout"
    android:layout_width="match_parent"
    android:layout_height="match_parent"
    tools:context=".MainFragment">

    <EditText
        android:id="@+id/enterName"
        android:layout_width="match_parent"
        android:layout_height="wrap_content"
        android:hint="What is your name?"
        android:inputType="textPersonName"
        app:layout_constraintBottom_toBottomOf="parent"
        app:layout_constraintEnd_toEndOf="parent"
        app:layout_constraintStart_toStartOf="parent"
        app:layout_constraintTop_toTopOf="parent" />

    <Button
        android:id="@+id/buttonWelcomeMe"
        android:layout_width="wrap_content"
        android:layout_height="wrap_content"
        android:layout_marginStart="8dp"
        android:layout_marginTop="8dp"
        android:layout_marginEnd="8dp"
        android:layout_marginBottom="148dp"
        android:text="Welcome Me"
        app:layout_constraintBottom_toBottomOf="parent"
        app:layout_constraintEnd_toEndOf="parent"
        app:layout_constraintStart_toStartOf="parent"
        app:layout_constraintTop_toBottomOf="@+id/enterName" />

</android.support.constraint.ConstraintLayout>
**fragment_destination.xml **
<?xml version="1.0" encoding="utf-8"?>
<android.support.constraint.ConstraintLayout xmlns:android="http://schemas.android.com/apk/res/android"
    xmlns:app="http://schemas.android.com/apk/res-auto"
    xmlns:tools="http://schemas.android.com/tools"
    android:id="@+id/frameLayout2"
    android:layout_width="match_parent"
    android:layout_height="match_parent"
    tools:context=".DestinationFragment">

    <TextView
        android:id="@+id/welcomeWithNameTv"
        android:layout_width="wrap_content"
        android:layout_height="wrap_content"
        tools:text="Hello Andy!"
        app:layout_constraintBottom_toBottomOf="parent"
        app:layout_constraintEnd_toEndOf="parent"
        app:layout_constraintStart_toStartOf="parent"
        app:layout_constraintTop_toTopOf="parent" />

</android.support.constraint.ConstraintLayout>
activity_main.xml
<?xml version="1.0" encoding="utf-8"?>
<android.support.constraint.ConstraintLayout xmlns:android="http://schemas.android.com/apk/res/android"
    xmlns:app="http://schemas.android.com/apk/res-auto"
    android:id="@+id/fragment_container"
    xmlns:tools="http://schemas.android.com/tools"
    android:layout_width="match_parent"
    android:layout_height="match_parent"
    tools:context=".MainActivity">

</android.support.constraint.ConstraintLayout>
6. Coding
1. MainActivity
MainActivity.kt
import android.support.v7.app.AppCompatActivity
import android.os.Bundle
import androidx.navigation.fragment.NavHostFragment

class MainActivity : AppCompatActivity() {

    override fun onCreate(savedInstanceState: Bundle?) {
        super.onCreate(savedInstanceState)
        setContentView(R.layout.activity_main)
        val host = NavHostFragment.create(R.navigation.welcome_nav_graph)
        supportFragmentManager.beginTransaction().replace(R.id.fragment_container, host).setPrimaryNavigationFragment(host).commit()
    }
}
2. MainFragment
MainFragment.kt
import android.os.Bundle
import android.support.v4.app.Fragment
import android.view.LayoutInflater
import android.view.View
import android.view.ViewGroup
import androidx.navigation.fragment.findNavController
import kotlinx.android.synthetic.main.fragment_main.*

class MainFragment : Fragment() {

    override fun onCreateView(inflater: LayoutInflater, container: ViewGroup?,
                              savedInstanceState: Bundle?): View? {
        // Inflate the layout for this fragment
        return inflater.inflate(R.layout.fragment_main, container, false)
    }

    override fun onViewCreated(view: View, savedInstanceState: Bundle?) {
        super.onViewCreated(view, savedInstanceState)

        // Sending data from one fragment to another fragment
        buttonWelcomeMe.setOnClickListener{

            val name = enterName.text.toString()
            if(name.isEmpty()) {
                enterName.error = "Please enter a name"
            } else {
                val action = MainFragmentDirections.actionMainFragmentToDestinationFragment()
                action.setNameToShow(name)
                findNavController().navigate(action)
            }
        }
    }


}
3. DestinationFragment
DestinationFragment.kt
import android.os.Bundle
import android.support.v4.app.Fragment
import android.view.LayoutInflater
import android.view.View
import android.view.ViewGroup
import kotlinx.android.synthetic.main.fragment_destination.*

class DestinationFragment : Fragment() {

    override fun onCreateView(inflater: LayoutInflater, container: ViewGroup?,
                              savedInstanceState: Bundle?): View? {
        // Inflate the layout for this fragment
        return inflater.inflate(R.layout.fragment_destination, container, false)
    }
    override fun onViewCreated(view: View, savedInstanceState: Bundle?) {
        super.onViewCreated(view, savedInstanceState)

        val name = DestinationFragmentArgs.fromBundle(arguments).nameToShow
        welcomeWithNameTv.text = "Hello $name!"
    }

}
7. Kết luận
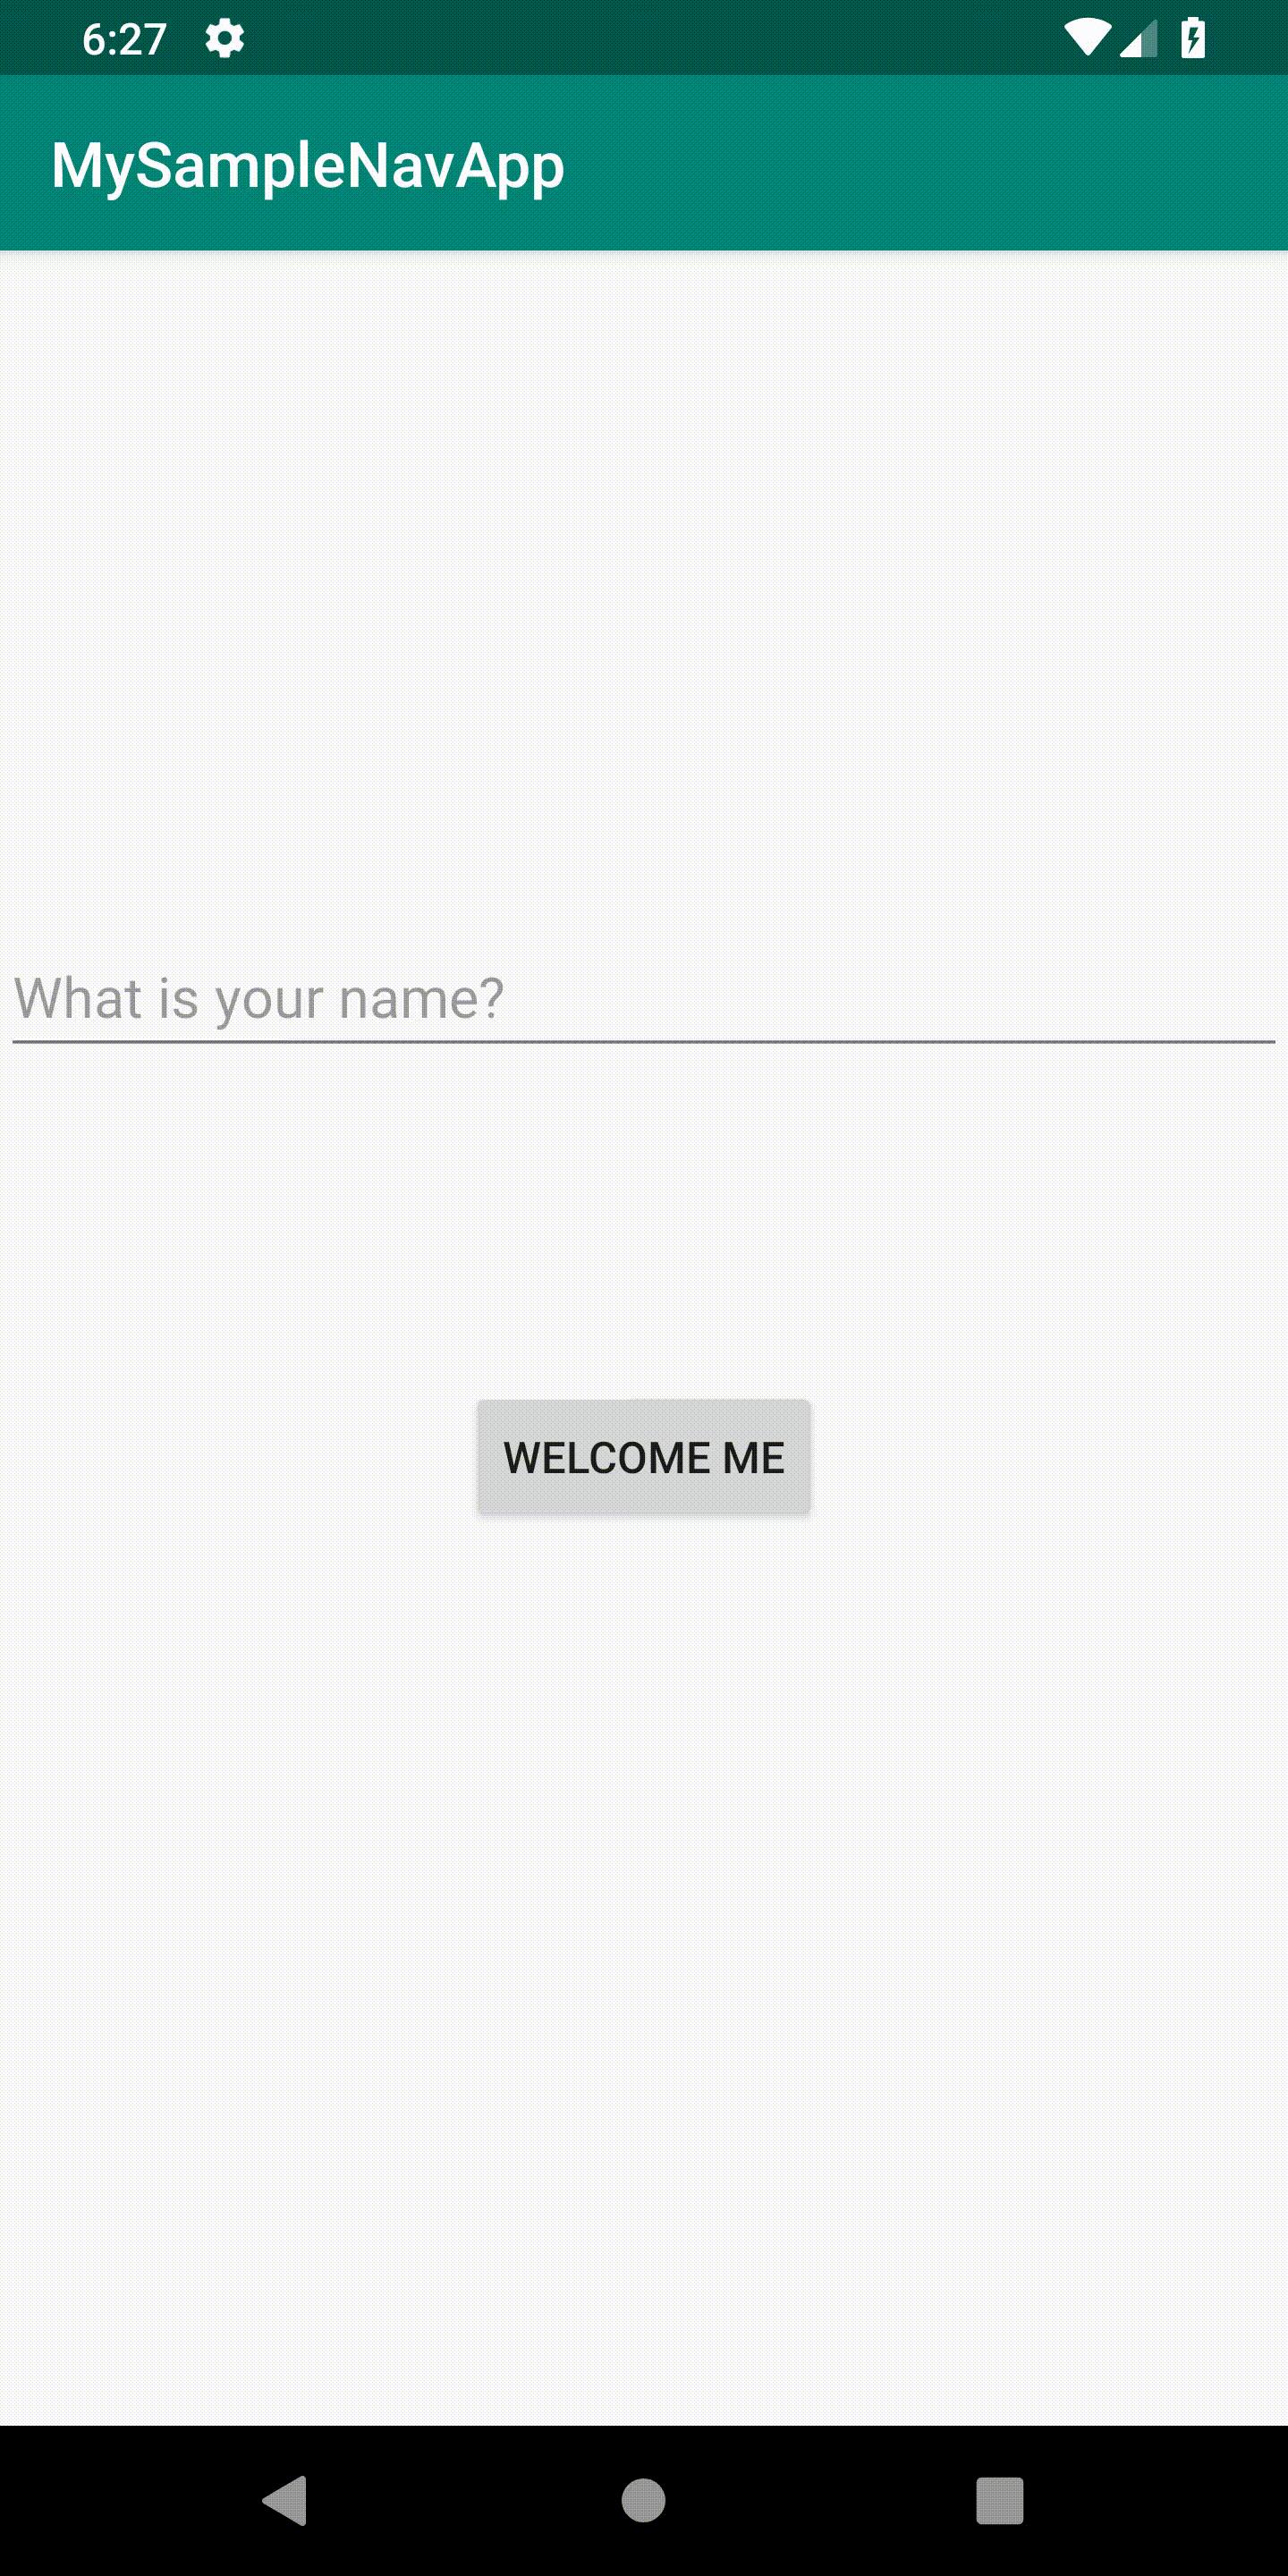
Chạy app và chúng ta sẽ có kết quả như sau :
All rights reserved
