Sử dụng GraphQL trong Android với Apollo-android client
Bài đăng này đã không được cập nhật trong 6 năm
GraphQL là gì?
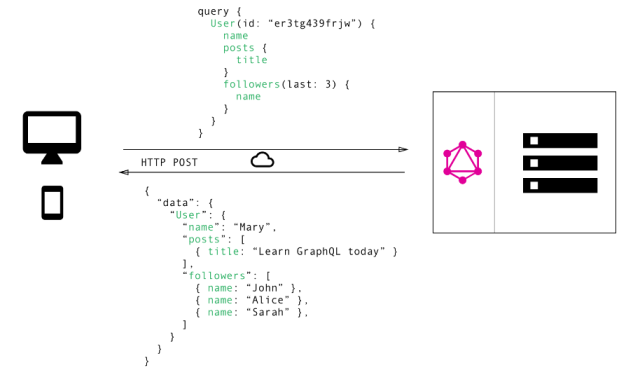
GraphQL là một ngôn ngữ truy vấn cho APIs để có thể lấy dữ liệu từ server, bên cạnh REST APIs mà hầu hết chúng ta đều đang sử dụng. GraphQL không chỉ riêng một platform mà chạy với nhiều loại clients như Andorid, iOS, web.
Lợi ích:
- Hướng Client, client chỉ get những gì client cần: Điều này nghĩa là client định nghĩa loại response mà client muốn get, giúp client chủ động thêm.
Query:
query {
  repository(owner:"jakewharton", name:"butterknife") {
    name
    description
    forkCount
    url
  }
}
Response:
{
  "data": {
    "repository": {
      "name": "butterknife",
      "description": "Bind Android views and callbacks to fields and methods.",
      "forkCount": 3989,
      "url": "https://github.com/JakeWharton/butterknife"
    }
  }
}
Trong ví dụ này thì client query name, description, fork count và URL của repo đó và trong response thì chúng ta chỉ nhận những field mà chúng ta đã request, nhờ đó mà giảm thiểu thời gian so với case chúng ta cần get nhiều thông tin chi tiết.
- Tránh thực hiện nhiều lời gọi: với case của REST APIs chúng ta phải duy trì nhiều endpoints. Ví dụ, 1 end point để lấy
idcủa user từ/usersvà thông tin chi tiết của user từ/users/<id>, vậy là cần 2 lần gọi để lấy thông tin chi tiết. Với việc dùng graphQL sẽ giảm còn 1 query vì nhờ khái niệm về các đối số trong GraphQL.
Resultant single Query:
query{
User(id:"abcj34"){ //Argument
   name
   subject
 }
}

Một số tools và APIs cần biết trước khi thực hành
-
Nếu bạn đã có REST API và muốn chuyển sang GraphQL API thì bạn có thể sử dụng express-graphql, một GraphQL wrapper cho REST API hoặc SOAP.
-
Github GraphQL API: https://developer.github.com/v4/
-
GraphQL: https://github.com/graphql/graphiql, đây là một loại plugin trong browser dùng để test query cho API. Bạn có thể tùy biến request bằng cách thêm URL và thêm các kiểu header khác nhau
-
Altair GraphQL Client https://github.com/imolorhe/altair: một thứ giống postman cho GraphQL API.
Cài đặt GraphQL trên Android
Đề cài đặt GraphQL trên Android thì chúng ta sẽ dùng apolo-android
1. Config apollo-android
project/gradle
classpath("com.apollographql.apollo:gradle-plugin:0.3.2")
app/gradle
plugins {
    id("com.apollographql.android")
}

dependencies {
    implementation("com.apollographql.apollo:apollo-runtime:0.3.2")
    implementation("com.apollographql.apollo:apollo-android-support:0.3.2")
}
2. Thêm các file cho CodeGen của các model
Để sinh code các model thì cần thêm 2 file vào project, thứ nhất là một file với phần mở rộng .graphql và file thứ hai là một schema.json, đây cũng là input để sinh code cho các model.
- Với schema.json, bạn nên dùng apollo-codegen để gửi một query tới server và get schema.json. Để get apollo-codegen thì chạy đoạn sau
1. npm-install apollo-codegen //For installing the apollo-codegen
2. For sending the introspection query and getting the schema.json execute following:
apollo-codegen download-schema https://api.github.com/graphql --output schema.json --header "Authorization: Bearer <Your TOKEN here>"
- Tạo file với các query .graphql và thêm query sau:
query FindQuery($owner:String!,$name:String!){
  repository(owner:$owner, name:$name) {
    name
    description
    forkCount
    url
  }
}
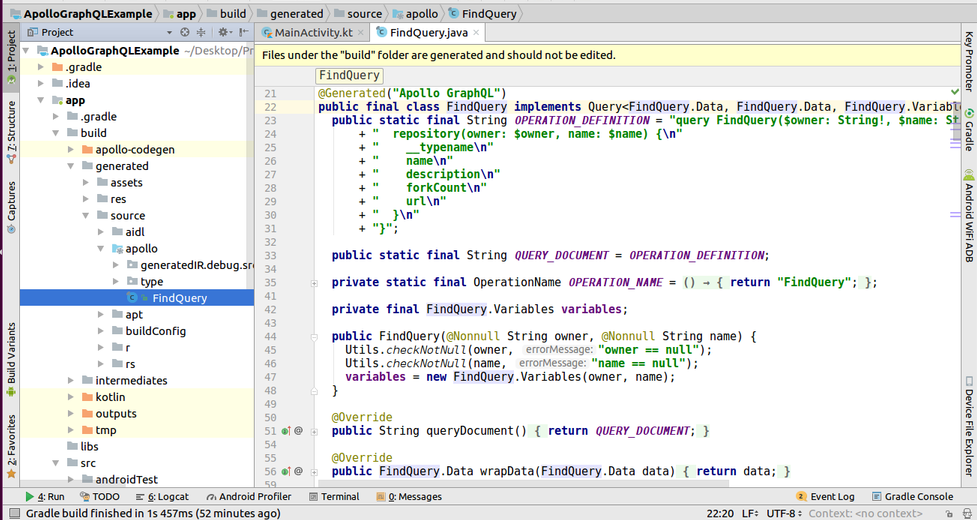
Tạo một đường dẫn với tên "graphql" dưới thư mục /main của project, cùng mức với đường dẫn java và paste 2 file trên. Rồi tiếp hành rebuild project và khi mà bạn build success thì bạn sẽ thấy các model được tự động sinh ra trong build/generated như trong ảnh dưới:

3. Cài đặt Apollo client
Apollo-android sử dụng okhttp client cho việc request các truy vấn và get response. Chúng ta thêm các header bằng việc sử dụng okhttp interceptor, rồi dùng okHttpClient cho ApolloCLient.builder() như sau.
private fun setupApollo(): ApolloClient {
        val okHttp = OkHttpClient
                .Builder()
                .addInterceptor({ chain ->
                    val original = chain.request()
                    val builder = original.newBuilder().method(original.method(),
                            original.body())
                    builder.addHeader("Authorization"
                            , "Bearer " + BuildConfig.AUTH_TOKEN)
                    chain.proceed(builder.build())
                })
                .build()
        return ApolloClient.builder()
                .serverUrl(BASE_URL)
                .okHttpClient(okHttp)
                .build()
    }
4. Truy vấn từ client
Từ client, chúng ta tạo truy vấn như sau và truyền các đối số tương ứng. Thêm vào hàng đợi xử lý và lấy kết quả và cập nhật lên giao diện.
client = setupApollo()
client.query(FindQuery    //From the auto generated class
                 .builder()
                 .name(repo_name_edittext.text.toString()) //Passing required arguments
                 .owner(owner_name_edittext.text.toString()) //Passing required arguments
                 .build())
                 .enqueue(object : ApolloCall.Callback<FindQuery.Data>() {

                    override fun onFailure(e: ApolloException) {
                          Log.info(e.message.toString())
                    }

                    override fun onResponse(response: Response<FindQuery.Data>) {
                         Log.info(" " + response.data()?.repository())
                         runOnUiThread({
                           progress_bar.visibility = View.GONE
                           name_text_view.text = String.format(getString(R.string.name_text),
                                response.data()?.repository()?.name())
                           description_text_view.text = String.format(getString(R.string.description_text),
                                response.data()?.repository()?.description())
                           forks_text_view.text = String.format(getString(R.string.fork_count_text),
                                response.data()?.repository()?.forkCount().toString())
                           url_text_view.text = String.format(getString(R.string.url_count_text),
                                        response.data()?.repository()?.url().toString())
                            })
                     }
                   })
Các bạn tham khảo sample project của tác giả tại đây nhé https://github.com/amanjeetsingh150/GraphQL-Android?source=post_page-----ab8e493abdd7----------------------
Các bạn cũng có dùng RxJava với Apollo bằng cách thêm dependency sau vào app/gradle
implementation ("com.apollographql.apollo:apollo-rx2-support:0.4.4")
Rx2Apollo.from(FindQuery.builder()
      .limit(10)
      .build())
.doOnerror(...)
.doOnNext(...)
.doOnComplete(...)
Bên cạnh những điểm mạnh của GraphQL thì nó cũng có những điểm yếu nữa. Chúng ta hãy cùng xem tiếp công nghệ này sẽ như thế nào trong tương lai nhé.
Tham khảo
https://medium.com/mindorks/what-is-graphql-and-using-it-on-android-ab8e493abdd7
All rights reserved