SMS và Networking Trong Android
Bài đăng này đã không được cập nhật trong 4 năm
SMS and Networking In Android
Nội dung gồm các vấn đề sau:
- Làm sao để gửi tin nhắn SMS từ ứng dụng của bạn.
- Làm sao để gửi SMS từ ứng dụng có sẵn build-in Messaging
- Làm sao để nhận tin nhắn
- Làm sao để gửi email
- Làm sao để connect tới WEB sử dụng HTTP
- Làm sao để sử dụng WEB services
1. Gửi sms từ ứng dụng của bạn
Trước tiên hãy xem xét ví dụ sau:
View:
<LinearLayout xmlns:android="http://schemas.android.com/apk/res/android"
    xmlns:tools="http://schemas.android.com/tools"
    android:layout_width="fill_parent"
    android:layout_height="fill_parent"
    android:orientation="vertical" >
    <EditText
        android:id="@+id/txtMessage"
        android:layout_width="fill_parent"
        android:layout_height="wrap_content" />
    <Button
        android:id="@+id/btnSend"
        android:layout_width="fill_parent"
        android:layout_height="wrap_content"
        android:text="Gửi" />
</LinearLayout>
Add permission để sử dụng SEND_SMS
<?xml version="1.0" encoding="utf-8"?>
<manifest xmlns:android="http://schemas.android.com/apk/res/android"
    package="com.example.sendsms"
    android:versionCode="1"
    android:versionName="1.0" >
    <uses-sdk
        android:minSdkVersion="8"
        android:targetSdkVersion="21" />
    <application
        android:allowBackup="true"
        android:icon="@drawable/ic_launcher"
        android:label="@string/app_name"
        android:theme="@style/AppTheme" >
        <activity
            android:name=".MainActivity"
            android:label="@string/app_name" >
            <intent-filter>
                <action android:name="android.intent.action.MAIN" />
                <category android:name="android.intent.category.LAUNCHER" />
            </intent-filter>
        </activity>
    </application>
**<uses-permission android:name="android.permission.SEND_SMS"></uses-permission>**
</manifest>
Code Logic
protected void onCreate(Bundle savedInstanceState) {
		super.onCreate(savedInstanceState);
		setContentView(R.layout.activity_main);

		Button btnSend = (Button) findViewById(R.id.btnSend);
		final EditText txtMes = (EditText) findViewById(R.id.txtMessage);
		btnSend.setOnClickListener(new View.OnClickListener() {

			@Override
			public void onClick(View v) {
				sendSMS("01656087075", txtMes.getText().toString());
			}
		});
	}
	private void sendSMS(String phoneNumber, String mes){
		SmsManager sms = SmsManager.getDefault();
		sms.sendTextMessage(phoneNumber, null, mes, null, null);
	}
Kết qủa:
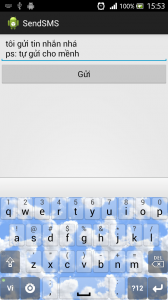
Nhấn vào Button Gửi và nhận được:
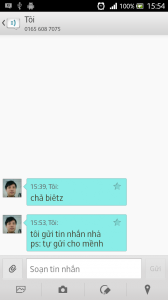
Giải thích ví dụ:
Trong Android chỉ cần sử dụng SmsManager để tạo và phương thức sendTextMessage để gửi một tin nhắn văn bản.
        SmsManager sms = SmsManager.getDefault();
		sms.sendTextMessage(phoneNumber, null, mes, null, null);
trong đó có các tham số sau:
- destinationAddress: Số điện thoại sẽ gửi đến.
- scAddress: địa chỉ cả nhà cung cấp dịch vụ. mặc định sẽ là SMSC
- text : nội dung tin nhắn
- sentIntent : Intent sẽ được gọi khi message được gửi.
- deliveryIntent:Intent sẽ được gọi khi message đã gửi xong.
Ở trên tôi đã dùng các đối số mặc định để định nghĩa các PendingInten. Trên thực tế việc gửi Tin nhắn có thể gặp một số lỗi trong qúa trình gửi. để bắt đc các ngoại lệ sảy ra trong qúa trình gửi thì ta sử dụng class có sẵn trong Android như sau:
// When the SMS has been sent
		registerReceiver(new BroadcastReceiver() {

			@Override
			public void onReceive(Context arg0, Intent arg1) {
				switch (getResultCode()){
					case Activity.RESULT_OK:
						Toast.makeText(getBaseContext(), "SMS sented", Toast.LENGTH_LONG).show();
						break;
					case SmsManager.RESULT_ERROR_GENERIC_FAILURE:
						Toast.makeText(getBaseContext(), "Generic failue!", Toast.LENGTH_LONG).show();
						break;
					case SmsManager.RESULT_ERROR_NO_SERVICE:
						Toast.makeText(getBaseContext(), "No Service!", Toast.LENGTH_LONG).show();
						break;
					case SmsManager.RESULT_ERROR_NULL_PDU:
						Toast.makeText(getBaseContext(), "NULL PDU!", Toast.LENGTH_LONG).show();
						break;
					case SmsManager.RESULT_ERROR_RADIO_OFF:
						Toast.makeText(getBaseContext(), "Radio OFF!", Toast.LENGTH_LONG).show();
						break;
				}

			}
		}, new Intent(SENT));

		// when delivered
		registerReceiver(new BroadcastReceiver() {

			@Override
			public void onReceive(Context context, Intent intent) {
				switch (getResultCode()) {
					case Activity.RESULT_OK:
						Toast.makeText(getBaseContext(), "OK", Toast.LENGTH_LONG).show();
					case Activity.RESULT_CANCELED:
						Toast.makeText(getBaseContext(), "Canceled!", Toast.LENGTH_LONG).show();
				}
			}
		}, new Intent(DELIVERED));

		SmsManager sms = SmsManager.getDefault();
		sms.sendTextMessage(phoneNumber, null, mes, sentPI, deliverPI);
Ứng với từng trường hợp chương trình sẽ show ra log tương ứng từ các PenddingIntent.
2. Nhận một tin nhắn SMS
Để lắng nghe sự kiện một SMS được gửi đến. trong Android chúng ta tạo một class kế thừa từ BroadcastReceiver. Class này cho phép ứng dụng của bạn nhận một intent được gửi từ ứng dụng khác sử dụng sendBroadcast() method. khi một intent được gửi đến thì method onReceive() sẽ được gọi. chúng ta chỉ cần overide nó để bắt thông tin bên trong là xong.
public class SMSReceiver extends BroadcastReceiver {
	public void onReceive(Context context, Intent intent){
		Bundle bundle = intent.getExtras();
		SmsMessage[] msgs = null;

		String str = "";
		if (bundle != null){
			Object[] pdus = (Object[]) bundle.get("pdus");
			msgs = new SmsMessage[pdus.length];

			for (int i=0; i<msgs.length; i++){
				msgs[i] = SmsMessage.createFromPdu((byte[])pdus[i]);
				str += "SMS from" + msgs[i].getOriginatingAddress();

				str += " : ";
				str += msgs[i].getMessageBody().toString();
				str += "\n";
			}
			Toast.makeText(context, str, Toast.LENGTH_LONG).show();
		}
	}
}
Bây giờ,mọi thứ mà chúng ta có nằm trong đối tượng Intent. Tôi sẽ bóc tách nó thông qua đối tượng Bundle. Nội dung tin nhắn được lưu trong một đối tượng kiểu mảng với định dạng là PDU. để bóc tách từng tin nhắn thì ta cần sử dụng method createFromPDU() của class SmsMesage :
msgs[i] = SmsMessage.createFromPdu((byte[])pdus[i]);
Lấy địa chỉ người gửi thông qua phương thức: getOriginatingAddress()
Lấy nội dung tin nhắn thông qua phương thức: getMessageBody()
Và kết qủa là:
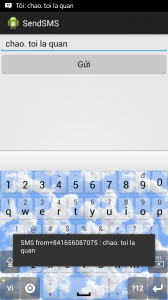
3. Gửi Email trong Android
Giống như SMSAndroid cũng hỗ trợ email.Ứng dụng Gmail -Email trong Android cho phép bạn cấu hình tài khoản email sử dụng POP3 và IMAP. trước tiên hãy làm một ví dụ:
Views:
<RelativeLayout xmlns:android="http://schemas.android.com/apk/res/android"
    xmlns:tools="http://schemas.android.com/tools"
    android:layout_width="match_parent"
    android:layout_height="match_parent"
    android:paddingBottom="@dimen/activity_vertical_margin"
    android:paddingLeft="@dimen/activity_horizontal_margin"
    android:paddingRight="@dimen/activity_horizontal_margin"
    android:paddingTop="@dimen/activity_vertical_margin"
    tools:context="com.example.sendemail.MainActivity" >

    <Button
        android:id="@+id/btnSend"
        android:layout_width="fill_parent"
        android:layout_height="wrap_content"
        android:text="Send email" />

</RelativeLayout>
Logic:
// định nghĩa một phương thức để send email
private void sendEmail(String[] emailAddresses,
			String[] carbonCopies, String subject, String message ){
		Intent emailIntent = new Intent(Intent.ACTION_SEND);
		emailIntent.setData(Uri.parse("mailto:"));
		String[] to = emailAddresses;
		String[] cc = carbonCopies;
		emailIntent.putExtra(Intent.EXTRA_EMAIL, to);
		emailIntent.putExtra(Intent.EXTRA_CC, cc);
		emailIntent.putExtra(Intent.EXTRA_SUBJECT, subject);
		emailIntent.putExtra(Intent.EXTRA_TEXT, message);
		emailIntent.setType("message/rfc822");
		startActivity(Intent.createChooser(emailIntent, "Email"));
	}

// gọi hàm send email

btnSend = (Button) findViewById(R.id.btnSend);
		btnSend.setOnClickListener(new View.OnClickListener() {

			public void onClick(View arg0) {
			  String[] to = {"hoang.van.quan@framgia.com"};
			  String[] cc = {"hoang.van.quan@framgia.com"};
			  sendEmail(to, cc, "Hello", "Hello my friend!");

			}
		});
Kết qủa :

Nhấn vào button “Send email” và nhận đc kết quả:
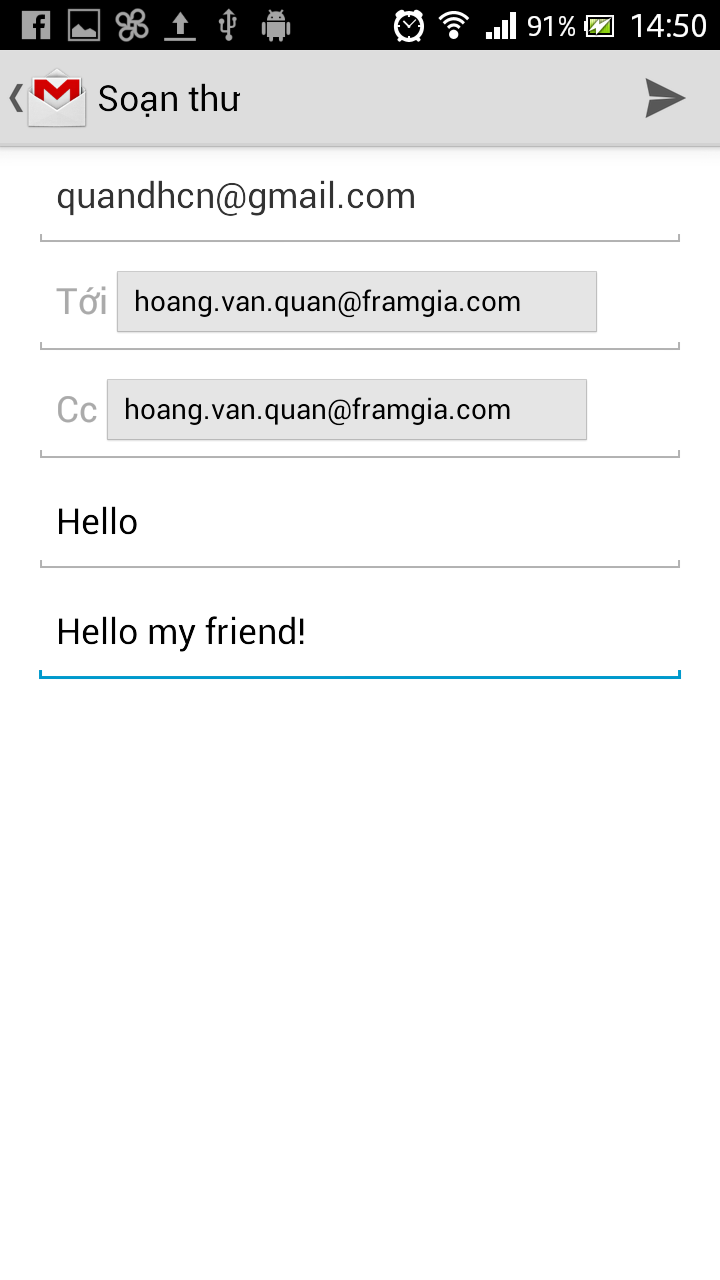
Emai nhận được:

Giải thích ví dụ:
Trong ví dụ trên tôi đã sử dụng một ứng dụng được built-in trong Android để send email. bạn chỉ cần gọi intent của nó lên bằng phương thức setData() và set parameters cho nó bằng phương thức putExtra() và setType cho nó là Xong.
4. Network
Các phần trên nói về việc kết nối với thế giới bên ngoài của Android thông qua SMSvà Email. Còn những các khác nữa để có thể connect với thế giới bên ngoài. Một trong số đó là sử dụng phương thức HTTP. với cách này bạn có thể làm được nhiều việc hơn với những data lớn hơn.
Vậy để connect được với thế giới bên ngoài. bạn cần phải open một conection thông qua HTTP method.
Ở đây tôi sẽ định nghĩa một private method có tên OpenHttpConnection như sau:
public class MainActivity extends Activity {
private InputStream OpenHttpConnection (String urlString)
throwsIOException
{
InputStream in = null;
intresponse = -1;
URL url = newURL(urlString);
URLConnection conn = url.openConnection();
if(!(conn instanceof HttpURLConnection))
throw newIOException(“NotanHTTPconnection”);
try{
HttpURLConnection httpConn = (HttpURLConnection) conn;
httpConn.setAllowUserInteraction(false);
httpConn.setInstanceFollowRedirects(true);
httpConn.setRequestMethod(“GET”);
httpConn.connect();
response = httpConn.getResponseCode();
if(response == HttpURLConnection.HTTP_OK) {
in = httpConn.getInputStream();
}
}
catch(Exception ex)
{
throw newIOException(“Errorconnecting”);
}
return in;
}
Bởi vì phương thức HTTP sẽ kết nối tới Web nên bạn cần phải cung cấp quyền truy cập INTERNER cho ứng dụng của bạn ở trong AndroidManifest.xml:
<uses-permission android:name="android.permission.INTERNET"></uses-permission>
Trong OpenHttpConnection() method tôi truyền vào 1 URL sau đó return lại một đối tượng kiểu InputStream. Để sử dụng một InputStream object bạn cần phải download data thông qua việc đọc từng bytes từ stream object. trong trường hợp này tôi sử dụng method HttpURLConnection để open một HTTP connection đến URL truyền vào. bạn cũng nên nhớ là phải quy định request method cho việc kết nối của mình:
HttpURLConnectionhttpConn=(HttpURLConnection)conn;
httpConn.setAllowUserInteraction(false);
httpConn.setInstanceFollowRedirects(true);
httpConn.setRequestMethod(“GET”);
Sau đó, Thực hiện connect và lấy response trả về:
httpConn.connect();
response=httpConn.getResponseCode();
if(response==HttpURLConnection.HTTP_OK){
in=httpConn.getInputStream();
}
cuối cùng ta return lại InputStream object.
return in;
Bây giờ khi đã hoàn thiện phương thức trả về một InputStream object chúng ta có thể sử dụng phương thức này để kết nối với thế giới bên ngoài thông qua HTTP.
Ví dụ hiển thị ảnh hay text được lấy từ URL
Views:
<LinearLayout xmlns:android="http://schemas.android.com/apk/res/android"
    xmlns:tools="http://schemas.android.com/tools"
    android:layout_width="match_parent"
    android:layout_height="match_parent"
    android:orientation="vertical"
    tools:context=".MainActivity" >
    <Button
        android:layout_width="wrap_content"
        android:layout_height="wrap_content"
        android:layout_gravity="center"
        android:id="@+id/load"
        android:text="Load Image" />
    <ImageView
        android:layout_width="wrap_content"
        android:layout_height="wrap_content"
        android:layout_gravity="center"
        android:id="@+id/img"/>
</LinearLayout>
Logic
// trả về ảnh dạng bitmap từ URL
private Bitmap DownloadImage(String URL)
{
Bitmap bitmap = null;
InputStream in = null;
try{
in = OpenHttpConnection(URL);
bitmap = BitmapFactory.decodeStream(in);
in.close();
} catch(IOException e1) {
Toast.makeText(this, e1.getLocalizedMessage(),
Toast.LENGTH_LONG).show();
e1.printStackTrace();
}
returnbitmap;
}
// hiển thị ảnh lên màn hình thông qua ImageView
load_img = (Button)findViewById(R.id.load);
img = (ImageView)findViewById(R.id.img);
load_img.setOnClickListener(new View.OnClickListener() {
@Override
public void onClick(View arg0) {
// TODO Auto-generated method stub
new LoadImage().execute("https://scontent-a-hkg.xx.fbcdn.net/hphotos-xfa1/v/t1.0-9/10801771_10152924378586870_2287647863558986014_n.jpg?oh=0bdcb13c5743993ec99e1ec679cc65c9&oe=555E8CDE");
}
});
Kết quả là:
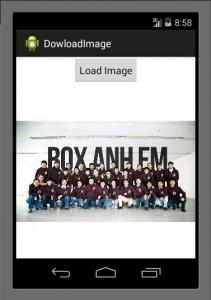
Ngoài ra, HTTP connect còn giúp chúng ta thực hiện nhiều tác vụ rất lớn nữa (như làm việc với Api). nhưng trong khuôn khổ bài báo cáo này Tôi không thể làm được hết.
Thanks
All rights reserved