"Sign in with Google" with Laravel Socialite and React
Bài đăng này đã không được cập nhật trong 6 năm
Giới thiệu
Chào các bạn, hôm nay mình sẽ hướng dẫn các bạn thực hiện implement chức năng "Sign in with Google" trong một ứng dụng Single Page App, cụ thể ở đây là sử dụng React.
Phía server chúng ta sẽ sử dụng Laravel và package laravel/socialite hỗ trợ cho việc đăng nhập bằng các tài khoản social.
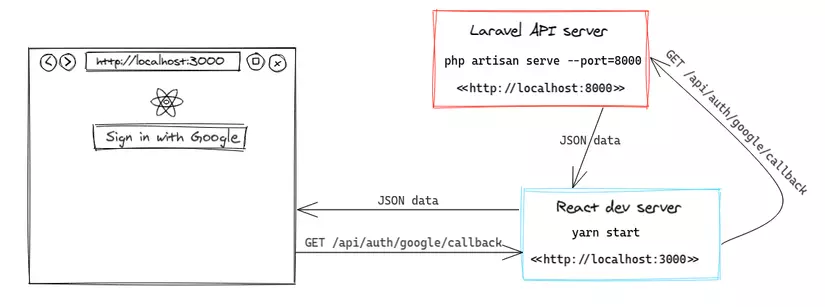
Luồng hoạt động
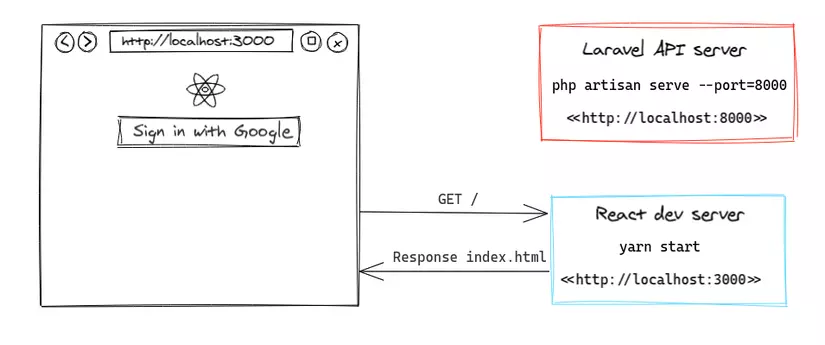
Chúng ta coi backend server và web client hoạt động độc lập và giao tiếp với nhau qua API, Laravel ở backend chỉ có nhiệm vụ viết API cho client sử dụng và việc render view dưới client là do React đảm nhiệm theo kiểu Single Page App, không qua view blade của Laravel nữa.
Từ đó chúng ta có luồng cơ bản như sau:
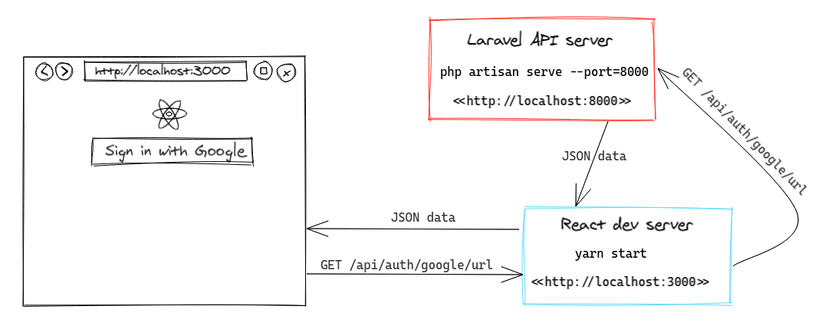
- React render trang login và gọi API để lấy link đăng nhập với Google. Do link này có liên quan đến một số config trên server nên generate động để không phải phân tán config ở cả client và server
- Server trả về link đăng nhập với Google
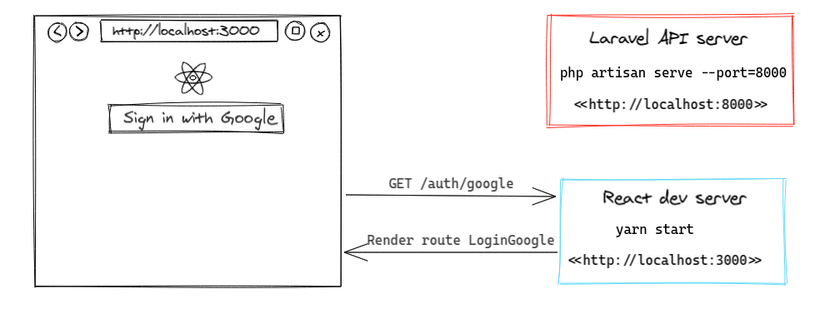
- User click vào link đăng nhập sẽ được chuyển sang trang xác thực của Google
- User đồng ý đăng nhập vào website thì Google sẽ redirect về trang của chúng ta kèm theo một số tham số trên url
- React handle trang redirect và gọi api lên server để server lấy thông tin user từ Google
- Server gửi request đến Google để lấy thông tin user, sau đó lưu thông tin user vào database và trả về response cho client.
Database
Có nhiều cách thiết kế, phụ thuộc vào luồng hoạt động của web app. Ví dụ có các trường hợp sau.
Mỗi user chỉ liên kết với 1 social account
Trường hợp này chúng ta chỉ cần 1 bảng users:
| Column | Type |
|---|---|
| id | unsigned int auto increment |
| name | varchar not null |
| varchar | |
| password | varchar |
| social_provider | varchar |
| social_id | varchar |
Ở đây ta có 2 column social_provider (google, facebook, github,...) và social_id để phân biệt user từ social provider nào. Và email và password có thể null được vì một số provider không cho lấy thông tin email.
Mỗi user có thể liên kết với nhiều social account
Trường hợp này chúng ta sẽ thiết kế 2 bảng users và social_accounts:
Bảng users:
| Column | Type |
|---|---|
| id | unsigned int auto increment |
| name | varchar not null |
| varchar | |
| password | varchar |
Bảng social_accounts:
| Column | Type |
|---|---|
| id | unsigned int auto increment |
| user_id | unsigned int (users) |
| social_id | varchar not null |
| social_name | varchar |
| social_provider | varchar |
Tiến hành
Trong bài viết này chúng ta sẽ sử dụng database theo trường hợp 1 tài khoản user có thể liên kết với nhiều tài khoản social account.
API Server
Server code được đặt trong thư mục server:
composer create-project --prefer-dist laravel/laravel:6 server
Sửa lại migration mặc định của Laravel để cho trường email và password nullable:
public function up()
{
    Schema::create('users', function (Blueprint $table) {
        $table->bigIncrements('id');
        $table->string('name');
        $table->string('email')->nullable()->unique();
        $table->timestamp('email_verified_at')->nullable();
        $table->string('password')->nullable();
        $table->rememberToken();
        $table->timestamps();
    });
}
Tạo model SocialAccount và table social_accounts:
php artisan make:model -m Models\\SocialAccount
<?php
namespace App\Models;

use Illuminate\Database\Eloquent\Model;

class SocialAccount extends Model
{
    protected $fillable = [
        'user_id',
        'social_id',
        'social_provider',
        'social_name',
    ];

    public function user()
    {
        return $this->belongsTo(User::class);
    }
}
public function up()
{
    Schema::create('social_accounts', function (Blueprint $table) {
        $table->bigIncrements('id');
        $table->unsignedBigInteger('user_id');
        $table->string('social_id');
        $table->string('social_provider');
        $table->string('social_name');
        $table->timestamps();
    });
}
Để cho tiện cho việc demo mà không phải setup cầu kỳ, ở đây chúng ta sẽ dùng sqlite:
Tạo file db sqlite:
cd server
touch database/db.sqlite
Lấy đường dẫn tuyệt đối của file sqlite và update file .env:
$ realpath database/db.sqlite
/home/ubuntu/Projects/laravel-socialite-react-spa-new/server/database/db.sqlite
Update .env:
-DB_CONNECTION=mysql
-DB_HOST=127.0.0.1
-DB_PORT=3306
-DB_DATABASE=laravel
-DB_USERNAME=root
-DB_PASSWORD=
+DB_CONNECTION=sqlite
+DB_DATABASE=/home/ubuntu/Projects/laravel-socialite-react-spa-new/server/database/db.sqlite
Migrate và khởi động server api:
php artisan migrate
php artisan serve --port=8000
Và chúng ta có server hoạt động ở địa chỉ: http://localhost:8000
Lưu ý: đối với artisan server, mỗi khi bạn thay đổi file .env, hãy nhớ khởi động lại lệnh artisan serve.
React client
Client code được đặt trong thư mục web:
npx create-react-app web
Để thuận tiện cho việc dev và không phải config cors, ở đây chúng ta sẽ dùng proxy do create-react-app hỗ trợ, chỉ cần thêm 1 dòng vào file package.json:
   "name": "web",
   "version": "0.1.0",
   "private": true,
+  "proxy": "http://localhost:8000",
   "dependencies": {
     "@testing-library/jest-dom": "^4.2.4",
     "@testing-library/react": "^9.3.2",
Tức là ở client sẽ gọi đến api /api/auth/google/url, do ở client không có route nào có prefix là /api nên dev server sẽ gọi đến proxy server => http://localhost:8000/api/auth/google/url.
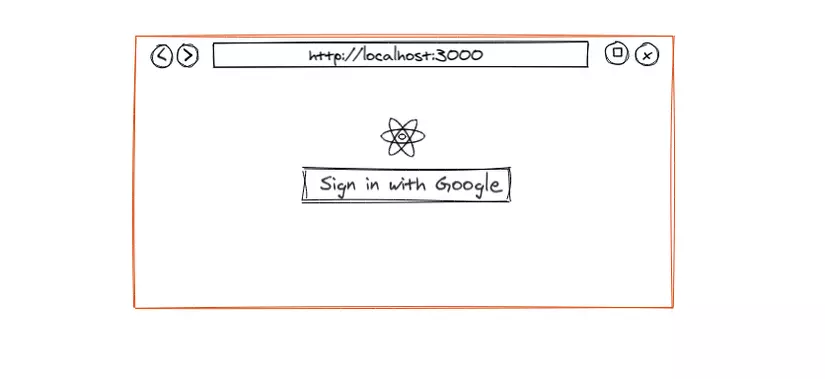
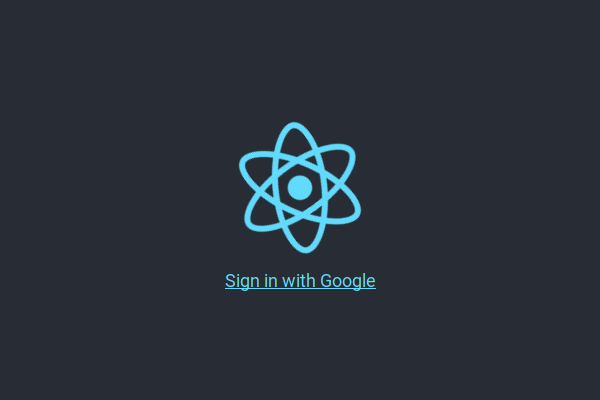
Ví dụ về luồng hoạt động:
Trang chủ:
Cài đặt Laravel Socialite
Cài đặt laravel/socialite composer package:
composer require laravel/socialite
Thiết lập Google Client ID và Client Secret:
    'google' => [
        'client_id' => env('GOOGLE_CLIENT_ID'),
        'client_secret' => env('GOOGLE_CLIENT_SECRET'),
        'redirect' => env('GOOGLE_REDIRECT_URL'),
    ],
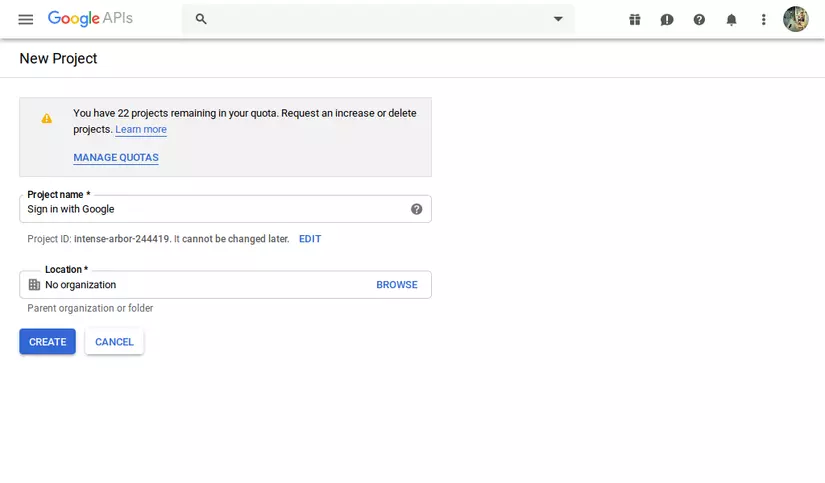
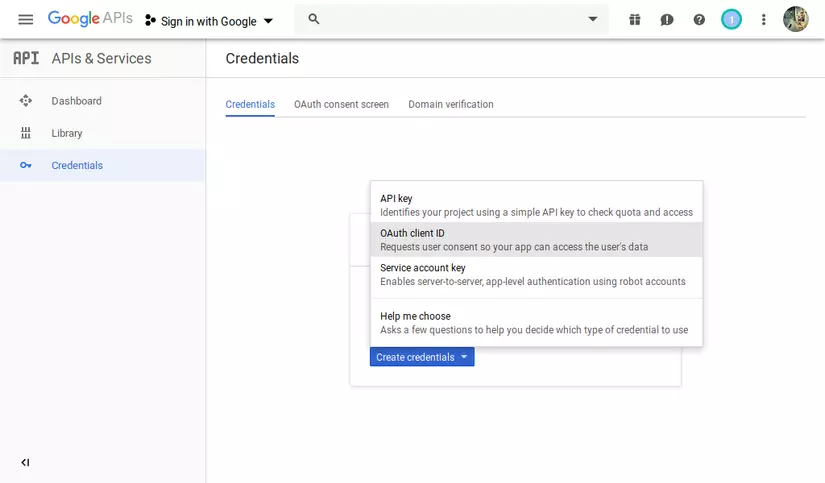
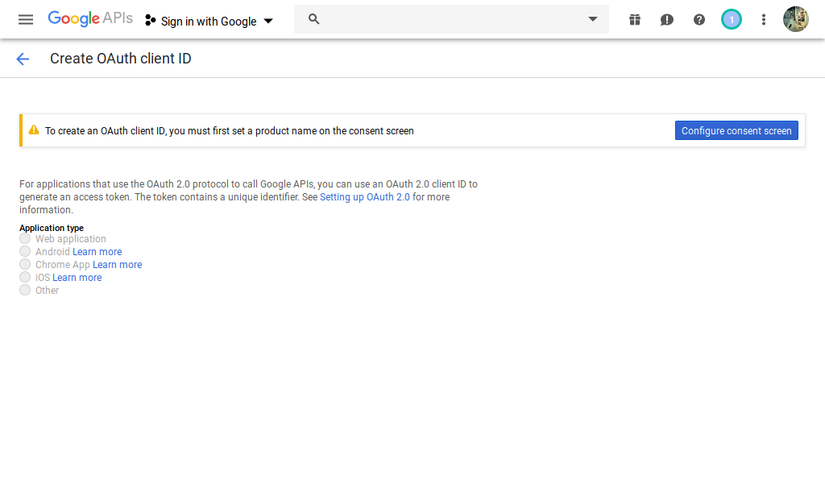
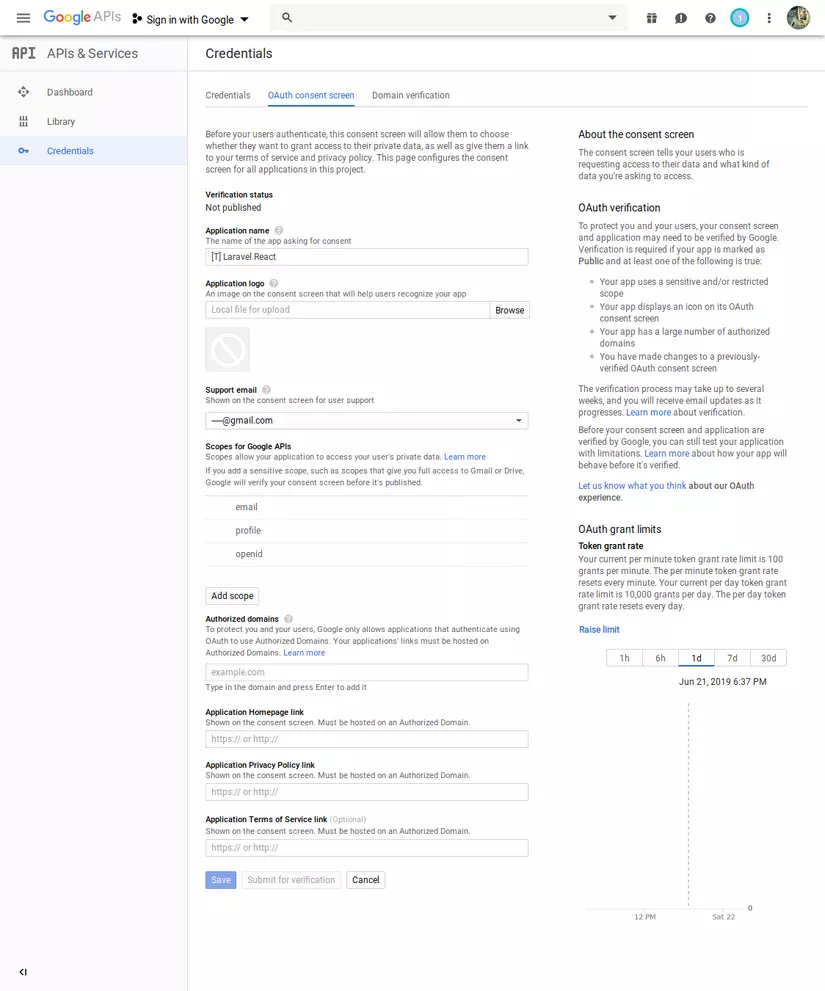
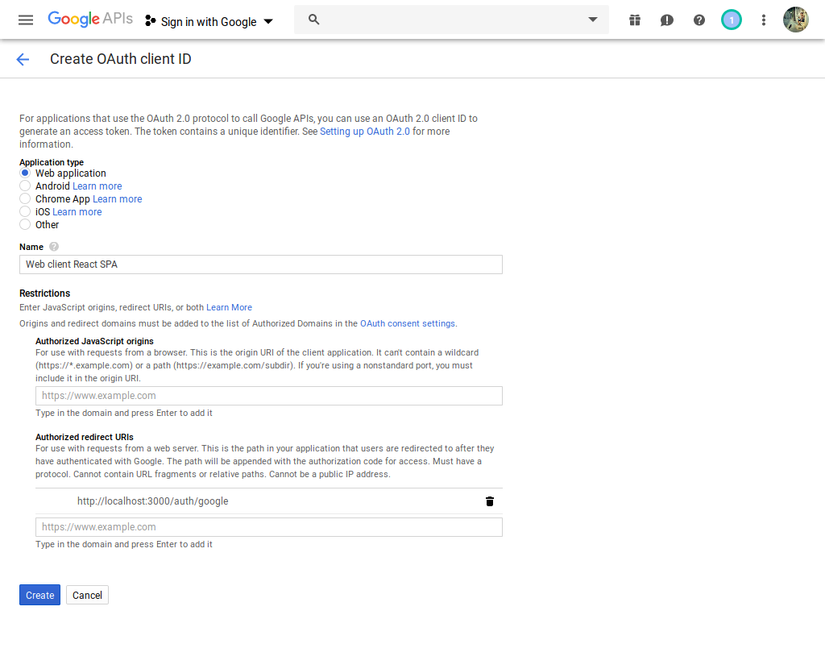
Tạo Google Client ID, Secret
Các bạn vào trang Google API Console và làm theo hướng dẫn như sau:
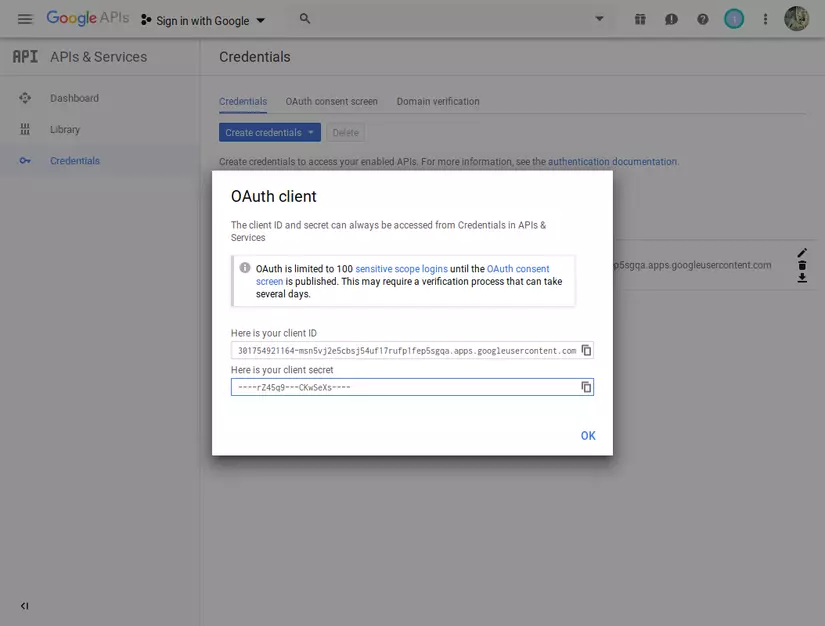
Sau đó copy client id và client secret và thêm vào file .env:
GOOGLE_CLIENT_ID=---------.apps.googleusercontent.com
GOOGLE_CLIENT_SECRET=------Uec
GOOGLE_REDIRECT_URL=http://localhost:3000/auth/google
Route và controller
Theo luồng hoạt động ở trên thì chúng ta cần 2 api. Đầu tiên là tạo Controller:
php artisan make:controller Api\\Auth\\GoogleController
<?php

namespace App\Http\Controllers\Api\Auth;

use App\Http\Controllers\Controller;
use App\Http\Resources\UserResource;
use App\Models\SocialAccount;
use App\Models\User;
use Illuminate\Support\Facades\DB;
use Illuminate\Support\Facades\Response;
use Laravel\Socialite\Facades\Socialite;

class GoogleController extends Controller
{
    public function loginUrl()
    {
        //
    }

    public function loginCallback()
    {
        //
    }
}
Sau đó là đăng ký routes:
<?php

Route::get('auth/google/url', 'Api\Auth\GoogleController@loginUrl');
Route::get('auth/google/callback', 'Api\Auth\GoogleController@loginCallback');
API get google login url
class GoogleController extends Controller
{
    public function googleLoginUrl()
    {
        return Response::json([
            'url' => Socialite::driver('google')->stateless()->redirect()->getTargetUrl(),
        ]);
    }
}
NOTE: ở đây chúng ta dùng method stateless() để disable việc sử dụng session để verify state, vì ở
route/api.phpsẽ không đi qua middleware tạo session nên sẽ không sử dụng được session.
API get google login callback
class GoogleController extends Controller
{
    public function loginCallback()
    {
        $googleUser = Socialite::driver('google')->stateless()->user();
        $user = null;

        DB::transaction(function () use ($googleUser, &$user) {
            $socialAccount = SocialAccount::firstOrNew(
                ['social_id' => $googleUser->getId(), 'social_provider' => 'google'],
                ['social_name' => $googleUser->getName()]
            );

            if (!($user = $socialAccount->user)) {
                $user = User::create([
                    'email' => $googleUser->getEmail(),
                    'name' => $googleUser->getName(),
                ]);
                $socialAccount->fill(['user_id' => $user->id])->save();
            }
        });

        return Response::json([
            'user' => new UserResource($user),
            'google_user' => $googleUser,
        ]);
    }
}
Các bước thực hiện sẽ là:
- Lấy user từ Google:
$googleUser = Socialite::driver('google')->stateless()->user();, rất đơn giản do tất cả logic phức tạp để gọi đến Google đã được xử lý bởi Socialite - Tạo đối tượng model
SocialAccount, sau đó nếu tài khoản này chưa liên kết với user nào thì sẽ tạo một tài khoản user mới - Sau đó tùy theo logic của web và cách thực hiện authentication (jwt, passport) mà bạn sẽ xử lý. Chẳng hạn tạo một jwt token để user có thể đăng nhập hoặc set trạng thái là chưa active và đợi đến khi admin activate thì mới được đăng nhập...
Xử lý trên client
Chúng ta sẽ cần sử dụng một thử viện router để xử lý callback url như khi setup trên Google: http://localhost:3000/auth/google
yarn add react-router-dom
Khai báo component App và đăng ký routes:
function App() {
    return (
        <Router>
            <Switch>
                <Route exact path="/" component={Home} />
                <Route exact path="/auth/google" component={LoginGoogle} />
            </Switch>
        </Router>
    );
}
Trên trang home / chúng ta sẽ hiển thị link "Sign in with Google":
class Home extends React.Component {
    state = {
        googleLoginUrl: null,
    };

    componentDidMount() {
        fetch('/api/auth/google/url', { headers: new Headers({ accept: 'application/json' }) })
            .then((response) => {
                if (response.ok) {
                    return response.json();
                }
                throw new Error('Something went wrong!');
            })
            .then((data) => this.setState({ googleLoginUrl: data.url }))
            .catch((error) => console.error(error));
    }

    render() {
        const { googleLoginUrl } = this.state;
        return (
            <Layout>
                {googleLoginUrl && (
                    <a className="App-link" href={googleLoginUrl}>
                        Sign in with Google
                    </a>
                )}
            </Layout>
        );
    }
}
Và tiếp tục xử lý callback redirect từ Google ở trang /auth/google:
class LoginGoogle extends React.Component {
    state = {
        loading: true,
        error: null,
        data: {},
    };

    componentDidMount() {
        fetch(`/api/auth/google/callback${this.props.location.search}`, { headers: new Headers({ accept: 'application/json' }) })
            .then((response) => {
                if (response.ok) {
                    return response.json();
                }
                throw new Error('Something went wrong!');
            })
            .then((data) => {
                this.setState({ loading: false, data });
            })
            .catch((error) => {
                this.setState({ loading: false, error });
                console.error(error);
            });
    }

    render() {
        const { loading, error, data } = this.state;
        if (loading) {
            return <Layout>Loading....</Layout>;
        }

        if (error) {
            return (
                <Layout>
                    <div>
                        <p>Error:</p>
                        <code className="Code-block">{error.toString()}</code>
                    </div>
                </Layout>
            );
        }

        return (
            <Layout>
                <div>
                    <details>
                        <summary>Welcome {data.user.name}</summary>
                        <p>Here is your info: </p>
                        <code className="Code-block">{JSON.stringify(data, null, 2)}</code>
                    </details>
                </div>
            </Layout>
        );
    }
}
Logic ở đây là khi User chấp nhận đăng nhập thì Google sẽ redirect đến địa chỉ callback: http://localhost:3000/auth/google và kèm theo các tham số, chẳng hạn:
http://localhost:3000/auth/google?code=4%2FbwF0W-----sXNrYwZGGDUpc&scope=email+profile+openid+https%3A%2F%2Fwww.googleapis.com%2Fauth%2Fuserinfo.profile+https%3A%2F%2Fwww.googleapis.com%2Fauth%2Fuserinfo.email&authuser=1&session_state=44a69823d-----7235201eec3bd2e915a..ecb7&prompt=consent
Chúng ta sẽ lấy ra tất cả các tham số này qua props this.props.location.search và request lên api kèm theo các tham số này để Socialite có thể đọc và request đến Google.
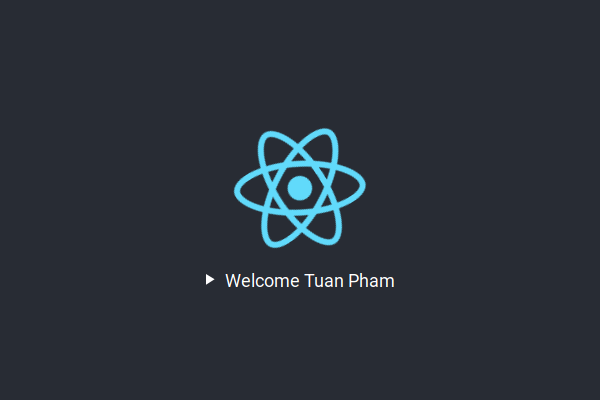
Kết quả:
Lời kết
Trên đây mới chỉ là Proof Of Concept để chúng ta hiểu hơn về luồng hoạt động, các bạn có thể hoàn thiện demo (hoặc chờ bài tiếp theo của mình : D) với các chức năng và cải tiến như:
- [ ] Persist login với JWT?
- [ ] Refactoring React sử dụng React Hooks (recommend khi start React từ 2020 : D)
- [ ] Login với email password
- [ ] Connect với Google account sau khia login
All rights reserved
