Setup Boilerplate cho dự án NestJS - Phần 6.2: Unit test Repository, Guard, Interceptor, Middleware, Pipe.
Bài đăng này đã không được cập nhật trong 3 năm
Đây là bài viết nằm trong Series NestJS thực chiến, các bạn có thể xem toàn bộ bài viết ở link: https://viblo.asia/s/nestjs-thuc-chien-MkNLr3kaVgA
Chúng ta sẽ tiếp tục phần 2 của bài viết Setup Boilerplate cho dự án NestJS - Phần 6.1: Unit test tất cả các thành phần trong NestJS .
Ở phần này chúng ta sẽ tiếp tục viết test case cho các thành phần còn lại trong NestJS. Sau đó chúng ta sẽ tìm hiểu một vài trick để tiết kiệm thời gian viết unit test với tính năng Auto Mocking kết hợp với package @golevelup/ts-jest.
Các bạn có thể tải về source code của phần này ở đây.
2.3 Viết test case cho các thành phần trong NestJS (tiếp theo)
Phần này chúng ta sẽ cùng viết các test case cho các thành phần sau:
- Repository
- Guard
- Interceptor
- Middleware
- Pipe
- Model (optional)
Repository
Vì source code của chúng ta được thiết kế với repository layer nên cũng cần phải có unit test cho phần này để đảm bảo logic ở đây hoạt động đúng như mong đợi.
Trước tiên tạo MockEntity, ở đây mình dùng abstract class để mock các method chung và tương ứng với từng entity sẽ kế thừa và định nghĩa lại entity_sub của riêng nó.
export abstract class MockEntity<T> {
	protected abstract entity_stub: T;

	async create(): Promise<{ save: () => T }> {
		return {
			save: () => this.entity_stub,
		};
	}

	async findById() {
		return this.entity_stub;
	}
	// NOTE: Using async and return Promise will not work
	findOne(): { exec: () => T } {
		return {
			exec: () => this.entity_stub,
		};
	}
	async count() {
		return 1;
	}
	async find() {
		return [this.entity_stub];
	}

	async findByIdAndUpdate() {
		return this.entity_stub;
	}

	async findOneAndUpdate() {
		return this.entity_stub;
	}

	async findByIdAndDelete() {
		return this.entity_stub;
	}

	populate() {
		return this.entity_stub;
	}

	exec() {
		return this.entity_stub;
	}
}
Tiếp theo chúng ta sẽ tạo UserEntity kế thừa abstract class vừa tạo.
import { MockEntity } from '@repositories/test/supports/mock.entity';
import { User } from '@modules/users/entities/user.entity';
import { createUserStub } from '@modules/users/test/stubs/user.stub';

export class UserEntity extends MockEntity<User> {
	protected entity_stub = createUserStub();
}
Mọi thứ đã chuẩn bị xong, việc cuối cùng là viết unit test cho UserRepository
import { FilterQuery, Model } from 'mongoose';
import { getModelToken } from '@nestjs/mongoose';
import { Test } from '@nestjs/testing';

// OUTER
import { PaginateParams } from 'src/types/common.type';

// INNER
import { UserDocument, User } from '@modules/users/entities/user.entity';
import { createUserStub } from '@modules/users/test/stubs/user.stub';
import { UsersRepository } from '@repositories/users.repository';
import { UserEntity } from './supports/user.entity';

describe('UsersRepository', () => {
	let repository: UsersRepository;
	let model: Model<UserDocument>;

	beforeEach(async () => {
		const module_ref = await Test.createTestingModule({
			providers: [
				UsersRepository,
				{
					provide: getModelToken(User.name),
					useClass: UserEntity,
				},
			],
		}).compile();
		repository = module_ref.get<UsersRepository>(UsersRepository);
		model = module_ref.get(getModelToken(User.name));
	});

	afterEach(() => jest.clearAllMocks());

	describe('create', () => {
		it('should create new user if data given valid', async () => {
			// Arrange
			const { _id, ...user_stub } = createUserStub();
			// We must spy on all the method of the model because it just a normal method in UserModel
			// Comment this love below to see the error: `Matcher error: received value must be a mock or spy function`
			jest.spyOn(model, 'create');
			// Act
			const result = await repository.create(user_stub);

			// Assert
			expect(model.create).toBeCalled();
			expect(result).toEqual({
				...user_stub,
				_id,
			});
		});
	});

	describe('findOneById', () => {
		it('should return user if id matched', async () => {
			// Arrange
			const user_stub = createUserStub();
			jest.spyOn(model, 'findById');
			// Act
			const result = await repository.findOneById(user_stub._id.toString());
			// Assert
			expect(model.findById).toBeCalled();
			expect(result).toEqual(user_stub);
		});
	});
	describe('findOneByCondition', () => {
		it('should return user if pass filter', async () => {
			// Arrange
			const user_stub = createUserStub();
			const filter: FilterQuery<User> = { first_name: user_stub.first_name };
			jest.spyOn(model, 'findOne');
			// Act
			const result = await repository.findOneByCondition(filter);
			// Assert
			expect(model.findOne).toBeCalled();
			expect(model.findOne).toBeCalledWith({
				...filter,
				deleted_at: null, // Because our logic support soft delete, so we need add this row.
			});
			expect(result).toEqual(user_stub);
		});
	});
	describe('findAll', () => {
		it('should return list of user base on filter', async () => {
			// Arrange
			const options: PaginateParams = { offset: 0, limit: 4 };
			jest.spyOn(model, 'count');
			jest.spyOn(model, 'find');

			// Act
			const result = await repository.findAll({}, options);

			// Assert
			expect(model.count).toBeCalled();
			expect(model.count).toBeCalledWith({ deleted_at: null });
			expect(model.find).toBeCalled();
			expect(model.find).toBeCalledWith(
				{ deleted_at: null },
				undefined,
				options,
			);
			expect(result).toMatchObject({
				count: expect.any(Number),
				items: expect.any(Array),
			});
		});
	});
	describe('update', () => {
		it('should update user with given data', async () => {
			// Arrange
			const { _id, ...user_stub } = createUserStub();
			jest.spyOn(model, 'findOneAndUpdate');

			// Act
			const result = await repository.update(_id.toString(), user_stub);

			// Assert
			expect(model.findOneAndUpdate).toBeCalledWith(
				{ _id, deleted_at: null },
				user_stub,
				{ new: true },
			);
			expect(result).toEqual({ ...user_stub, _id });
		});
	});
	describe('softDelete', () => {
		it('should soft delete user with given id', async () => {
			// Arrange
			const { _id } = createUserStub();
			jest.spyOn(model, 'findByIdAndUpdate').mockReturnThis();

			// Act
			const result = await repository.softDelete(_id.toString());

			// Assert
			expect(model.findByIdAndUpdate).toBeCalledWith(_id, {
				deleted_at: expect.any(Date),
			});
			expect(result).toBeTruthy();
		});
	});
	describe('permanentlyDelete', () => {
		it('should permanently delete user with given id', async () => {
			// Arrange
			const { _id } = createUserStub();
			jest.spyOn(model, 'findByIdAndDelete');

			// Act
			const result = await repository.permanentlyDelete(_id.toString());

			// Assert
			expect(model.findByIdAndDelete).toBeCalledWith(_id);
			expect(result).toBeTruthy();
		});
	});

	describe('findAllWithSubFields', () => {
		it('should return list of user base on filter and populate sub document', async () => {
			// Arrange
			const options: PaginateParams = { offset: 0, limit: 4 };
			const populate = ['role'];
			jest.spyOn(model, 'count');
			// Typescript don't allow assign value directly to mongoose method that return Query
			jest.spyOn(model, 'find').mockReturnThis();
			jest
				.spyOn(model, 'populate')
				.mockImplementationOnce((): any => [createUserStub()]);
			// Act
			const result = await repository.findAllWithSubFields(
				{},
				{
					...options,
					populate,
				},
			);
			// Assert
			expect(model.count).toBeCalled();
			expect(model.count).toBeCalledWith({ deleted_at: null });
			expect(model.find).toBeCalled();
			expect(model.find).toBeCalledWith({ deleted_at: null }, '', {
				skip: options.offset,
				limit: options.limit,
			});
			expect(model.find().populate).toHaveBeenCalledWith(populate);
			expect(result).toMatchObject({
				count: expect.any(Number),
				items: expect.any(Array),
			});
		});
	});
});
Giải thích:
- Như đã từng nói về ví dụ với mock database ở phần trước chúng ta dùng
getModelTokenvàuseValue, ở đây chúng ta sẽ thay thếuseValuevớiuseClassđể sử dụngUserEntityvừa tạo ở trên. - Các test case cơ bản sẽ tương tự như service:
- Kiểm tra tham số truyền vào method của model.
- Kiểm tra kết quả trả về từ model cho repository.
- Với các method có gọi
exechaypopulatehoặc bất kì các method chaining nào thì mình sẽ dùngmockReturnThisđể trả về context object hiện tại, giúp gọi đến các method được định nghĩa trongMockEntity.
Hoặc các bạn có thể dùng return về các method chaining như cách mình làm với method
findOne, tuy nhiên nếu có nhiều method chaining thì phải return lồng nhau.
Guard
Phần này mình sẽ hướng dẫn các bạn viết unit test cho các guard, trong AuthModule của chúng ta có một số guard, mình sẽ bắt đầu với JwtAccessTokenGuard. Vì đa số guard hay các thành phần khác có sử dụng ExecutionContext nên trước tiên mình sẽ tạo mock cho nó để dùng chung.
Phần dưới chúng ta sẽ dùng package
@golevelup/ts-jestđể tự động tạo các mock này.
import { ExecutionContext } from '@nestjs/common';

export const execution_context: ExecutionContext = {
	getClass: jest.fn(),
	getHandler: jest.fn(),
	getArgs: jest.fn(),
	getType: jest.fn(),
	getArgByIndex: jest.fn(),
	switchToHttp: jest.fn(),
	switchToRpc: jest.fn(),
	switchToWs: jest.fn(),
};
Tiến hành viết test cho JwtAccessTokenGuard
import { Test, TestingModule } from '@nestjs/testing';
import { Reflector } from '@nestjs/core';
import { AuthGuard } from '@nestjs/passport';
import { JwtAccessTokenGuard } from '../guards/jwt-access-token.guard';
import { execution_context } from 'src/shared/test/mocks/execution-context.mock';
import { IS_PUBLIC_KEY } from 'src/decorators/auth.decorator';

describe('JwtAccessTokenGuard', () => {
	let guard: JwtAccessTokenGuard;
	let reflector: Reflector;

	beforeEach(async () => {
		const moduleRef: TestingModule = await Test.createTestingModule({
			providers: [
				JwtAccessTokenGuard,
				{
					provide: Reflector,
					useValue: {
						getAllAndOverride: jest.fn(),
					},
				},
			],
		}).compile();

		guard = moduleRef.get<JwtAccessTokenGuard>(JwtAccessTokenGuard);
		reflector = moduleRef.get<Reflector>(Reflector);
	});

	afterEach(() => {
		jest.clearAllMocks();
	});

	it('should return true when isPublic is true', () => {
		// Arrange
		jest.spyOn(reflector, 'getAllAndOverride').mockReturnValueOnce(true);

		// Act & Assert
		expect(guard.canActivate(execution_context)).toBeTruthy();
		expect(reflector.getAllAndOverride).toBeCalledWith(IS_PUBLIC_KEY, [
			execution_context.getHandler(),
			execution_context.getClass(),
		]);
	});

	it('should call super.canActivate() when isPublic is false', () => {
		// Arrange
		jest.spyOn(reflector, 'getAllAndOverride').mockReturnValueOnce(false);
		jest
			.spyOn(AuthGuard('jwt').prototype, 'canActivate')
			.mockReturnValueOnce(true);
		// Act & Assert
		expect(guard.canActivate(execution_context)).toBeTruthy();
		expect(reflector.getAllAndOverride).toBeCalledWith(IS_PUBLIC_KEY, [
			execution_context.getHandler(),
			execution_context.getClass(),
		]);
		expect(AuthGuard('jwt').prototype.canActivate).toBeCalledTimes(1);
	});
});
Giải thích:
- Trước tiên chúng ta sẽ mock cho
Reflector. Do chúng ta chỉ dùng methodgetAllAndOverridenên ở đây mình sẽ viết thẳng vàouseValuecho nhanh, các bạn có thể viết mock riêng cho nó để tái sử dụng cũng được. - Chúng ta sẽ test 2 trường hợp:
- Nếu có decorator
isPulicthì sẽ bypass guard: dùngspyOnđể mock kết quả trả về từgetAllAndOverrideđồng thời cũng dùng để kiểm tra params truyền vào. - Ngược lại nếu nếu không có decorator
isPublicthì methodcanActivecủanestjs/passportsẽ được gọi: dùngspyOncho methodcanActiveđể mock kết quả trả về và cũng kiểm tra nó có thật sự được gọi hay không.
- Nếu có decorator
- Sử dụng
afterEachvớijest.clearAllMockslà một best practice mà chúng ta nên dùng để isolate mock giữa các test case với nhau. Các bạn có thể thêm vào tất cả các file unit test trước đó, trong một số trường hợp có thể dùngresetAllMockshoặcrestoreAllMocks.
Các bạn chạy lệnh npm run test:watch auth/test/guard để kiểm tra kết quả nhé.
Mình sẽ viết thêm một test nữa cho RolesGuard cho các bạn dễ hình dung. Chỉnh sửa lại mock ExecutionContext một tí vì chúng ta có dùng getRequest trong switchToHttp
export const execution_context: ExecutionContext = {
	...
	switchToHttp: jest.fn().mockReturnValue({ getRequest: jest.fn() }),
	...
};
Tạo và viết test case cho RolesGuard:
import { Test } from '@nestjs/testing';
import { RolesGuard } from '../guards/roles.guard';
import { Reflector } from '@nestjs/core';
import { createMock } from '@golevelup/ts-jest';
import { ExecutionContext } from '@nestjs/common';
import { execution_context } from 'src/shared/test/mocks/execution-context.mock';
import { mock_request_with_user } from './mocks/requests.mock';
import { ROLES } from 'src/decorators/roles.decorator';

describe('RolesGuard', () => {
	let roles_guard: RolesGuard;
	let reflector: Reflector;
	beforeEach(async () => {
		const module_ref = await Test.createTestingModule({
			providers: [
				RolesGuard,
				{
					provide: Reflector,
					useValue: {
						getAllAndOverride: jest.fn(),
					},
				},
			],
		}).compile();

		roles_guard = module_ref.get<RolesGuard>(RolesGuard);
		reflector = module_ref.get<Reflector>(Reflector);
	});

	afterEach(() => jest.clearAllMocks());

	it('should return true if the user has a required role', () => {
		// Arrange
		jest.spyOn(reflector, 'getAllAndOverride').mockReturnValueOnce(['admin']);
		(
			execution_context.switchToHttp().getRequest as jest.Mock
		).mockReturnValueOnce(mock_request_with_user);

		// Act & Assert
		expect(roles_guard.canActivate(execution_context)).toBeTruthy();
		expect(reflector.getAllAndOverride).toBeCalledWith(ROLES, [
			execution_context.getHandler(),
			execution_context.getClass(),
		]);
	});

	it('should return false if the user does not have a required role', () => {
		// Arrange
		jest.spyOn(reflector, 'getAllAndOverride').mockReturnValueOnce(['admin']);
		(
			execution_context.switchToHttp().getRequest as jest.Mock
		).mockReturnValueOnce({
			user: {
				role: 'user',
			},
		});

		// Act & Assert
		expect(roles_guard.canActivate(execution_context)).toBeFalsy();
		expect(reflector.getAllAndOverride).toBeCalledWith(ROLES, [
			execution_context.getHandler(),
			execution_context.getClass(),
		]);
	});
});
Giải thích:
- Chúng ta sẽ mock cho 2 phần là danh sách role và thông tin role trong account user.
- Test case sẽ kiểm tra tham số truyền vào
getAllAndOverridevà kết quả trả về.
Interceptor
Để minh họa cho unit test với interceptor mình sẽ tạo một ResponseInterceptor có nhiệm vụ serialize response theo chuẩn thông dụng có dạng {code: number, message: string, data: any}.
import {
	Injectable,
	NestInterceptor,
	ExecutionContext,
	CallHandler,
} from '@nestjs/common';
import { Observable } from 'rxjs';
import { map } from 'rxjs/operators';

@Injectable()
export class ResponseInterceptor implements NestInterceptor {
	intercept(context: ExecutionContext, next: CallHandler): Observable<any> {
		return next.handle().pipe(
			map((data) => {
				return {
					code: 200,
					message: 'Success',
					data: data,
				};
			}),
		);
	}
}
Nội dung file test như sau:
import { CallHandler } from '@nestjs/common';
import { Observable, of } from 'rxjs';
import { ResponseInterceptor } from './response.interceptor';
import { execution_context } from 'src/shared/test/mocks/execution-context.mock';

const return_data = { foo: 'bar' };

describe('ResponseInterceptor', () => {
	let interceptor: ResponseInterceptor;
	let next: CallHandler;

	beforeEach(() => {
		interceptor = new ResponseInterceptor();
		// create the mock CallHandler for the interceptor
		next = {
			handle: jest.fn(() => of(return_data)),
		} as CallHandler;
	});

	describe('intercept', () => {
		// we use done here to be able to tell the observable subscribe function
		// when the observable should finish. If we do not pass done
		// Jest will complain about an asynchronous task not finishing within 5000 ms.
		it('should transform the response data', (done) => {
			// Arrange
			const expected_data = {
				code: 200,
				message: 'Success',
				data: return_data,
			};

			// Act & Assert
			// if your interceptor has logic that depends on the context
			// you can always pass in a mock value instead of an empty object
			// just make sure to mock the expected alls like switchToHttp
			// and getRequest
            const response_interceptor: Observable<any> = interceptor.intercept(
				execution_context,
				next,
			);
			response_interceptor.subscribe({
				next: (data) => {
					expect(data).toEqual(expected_data);
				},
				error: (error) => {
					console.log(error);
				},
				complete: () => {
					done();
				},
			});
		});
        it('should handle errors thrown by the handler', (done) => {
			// Arrange
			const error = new Error('Something went wrong');
			(next.handle as jest.Mock).mockImplementationOnce(() => {
				return throwError(() => error);
			});

			// Act
			const response_interceptor: Observable<any> = interceptor.intercept(
				execution_context,
				next,
			);

			// Assert
			response_interceptor.subscribe({
				next: () => {},
				error: (err) => {
					expect(err).toBe(error);
					done();
				},
				complete: () => {
					done();
				},
			});
		});
	});
});
Giải thích:
- Để viết được unit test cho interceptor khá là thách thức nếu chúng ta không hiểu rõ về cách RxJS hoạt động, chúng ta sẽ có bài viết về RxJS sau. Giả sử các bạn đã nắm được căn bản về RxJS, quá trình viết test như sau:
- Đầu tiên chúng ta sẽ mock method
handlecủa paramnext: CallHandler. Method đó trả về Observable nên chúng ta cần dùng methodofđể tạo ra nó và có thể pipable thông qua RxJS operator (gọi method pipe). Về bản chất thì khi gọihandlechính là gọi đến method handler ở controller, nên để mock kết quả trả về chúng ta sẽ truyềnreturn_datavào params củaof. - Khi tiến hành test chúng ta sẽ gọi method
intercept. Tuy nhiên khác với các method thông thường, observable object sẽ không được thực thi ngay. Để có thể thực thi chúng ta cần gọisubscribevà truyền vào params để xử lý kết quả hoặc lỗi.
- Đầu tiên chúng ta sẽ mock method
- Trong một số trường hợp interceptor không có dependency nên không cần dùng
createTestingModulemà tạo thẳng bằng keywordnewcũng được. - Lưu ý phải gọi
doneđể xác nhận với Jest là đã test xong test case, nếu không sẽ gặp lỗi timeout: "Exceeded timeout of 5000 ms for a test while waiting fordone()to be called".
Middleware
Một thành phần cũng không kém phần quan trọng mà chúng ta không thể bỏ qua đó là middleware. Để viết unit test cho nó chúng ta sẽ xoay quanh method use, lấy ví dụ về VersionMiddleware mà chúng ta đã từng làm trong bài viết về NestJS Request Lifecycle:
import {
	BadRequestException,
	Injectable,
	NestMiddleware,
} from '@nestjs/common';
import { Request, Response, NextFunction } from 'express';

@Injectable()
export class VersionMiddleware implements NestMiddleware {
	use(req: Request, res: Response, next: NextFunction) {
		const app_version = req.headers['x-app-version'];
		if (!app_version || app_version !== '2.0.0')
			throw new BadRequestException('Invalid App Version');
		next();
	}
}
Nội dung file test sẽ như sau:
import { NextFunction, Request, Response } from 'express';
import { VersionMiddleware } from './version.middleware';
import { BadRequestException } from '@nestjs/common';

describe('VersionMiddleware', () => {
	let middleware: VersionMiddleware;
	let next: NextFunction;
	let req: Request;
	let res: Response;

	beforeEach(() => {
		middleware = new VersionMiddleware();

		next = jest.fn();
		req = {} as Request;
		res = {} as Response;
	});

	describe('use', () => {
		it('should pass if X-App-Version header is set to 2.0.0', () => {
			// Arrange
			req.headers = {
				'x-app-version': '2.0.0',
			};

			// Act
			middleware.use(req, res, next);

			// Assert
			expect(next).toBeCalled();
		});

		it('should throw BadRequestException if X-App-Version header is not set', () => {
			// Arrange
			req.headers = {};

			/* Option 1:*/
			try {
				// Act
				middleware.use(req, res, next);
			} catch (error) {
				// Assert
				expect(error).toStrictEqual(
					new BadRequestException('Invalid App Version'),
				);
			}

			/* Option 2: */
			// Act & Assert
			// We must wrap `middleware.use` inside anonymous function because when a function is invoked directly like middleware.use(req, res, next),
			// its exceptions are propagated up the stack trace instead of being caught by Jest's expect statement.
			// expect(() => middleware.use(req, res, next)).toThrow(BadRequestException);
		});

		it('should throw BadRequestException if X-App-Version header is not valid', () => {
			// Arrange
			req.headers = {
				'x-app-version': '1.0.0',
			};

			/* Option 1:*/
			// try {
			// 	// Act
			// 	middleware.use(req, res, next);
			// } catch (error) {
			// 	// Assert
			// 	expect(error).toStrictEqual(
			// 		new BadRequestException('Invalid App Version'),
			// 	);
			// }

			/* Option 2: */
			// Act & Assert
			expect(() => middleware.use(req, res, next)).toThrowError(
				new BadRequestException('Invalid App Version'),
			);
		});
	});
});
Giải thích:
- Việc đầu tiên là tạo mock cho các tham số của method
use. Tuy nhiên chúng ta chỉ dùng jest mock chonextchứ không cần choreqvàresvì chúng có rất nhiều field chúng ta không thể viết hết được như ởexecution_context. - Các test case sẽ tương tự như với interceptor, nội dung sẽ tùy thuộc vào logic middleware, các bạn chỉ cần lưu ý ở trường hợp lỗi. Nếu chúng ta chỉ gọi
middleware.usetrongexpectthì sẽ không thể catch được lỗi. Thay vào đó chúng ta có 2 cách:- Wrap
middleware.usebên trong anonymous function sau đó dùngtoThrowhoặctoThrowErrorđể kiểm tra lỗi trả về. - Dùng
try catchđể catch lỗi sau đó dùngexpectđể kiểm tra.
- Wrap
Pipe
Viết unit test cho pipe cũng khá đơn giản, tương tự với middleware, chúng ta cũng sẽ dùng một ví dụ khác ở bài trước:
import { BadRequestException, Injectable, PipeTransform } from '@nestjs/common';
import { isObjectIdOrHexString, ObjectId } from 'mongoose';

@Injectable()
export class ParseMongoIdPipe implements PipeTransform<any, ObjectId[]> {
	transform(value: any): ObjectId[] {
		if (!value) {
			throw new BadRequestException('Invalid ID');
		}

		if (isObjectIdOrHexString(value)) {
			return value;
		}
		throw new BadRequestException('Invalid ID');
	}
}
Nội dung file test như bên dưới, phần này thì chúng ta chỉ cần đảm bảo khi truyền các id không hợp lệ thì sẽ gặp lỗi BadRequestException
import { BadRequestException, ConflictException } from '@nestjs/common';
import { ParseMongoIdPipe } from './parse-mongo-id.pipe';
import * as mongoose from 'mongoose';

describe('ParseMongoIdPipe', () => {
	let pipe: ParseMongoIdPipe;
	beforeEach(() => {
		pipe = new ParseMongoIdPipe();
	});

	describe('transform', () => {
		it('should return the same value if it is a valid ObjectId', () => {
			// Arrange
			const valid_mongo_id = new mongoose.Types.ObjectId();

			// Act
			const result = pipe.transform(valid_mongo_id);

			// Assert
			expect(result).toBe(valid_mongo_id);
		});

		it('should throw a BadRequestException with "Invalid ID" error message if no value is provided', () => {
			// Arrange & Act & Assert
			expect(() => pipe.transform(undefined)).toThrowError(BadRequestException);
			expect(() => pipe.transform(undefined)).toThrowError('Invalid ID');
		});

		it('should throw a BadRequestException with "Invalid ID" error message if non-ObjectId values are provided', () => {
			// Arrange & Act & Assert
			expect(() => pipe.transform('invalid-id')).toThrowError(BadRequestException);
			expect(() => pipe.transform('invalid-id')).toThrowError('Invalid ID');
            expect(() => pipe.transform(123)).toThrowError(BadRequestException);
			expect(() => pipe.transform(123)).toThrowError('Invalid ID');
			expect(() => pipe.transform({})).toThrowError(BadRequestException);
			expect(() => pipe.transform({})).toThrowError('Invalid ID');
		});
	});
});
Model
Viết unit test cho model thì không bắt buộc, tùy thuộc vào dự án của chúng ta có bất kỳ logic nghiệp vụ hoặc quy tắc xác thực phức tạp nào nhất thiết phải được test. Mình sẽ cùng các bạn viết luôn cho đủ bộ, để sau này cần thiết các bạn có thể tham khảo lại.
Để có thể test cho model chúng ta cần một testing database để tạo kết nối, có nhiều cách thực hiện việc này. Ở bài viết này mình sẽ dùng package mongodb-memory-server thay vì phải set up một database thật, nó là một in-memory version của mongo database. Bên cạnh đó package này kết nối và main memory của thiết bị và không lưu và ổ cứng nên tốc độ sẽ nhanh hơn và tốt hơn cho việc test. Tham khảo thêm về package này ở đây.
npm i mongodb-memory-server -D
Sau khi đã cài đặt xong chúng ta tiến hành set up testing database. Tạo thư mục và file /db/setup.ts bên trong folder src/shared/test.
import { MongooseModule, MongooseModuleOptions } from '@nestjs/mongoose';
import { MongoMemoryServer } from 'mongodb-memory-server';
import mongoose from 'mongoose';

let mongod: MongoMemoryServer;

export const rootMongooseTestModule = (options: MongooseModuleOptions = {}) =>
	MongooseModule.forRootAsync({
		useFactory: async () => {
			mongod = await MongoMemoryServer.create();
			const mongoUri = mongod.getUri();
			return {
				uri: mongoUri,
				...options,
			};
		},
	});

export const closeInMongodConnection = async () => {
	await mongoose.disconnect();
	if (mongod) await mongod.stop();
};
Giải thích:
- Theo như tài liệu của mongodb-memory-server thì chúng ta sẽ tạo database server để lấy uri và truyền nó vào config của
MongooseModule. - Mình sẽ tạo
rootMongooseTestModulebằng HoF để tái sử dụng với file test của các model khác. - Mỗi khi test xong chúng ta cần ngắt kết nối đến testing database. Method
closeInMongodConnectiongiúp chúng ta thực hiện ngắt kết nối với mongoose và stop database server.
Trước khi viết test case mình sẽ chỉnh sửa lại class User để thêm vào constructor để khi viết test thì nội dung sẽ trở nên readable hơn.
...
export class User extends BaseEntity {
	constructor({
		first_name,
		last_name,
		email,
		username,
		password,
		role,
		gender,
		phone_number,
	}: {
		first_name?: string;
		last_name?: string;
		email?: string;
		username?: string;
		password?: string;
		role?: mongoose.Types.ObjectId;
		gender?: GENDER;
		phone_number?: string;
	}) {
		super();
		this.first_name = first_name;
		this.last_name = last_name;
		this.email = email;
		this.username = username;
		this.password = password;
		this.role = role;
		this.gender = gender;
		this.phone_number = phone_number;
	}
...
Sau khi đã chuẩn bị xong thì việc cuối cùng là viết test cho UserModel:
import { User, UserDocument, UserSchema } from '../entities/user.entity';
import { createUserStub } from './stubs/user.stub';
import { Test } from '@nestjs/testing';
import { MongooseModule, getModelToken } from '@nestjs/mongoose';
import * as mongoose from 'mongoose';
import { Model } from 'mongoose';
import {
	closeInMongodConnection,
	rootMongooseTestModule,
} from 'src/shared/test/db/setup';

describe('UserModel', () => {
	let model: Model<UserDocument>;

	beforeEach(async () => {
		const module_ref = await Test.createTestingModule({
			imports: [
				rootMongooseTestModule(),
				MongooseModule.forFeature([{ name: User.name, schema: UserSchema }]),
			],
			providers: [],
		}).compile();
		model = module_ref.get<Model<UserDocument>>(getModelToken(User.name));
	});

	afterEach(async () => {
		await model.deleteMany({});
	});

	afterAll(async () => {
		await closeInMongodConnection();
	});

	describe('create', () => {
		it('should create & save user successfully', async () => {
			// Arrange
			const user_stub = createUserStub();
			const valid_user = new User({
				...user_stub,
				role: new mongoose.Types.ObjectId(),
			});
			const created_user = await model.create(valid_user);
			const saved_user = await created_user.save();
			expect(saved_user._id).toBeDefined();
			expect(saved_user.first_name).toBe(valid_user.first_name);
			expect(saved_user.last_name).toBe(valid_user.last_name);
			expect(saved_user.email).toBe(valid_user.email);
		});
		it('should insert user successfully, but the field not defined in schema should be undefined', async () => {
			// Arrange
			const user_stub = createUserStub();
			const valid_user = new User({
				...user_stub,
				role: new mongoose.Types.ObjectId(),
			});

			// Act
			// @ts-ignore
			valid_user.unknown_field = 'Some field';
			const created_user = await model.create(valid_user);
			const saved_user = await created_user.save();

			// Assert
			expect(saved_user._id).toBeDefined();
			// @ts-ignore
			expect(saved_user.unknown_field).toBeUndefined();
		});
		it('should throw error if create user without required fields', async () => {
			// Arrange
			const { gender } = createUserStub();
			const invalid_user = new User({ gender });

			// Act & Assert
			try {
				await model.create(invalid_user);
			} catch (error) {
				console.log(error);
				expect(error).toBeInstanceOf(mongoose.Error.ValidationError);
				expect(error.errors.first_name).toBeDefined();
				expect(error.errors.last_name).toBeDefined();
				expect(error.errors.email).toBeDefined();
				expect(error.errors.username).toBeDefined();
				expect(error.errors.password).toBeDefined();
				expect(error.errors.role).toBeDefined();
			}
		});
		it('should throw error if create user does not pass match option', async () => {
			// Arrange
			const user_stub = createUserStub();
			const invalid_user = new User({
				...user_stub,
				role: new mongoose.Types.ObjectId(),
				email: 'invalid_email',
				phone_number: '123456789a',
			});

			// Act & Assert
			try {
				await model.create(invalid_user);
			} catch (error) {
				expect(error).toBeInstanceOf(mongoose.Error.ValidationError);
				expect(error.errors.email).toBeDefined();
				expect(error.errors.phone_number).toBeDefined();
			}
		});
		it('should throw error if create user does not pass min length option', async () => {
			// Arrange
			const user_stub = createUserStub();
			const invalid_user = new User({
				...user_stub,
				role: new mongoose.Types.ObjectId(),
				first_name: 'a',
				last_name: 'b',
			});

			// Act & Assert
			try {
				await model.create(invalid_user);
			} catch (error) {
				expect(error).toBeInstanceOf(mongoose.Error.ValidationError);
				expect(error.errors.first_name).toBeDefined();
				expect(error.errors.last_name).toBeDefined();
			}
		});
	});
});
Giải thích:
- Việc trước tiên chúng ta cần làm là khởi tạo và kết nối đến testing database bằng
beforeAll. - Vì các test case dùng chung database server nên mình sẽ hạn chế chúng ảnh hưởng lẫn nhau bằng cách clear data trong collection sau mỗi test case.
afterAlllà method phù hợp nhất cho trường hợp này. - Như đã nói ở trên chúng ta sẽ ngắt kết nối và stop database server với
afterAllvàcloseInMongodConnection. - Các test case của chúng ta sẽ xoay quanh các vấn đề sau:
- Dữ liệu hợp lệ thì phải được lưu vào database thành công.
- Tiến hành test các option được định nghĩa trong decorator
@Prop. - Test các hook được gắn vào schema.
Đến đây thì chúng ta đã hoàn thành xong việc viết test cho hầu hết các thành phần của NestJS, về phần Exception filters thì các bạn có thể dựa theo các thành phần trên để viết. Phần tiếp theo chúng ta sẽ đến một trick khi viết unit test để code chúng ta trở nên ngắn gọn và clean hơn.
2.4 Viết test nhanh và tiện hơn với @golevelup/ts-jest
Tại sao nên dùng
Ở phần guard và interceptor chúng ta đã tạo mock cho execution_context, ban đầu khá là đơn giản vì chỉ cần khai báo các property. Tuy nhiên có 2 vấn đề:
- Nếu object có quá nhiều property như
Request,Responsethì chúng ta không thể nào mock hết cho chúng. Buộc phải dùng trick nhưas Request, as Responseở middleware. - Các object có sub object bên trong thì chúng ta phải mock toàn bộ cho chúng nếu muốn sử dụng. Ví dụ
switchToHttp: jest.fn().mockReturnValue({ getRequest: jest.fn() }).
Package @golevelup/ts-jest sẽ giúp chúng ta giải quyết 2 vấn đề trên, nó sẽ tự động tạo mock cho tất cả các property của object bao gồm cả sub object bên trong chỉ bằng một dòng code.
Cài đặt
npm i @golevelup/ts-jest
Sử dụng
Sau khi cài đặt xong chúng ta có thể thay đổi execution_context ban đầu đã viết thành như bên dưới.
import { createMock } from '@golevelup/ts-jest';
import { ExecutionContext } from '@nestjs/common';

export const execution_context: ExecutionContext =
	createMock<ExecutionContext>();
Rất đơn giản và ngắn gọn hơn nhiều phải không nào. Mình sẽ lấy thêm ví dụ nữa về AuthService, chúng ta đã phải tạo mock cho ConfigService và JwtService, nếu như dùng @golevelup/ts-jest thì chỉ cần như bên dưới:
...
    let jwt_service: JwtService;
    let config_service: DeepMocked<ConfigService>;
    beforeEach(async () => {
		const module_ref = await Test.createTestingModule({
			providers: [
				AuthService,
				{
					provide: JwtService,
					useValue: createMock<JwtService>(),
				},
				{
					provide: ConfigService,
					useValue: createMock<ConfigService>(),
				},
				UsersService,
			],
		}).compile();
        jwt_service = module_ref.get(JwtService);
		config_service = module_ref.get(ConfigService);
		...
	});
Giải thích:
- Sự dụng
DeepMockedđể IDE dùng auto-completion và không báo lỗi khi chúng ta mock dữ liệu trả về. mockConfigServicevàmockJwtServicesẽ được thay thế bằngcreateMock
Tuy nhiên khi chuyển từ mock qua @golevelup/ts-jest thì một vài test case sẽ báo lỗi, ví dụ như ở đây mình gặp lỗi với test case generateAccessToken
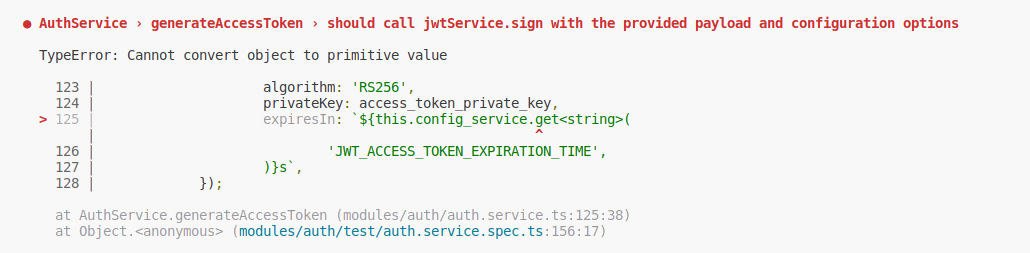
Để giải quyết chúng ta chỉ cần mock dữ liệu trả về từ method này:
    describe('generateAccessToken', () => {
		it('should call jwtService.sign with the provided payload and configuration options', () => {
			// Arrange
			const user_stub = createUserStub();
			config_service.get.mockReturnValueOnce('3600'); <=== Thêm vào đây
			// Act
			auth_service.generateAccessToken({
				user_id: user_stub._id as string,
			});
            // Assert
            ...
2.5 Auto mocking
Nếu như dự án phát triển đầy đủ thì module sẽ có thêm nhiều dependency dẫn tới việc set up mock cho toàn bộ dependency khá là mất thời gian, mặc dù đã có createMock. Rất may là NestJS V8 cung cấp cho chúng ta một tính năng gọi là Auto mocking giúp hạn chế vấn đề này, đặc biệt khi kết hợp với package @golevelup/ts-jest.
Lấy vì dụ ở AuthService, chúng ta có thể rút gọn thêm với Auto mocking như sau:
...
    beforeEach(async () => {
		const module_ref = await Test.createTestingModule({
			providers: [
				AuthService,
				UsersService,
			],
		})
			.useMocker(createMock) // <--- Thêm vào đây
			.compile();
		...
	});
Với cách kết hợp trên, chúng ta sẽ tiết kiệm được rất nhiều thời gian cho việc set up các dependency và dành thời gian đó để tập trung vào tối ưu các test case. Chúng ta đã đi qua toàn bộ phần thực hành về viết unit test, tuy nhiên để có thể viết được hiệu quả thì chúng ta cần tìm hiểu và thực hành thêm nhiều lần. Phần cuối cùng của bài viết chia sẻ về một vài tips để tối ưu unit test của chúng ta.
Làm thế nào để viết unit test hiệu quả?
Dưới đây là một vài thông tin mà theo mình có thể giúp ích cho các bạn trong quá trình viết unit test:
- Đặt tên test case rõ ràng, mô tả chính xác những gì đang được test.
- Sử dụng các kỹ thuật test double như mock object, spy object, stub object, fake object,... để giả lập các thành phần ngoài và tạo môi trường kiểm thử đáp ứng các yêu cầu của test case.
- Cố gắng viết các test case độc lập với nhau, tức là kết quả của một test case không ảnh hưởng đến kết quả của các test case khác.
- Tập trung vào một chức năng hoặc tính năng duy nhất khi viết các test case. Không nên viết các test case quá lớn hoặc kiểm tra quá nhiều tính năng cùng một lúc. Chia nhỏ các chức năng thành các test case riêng biệt sẽ giúp tìm ra lỗi và sửa chữa chúng dễ dàng hơn.
- Kiểm tra kỹ lưỡng tất cả các edge và special case khi viết các test case. Hãy chắc chắn rằng tất cả các trường hợp đã được xử lý đúng cách và không có lỗi không mong muốn xảy ra.
- Sử dụng Test-driven development (TDD) khi có thể. TDD sẽ giúp đảm bảo rằng code được viết đáp ứng đầy đủ các yêu cầu từ các test case đã được định nghĩa trước.
- Sử dụng các công cụ hỗ trợ viết test như Jest hay Mocha cho JavaScript/TypeScript. Các công cụ này cung cấp nhiều tính năng hỗ trợ việc viết test case hiệu quả như chạy tự động, tự động xác nhận kết quả và báo cáo lỗi.
- Tự động hóa quá trình viết test case bằng các công cụ như Codecov hay Coveralls. Các công cụ này giúp kiểm tra độ phủ test case của mã nguồn, giúp nhà phát triển xác định được phần nào của mã chưa được kiểm tra và cải thiện chất lượng test case.
Kết luận
Trong bài viết này, chúng ta đã đi qua quá trình tạo các unit test cho các thành phần trong dự án NestJS. Đã được thảo luận về cách triển khai unit test cho các controller, service, middleware, interceptor,... trong NestJS, ddể đảm bảo tính ổn định và chất lượng của source code. Giúp chúng ta phát hiện sớm các lỗi logic và sửa chúng trước khi triển khai dự án vào môi trường production.
Thực hiện unit test cũng giúp chúng ta tăng cường khả năng mở rộng và bảo trì dự án. Khi chúng ta thay đổi hoặc cải thiện mã nguồn, chúng ta có thể chạy các unit test để đảm bảo rằng các thay đổi không gây ra lỗi và không ảnh hưởng đến các thành phần khác trong hệ thống.
Cảm ơn các bạn đã dành thời gian đọc bài viết, chúc các bạn buổi tối vui vẻ ^_^
Tài liệu tham khảo
- mguay22 (no date) MGUAY22/nestjs-mongo at unit-testing, GitHub. Available at: https://github.com/mguay22/nestjs-mongo/tree/unit-testing (Accessed: 30 May 2023).
- Dale Waterworth · et al. (2021) TDD typescript nestjs API layers with jest part 3: Repository unit test - dzone, dzone.com. Available at: https://dzone.com/articles/tdd-typescript-nestjs-api-layers-with-jest-part3-repository (Accessed: 30 May 2023).
- Martins, T. (2022) Advanced testing strategies with mocks, Trilon. Available at: https://trilon.io/blog/advanced-testing-strategies-with-mocks-in-nestjs (Accessed: 30 May 2023).
- Tom Ray (2022) Ultimate Guide: Nestjs unit testing and mocking [updated 2022], Tom Ray - Learn NestJS Best Practices. Available at: https://www.tomray.dev/nestjs-unit-testing (Accessed: 30 May 2023).
- jmcdo29 (no date) Testing-nestjs/apps/complex-sample at 6C77B2A5001A48673C77C9659D985A083354579F · JMCDO29/testing-nestjs, GitHub. Available at: https://github.com/jmcdo29/testing-nestjs/tree/6c77b2a5001a48673c77c9659d985a083354579f/apps/complex-sample (Accessed: 30 May 2023).
- Goldbergyoni (no date) Goldbergyoni/javascript-testing-best-practices: comprehensive and exhaustive JavaScript & Node.js testing best practices (December 2022), GitHub. Available at: https://github.com/goldbergyoni/javascript-testing-best-practices#-️-12-structure-tests-by-the-aaa-pattern (Accessed: 30 May 2023).
- NestJs request and Response Interceptor Unit Testing, Stack Overflow. Available at: https://stackoverflow.com/questions/59624156/nestjs-request-and-response-interceptor-unit-testing (Accessed: 30 May 2023).
All rights reserved
