Series Hướng dẫn xây dựng ứng dụng bán hàng bằng angular js kết hợp với Rails(Phần 1)
Bài đăng này đã không được cập nhật trong 4 năm
Mở đầu
Chắc hẳn đổi với các front-end developer đều rất quen thuộc với Angular framework do Google đỡ đầu, một trong những framework javascript rất đầy đủ về cả chức năng lẫn tài liệu, và Angular cũng là một trong những yêu cầu hàng đầu đối với rất nhiều nhà tuyển dụng hiện nay.
Với sự nổi lên của React do Facebook phát hành, Angular cũng chuyển mình thay đổi với một phiên bản mới hoàn toàn kèm với nhiều sự thay đổi cũng như những tích hợp mới để trở nên mạnh mẽ hơn nữa với lời hứa của Google:
- Hiệu năng cao hơn.
- Dễ sử dụng hơn.
- Tương thích với ES6.
- Dùng theo tiêu chuẩn web (web standards).
Thế thì tại sao mình k sớm vui đùa cùng angular js nhờ
 Ở bài viết ngày hôm nay mình từng bước hướng dẫn xây dựng một website bán hàng với angular js kết hợp với ruby on rails nhé
Setup
Đầu tiên bạn phải có một app mới với rails, một bộ template và bộ thư viện của angular js
Để đỡ mất thời gian thì teamplate bạn có thể lấy nó tại đây, nó do mình tìm trên mạng và hoàn toàn free nhé. cứ yên tâm mà sử dụng (yaoming)
Setup angular js: bạn có thể xem hướng dẫn tại đây
Ngoài ra bạn cần require thư viện bootstrap cùng các thư viện bộ template vào.
Tiếp đến chúng ta cần phân ra rõ, những session nào là header, cũng như content và footer để cho dễ quản lý. Cái này chắc các bạn tự phân được nhé  À mình cần phải có một cái Uploader để hiển thị ảnh cho sản phẩm, và nhớ cài ảnh mặc định cho nó nhé
Chuẩn bị DB cho app
Sau khi đã setup thành công các bước trên nhiệm vụ tiếp theo bạn cần có một mô hình thực thể quan hệ và thực tế hoá nó bằng các Models nhé ở đây mình đã chuẩn bị sẵn:
rails g model category name:string parent_id:integer
rails g model item name:string parent_id:integer price:integer category_id:integer avg_rate:float desscription:string total:integer image:string status:integer
Có lẽ chưa cần quản lý vội, mà ta hãy đi xây dựng view cho người dùng trước cho đỡ nhàm chán nhé. Đây là seed dữ liệu chúng ta cần có:
puts "Create Categories"
categories_name= ["SPORTSWEAR", "MENS", "WOMENS", "KIDS", "FASHION", "HOUSEHOLDS", "INTERIORS", "CLOTHING", "BAGS", "SHOES"]
categories_name.each do |category_name|
  Category.create! name: category_name
end
puts "Create Child Categories"
Category.take(4).each do |parent|
  5.times do |i|
    Category.create! name: Faker::Name.name, parent_id: parent.id
  end
end

puts "Create Categories"
User.create! email: "user@user.com", password: "user@user.com", full_name: "User Fashion", add: "Da Nang", phone_number: "0966077747"

puts "Create Items"
Category.all.each do |category|
  10.times do |i|
    Item.create! name: Faker::Name.name,
    category_id: category.id,
    price: Faker::Number.number(4),
    avg_rate: [0, 1, 2, 3, 4, 5].sample.to_f,
    desscription: Faker::Lorem.sentence(3),
    total: Faker::Number.number(3),
    status: [0, 1, 2].sample
  end
end
Config routes và trang Dashboard
Ý tưởng của mình là hiện những sản phẩm có top rates, những categories cũng như những nhãn hiệu của sản phẩm trên trang này Điều cần có đó là 1 controller Dashboard nhằm thực hiện những nhiệm vụ trên
rails g controller Dashboard index
sau khi đã có controller chúng ta tiến hành config routes root trỏ về index của controller này:
root to: "dashboard#index"
Tiến hánh lấy dữ liệu ra:
class DashboardController < ApplicationController
  def index
    @top_rate_items = Item.top_rate.limit(3)
    @categories = Category.with_child_limit(10)
  end
end
đây là 2 scope nhằm lấy ra giới hạn categories và con của nó(ở đây mình chỉ làm 2 cấp, bạn nào thích thì có thể làm nhiều hơn và tham khảo đệ quy nếu có nhiều cấp nhé) và scope sắp xếp theo rates
class Category < ApplicationRecord
  has_many :items, class_name: Item.name, foreign_key: :category_id, dependent: :destroy
  has_many :child, class_name: self.name, foreign_key: :parent_id

  scope :with_child_limit,-> limt_number do
    limit(limt_number).map do |category|
      child = category.child
      category = category.attributes
      category[:child] = child
      category
    end
  end
end
class Item < ApplicationRecord
  belongs_to :category

  scope :top_rate, ->{order avg_rate: :desc}
  mount_uploader :image, ImageUploader
end
Hiển thị dữ liệu với angular
Sau khi đã có data từ server trả về và như đã config ở bước đầu cái app mình sẽ mang tên "userApp" Chúng ta sẽ đi định nghĩa 1 controller của js Cú pháp dạng sau:
'use strict';

angular.module('userApp')
  .controller('headerController', headerController);

function headerController() {
  var vm = this;
  vm.topRateItems = [];
  vm.initTopRateItems = function(topRateItems){
    vm.topRateItems = topRateItems;
  }

  vm.activeFirstItem = function(index){
    return (index == 0);
  }
}
vm.topRateItems là 3 item mình đã lấy ra ở index dashboard controller rails vm.activeFirstItem là hàm mình sẽ làm cho item đầu tiên trong đống đó khác biệt một chút bằng cú pháp ng-class Ở phần view chúng ta cần hiện khai báo controller và hàm initTopRateItems chính là hàm ném dữ liệu từ server trả về cho angular xử lý, hàm này sẽ chạy tại thời điểm load trang hay nói cách khác là nơi khởi tạo dữ liệu
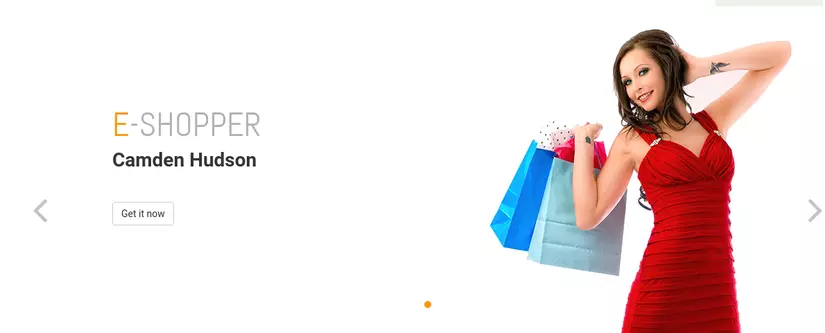
<div class="carousel-inner" ng-controller="headerController as vm"
              ng-init="vm.initTopRateItems(<%= @top_rate_items.to_json %>)">
              <div ng-repeat="item in vm.topRateItems track by $index"
                class="item" ng-class="{active: vm.activeFirstItem($index)}">
                <div class="col-sm-6">
                  <h1><span>E</span>-SHOPPER</h1>
                  <h2>{{item.name}}</h2>
                  <p>{{item.description}}</p>
                  <button type="button" class="btn btn-default get">Get it now</button>
                </div>
                <div class="col-sm-6">
                  <%= image_tag Item.first.image, class: "girl img-responsive" %>
                </div>
              </div>
            </div>
Khá đơn giản phải không nào, cú pháp ng-repeat giúp ta lặp đối tượng một cách đơn giản để có được 1 slider 3 đối tượng rates cao nhất.
 Tương tự như vậy chúng ta sẽ hiển thị Categories của nó nào:
<section ng-controller="innerPagesController as vm" ng-init="vm.initData(<%= @categories.to_json %>)">
    <div class="container">
      <div class="row">
        <div class="col-sm-3">
          <div class="left-sidebar">
            <h2>Category</h2>
            <div class="panel-group category-products" id="accordian"><!--category-productsr-->
              <div class="panel panel-default" ng-repeat="category in vm.categories">
                <div class="panel-heading">
                  <h4 class="panel-title">
                    <a data-toggle="collapse" data-parent="#accordian" href="#sportswear">
                      <span class="badge pull-right" ng-show="vm.hasChild(category)"><i class="fa fa-plus"></i></span>
                      {{category.name}}
                    </a>
                  </h4>
                </div>
                <div id="sportswear" class="panel-collapse collapse" ng-show="vm.hasChild(category)">
                  <div class="panel-body">
                    <ul>
                      <li ng-repeat="child in category.child">
                        <a href="#">{{child.name}}</a>
                      </li>
                    </ul>
                  </div>
                </div>
              </div>
            </div>
        </div>
      </div>
    </div>
  </div>
</section>
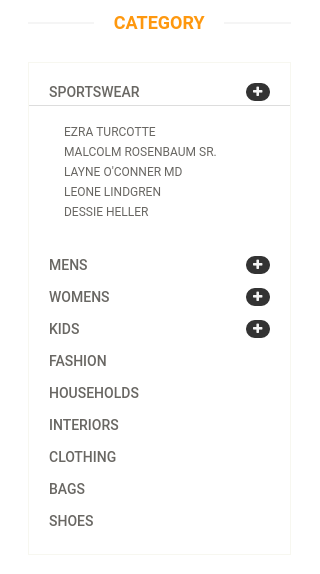 Giờ thì chúng ta đã hiển thị được cả item và categories của nó rồi đấy!
Tôi rất muốn hướng dẫn thêm nhưng xem lại thì bài đã quá dài rồi, nếu hứng thú bạn có thể vote và chờ đợi bài tiếp theo ở Series này, Cám ơn đã theo dõi và quan tâm.
Giờ thì chúng ta đã hiển thị được cả item và categories của nó rồi đấy!
Tôi rất muốn hướng dẫn thêm nhưng xem lại thì bài đã quá dài rồi, nếu hứng thú bạn có thể vote và chờ đợi bài tiếp theo ở Series này, Cám ơn đã theo dõi và quan tâm.
All rights reserved
