Routing with React Navigation in React Native
Bài đăng này đã không được cập nhật trong 6 năm
Trong bài viết này, chúng ta sẽ tìm hiểu cách điều hướng màn hình ứng dụng di động bằng cách sử dụng react-navigation trong React Native.
Why React Navigation?
React Navigation là một thư viện phổ biến để định tuyến và điều hướng trong ứng dụng React Native.
React Navigation là một thư viện dựa trên JavaScript để điều hướng màn hình. Nó chính thức được giới thiệu bởi cả Facebook và React Native Document như là giải pháp tối ưu để điều hướng màn hình.
Getting Set Up
Chúng ta sẽ đi tạo một ứng dụng tên là MyAlligatorFace.
Đầu tiên, tạo một ứng dụng React Native mới:
$ create-react-native-app MyAlligatorFace

$ cd MyAlligatorFace
$ npm start
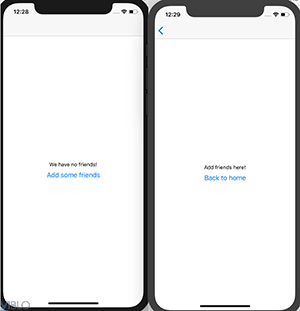
Ý tưởng là khi mở ứng dụng lên, thì tên những người bạn của ta sẽ hiển thị trên màn hình:
import React from 'react';
import { StyleSheet, Text, View } from 'react-native';

export default class App extends React.Component {
  render() {
    return (
      <View style={styles.container}>
        We have no friends!
      </View>
    );
  }
}

const styles = StyleSheet.create({
  container: {
    flex: 1,
    backgroundColor: '#fff',
    alignItems: 'center',
    justifyContent: 'center',
  },
});

Home Screen
Ứng dụng của chúng ta sẽ cần hai màn hình: HomeScreen và FriendScreen. Trong HomeScreen, chúng ta sẽ thấy những người bạn của mình và trong màn hình FriendScreen chúng ta sẽ có thể thêm những người bạn mới.
Để bắt đầu, hãy lấy code từ App.js và thêm nó vào một file mới có tên Home.js:
import React from 'react';
import { StyleSheet, Text, View } from 'react-native';

export default class Home extends React.Component {
  render() {
    return (
      <View style={styles.container}>
        We have no friends!
      </View>
    );
  }
}

const styles = StyleSheet.create({
  container: {
    flex: 1,
    backgroundColor: '#fff',
    alignItems: 'center',
    justifyContent: 'center',
  },
});
Để điều hướng đến HomeScreen, chúng ta sẽ tạo một StackNavigator.
StackNavigator with React Navigation
StackNavigator hoạt động chính xác như một ngăn xếp. Mỗi màn hình chúng ta điều hướng đến được đẩy lên trên cùng của ngăn xếp và mỗi lần nhấn nút quay lại, màn hình này sẽ bị đẩy ra khỏi đỉnh của ngăn xếp.
Đầu tiên, cài đặt react-navigation:
$ npm install --save react-navigation
Tiếp theo, tạo một file có tên AppNavigator.js:
import { createStackNavigator } from 'react-navigation';
import Home from './Home';

const AppNavigator = createStackNavigator({
  Home: { screen: Home },
});

export default AppNavigator;
Điều này tạo ra một ngăn xếp nhỏ trong Navigator, chỉ có một màn hình: HomeScreen.
Nội dung hiển thị của ứng dụng bắt đầu từ App.js. Nếu chúng ta đưa StackNavigator của mình vào App.js, ứng dụng của chúng ta sẽ được mô đun hóa và clean hơn nhiều.
Sửa file App.js thnahf như sau:
import React from 'react';
import AppNavigator from './AppNavigator';

export default class App extends React.Component {
  render() {
    return (
      <AppNavigator/>
    );
  }
}
Sau khi lưu thay đổi và chạy ứng dụng, mọi thứ vẫn chạy và không có có gì thay đổi. Nhưng thật chúng ta vẫn chưa có bạn bè. Hãy cùng làm FriendScreen để thay đổi điều đó!
Friends Page
Đầu tiên tạo một file tương tự như Home.js được gọi là Friends.js:
import React from 'react';
import { StyleSheet, Text, View } from 'react-native';

export default class Friends extends React.Component {
  render() {
    return (
      <View style={styles.container}>
        Add friends here!
      </View>
    );
  }
}

const styles = StyleSheet.create({
  container: {
    flex: 1,
    backgroundColor: '#fff',
    alignItems: 'center',
    justifyContent: 'center',
  },
});
Tiếp theo, thêm nó vào Navigator:
import { createStackNavigator } from 'react-navigation';
  import Home from './Home';
  import Friends from './Friends';

  const AppNavigator = createStackNavigator({
    Home: { screen: Home },
    Friends: { screen: Friends},
  });

  export default AppNavigator;
Cuối cùng, thêm các nút điều hướng giữa hai màn hình.
Trong Home.js, sửa code giống sau đây:
import React from 'react';
import { StyleSheet, Text, View, Button } from 'react-native';

export default class Home extends React.Component {
  render() {
    return (
      <View style={styles.container}>
        We have no friends!
        <Button
          title="Add some friends"
          onPress={() =>
            this.props.navigation.navigate('Friends')
          }
        />
      </View>
    );
  }

  const styles = StyleSheet.create({
    container: {
      flex: 1,
      backgroundColor: '#fff',
      alignItems: 'center',
      justifyContent: 'center',
    },
  });
Trong Friends.js:
import React from 'react';
import { StyleSheet, Text, View, Button } from 'react-native';

export default class Friends extends React.Component {
  render() {
    return (
      <View style={styles.container}>
        Add friends here!
        <Button
          title="Back to home"
          onPress={() =>
            this.props.navigation.navigate('Home')
          }
        />
      </View>
    );
  }
}

const styles = StyleSheet.create({
  container: {
    flex: 1,
    backgroundColor: '#fff',
    alignItems: 'center',
    justifyContent: 'center',
  },
});
Hãy cùng nói về this.props.navigation:
Với react-navigation: miễn là màn hình của chúng ta được đưa vào StackNavigator, nó sẽ tự động kế thừa nhiều props từ navigation object. Chúng ta chỉ sử dụng một trong số chúng: navigate, để chuyển đến một trang khác, nhưng chúng ta có thể làm nhiều hơn thế. Ví dụ: chúng ta có thể xem lịch sử điều hướng và lấy ra các tham số từ các trang khác.
Chạy ứng dụng lên và chúng ta có thể back qua lại giữa 2 màn hình :
Adding Friends
Trong App.js, thêm một mảng possibleFriends và một mảng currentFriends vào state:
Và thêm một function để di chuyển một người bạn trong possibleFriends vào currentFriends:
import React from 'react';
  import AppNavigator from './AppNavigator';

  export default class App extends React.Component {
    constructor(props) {
      super(props)
      this.state = {
        possibleFriends: [
          'Allie',
          'Gator',
          'Lizzie',
        ],
        currentFriends: [],
      }
    }

    addFriend = (index) => {
      const {
        currentFriends,
        possibleFriends,
      } = this.state

      // Pull friend out of possibleFriends
      const addedFriend = possibleFriends.splice(index, 1)

      // And put friend in currentFriends
      currentFriends.push(addedFriend)

      // Finally, update our app state
      this.setState({
        currentFriends,
        possibleFriends,
      })
    }

    render() {
      return (
        <AppNavigator/>
      );
    }
  }
Passing Logic to Other Screens
Bây giờ có thể thêm bạn bè trong App.js, nhưng chúng ta cần thêm ở Friends.js và để họ hiển thị trong Home.js bẳng cách sử dụng props.
Thêm vào file file App.js như sau:
    render() {
      return (
        <AppNavigator
          screenProps={ {
            currentFriends: this.state.currentFriends,
            possibleFriends: this.state.possibleFriends,
            addFriend: this.addFriend,
          } }
        />
      );
    }
  }
Sau đó chúng ta có thể truy cập chúng trong các màn hình trong Navigator. Chẳng hạn, hiển thị danh sách bạn bè hiện tại trong HomeScreen, Sửa file Home.js như sau:
import React from 'react';
import { StyleSheet, Text, View, Button } from 'react-native';
export default class Home extends React.Component {
render() {
return (
<View style={styles.container}>
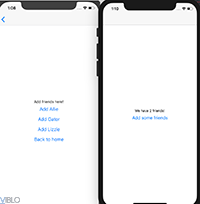
We have { this.props.screenProps.currentFriends.length } friends!
<Button
title="Add some friends"
onPress={() =>
this.props.navigation.navigate('Friends')
}
/>
</View>
);
}
const styles = StyleSheet.create({
container: {
flex: 1,
backgroundColor: '#fff',
alignItems: 'center',
justifyContent: 'center',
},
});
 Bây giờ chúng ta cần thêm bạn bè của mình vào Friends.js để hoàn thiện ứng dụng
import React from 'react';
import { StyleSheet, Text, View, Button } from 'react-native';

export default class Friends extends React.Component {
  render() {
    return (
      <View style={styles.container}>
        Add friends here!
        {
          this.props.screenProps.possibleFriends.map((friend, index) => (
            <Button
              key={ friend }
              title={ `Add ${ friend }` }
              onPress={() =>
                this.props.screenProps.addFriend(index)
              }
            />
          )
        )
        }
        <Button
          title="Back to home"
          onPress={() =>
            this.props.navigation.navigate('Home')
          }
        />
      </View>
    );
  }
}

const styles = StyleSheet.create({
  container: {
    flex: 1,
    backgroundColor: '#fff',
    alignItems: 'center',
    justifyContent: 'center',
  },
});
hãy chạy lại ứng dụng, chúng ta có thể thấy bạn bè của mình để thêm:
Xong 
Tài liệu th khảo
Bài viết được dịch từ Routing with React Navigation in React Native
All rights reserved
