Room Database kết hợp với Live Data trong Android
Bài đăng này đã không được cập nhật trong 7 năm
Như ở bài trước mình có giới thiệu với các bạn về LiveData trong bài nói về Architecture Components. Trong bài viết này mình sẽ hướng dẫ các bạn kết hợp LiveData với Room Database để viết 1 ứng dụng có thể cập nhật thay đổi lên View ngay khi có sự thay đổi từ Database.
Nếu các bạn chưa biết về Room Database thì các bạn có thể tham khảo bài viết ở đây.
1. Cài đặt project
1.1 Cập nhật file gradle
Đầu tiên là bạn phải implementation các thư viện vào trong file build.gradle (Module: app)
// Room components
implementation "android.arch.persistence.room:runtime:1.1.1"
annotationProcessor "android.arch.persistence.room:compiler:1.1.1"
androidTestImplementation "android.arch.persistence.room:testing:1.1.1"

// Lifecycle components
implementation "android.arch.lifecycle:extensions:1.1.1"
annotationProcessor "android.arch.lifecycle:compiler:1.1.1"
1.2 Xây dựng View
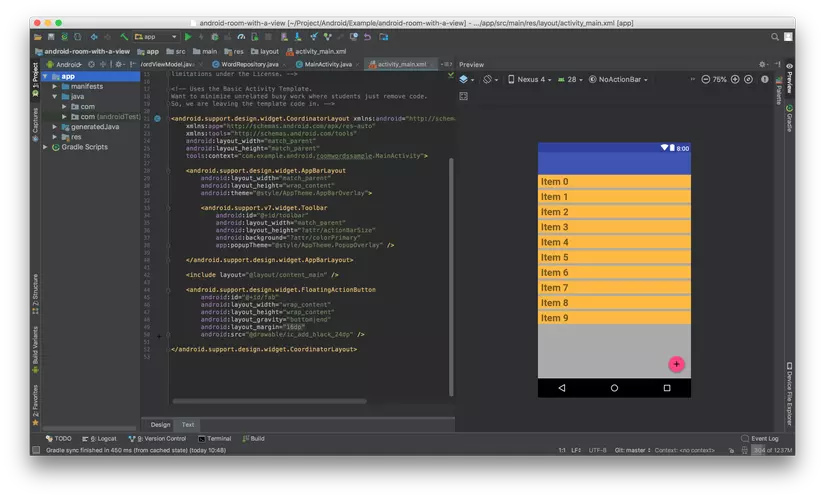
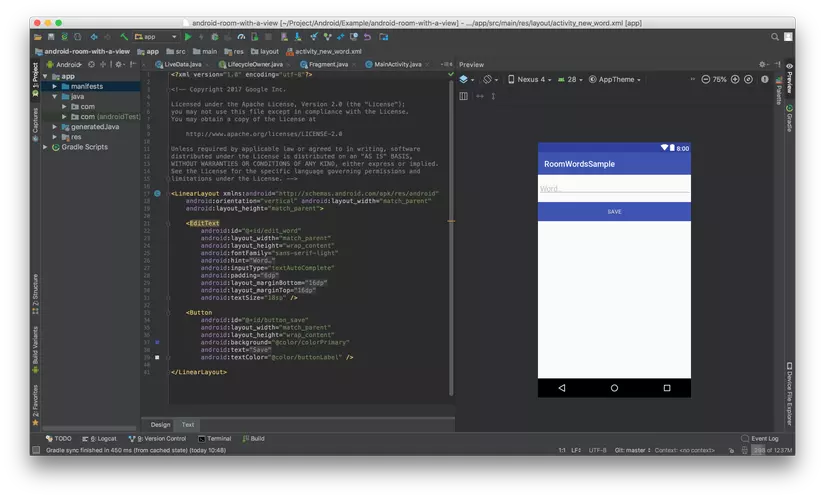
Các bạn xây dựng 2 giao diện đơn giản.
1 RecyclerView để hiển thị thông tin, và 1 giao diên nhập dữ liệu. Phần này chắc mình sẽ không đi chi tiết nữa vì nó toàn là những View cơ bản của Android thôi.
activity_main.xml

activity_new_word.xml

Do chúng ta sử dụng RecyclerView nên các bạn cần viết 1 Adapter cho nó.
WordListAdapter.kt
class WordListAdapter internal constructor(
        context: Context
) : RecyclerView.Adapter<WordListAdapter.WordViewHolder>() {

    private val inflater: LayoutInflater = LayoutInflater.from(context)
    private var words = emptyList<Word>() // Cached copy of words

    inner class WordViewHolder(itemView: View) : RecyclerView.ViewHolder(itemView) {
        val wordItemView: TextView = itemView.findViewById(R.id.textView)
    }

    override fun onCreateViewHolder(parent: ViewGroup, viewType: Int): WordViewHolder {
        val itemView = inflater.inflate(R.layout.recyclerview_item, parent, false)
        return WordViewHolder(itemView)
    }

    override fun onBindViewHolder(holder: WordViewHolder, position: Int) {
        val current = words[position]
        holder.wordItemView.text = current.word
    }

    internal fun setWords(words: List<Word>) {
        this.words = words
        notifyDataSetChanged()
    }

    override fun getItemCount() = words.size
}
Tiếp đến trên MainActivity.kt các bạn set những thông số cơ bản cho RecyclerView
@Override
override fun onCreate(savedInstanceState: Bundle?) {
        super.onCreate(savedInstanceState)
        setContentView(R.layout.activity_main)

        val toolbar = findViewById<Toolbar>(R.id.toolbar)
        setSupportActionBar(toolbar)

        val recyclerView = findViewById<RecyclerView>(R.id.recyclerview)
        val adapter = WordListAdapter(this)
        recyclerView.adapter = adapter
        recyclerView.layoutManager = LinearLayoutManager(this)

    ...
}
Rồi tiếp đến chúng ta sẽ đi vào phần quan trọng nhất của bài viết.
2. Cấu Trúc Project
Cấu trúc đơn giản của Project sẽ gồm các file sau:
- Word: Entity của dự án nơi định nghĩa bảng và trường của Database. Mỗi 1 Entity tương đương với 1 bảng trong Database.
- WordDao:
Interfaceđịnh nghĩa các câu truy vấn Database - WordRoomDatabase: Class này extends từ
RoomDatabaselà nơi thao tác trực tiếp và thực hiện các truy vấn xuống Database. - WordRepository: Class cung cấp dữ liệu cho các hoạt động (Activity, Fragment, Service).
- WordViewModel: Class lưu trữ dữ liệu theo vòng đời của hoạt động. Các bạn có thể xem bài viết Architecture Components giới thiệu để hiểu rõ hơn.
Rồi bây giờ chúng ta sẽ đi vào chi tiết từng Class.
2.1 Word
@Entity(tableName = "word_table")
data class Word(@PrimaryKey @ColumnInfo(name = "word") val word: String)
Vì đây là Project Demo đơn giản nên cơ sở dữ liệu chỉ có 1 trường và trường đó sẽ là khóa chính luôn.
2.2 WordDao
@Dao
interface WordDao {

    // LiveData is a data holder class that can be observed within a given lifecycle.
    // Always holds/caches latest version of data. Notifies its active observers when the
    // data has changed. Since we are getting all the contents of the database,
    // we are notified whenever any of the database contents have changed.
    @Query("SELECT * from word_table ORDER BY word ASC")
    fun getAlphabetizedWords(): LiveData<List<Word>>

    // We do not need a conflict strategy, because the word is our primary key, and you cannot
    // add two items with the same primary key to the database. If the table has more than one
    // column, you can use @Insert(onConflict = OnConflictStrategy.REPLACE) to update a row.
    @Insert
    fun insert(word: Word)

    @Query("DELETE FROM word_table")
    fun deleteAll()
}
Class định nghĩa các truy vấn Database.
Ở 2 hàm insert và deleteAll thì đơn giản không có vấn đề gì.
Nhưng mà các bạn để ý hàm getAlphabetizedWords(): LiveData<List<Word>>. Vì RoomDatabae và LiveData đều nằm trong Architecture Components do Google giới thiệu nên chúng hỗ trợ nhau rất tốt. "Cái này bọn mình thường nói với nhau là dùng Google hay hàng chính chủ bao giờ cũng sướng hơn".
Còn nếu các bạn không muốn, hoặc các bạn sử dụng dữ liệu vào mục đích khác thì các bạn có thể viết getAlphabetizedWords(): List<Word> để RoomDatabase trả về dữ liệu thuần cho các bạn.
2.3 WordRoomDatabase
@Database(entities = [Word::class], version = 1)
abstract class WordRoomDatabase : RoomDatabase() {}
Như ở đây các bạn thấy là Database gồm 1 bảng là entities = {Word.class} và đang ở version = 1
companion object {
    abstract fun wordDao(): WordDao

    @Volatile
    private var INSTANCE: WordRoomDatabase? = null

    fun getDatabase(context: Context): WordRoomDatabase {
        // if the INSTANCE is not null, then return it,
        // if it is, then create the database
        return INSTANCE ?: synchronized(this) {
            val instance = Room.databaseBuilder(
                    context.applicationContext,
                    WordRoomDatabase::class.java,
                    "word_database"
            )
                    // Wipes and rebuilds instead of migrating if no Migration object.
                    // Migration is not part of this codelab.
                    .fallbackToDestructiveMigration()
                    .build()
            INSTANCE = instance
            // return instance
            instance
        }
    }
}
ở đây mình khai báo các thuốc tính cơ bản để khỏi tạo 1 Database.
2.4 WordRepository
Class này đơn thuần để móc nối các nguồn dữ liêu khác nhau để cung cấp lên tầng trên sử dụng.
class WordRepository(private val wordDao: WordDao) {

    // Room executes all queries on a separate thread.
    // Observed LiveData will notify the observer when the data has changed.
    val allWords: LiveData<List<Word>> = wordDao.getAlphabetizedWords()

    // You must call this on a non-UI thread or your app will crash. So we're making this a
    // suspend function so the caller methods know this.
    // Like this, Room ensures that you're not doing any long running operations on the main
    // thread, blocking the UI.
    @Suppress("RedundantSuspendModifier")
    @WorkerThread
    suspend fun insert(word: Word) {
        wordDao.insert(word)
    }
}
Trong ví dụ này mình chỉ có 1 nguồn dữ liệu duy nhất là từ Database nên mình chỉ cần truyền vào WordDao là đủ.
2.5 WordViewModel
class WordViewModel(application: Application) : AndroidViewModel(application) {

    private var parentJob = Job()
    // By default all the coroutines launched in this scope should be using the Main dispatcher
    private val coroutineContext: CoroutineContext
        get() = parentJob + Dispatchers.Main
    private val scope = CoroutineScope(coroutineContext)

    private val repository: WordRepository
    // Using LiveData and caching what getAlphabetizedWords returns has several benefits:
    // - We can put an observer on the data (instead of polling for changes) and only update the
    //   the UI when the data actually changes.
    // - Repository is completely separated from the UI through the ViewModel.
    val allWords: LiveData<List<Word>>

    init {
        val wordsDao = WordRoomDatabase.getDatabase(application, scope).wordDao()
        repository = WordRepository(wordsDao)
        allWords = repository.allWords
    }

    /**
     * Launching a new coroutine to insert the data in a non-blocking way
     */
    fun insert(word: Word) = scope.launch(Dispatchers.IO) {
        repository.insert(word)
    }

    override fun onCleared() {
        super.onCleared()
        parentJob.cancel()
    }
}
Trong hàm init ở đây mình có khỏi tạo các biến cần thiết và gắn liên kết cho biến allWords.
Biến scope trong class này để quy định Thread sẽ thực thi hàm. Ở đây mặc định mình để là hàm sẽ chạy trên MainThread
Các bạn chú ý ở hàm
fun insert(word: Word) = scope.launch(Dispatchers.IO) {
        repository.insert(word)
    }
hàm Insert này phải chạy ở Thread khác với với Thread Main.
Như vậy là ở trên mình đã định nghĩa cơ bản xong về cấu trúc tầng dưới của ứng dụng. Giờ chúng ta sẽ quay lại viết code cho 2 Activity.
2.6 MainActivity vs NewWordActivity
MainActivity.kt
private val newWordActivityRequestCode = 1
private lateinit var wordViewModel: WordViewModel

@Override
override fun onCreate(savedInstanceState: Bundle?) {
        super.onCreate(savedInstanceState)

    ...

    // Get a new or existing ViewModel from the ViewModelProvider.
    wordViewModel = ViewModelProviders.of(this).get(WordViewModel::class.java)

    // Add an observer on the LiveData returned by getAlphabetizedWords.
    // The onChanged() method fires when the observed data changes and the activity is
    // in the foreground.
    wordViewModel.allWords.observe(this, Observer { words ->
        // Update the cached copy of the words in the adapter.
        words?.let { adapter.setWords(it) }
    })

    val fab = findViewById<FloatingActionButton>(R.id.fab)
    fab.setOnClickListener {
        val intent = Intent(this@MainActivity, NewWordActivity::class.java)
        startActivityForResult(intent, newWordActivityRequestCode)
    }


override fun onActivityResult(requestCode: Int, resultCode: Int, intentData: Intent?) {
    super.onActivityResult(requestCode, resultCode, intentData)

    if (requestCode == newWordActivityRequestCode && resultCode == Activity.RESULT_OK) {
        intentData?.let { data ->
            val word = Word(data.getStringExtra(NewWordActivity.EXTRA_REPLY))
            wordViewModel.insert(word)
        }
    } else {
        Toast.makeText(
                applicationContext,
                R.string.empty_not_saved,
                Toast.LENGTH_LONG
        ).show()
    }
}
}
Ở hàm khỏi tạo wordViewModel mình truyền vào 1 Activity để AndroidViewModel dựa vào vòng đời của Activity có thể quản lý dữ liệu 1 cách tốt hơn. Trong AndroidViewModel thì dữ liệu kiểu LivaData sẽ được đăng ký lắng nghe sự thay đổi khi onResume() được gọi, hủy đăng ký lắng nghe khi hàm onPause() được gọi và dữ liệu sẽ bị hủy tại hàm onDestroy().
wordViewModel.allWords.observe(this, Observer { words ->
        // Update the cached copy of the words in the adapter.
        words?.let { adapter.setWords(it) }
    })
Tại đây mình có đăng ký sự kiện lắng nghe khi biến allWords có sự thay đổi về dữ liệu. Khi có dự thay đổi thì mình sẽ cập nhật lại dữ liệu tự động lên View.
Tiếp đến trong hàm onActivityResult khi nhận được dữ liệu từ bên Activity NewWordActivity trả về mình sẽ thực hiện thêm dữ liệu đó vào trong Database.
Do hàm getAlphabetizedWords() chúng ta định nghĩa trong interface WordDao trả về biến LiveData<List<Word>> nên khi có sự thay dữ liệu trong Database thì LiveData sẽ tự động cập nhật lại dữ liệu và trả 1 callback ra ngoài để chúng ta có thể biết về sự thay đổi đó.
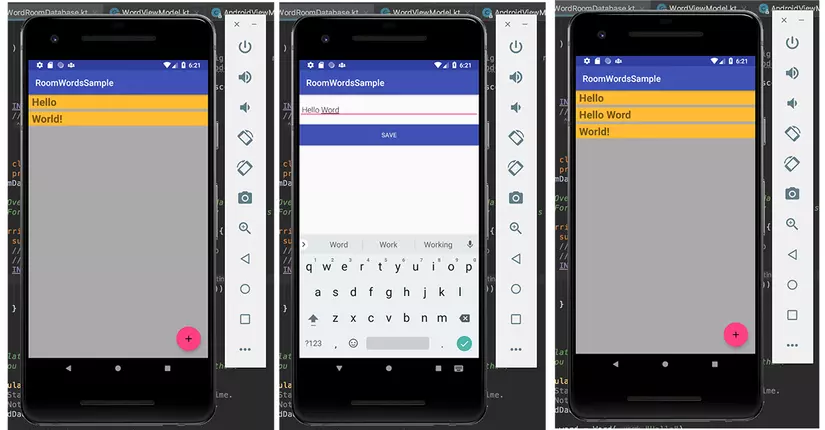
Và giờ thì mọi thứ có vẻ đã ổn rồi. Giờ sẽ thử chạy app xem kết quả sẽ như thế nào nhé.

Các bạn nhớ là khi các bạn ấn nút Save để quay trở về màn hình trước thì dữ liệu sẽ được tự động cập nhật nhé.
Trên đây mình đã giới thiệu với các bạn cơ bản cách kết hợp giữa RoomDatabase và LiveData để tạo 1 ứng dụng có thể thay đổi View khi có sự thay đổi từ Database. Trên ví dự trên thì sự tiện dụng là chưa thực tế cho lắm vì nó mới chỉ là ứng dụng Demo nhưng nếu các bạn gặp project mà lấy dữ liệu thụ động từ server và lưu xuống Database, thì các bạn sẽ thấy sự tiện dụng khi kết hợp 2 Architecture Components này với nhau.
All rights reserved