Realm database trong iOS
Bài đăng này đã không được cập nhật trong 7 năm
I. Giới thiệu
Đã là lập trình viên iOS, hẳn ai trong chúng ta cũng đã từng sử dụng Core Data để lưu dữ liệu của App vào database. Chúng ta đều có thể nhận thấy Core Data tương đối khó xử dụng ngay cả với những người đã có kinh nghiệm, code dài dòng, và việc quản lý dữ liệu rất khó khăn. Core Data lưu dữ liệu vào SQLite, và để nhìn thấy dữ liệu và quản lý dữ liệu trong SQLite một cách trực quan, chúng ta cần sử dụng các công cụ trả phí đắt tiền như SQLite Professional, Core Data Editor,…
Realm database khiến những đau thương khi phải làm việc với Core Data không còn nữa. So với Core Data, Realm có rất nhiều lợi thế:
- Dễ dàng sử dụng hơn
- Tốc độ query nhanh hơn
- Quản lý dữ liệu dễ dàng và trực quan hơn
- Open source và tài liệu tham khảo được viết rất tốt
- Cross platform
Với rất nhiều lợi thế như trên, Realm ngày càng được sử dụng phổ biến hơn. Trong bài viết này tôi xin giới thiệu với các bạn cách sử dụng Realm một cách cơ bản nhất thông qua một ứng dụng demo thực tế.
II. Nội dung
Sau đây, chúng ta sẽ tạo một ứng dụng đơn giản quản lý sách, ứng dụng sẽ có các chức năng:
- Thêm sách vào db
- Lấy sách từ db
- Sửa sách trong db
- Xoá sách khỏi db
4 chức năng trên tương ứng với 4 operation cơ bản của hầu hết các loại dữ liệu. Giờ chúng ta đã hiểu những việc sẽ phải làm, OK, let’s start.
1. Tạo project
Các bạn lần lượt làm theo các bước sau:
B1: Tạo một iOS project mới với tên RealmTutorial và ngôn ngữ Swift, không chọn “Use Core Data” B2: Tạo Podfile cho project với nội dung như sau:
# Uncomment the next line to define a global platform for your project
# platform :ios, '9.0'

target 'RealmTutorial' do
  # Comment the next line if you're not using Swift and don't want to use dynamic frameworks
  use_frameworks!

  # Pods for RealmTutorial

  pod 'RealmSwift'

end
B3: Gõ lệnh pod install vào Terminal để cài đặt thư viện Realm cho project. Sau khi việc install hoàn thành, các bạn tắt RealmTutorial.xcodeproj và mở RealmTutorial.xcworkspace để bắt đầu code
2: Thêm code cơ bản
Bây giờ chúng ta sẽ tạo các code cơ bản cho project, các code này không liên quan đến Realm.
B1: Xoá file ViewController.swift và xoá view của nó trong Main.storyboard vì chúng ta không cần chúng.
B2: Lần lượt tạo 2 file BookTableViewController và BookTableViewCell lần lượt kế thừa từ UITableViewController và UITableViewCell.
B3: Vào Main.storyboard, thêm UITableViewController, chọn Editor -> Embed In -> Navigation Controller để thêm navigation controller, đặt Initial View Controller cho UINavigationController vừa tạo
B4: Đặt tên class cho UITableViewController bên trên là BookTableViewController, đặt tên cho UITableViewCell trong BookTableViewController là BookTableViewCell, thêm reuse identifier cho cell là BookTableViewCell
B5: Thêm Bar Button Item với thuộc tính System Item là Add. Kéo tạo IBAction cho button này:
@IBAction func onAddButtonClicked(_ sender: Any) {

}
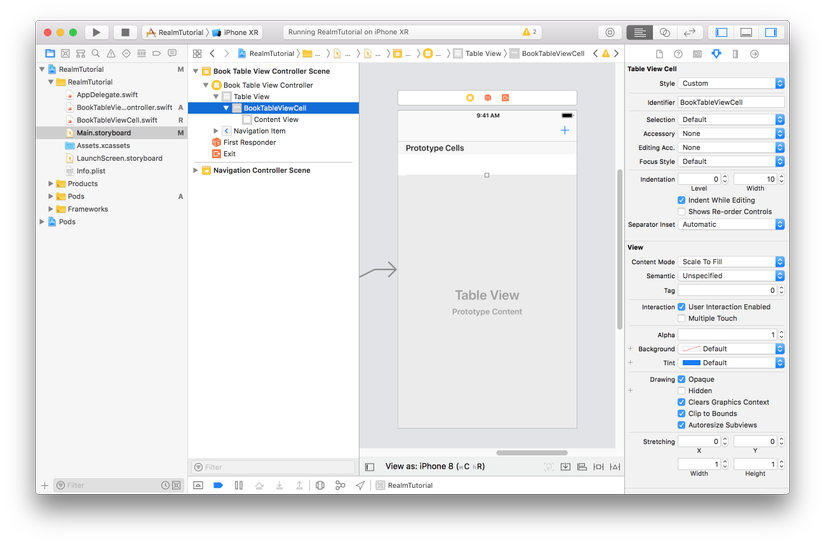
Sau khi hoàn thành các bước trên, chúng ta sẽ được project như hình sau
3. Realm Object
Đối với Core data, khi làm việc chúng ta cần tương tác với Entity, thì khi làm việc với Realm, chúng ta cần tương tác với Realm Object. Tất cả công việc của chúng ta (thêm/đọc/sửa/xoá) đều thực hiện trên Realm object, trong bài viết này chúng ta sẽ không đi sâu tìm hiểu về Realm Object mà chỉ tập chung vào cách sử dụng nó mà thôi.
Bây giờ, các bạn tạo file BookItem.swift và thêm nội dung cho file như code sau:
import Foundation
import RealmSwift

@objcMembers class BookItem: Object {
    enum Property: String {
        case id, name, isCompleted
    }

    dynamic var id = UUID().uuidString
    dynamic var name = ""
    dynamic var isCompleted = false

    override static func primaryKey() -> String? {
        return BookItem.Property.id.rawValue
    }

    convenience init(_ name: String) {
        self.init()
        self.name = name
    }
}
Trong đoạn code bên trên, có một số chỗ chúng ta cần lưu ý:
- Class BookItem thừa kế từ class Object. Class Object này là một class của Realm, với khai báo này chúng ta giúp Realm hiểu rằng BookItem là một Realm Object, và BookItem phải được khai báo là @objcMembers
- Các property của BookItem đều được định nghĩa là Dynamic property. Điều này cho phép Realm thực hiện những logic “sau hậu trường” để ánh xạ các thuộc tính này với dữ liệu trong db.
- Hàm primaryKey() được override để chúng ta chỉ định primarykey cho BookItem. Ở đây chúng ta dùng id của book, mà cụ thể là UUID để làm primary key trong Realm db.
Tiếp theo, chúng ta implement code cho BookTableViewCell.swift như sau:
import UIKit

class BookTableViewCell: UITableViewCell {

    private var onToggleCompleted: ((BookItem) -> Void)?
    private var book: BookItem?

    func configureWith(_ book: BookItem, onToggleCompleted: ((BookItem) -> Void)? = nil) {
        self.book = book
        self.onToggleCompleted = onToggleCompleted
        self.textLabel?.text = book.name
        self.accessoryType = book.isCompleted ? .checkmark : .none
    }

    func toggleCompleted() {
        guard let book = book else { fatalError("Book not found") }

        onToggleCompleted?(book)
    }
}
Trong code trên, chúng ta truyền vào cell object BookItem và một closure mà sẽ được chạy khi hàm toggleCompleted() được gọi đến, các thông tin của book được hiển thị trên cell.
Tiếp theo chúng ta implement code cho BookTableViewController như sau:
import UIKit
import RealmSwift

class BookTableViewController: UITableViewController {
	// 1
    private var books: Results<BookItem>?

    override func viewDidLoad() {
        super.viewDidLoad()

    }

    @IBAction func onAddButtonClicked(_ sender: Any) {

    }

    // MARK: - Table view data source

    override func numberOfSections(in tableView: UITableView) -> Int {
        return 1
    }

    override func tableView(_ tableView: UITableView, numberOfRowsInSection section: Int) -> Int {
        return books?.count ?? 0
    }

    override func tableView(_ tableView: UITableView, cellForRowAt indexPath: IndexPath) -> UITableViewCell {
        guard let cell = tableView.dequeueReusableCell(withIdentifier: "BookTableViewCell", for: indexPath) as? BookTableViewCell,
            let book = books?[indexPath.row] else {
                return BookTableViewCell(frame: .zero)
        }
        // 2
        cell.configureWith(book) { [weak self] book in

        }

        return cell
    }
}
Các hàm implement trong BookTableViewController đều khá quen thuộc, chúng ta chỉ cần quan tâm đến 2 chỗ:
- 1: property books được khai báo là một instance của class Results. Class Results là một class của Realm, là kết quả trả về của hàm query trong Realm
- 2: hàm configureWith(_:onToggleCompleted: ) chúng ta đã khai báo trong BookTableViewCell, ở đây chúng ta gán book và onToggleCompleted closure cho cell
4. Thêm Book
Bên trên chúng ta đã có khá nhiều code, nhưng chưa có code nào thực sự động đến Realm cả. Bây giờ chúng ta sẽ bắt đầu việc thêm dữ liệu vào database. Để thực hiện việc này, chúng ta thêm code vào cuối file BookItem.swift như sau:
extension BookItem {
    static func add(name: String, in realm: Realm = try! Realm()) -> BookItem {
        let book = BookItem(name)
        try! realm.write {
            realm.add(book)
        }
        return book
    }
}
Bất ngờ chưa? thêm object vào db của Realm chỉ cần 5 dòng code đơn giản bên trên thôi. chúng ta chỉ cần tạo một instance của BookItem, gọi hàm write(_: ) và add() của Realm để lưu dữ liệu vào db.
Tiếp theo, chúng ta thêm code sau vào BookTableViewController:
@IBAction func onAddButtonClicked(_ sender: Any) {
        showInputBookAlert("Add book name") { name in
            BookItem.add(name: name)
        }
    }

func showInputBookAlert(_ title: String, isSecure: Bool = false, text: String? = nil, callback: @escaping (String) -> Void) {
  let alert = UIAlertController(title: title, message: nil, preferredStyle: .alert)
  alert.addTextField(configurationHandler: { field in
    field.isSecureTextEntry = isSecure
    field.text = text
  })

  alert.addAction(UIAlertAction(title: "OK", style: .default) { _ in
    guard let text = alert.textFields?.first?.text, !text.isEmpty else {
      userInputAlert(title, callback: callback)
      return
    }

    callback(text)
  })

  let root = UIApplication.shared.keyWindow?.rootViewController
  root?.present(alert, animated: true, completion: nil)
}
Build chạy thử project, bấm nút “+”, gõ tên cho sách và bấm “OK” để lưu sách vào db.
“Ừmmm, làm sao để tôi biết được là object của tôi đã được lưu vào db? tôi có thấy nó khác gì đâu.” các bạn có thể tự đặt câu hỏi như vậy. Tất nhiên tại thời điểm hiện tại chúng ta chưa hiển thị data ra tableView, nên trên App chưa hiển thị cái gì cả. Rất may cho chúng ta là Realm cung cấp một công cụ tuyệt vời để quản lý database: Realm Studio. Các bạn vào đây để download Realm Studio, rồi mở file default.realm trong Document của App để xem toàn bộ dữ liệu trong db. Về cách mở default.realm, các bạn có thể tham khảo tại đây
Mở default.realm trong Realm Studio, chúng ta được như hình sau:
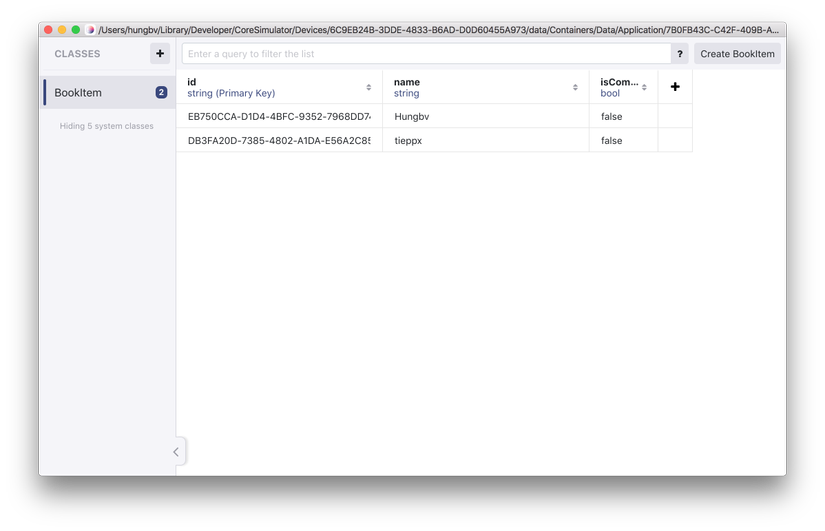
Realm Studio hiển thị các record dạng bảng rất trực quan, chúng ta cũng có thể thêm/sửa/xoá dữ liệu, thêm cột trong bảng hoặc thêm bảng mới.
5. Get list book
Việc lấy object trong Realm db cũng không hề phức tạp. Trong khuôn khổ nội dung bài viết này, chúng ta sẽ chỉ làm công việc đơn giản là lấy toàn bộ book trong db. Để làm việc này các bạn vào BookItem.swift và thêm code sau:
	static func getAll(in realm: Realm = try! Realm()) -> Results<BookItem> {
        return realm.objects(BookItem.self)
            .sorted(byKeyPath: BookItem.Property.isCompleted.rawValue)
    }
Trong đoạn code trên, chúng ta sử dụng hàm objects(_: ) để lấy toàn bộ object thuộc loại BookItem, và sắp xếp kết quả theo property isCompleted.
Tiếp theo, vào BookTableViewController.swift và thêm code vào viewDidLoad() như sau:
	override func viewDidLoad() {
        super.viewDidLoad()

        books = BookItem.getAll()
    }
Build chạy App, chúng ta sẽ được tableView với list các object đã tạo ở bên trên như hình sau:
6. Edit Book
Bây giờ, chúng ta sẽ sửa các BookItem object và lưu vào db, cụ thể chúng ta sẽ thay đổi trạng thái của property isCompleted.
Đầu tiên, các bạn vào BookItem.swift thêm hàm sau:
	func toggleCompleted() {
        guard let realm = realm else { return }
        try! realm.write {
            isCompleted = !isCompleted
        }
    }
Trong hàm trên, việc thay đổi property isCompleted được thực thi trong closure của hàm write(_: ).
Tiếp theo, chúng ta vào BookTableViewController thêm hàm sau:
	override func tableView(_ tableView: UITableView, didSelectRowAt indexPath: IndexPath) {
        guard let cell = tableView.cellForRow(at: indexPath) as? BookTableViewCell else {
            return
        }

        cell.toggleCompleted()
    }
Trong code trên, mỗi khi người dùng tap vào một BookTableViewCell thì hàm toggleCompleted() của cell sẽ được gọi đến, và closure được gán cho cell được thực thi. Hiện tại closure này vẫn đang được để trống trong tableView(_:cellForRowAt: ), chúng ta implement cho closure này như sau:
	override func tableView(_ tableView: UITableView, cellForRowAt indexPath: IndexPath) -> UITableViewCell {
        guard let cell = tableView.dequeueReusableCell(withIdentifier: "BookTableViewCell", for: indexPath) as? BookTableViewCell,
            let book = books?[indexPath.row] else {
                return BookTableViewCell(frame: .zero)
        }

        cell.configureWith(book) { [weak self] book in
            book.toggleCompleted()
            self?.tableView.reloadData()
        }

        return cell
    }
Build project, tap thử vào các cell, chúng ta được kết quả như sau:
 https://images.viblo.asia/6f6ef24a-b6f3-4c3e-b51d-b7504875fb22.png
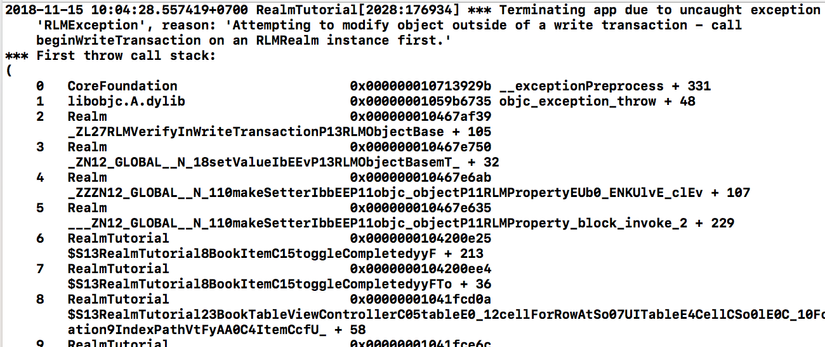
Chú ý: Các bạn có thể để ý là việc thay đổi BookItem object thêm/sửa/xoá được thực thi trong closure ở hàm write(_: ) của Realm. Mọi thay đổi về object của Realm đều phải thực hiện trong closure này, nếu chúng ta viết bên ngoài closure thì trong quá trình runtime, khi chạy đến code này App sẽ bị crash. Giả sử chúng ta code đoạn thay đổi property isCompleted bên trên như sau:
	func toggleCompleted() {
        guard let realm = realm else { return }
		isCompleted = !isCompleted
        try! realm.write {
            // isCompleted = !isCompleted
        }
    }
Thì khi App chạy, tap vào cell App sẽ bị crash với nội dung crash như hình sau:
7. Delete book
Đầu tiên, chúng ta thêm code delete Realm object trong BookItem.swift:
	func delete() {
        guard let realm = realm else { return }
        try! realm.write {
            realm.delete(self)
        }
    }
Tiếp theo, chúng ta thêm code để xoá cell trong tableView của BookTableViewController.swift như sau:
	override func tableView(_ tableView: UITableView, commit editingStyle: UITableViewCell.EditingStyle, forRowAt indexPath: IndexPath) {
        guard let book = books?[indexPath.row],
            editingStyle == .delete else { return }
        book.delete()
        tableView.reloadData()
    }
Build chạy thử project, các bạn có thể thấy các tác vụ thêm/đọc/sửa/xoá đều đã được hoàn thành.
8. Cập nhật khi thay đổi dữ liệu
Bên trên, mỗi khi viết code thêm/sửa/xoá, chúng ta đều phải viết thêm code xử lý sau khi quá trình thay đổi db hoàn thành. Realm có một cách thông mình hơn để quản lý mỗi khi có thay đổi trong db: observe.
Đầu tiên, chúng ta thêm Extension cho UITableView vào cuối file BookTableViewController.swift như sau:
extension UITableView {
    func applyChanges(deletions: [Int], insertions: [Int], updates: [Int]) {
        beginUpdates()
        deleteRows(at: deletions.map { IndexPath(row: $0, section: 0) }, with: .automatic)
        insertRows(at: insertions.map { IndexPath(row: $0, section: 0) }, with: .automatic)
        reloadRows(at: updates.map { IndexPath(row: $0, section: 0) }, with: .automatic)
        endUpdates()
    }
}
hàm applyChanges(deletions:insertions:updates: ) lấy đầu vào là mảng vị trí các cell cần delete/insert/update để thực hiện việc update dữ liệu trong tableView.
Tiếp theo, chúng ta thêm code cho BookTableViewController như sau:
    private var token: NotificationToken?
override func viewWillAppear(_ animated: Bool) {
        super.viewWillAppear(animated)

        token = books?.observe({ [weak tableView] changes in
            guard let tableView = tableView else { return }
            switch changes {
            case .initial:
                tableView.reloadData()
            case .update(_, let deletions, let insertions, let updates):
                tableView.applyChanges(deletions: deletions, insertions: insertions, updates: updates)
            case .error: break
            }
        })
    }

    override func viewWillDisappear(_ animated: Bool) {
        super.viewWillDisappear(animated)

        token?.invalidate()
    }
Bên trên, hàm observe(_: ) là hàm của Realm, closure trong hàm này sẽ được gọi đến mỗi khi có sự thay đổi trong database của books.
Tiếp theo, xoá toàn bộ code tableView.reloadData() trong các hành động thêm/sửa/xoá bên trên. Build chạy project, chúng ta sẽ có được kết quả cuối cùng.
III. Kết luận
Trên đây, tôi đã giới thiệu đến các bạn Realm data base, những lợi ích của nó so với sử dụng Core Data và cách sử dụng Realm một cách cơ bản nhất. Hi vọng bài viết này sẽ giúp ích cho các bạn trong quá trình tìm hiểu về Realm.
Cuối cùng, xin cảm ơn các bạn đã theo dõi bài viết này, have a nice day ^_^!
All rights reserved
