Improving Webpack build performance and verbosity
Bài đăng này đã không được cập nhật trong 4 năm
Quick guide for Single Page Applications with Webpack 2
In previous article we set up a simple single page application with routing and web pack builds.
Now we extend the application with better logic and using more web pack features and tools.
Analyzing the builds
Currently app is relatively small and we don’t get any really big files.
                         Asset       Size  Chunks                    Chunk Names
     0.6bcce77c5e562c64a428.js    76.8 kB       0  [emitted]
     1.6bcce77c5e562c64a428.js    76.8 kB       1  [emitted]
   app.6bcce77c5e562c64a428.js     487 kB       2  [emitted]  [big]  app
style.6bcce77c5e562c64a428.css     135 kB       2  [emitted]         app
                    index.html  380 bytes          [emitted]
So let’s ”harden” it with some additional features.
$ npm i highlight.js remarkable moment lodash
All these libraries we include in different parts of the application. You can see their usage in This commit: rkgrep/spa-tutorial@af3f57c
Now, after we run build we receive much different stats:
Hash: e97129f3c59b62c46515
Version: webpack 3.5.5
Time: 3347ms
                         Asset       Size  Chunks                    Chunk Names
     0.e97129f3c59b62c46515.js     864 kB       0  [emitted]  [big]
     1.e97129f3c59b62c46515.js     818 kB       1  [emitted]  [big]
     2.e97129f3c59b62c46515.js    1.08 MB       2  [emitted]  [big]
   app.e97129f3c59b62c46515.js     501 kB       3  [emitted]  [big]  app
style.e97129f3c59b62c46515.css     135 kB       3  [emitted]         app
                    index.html  380 bytes          [emitted]
So what can we do with that? 😟
Webpack performance setup
Name of this setup is not much obvious: it does not increase performance, but instead creates additional warnings on issues.
Let’s include it in our config file
base.config.js
// ... inside config object
    performance: {
        hints: 'warning',
        maxEntrypointSize: 400000,
        maxAssetSize: 300000,
    }
// ...
Now Webpack will provide warnings if entrypoint size exceeds 400 kB or any asset size exceeds 300 kB
WARNING in asset size limit: The following asset(s) exceed the recommended size limit (300 kB).
This can impact web performance.
Assets:
  0.1bfb05e210c1b9dc777e.js (864 kB)
  1.1bfb05e210c1b9dc777e.js (818 kB)
  2.1bfb05e210c1b9dc777e.js (1.08 MB)
  app.1bfb05e210c1b9dc777e.js (501 kB)

WARNING in entrypoint size limit: The following entrypoint(s) combined asset size exceeds the recommended limit (400 kB). This can impact web performance.
Entrypoints:
  app (636 kB)
      app.1bfb05e210c1b9dc777e.js
      style.1bfb05e210c1b9dc777e.css
Analyzing bundles
HTML report
In order to see details of every bundle we need webpack-bundle-analyzer plugin.
$ npm i -D webpack-bundle-analyzer
base.config.js
const { BundleAnalyzerPlugin } = require('webpack-bundle-analyzer')

// ...
    plugins: [
        // ...
        new BundleAnalyzerPlugin({
            analyzerMode: isProd ? 'static' : 'disabled',
        }),
    ],
// ...
Now, after each build, we will get a webpage with diagram showing size of each chunk and libraries inside:
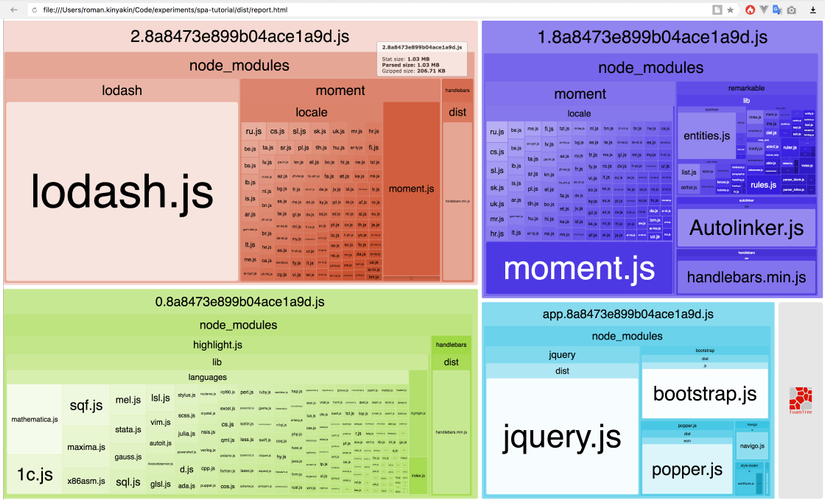
As you can see, moment library had been included into 2 chunks where it is being used as well as handlebars library.
This is both advantage and disadvantage of this approach, but in our case it is likely not to have such inclusions, but separate these libraries into their own file.
You can disable automatic display of report by setting openAnalyzer option to false
Stats file analyzing
If you want more details, you can generate special JSON file containing all profiling information.
To do this, enable profile option in web pack config and generateStatsFile in bundle analyzer config.
base.config.js
// ... in config object
   plugins: [
        // ...
        new BundleAnalyzerPlugin({
            analyzerMode: isProd ? 'static' : 'disabled',
            openAnalyzer: false,
            generateStatsFile: isProd,
        }),
    ],

    profile: isProd,
// ...
Now, in addition to report.hmtl, a JSON file is created named stats.json You can upload this file to https://webpack.github.io/analyse/ to visualize details.
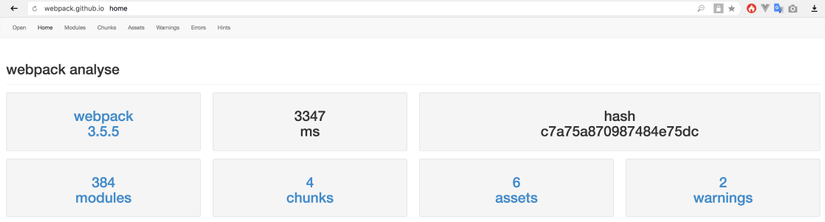
There is a lot of information, including time spent on compilation and all module dependencies.
Manual chunks and DLLs
So what should we do with our huge files?
First, we can tune up entry points by creating additional vendor file, which will contain our libraries separately.
Common chunks
In order to do this, we use CommonChunksPlugin, bundled within web pack.optimize object
base.config.js
const {
    ProvidePlugin,
    optimize: {
        CommonsChunkPlugin,
    }
} = require('webpack')

// ...
    entry: {
        vendor: [
            'jquery',
            'bootstrap',
            'moment',
            'handlebars',
        ],
        // ...
    },
    // ...
    plugins: [
        // ...
        new CommonsChunkPlugin({
            name: 'vendor',
            minChunks: Infinity,
        })
    ],
// ...
After this setup, libraries included in vendor entry will be separated into special chunk.
Hash: 0387c3e3ccbd4183fa38
Version: webpack 3.5.5
Time: 3147ms
                         Asset       Size  Chunks                    Chunk Names
     0.0387c3e3ccbd4183fa38.js     787 kB       0  [emitted]  [big]
     1.0387c3e3ccbd4183fa38.js     276 kB       1  [emitted]
     2.0387c3e3ccbd4183fa38.js     542 kB       2  [emitted]  [big]
   app.0387c3e3ccbd4183fa38.js    33.4 kB       3  [emitted]         app
vendor.0387c3e3ccbd4183fa38.js    1.01 MB       4  [emitted]  [big]  vendor
style.0387c3e3ccbd4183fa38.css     135 kB       3  [emitted]         app
                    index.html  458 bytes          [emitted]
Of course, the chunk is still big (1.01 MB), but at least, it is a single file.
DLLs
In webpack DDLs are separate builds, which provide a manifest file describing included libraries.
DLLs are implemented with separate web pack configs and 2 plugins: DLLPlugin, which describes DLL contents and DLLReferencePlugin, which allows to inject DLL into main config.
We will come back to DLLs on next steps of this tutorial.
Compression and minification
The very important step is to minify your files as much as possible.
Uglify JS plugin
The main plugin for magnification is Uglify JS, which is available as webpack.optimize.UglifyJsPlugin or as uglifyjs-webpack-plugin package.
base.config.js
const {
    ProvidePlugin,
    optimize: {
        CommonsChunkPlugin,
        UglifyJsPlugin,
    }
} = require('webpack')

// ...

    plugins: [
        // ...
        new UglifyJsPlugin(),
    ],

// ...
Now, after we run the build, scripts will become much smaller and suitable to serve online:
                         Asset       Size  Chunks                    Chunk Names
     0.02af493962bed643e207.js     559 kB       0  [emitted]  [big]
     1.02af493962bed643e207.js    93.3 kB       1  [emitted]
     2.02af493962bed643e207.js    72.1 kB       2  [emitted]
   app.02af493962bed643e207.js    14.4 kB       3  [emitted]         app
vendor.02af493962bed643e207.js     450 kB       4  [emitted]  [big]  vendor
style.02af493962bed643e207.css     135 kB       3  [emitted]         app
                    index.html  458 bytes          [emitted]
When your project grows up, uglification will take a lot of time to process, as it requires to analyze and transform all the code.
For such cases, there is parallel option, which can be turned on by setting to true or fine-tuned with additional parameters.
new UglifyJsPlugin({
    parallel: true,
}),
CSS minification
As you can see, styles.css file was not compressed at all. In order to do that, we need to tune css-loader options.
base.config.js
const cssLoader = {
    loader: 'css-loader',
    options: {
        minimize: true,
    },
}

// ...

    module: {
        rules: [
            // ...
            {
                test: /\.css$/,
                use: ExtractTextPlugin.extract({
                    fallback: 'style-loader',
                    use: [cssLoader],
                }),
            },
            {
                test: /\.scss|\.sass$/,
                use: ExtractTextPlugin.extract({
                    fallback: 'style-loader',
                    use: [cssLoader, 'sass-loader'],
                }),
            },
            // ...
        ],
    },
This will enable CSSNano minification.
Webpack supports loader options to be passed as objects or query strings. For example, the config above can be replaced by
'css-loader? minimize=true'
Now, CSS file size has been decreased by ~20%
style.5901fd90da81029ce30e.css 106 kB 3 [emitted] app
Context replacement

If you take a look at bundle report, you can notice that there are plenty of unnecessary files included in the build. For example, locales for moment.js library.
The reason for that is this piece of code in moment sources moment/moment · GitHub:
function loadLocale(name) {
    var oldLocale = null;
    // TODO: Find a better way to register and load all the locales in Node
    if (!locales[name] && (typeof module !== 'undefined') &&
            module && module.exports) {
        try {
            oldLocale = globalLocale._abbr;
            require('./locale/' + name);
            // because defineLocale currently also sets the global locale, we
            // want to undo that for lazy loaded locales
            getSetGlobalLocale(oldLocale);
        } catch (e) { }
    }
    return locales[name];
}
When webpack collects modules to include in bundles, require function called with expressions automatically loads all files in the directory. Which means that require('./locale/' + name); will load all locales even if they are not used in your application.
For such cases, you can use ContextReplacementPlugin to limit expressions resolving.
const {
    ProvidePlugin,
    ContextReplacementPlugin,
    optimize: {
        CommonsChunkPlugin,
        UglifyJsPlugin,
    }
} = require('webpack')

// ...

new ContextReplacementPlugin(/moment[\/\\]locale$/, /en|vi|ja/),
The first argument is the context to which replacement is applied (in our case it is moment/locales directory), the second is limitation, defined by regular expression or function.

Now only several locales are included in build.
Aliases
One of important features is possibility to alias module resolving. It might be required in case you need to shortcut your directories, or some change might be require to library.
Module aliases
Aliases are simply defined as map in resolve config group:
    resolve: {
        // ...
        alias: {
            handlebars: 'handlebars/dist/handlebars.min.js',
        },
        // ...
    },
This change was applied before. And the reason is that by default handlebars module is targeted on server-side environments. As our code is compiled in browser, there are incompatibilities, which are fixed in distributed script.
Such changes are quite handy and can save a lot of time.
Directory aliases
In most cases your project has some kind of structure and modules in deeper directories might require ones from upper levels. When such things happen, it is very complicated to track those dependencies, especially if you move files from one directory to another.
Navigating from some top-level folders is much simpler.
Let’s define the following aliases for our project:
const srcDir = resolve(__dirname, '..', 'src')

// ...

    resolve: {
        // ...
        alias: {
            handlebars: 'handlebars/dist/handlebars.min.js',

            '~html': resolve(srcDir, 'html'),
            '~styles': resolve(srcDir, 'styles'),
        },
        // ...
    },
After this change, you can simply use these aliases in any import or require statement.
import template from '~html/code.handlebars'
Strict match aliases
Sometimes, there might be issues with modules, but also, there are requirements from module subdirectories.
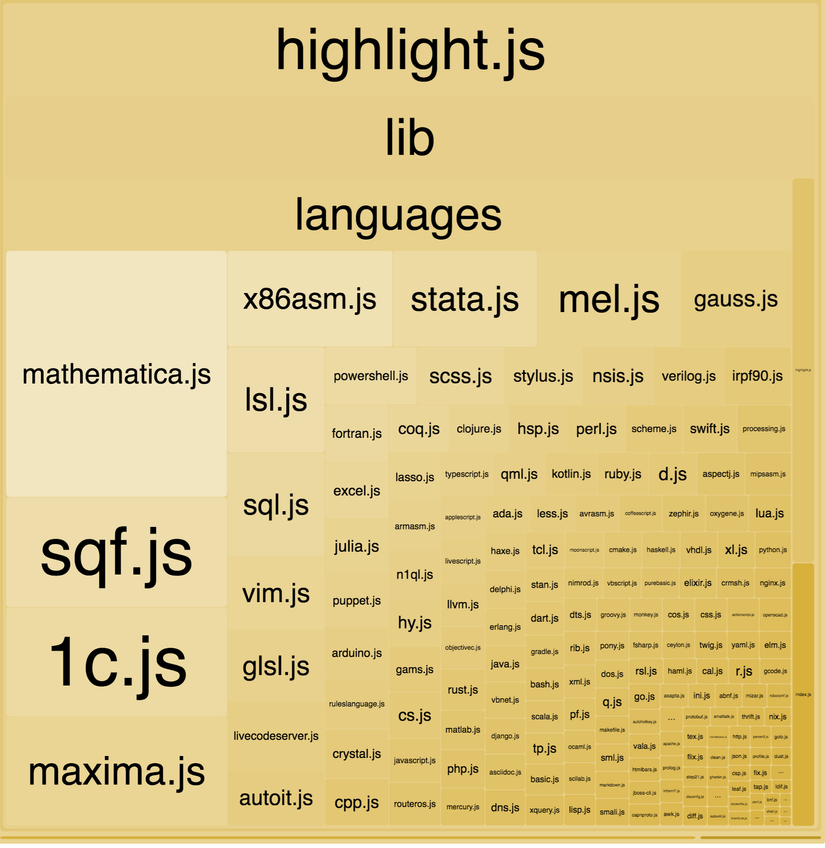
For example, our build includes a lot of languages supported by highlight.js library. But this issue cannot be fixed by context replacement, because there is no pattern matching in the source. All languages are imported directly.
highlight.js/lib/index.js
var hljs = require('./highlight');

hljs.registerLanguage('1c', require('./languages/1c'));
hljs.registerLanguage('abnf', require('./languages/abnf'));
hljs.registerLanguage('accesslog', require('./languages/accesslog'));
hljs.registerLanguage('actionscript', require('./languages/actionscript'));
// ...
This means, that we need to redefine this part of code somehow.
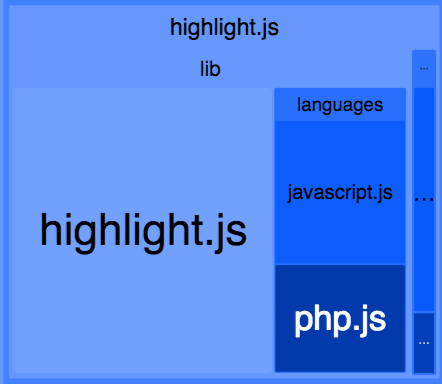
For this purpose we create our own highlight.js file with only required languages:
src/lib/highlight.js
import hljs from 'highlight.js/lib/highlight'

hljs.registerLanguage('javascript', require('./languages/javascript'))
hljs.registerLanguage('php', require('./languages/php'))

export default hljs
But what happens if we create an alias?
There will be an error, because highlight.js will reference not only the module itself, but all subpaths of it.
And our imports both in rewritten module and in one of sources won’t work
import hljs from 'highlight.js'
// This becomes src/lib/highlight.js as expected
import 'highlight.js/styles/darkula.css'
// This becomes src/lib/highlight.js/styles/darkula.css
In this case, we define a strict match, which is made by simply adding $ character to alias definition:
    resolve: {
        // ...
        alias: {
            'highlight.js$': resolve(srcDir, 'lib', 'highlight.js'),
            // ...
        },
    },
This will be applied only to 'highlight.js' references, but any subpaths will still lead to initial module.
Now, we have decreased size of our bundle significantly.
What’s next?
In next article I will describe how to set up environment variables, and use source maps for development.
Repository with this tutorial sources available on GitHub
All rights reserved
