Pytorch FB Challenge: The Final lab
Bài đăng này đã không được cập nhật trong 7 năm
It's been two months that I joined to Pytorch FB challenge. In this challenge, we need to learn how to use Pytorch to build a deep learning model and apply it to solve some problems. In the final of this challenge, we need to use Pytorch to build a deep learning model to cateogrize 102 species of flowers where you can find the data set from here. In order to complete the challenge, we need to build a model which can predict correct types of flower with over 80%. So let's build our deep learning model.
1. Build the model
We could build a model from scratch to solve this problem however, we need a lot of data set and time to build an accurate model. Therefore, we are using transfer-learning technique to train our network. Transfer learning is a proccess of using a pre-train network then add our fully-connected layers into it. In this proccess, we can build an better model with few dataset and it take less time to train it. There are many pre-train model in pytorch torchvision package such as AlexNet, VGG, ResNet, SqueezeNet, DenseNet, Inception v3. But first we need to import needed packages.
import torch
import torch.nn as nn
import torch.optim as optim
from torch.optim import lr_scheduler
import numpy as np
import torchvision
from torchvision import datasets, models, transforms
import matplotlib.pyplot as plt
import time
import os
import copy
import seaborn as sns
In this challenge, I choose a pre-train ResNet model. First, We need to freeze all the network except the final layer. We need to set requires_grad == False to freeze the parameters so that the gradients are not computed in backward(). Then we can add our fully-connected layer into it.
model_conv = torchvision.models.resnet18(pretrained=True)
for param in model_conv.parameters():
    param.requires_grad = False

# Parameters of newly constructed modules have requires_grad=True by default
num_ftrs = model_conv.fc.in_features
model_conv.fc = nn.Linear(num_ftrs, len(cat_to_name))

model_conv = model_conv.to(device)

criterion = nn.CrossEntropyLoss()

# Observe that only parameters of final layer are being optimized as
# opposed to before.
optimizer_conv = optim.SGD(model_conv.fc.parameters(), lr=0.001, momentum=0.9)

# Decay LR by a factor of 0.1 every 7 epochs
exp_lr_scheduler = lr_scheduler.StepLR(optimizer_conv, step_size=7, gamma=0.1)
Now it done. Let's train our model.
2. Train the model
Firstly, we need to load the dataset into memory. Then we resize, crop, normalize, and seperate the image data so that we can fit and validate our network.
data_transforms = {
    'train': transforms.Compose([
        transforms.RandomResizedCrop(224),
        transforms.RandomHorizontalFlip(),
        transforms.ToTensor(),
        transforms.Normalize([0.485, 0.456, 0.406], [0.229, 0.224, 0.225])
    ]),
    'valid': transforms.Compose([
        transforms.Resize(256),
        transforms.CenterCrop(224),
        transforms.ToTensor(),
        transforms.Normalize([0.485, 0.456, 0.406], [0.229, 0.224, 0.225])
    ]),
}
data_dir = 'flower_data'
image_datasets = {x: datasets.ImageFolder(os.path.join(data_dir, x),
                                          data_transforms[x])
                  for x in ['train', 'valid']}
dataloaders = {x: torch.utils.data.DataLoader(image_datasets[x], batch_size=4,
                                             shuffle=True, num_workers=4)
              for x in ['train', 'valid']}
dataset_sizes = {x: len(image_datasets[x]) for x in ['train', 'valid']}
class_names = image_datasets['train'].classes

device = torch.device("cuda:0" if torch.cuda.is_available() else "cpu")
Next, we define a train_model function where we train and validate our model and save the most accurated network into file.
def train_model(model, criterion, optimizer, scheduler, num_epochs=25):
    since = time.time()

    best_model_wts = copy.deepcopy(model.state_dict())
    best_acc = 0.0

    for epoch in range(num_epochs):
        print('Epoch {}/{}'.format(epoch, num_epochs - 1))
        print('-' * 10)

        # Each epoch has a training and validation phase
        for phase in ['train', 'valid']:
            if phase == 'train':
                scheduler.step()
                model.train()  # Set model to training mode
            else:
                model.eval()   # Set model to evaluate mode

            running_loss = 0.0
            running_corrects = 0

            # Iterate over data.
            for inputs, labels in dataloaders[phase]:
                inputs = inputs.to(device)
                labels = labels.to(device)

                # zero the parameter gradients
                optimizer.zero_grad()

                # forward
                # track history if only in train
                with torch.set_grad_enabled(phase == 'train'):
                    outputs = model(inputs)
                    _, preds = torch.max(outputs, 1)
                    loss = criterion(outputs, labels)

                    # backward + optimize only if in training phase
                    if phase == 'train':
                        loss.backward()
                        optimizer.step()

                # statistics
                running_loss += loss.item() * inputs.size(0)
                running_corrects += torch.sum(preds == labels.data)

            epoch_loss = running_loss / dataset_sizes[phase]
            epoch_acc = running_corrects.double() / dataset_sizes[phase]

            print('{} Loss: {:.4f} Acc: {:.4f}'.format(
                phase, epoch_loss, epoch_acc))

            # deep copy the model
            if phase == 'valid' and epoch_acc > best_acc:
                best_acc = epoch_acc
                best_model_wts = copy.deepcopy(model.state_dict())

        print()

    time_elapsed = time.time() - since
    print('Training complete in {:.0f}m {:.0f}s'.format(
        time_elapsed // 60, time_elapsed % 60))
    print('Best val Acc: {:4f}'.format(best_acc))

    # load best model weights
    model.load_state_dict(best_model_wts)
    return model
Then, we can train our model with 25 epochs. (Note: for my desktop using CPU, it took me one night to complete the model training of 25 epochs.)
model_conv = train_model(model_conv, criterion, optimizer_conv,
                         exp_lr_scheduler, num_epochs=25)
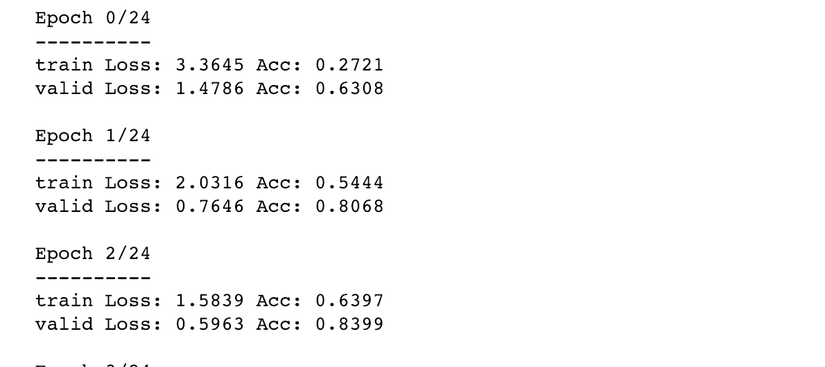
At first epochs, we got acc: 0.6308 or 63%.
 At eposh 25 th, we got Acc: 0.9218 or 92%.
 92% seem enough for me. Let's test it.
3. Test the model
We first load our trained model from our check point and set it to eval mode.
checkpoint = torch.load('classifier.pth')
model_conv.class_to_idx = checkpoint['class_to_idx']
# model_conv.load_state_dict(checkpoint['state_dict'])
model_conv.load_state_dict(torch.load('model.pt'))
model_conv.eval()
print(len(checkpoint['class_to_idx']))
Then, we define some functions for process_image, imshow, and predict the given image.
from PIL import Image
def process_image(image_path):
    # you can read its definition in our source code.
    ...
    return img

def imshow(image, ax=None, title=None):
    # you can read its definition in our source code.
    ...
    return ax


def plot_solution(image_path, model):
    # you can read its definition in our source code.
    ...
    plt.show()
And then the predict function.
def predict(image_path, model, top_num=5):
    # Process image
    img = process_image(image_path)

    # Numpy -> Tensor
    image_tensor = torch.from_numpy(img).type(torch.FloatTensor)
    # Add batch of size 1 to image
    model_input = image_tensor.unsqueeze(0)

    # Probs
    probs = torch.exp(model.forward(model_input))

    # Top probs
    top_probs, top_labs = probs.topk(top_num)
    top_probs = top_probs.detach().numpy().tolist()[0]
    top_labs = top_labs.detach().numpy().tolist()[0]

    # Convert indices to classes
    idx_to_class = {val: key for key, val in
                                      model.class_to_idx.items()}
    top_labels = [idx_to_class[lab] for lab in top_labs]
    top_flowers = [cat_to_name[idx_to_class[lab]] for lab in top_labs]
    print(top_labs)
    return top_probs, top_labels, top_flowers
Now, let's do some prediction.
image_path = 'flower_data/valid/26/image_06506.jpg'
plot_solution(image_path, model_conv)
cat_to_name['26']
 Wow, it predicted correctly. Now let's submit it to our lab.
We need upload our checkpoint to the lab and write python code to load it.
import torch
from torch import nn
from torchvision import models


def load_checkpoint(checkpoint_path):
    checkpoint = torch.load(checkpoint_path)

    model_conv = models.resnet18(pretrained=True)
    for param in model_conv.parameters():
        param.requires_grad = False

    num_ftrs = model_conv.fc.in_features
    model_conv.class_to_idx = checkpoint['class_to_idx']
    model_conv.fc = nn.Linear(num_ftrs, len(checkpoint['class_to_idx']))
    model_conv.load_state_dict(checkpoint['state_dict'])

    return model_conv

model = load_checkpoint('classifier.pth')
model.eval()
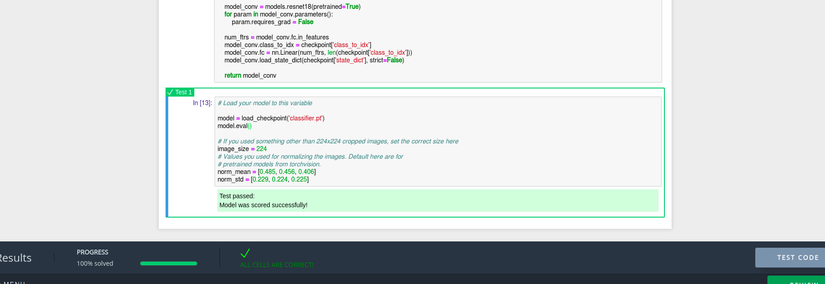
Then we can click submit button to see the result.
 "ALL CELLS ARE CORRECT!" awesome.
We've completed it.
4. Resources
- source code: https://github.com/RathanakSreang/pytorch_final_challenge/blob/master/Solution.ipynb
- https://www.kaggle.com/youben/flowers102species
- https://cs231n.github.io/transfer-learning/
- https://pytorch.org/docs/stable/torchvision/models.html
- https://pytorch.org/tutorials/beginner/transfer_learning_tutorial.html#
- https://pytorch.org/docs/master/notes/autograd.html
Conclusion
During the Pytorch FB Challenge, I've gained a lot of knowledge and experiences from the exercises, communities and the final lab. Sadly, I haven't passed to next phase. However, I'll keep continue learning and using Pytorch for my future work and I am looking forward to joining the other challenges.
All rights reserved