PRIVATE CLOUD OPENSHIFT – P1: Cài đặt OpenShift bảng Community cho môi trường Production
Bài đăng này đã không được cập nhật trong 3 năm
Bài viết này là một phần của chùm bài viết: Private cloud OpenShift.
Một số từ viết tắt:
| Từ viết tắt | Diễn giải |
|---|---|
| OKD | OpenShift Community (Origin) |
| LB | Load Balancing |
| GW | Gateway |
| NFS | Network File System |
| DNS | Domain Name System |
| FCOS 33 | Fedora CoreOS 33 |
| CentOS 8 | Operation System |
Để đọc bài viết này hiệu quả, yêu cầu có kiến thức về: Linux, Webserver, Load Balancing, DNS, ssh key, Docker
Sơ qua về tiến trình cài đặt: Boostrap sẽ cài đặt cho các Master. Master sẽ cài đặt cho các Worker.
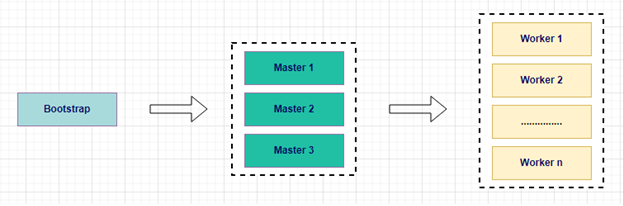
Nên nhớ Boostrap chỉ dùng để cài đặt cho các Master. Xong việc nó sẽ tự động hủy.
Mô hình sẽ cài đặt: 3 node Master và 2 node Worker.
Danh sách các server cần phải chuẩn bị: (Giả sử môi trường đang thực hiện có lớp mạng 192.168.99.x, có gateway 192.168.99.1)
| Machine | Type | Operation System | IP Address | Resource |
|---|---|---|---|---|
| okd4-services | DNS / Web / admin | CentOS 8 | 192.168.99.51 | 16G RAM, 4 core cpu, 200G HDD |
| okd4-lb | LB | CentOS 8 | 192.168.99.52 | 8G RAM, 2 core cpu, 120G HDD |
| okd4-nfs | NFS | CentOS 8 | 192.168.99.53 | 24G RAM, 4 core cpu, 120G HDD (OS), 2T HDD data |
| okd4-bootstrap | Bootstrap | FCOS 33 | 192.168.99.60 | 16G RAM, 4 core cpu, 200G HDD |
| okd4-control-plane-1 | Master | FCOS 33 | 192.168.99.61 | 16G RAM, 4 core cpu, 200G HDD |
| okd4-control-plane-2 | Master | FCOS 33 | 192.168.99.62 | 16G RAM, 4 core cpu, 200G HDD |
| okd4-control-plane-3 | Master | FCOS 33 | 192.168.99.63 | 16G RAM, 4 core cpu, 200G HDD |
| okd4-compute-1 | Worker | FCOS 33 | 192.168.99.64 | 128G RAM, 40 core cpu, 300G HDD |
| okd4-compute-2 | Worker | FCOS 33 | 192.168.99.65 | 128G RAM, 40 core cpu, 300G HDD |
Version các phần mềm
| Software | Description | Version |
|---|---|---|
| okd | Openshift Community | 4.6.0-0.okd-2021-02-14-205305 |
| oc | Openshitf Client | 4.6.0-0.okd-2021-02-14-205305 |
| Fedora CoreOS 33 (FCOS 33) | Operation System: FCOS 33 | fedora-coreos-33.20210201.3.0-live.x86_64 |
| Kubernetes | kubernetes | 1.19.4 |
| CentOS 8 | Operation System: CentOS 8 | CentOS-8.3.2011-x86_64 |
Lưu ý: version của phần mềm sẽ thích hợp với nhau. Ví dụ okd4.6 sẽ đi với FCOS33
Bài viết này cài đặt okd 4.6 mà không phải version cuối cùng với mục đích là để trải nghiệm nguyên hệ cluster nó upgrade như thế nào.
Thông tin khái quát ở trên đã xong, tiến hành cài đặt thôi nào!!!
I/ Install okd4-services
1. Tiền xử lý
Cài hệ điều hành CentOS-8.3.2011-x86_64. Đặt ip là 192.168.99.51 và để tạm DNS:8.8.8.8
Cài dịch vụ để đồng bộ ngày giờ: chrony
2. Chuẩn bị
Tạo ssh-key
$ ssh-keygen -t rsa
Generating public/private rsa key pair.
Enter file in which to save the key (/root/.ssh/idrsa):
Enter passphrase (empty for no passphrase):
Enter same passphrase again:
Your identification has been saved in /root/.ssh/idrsa.
Your public key has been saved in /root/.ssh/idrsa.pub.
Tạo sẵn các file cấu hình
Tạo thư mục okd4_files
$ mkdir /root/okd4_files
Tạo các file cho cấu hình DNS:
+Tạo file /root/okd4_files/named.conf với nội dung bên dưới:
//
// named.conf
//
// Provided by Red Hat bind package to configure the ISC BIND named(8) DNS
// server as a caching only nameserver (as a localhost DNS resolver only).
//
// See /usr/share/doc/bind*/sample/ for example named configuration files.
//
// See the BIND Administrator's Reference Manual (ARM) for details about the
// configuration located in /usr/share/doc/bind-{version}/Bv9ARM.html

options {
	listen-on port 53 { 127.0.0.1; 192.168.99.51; };
#	listen-on-v6 port 53 { ::1; };
	directory 	"/var/named";
	dump-file 	"/var/named/data/cache_dump.db";
	statistics-file "/var/named/data/named_stats.txt";
	memstatistics-file "/var/named/data/named_mem_stats.txt";
	recursing-file  "/var/named/data/named.recursing";
	secroots-file   "/var/named/data/named.secroots";
	allow-query     { localhost; 192.168.99.0/24; };

	/*
	 - If you are building an AUTHORITATIVE DNS server, do NOT enable recursion.
	 - If you are building a RECURSIVE (caching) DNS server, you need to enable
	   recursion.
	 - If your recursive DNS server has a public IP address, you MUST enable access
	   control to limit queries to your legitimate users. Failing to do so will
	   cause your server to become part of large scale DNS amplification
	   attacks. Implementing BCP38 within your network would greatly
	   reduce such attack surface
	*/
	recursion yes;

	forwarders {
                8.8.8.8;
                8.8.4.4;
        };

	dnssec-enable yes;
	dnssec-validation yes;

	/* Path to ISC DLV key */
	bindkeys-file "/etc/named.root.key";

	managed-keys-directory "/var/named/dynamic";

	pid-file "/run/named/named.pid";
	session-keyfile "/run/named/session.key";
};

logging {
        channel default_debug {
                file "data/named.run";
                severity dynamic;
        };
};

zone "." IN {
	type hint;
	file "named.ca";
};

include "/etc/named.rfc1912.zones";
include "/etc/named.root.key";
include "/etc/named/named.conf.local";
+Tạo file /root/okd4_files/named.conf.local với nội dung bên dưới:
zone "okd.local" {
    type master;
    file "/etc/named/zones/db.okd.local"; # zone file path
};
zone "99.168.192.in-addr.arpa" {
    type master;
    file "/etc/named/zones/db.192.168.99";  # 192.168.99/24 subnet
};
+Tạo file /root/okd4_files/db.okd.local với nội dung bên dưới:
$TTL    604800
@       IN      SOA     okd4-services.okd.local. admin.okd.local. (
                  1     ; Serial
             604800     ; Refresh
              86400     ; Retry
            2419200     ; Expire
             604800     ; Negative Cache TTL
)

; name servers - NS records
    IN      NS      okd4-services

; name servers - A records
okd4-services.okd.local.          IN      A       192.168.99.51
okd4-lb.okd.local.          IN      A       192.168.99.52
okd4-nfs.okd.local.          IN      A       192.168.99.53

; OpenShift Container Platform Cluster - A records
okd4-bootstrap.cloud.okd.local.        IN      A      192.168.99.60
okd4-control-plane-1.cloud.okd.local.  IN      A      192.168.99.61
okd4-control-plane-2.cloud.okd.local.  IN      A      192.168.99.62
okd4-control-plane-3.cloud.okd.local.  IN      A      192.168.99.63
okd4-compute-1.cloud.okd.local.        IN      A      192.168.99.64
okd4-compute-2.cloud.okd.local.        IN      A      192.168.99.65

; OpenShift internal cluster IPs - A records
api.cloud.okd.local.    IN    A    192.168.99.52
api-int.cloud.okd.local.    IN    A    192.168.99.52
*.apps.cloud.okd.local.    IN    A    192.168.99.52
etcd-0.cloud.okd.local.    IN    A     192.168.99.61
etcd-1.cloud.okd.local.    IN    A     192.168.99.62
etcd-2.cloud.okd.local.    IN    A     192.168.99.63
console-openshift-console.apps.cloud.okd.local.     IN     A     192.168.99.52
oauth-openshift.apps.cloud.okd.local.     IN     A     192.168.99.52

; OpenShift internal cluster IPs - SRV records
_etcd-server-ssl._tcp.cloud.okd.local.    86400     IN    SRV     0    10    2380    etcd-0.cloud
_etcd-server-ssl._tcp.cloud.okd.local.    86400     IN    SRV     0    10    2380    etcd-1.cloud
_etcd-server-ssl._tcp.cloud.okd.local.    86400     IN    SRV     0    10    2380    etcd-2.cloud
+Tạo file /root/okd4_files/db.192.168.99 với nội dung bên dưới:
$TTL    604800
@       IN      SOA     okd4-services.okd.local. admin.okd.local. (
                  6     ; Serial
             604800     ; Refresh
              86400     ; Retry
            2419200     ; Expire
             604800     ; Negative Cache TTL
)

; name servers - NS records
    IN      NS      okd4-services.okd.local.

; name servers - PTR records
51    IN    PTR    okd4-services.okd.local.
52    IN    PTR    okd4-lb.okd.local.
53    IN    PTR    okd4-nfs.okd.local.

; OpenShift Container Platform Cluster - PTR records
60    IN    PTR    okd4-bootstrap.cloud.okd.local.
61    IN    PTR    okd4-control-plane-1.cloud.okd.local.
62    IN    PTR    okd4-control-plane-2.cloud.okd.local.
63    IN    PTR    okd4-control-plane-3.cloud.okd.local.
64    IN    PTR    okd4-compute-1.cloud.okd.local.
65    IN    PTR    okd4-compute-2.cloud.okd.local.
52    IN    PTR    api.cloud.okd.local.
52    IN    PTR    api-int.cloud.okd.local.
3. Cài đặt DNS
$ sudo dnf -y install bind bind-utils
Copy các file cấu hình của DNS đã tạo ở trên:
cd /root/okd4_files
sudo cp named.conf /etc/named.conf
sudo cp named.conf.local /etc/named/
sudo mkdir /etc/named/zones
sudo cp db.okd.local /etc/named/zones
sudo cp db.192.168.100 /etc/named/zones
Start dịch vụ named:
sudo systemctl enable named
sudo systemctl stop named
sudo systemctl start named
sudo systemctl status named
Firewall:
sudo firewall-cmd --permanent --add-port=53/udp
sudo firewall-cmd --reload
Thay thế DNS okd4-service thành 127.0.0.1:
sudo nmcli connection modify ens192 ipv4.dns "127.0.0.1"
Test DNS:
$ dig okd.local

; <<>> DiG 9.11.20-RedHat-9.11.20-5.el8 <<>> okd.local
;; global options: +cmd
;; Got answer:
;; WARNING: .local is reserved for Multicast DNS
;; You are currently testing what happens when an mDNS query is leaked to DNS
;; ->>HEADER<<- opcode: QUERY, status: NOERROR, id: 54559
;; flags: qr aa rd ra; QUERY: 1, ANSWER: 0, AUTHORITY: 1, ADDITIONAL: 1

;; OPT PSEUDOSECTION:
; EDNS: version: 0, flags:; udp: 4096
; COOKIE: 8910da20288a538b10a49a6e602aa53d3ad872fafe5a941e (good)
;; QUESTION SECTION:
;okd.local.                     IN      A

;; AUTHORITY SECTION:
okd.local.              604800  IN      SOA     okd4-services.okd.local. admin.okd.local. 1 604800 86400 2419200 604800

;; Query time: 0 msec
;; SERVER: 127.0.0.1#53(127.0.0.1)
;; WHEN: Mon Feb 15 11:45:49 EST 2021
;; MSG SIZE  rcvd: 122
Test revert ip address
$ dig -x 192.168.99.51

; <<>> DiG 9.11.26-RedHat-9.11.26-6.el8 <<>> -x 192.168.99.51
;; global options: +cmd
;; Got answer:
;; ->>HEADER<<- opcode: QUERY, status: NOERROR, id: 61080
;; flags: qr aa rd ra; QUERY: 1, ANSWER: 1, AUTHORITY: 1, ADDITIONAL: 2

;; OPT PSEUDOSECTION:
; EDNS: version: 0, flags:; udp: 1232
; COOKIE: 2c2e0515b0012028092f5fc062f5eeedaabb8b1b5e638e3c (good)
;; QUESTION SECTION:
;51.99.168.192.in-addr.arpa.   IN      PTR

;; ANSWER SECTION:
51.99.168.192.in-addr.arpa. 604800 IN  PTR     okd4-services.okd.local.

;; AUTHORITY SECTION:
99.168.192.in-addr.arpa. 604800 IN     NS      okd4-services.okd.local.

;; ADDITIONAL SECTION:
okd4-services.okd.local. 604800 IN      A       192.168.99.51

;; Query time: 0 msec
;; SERVER: 127.0.0.1#53(127.0.0.1)
;; WHEN: Fri Aug 12 13:10:53 +07 2022
;; MSG SIZE  rcvd: 151
4. Cài đặt webserver dùng tạm trong quá trình install: httpd
$ sudo dnf install -y httpd
Thay port lắng nghe của httpd từ 80 thành 8080:
sudo sed -i 's/Listen 80/Listen 8080/' /etc/httpd/conf/httpd.conf
Firewall:
sudo setsebool -P httpd_read_user_content 1
sudo firewall-cmd --permanent --add-port=8080/tcp
sudo firewall-cmd --reload
Chạy webserver
sudo systemctl enable httpd
sudo systemctl start httpd
Test webserver:
$ curl localhost:8080
<?xml version="1.0" encoding="utf-8"?>
<!DOCTYPE HTML>
<html lang="en">
  <head>
    <title>CentOS 提供的 Apache HTTP 服务器测试页</title>
    <meta charset="utf-8"/>
….
5. Cài tool okd4.6 và oc
(Client tools for OpenShift và server)
Download okd4.6 và oc
Download ở: https://github.com/openshift/okd/releases?page=3
openshift-client-linux-4.6.0-0.okd-2021-02-14-205305.tar.gz openshift-install-linux-4.6.0-0.okd-2021-02-14-205305.tar.gz
Chép 2 file vừa download vào /softs/okd4.6.0
Giải nén và chép vào thư mục /usr/local/bin
cd /softs/okd4.6.0
tar -zxvf openshift-client-linux-4.6.0-0.okd-2021-02-14-205305.tar.gz
tar -zxvf openshift-install-linux-4.6.0-0.okd-2021-02-14-205305.tar.gz
sudo mv kubectl oc openshift-install /usr/local/bin/
Kiểm tra okd version:
$ openshift-install version
openshift-install 4.6.0-0.okd-2021-02-14-205305
built from commit 20585a2903a61784703fde00e38af1208c007599
release image quay.io/openshift/okd@sha256:6640a4daf0623023b9046fc91858d018bd34433b5c3485c4a61904a33b59a3b9
$ oc version
Client Version: 4.6.0-0.okd-2021-02-14-205305
6. Phát sinh các file cấu hình okd cluster:
Tạo thư mục chứa các file này
$ mkdir /root/install_dir
Tạo file /root/install_dir/install-config.yaml với nội dung sau:
apiVersion: v1
baseDomain: okd.local
metadata:
  name: cloud

compute:
- hyperthreading: Enabled
  name: worker
  replicas: 0

controlPlane:
  hyperthreading: Enabled
  name: master
  replicas: 3

networking:
  clusterNetwork:
  - cidr: 10.128.0.0/14
    hostPrefix: 23
  networkType: OpenShiftSDN
  serviceNetwork:
  - 172.30.0.0/16

platform:
  none: {}

fips: false

pullSecret: '{"auths":{"fake":{"auth": "bar"}}}'
sshKey: 'copy nội dung trong file /root/.ssh/id_rsa.pub đã tạo ở trên bỏ vào đây'
Backup lại file install-config.yaml, vì khi phát sinh Manifests nó sẽ xóa file này đi.
$ cp /root/install_dir/install-config.yaml /root/install_dir/install-config.yaml.bak
Phát sinh Kubernetes manifests:
$ openshift-install create manifests --dir=/root/install_dir/
Chạy lệnh bên dưới để cập nhật lại file cluster-scheduler-02-config.yaml với mục đích không cho master schedule
$ sed -i 's/mastersSchedulable: true/mastersSchedulable: False/' /root/install_dir/manifests/cluster-scheduler-02-config.yml
Tạo ignition-configs:
$ openshift-install create ignition-configs --dir=/root/install_dir/
Chép các file cấu hình okd lên webserver:
sudo mkdir /var/www/html/okd4
sudo cp -R /root/install_dir/* /var/www/html/okd4/
sudo chown -R apache: /var/www/html/
sudo chmod -R 755 /var/www/html/
Test thử file metadata.json
$ curl localhost:8080/okd4/metadata.json
{"clusterName":"cloud","clusterID":"929c3cfa-6a45-4962-ae2c-1142d2111b15","infraID":"cloud-7fqq9"}
7. Thiết lập biến môi trường
Thêm một dòng vào file /root/.bash_profile: export KUBECONFIG=/root/install_dir/auth/kubeconfig
Thực hiện refresh lại biến môi trường cho các session ssh đã mở:
$ . /root/.bash_profile
8. Cài đặt jq để thực hiện approve node nhanh chóng
wget -O jq https://github.com/stedolan/jq/releases/download/jq-1.6/jq-linux64
chmod +x jq
sudo mv jq /usr/local/bin/
jq --version
jq-1.6
Đến đây là đã có đủ các file để cài đặt và cấu hình cho OKD.
II/ Cài đặt okd4-lb
1. Tiền xử lý
Cài hệ điều hành CentOS-8.3.2011-x86_64, với ip là 192.168.99.52 và để DNS: 192.168.99.51
Cài dịch vụ để đồng bộ ngày giờ: chrony
2. Cài đặt HAProxy
sudo dnf install haproxy -y
Tạo file /etc/haproxy/haproxy.cfg với nội dung sau:
# Global settings
#---------------------------------------------------------------------
global
    maxconn     20000
    log         /dev/log local0 info
    chroot      /var/lib/haproxy
    pidfile     /var/run/haproxy.pid
    user        haproxy
    group       haproxy
    daemon

    # turn on stats unix socket
    stats socket /var/lib/haproxy/stats

#---------------------------------------------------------------------
# common defaults that all the 'listen' and 'backend' sections will
# use if not designated in their block
#---------------------------------------------------------------------
defaults
    mode                    http
    log                     global
    option                  httplog
    option                  dontlognull
    option http-server-close
    option forwardfor       except 127.0.0.0/8
    option                  redispatch
    retries                 3
    timeout http-request    10s
    timeout queue           1m
    timeout connect         10s
    timeout client          300s
    timeout server          300s
    timeout http-keep-alive 10s
    timeout check           10s
    maxconn                 20000

listen stats
    bind :9000
    mode http
    stats enable
    stats uri /

frontend okd4_k8s_api_fe
    bind :6443
    default_backend okd4_k8s_api_be
    mode tcp
    option tcplog

backend okd4_k8s_api_be
    balance source
    mode tcp
    server      okd4-bootstrap 192.168.99.60:6443 check
    server      okd4-control-plane-1 192.168.99.61:6443 check
    server      okd4-control-plane-2 192.168.99.62:6443 check
    server      okd4-control-plane-3 192.168.99.63:6443 check

frontend okd4_machine_config_server_fe
    bind :22623
    default_backend okd4_machine_config_server_be
    mode tcp
    option tcplog

backend okd4_machine_config_server_be
    balance source
    mode tcp
    server      okd4-bootstrap 192.168.99.60:22623 check
    server      okd4-control-plane-1 192.168.99.61:22623 check
    server      okd4-control-plane-2 192.168.99.62:22623 check
    server      okd4-control-plane-3 192.168.99.63:22623 check

frontend okd4_http_ingress_traffic_fe
    bind :80
    default_backend okd4_http_ingress_traffic_be
    mode tcp
    option tcplog

backend okd4_http_ingress_traffic_be
    balance source
    mode tcp
    server      okd4-compute-1 192.168.99.64:80 check
    server      okd4-compute-2 192.168.99.65:80 check

frontend okd4_https_ingress_traffic_fe
    bind *:443
    default_backend okd4_https_ingress_traffic_be
    mode tcp
    option tcplog

backend okd4_https_ingress_traffic_be
    balance source
    mode tcp
    server      okd4-compute-1 192.168.99.64:443 check
    server      okd4-compute-2 192.168.99.65:443 check
Firewall:
sudo setsebool -P haproxy_connect_any 1
sudo firewall-cmd --permanent --add-port=6443/tcp
sudo firewall-cmd --permanent --add-port=22623/tcp
sudo firewall-cmd --permanent --add-service=http
sudo firewall-cmd --permanent --add-service=https
sudo firewall-cmd --reload
Chạy HA Proxy:
sudo systemctl enable haproxy
sudo systemctl start haproxy
sudo systemctl status haproxy
Mở thêm port monitor của haproxy
sudo firewall-cmd --permanent --add-port=9000/tcp
sudo firewall-cmd --reload
Link monitor: http://192.168.99.51:9000 Thực tế trên môi trường production cần phải có 2 haproxy để backup với nhau. Keepalived + Haproxy: không nằm trong phạm vi bài viết này.
III/ Cài đặt bootstrap nodes:
1. Boot server từ file iso “FCOS 33”
2. Cấu hình ip cho bootstrap: 192.168.99.60
$ sudo nmtui
Address: 192.168.99.60/24 Gateway: 192.168.99.1 DNS server: 192.168.99.51
Refresh lại IP mới
$ sudo systemctl restart NetworkManager
3. Load ignition file
$ sudo coreos-installer install --ignition-url http://192.168.99.51:8080/okd4/bootstrap.ign /dev/sda --insecure-ignition --copy-network
4. Reboot to install
$ sudo reboot
5. Monitor quá trình install Bootstrap:
Đứng tại okd4-services, ssh vào bootstrap:
$ ssh core@192.168.99.60
-Khi coi log trên bootstrap thấy những dòng dưới đây là bootstrap đã sẵn sàng cho master
$ journalctl -b -f -u release-image.service -u bootkube.service
Feb 16 09:17:10 okd4-bootstrap.cloud.okd.local bootkube.sh[6706]: Created "0000_80_machine-config-operator_05_1_okd-master-extensions.yaml" machineconfigs.v1.machineconfiguration.openshift.io/99-master-okd-extensions -n Feb 16 09:17:10 okd4-bootstrap.cloud.okd.local bootkube.sh[6706]: Created "0000_80_machine-config-operator_05_2_okd-worker-extensions.yaml" machineconfigs.v1.machineconfiguration.openshift.io/99-worker-okd-extensions -n Feb 16 09:17:10 okd4-bootstrap.cloud.okd.local bootkube.sh[6706]: Created "99-okd-master-disable-mitigations.yaml" machineconfigs.v1.machineconfiguration.openshift.io/99-okd-master-disable-mitigations -n Feb 16 09:17:11 okd4-bootstrap.cloud.okd.local bootkube.sh[6706]: Created "99-okd-worker-disable-mitigations.yaml" machineconfigs.v1.machineconfiguration.openshift.io/99-okd-worker-disable-mitigations -n Feb 16 09:17:11 okd4-bootstrap.cloud.okd.local bootkube.sh[6706]: Created "99_openshift-machineconfig_99-master-ssh.yaml" machineconfigs.v1.machineconfiguration.openshift.io/99-master-ssh -n Feb 16 09:17:11 okd4-bootstrap.cloud.okd.local bootkube.sh[6706]: Created "99_openshift-machineconfig_99-worker-ssh.yaml" machineconfigs.v1.machineconfiguration.openshift.io/99-worker-ssh -n
IV/ Cài đặt control-plane-1 node (master 1):
1. Boot server từ file iso “FCOS 33”
2. Cấu hình ip cho master 1: 192.168.99.61
$ sudo nmtui
Address: 192.168.99.61/24 Gateway: 192.168.99.1 DNS server: 192.168.99.51
Refresh lại IP mới
$ sudo systemctl restart NetworkManager
3. Load ignition file
$ sudo coreos-installer install --ignition-url http://192.168.99.51:8080/okd4/master.ign /dev/sda --insecure-ignition --copy-network
4. Reboot to install
$ sudo reboot
5. Monitor quá trình install control-plane-1:
Đứng tại okd4-services, thực hiện lệnh sau:
$ oc get node
NAME                                       STATUS   ROLES    AGE       VERSION
okd4-control-plane-1.cloud.okd.local       Ready    master   2m33s   v1.19.2+f173eb4-1049
Nếu thấy status Ready là hoàn thành việc cài đặt control-plane-1 Thực hiện cài đặt tương tự cho control-plane-2, control-plane-3. Kiểm tra lại các control-plane
$ oc get node
NAME                                       STATUS   ROLES    AGE       VERSION
okd4-control-plane-1.cloud.okd.local       Ready    master   4m33s   v1.19.2+f173eb4-1049
okd4-control-plane-2.cloud.okd.local       Ready    master   3m23s   v1.19.2+f173eb4-1049
okd4-control-plane-3.cloud.okd.local       Ready    master   1m23s   v1.19.2+f173eb4-1049
Tất cả Master đều ở trạng thái Ready
-Kiểm tra Bootstrap đã hoàn thành sứ mệnh chưa:
$ openshift-install --dir=install_dir/ wait-for bootstrap-complete --log-level=info

INFO Waiting up to 20m0s for the Kubernetes API at https://api.cloud.okd.local:6443...
INFO API v1.19.2+f173eb4-1049+4cad5caeae67c3-dirty up
INFO Waiting up to 30m0s for bootstrapping to complete...
INFO It is now safe to remove the bootstrap resources
INFO Time elapsed: 4m0s
Nếu thấy dòng “INFO It is now safe to remove the bootstrap resources” thì Bootstrap đã hoàn thành sứ mệnh. Nó sẽ tự hủy và không còn tác dụng gì nữa.
-Đứng ở okd4-lb, thực hiện remove bootstrap khỏi LB:
sudo sed -i  '/ okd4-bootstrap /s/^/#/' /etc/haproxy/haproxy.cfg
sudo systemctl reload haproxy
V/ Cài đặt compute-1 node (worker 1):
1. Boot server từ file iso “FCOS 33”
2. Cấu hình ip cho worker 1: 192.168.99.64
$ sudo nmtui
Address: 192.168.99.64/24 Gateway: 192.168.99.1 DNS server: 192.168.99.51
Refresh lại IP mới
$ sudo systemctl restart NetworkManager
3. Load ignition file
$ sudo coreos-installer install --ignition-url http://192.168.99.51:8080/okd4/worker.ign /dev/sda --insecure-ignition --copy-network
4. Reboot to install
sudo reboot
5. Monitor quá trình install compute-1:
Worker muốn join vào cluster thì phải được Master approve. Thông thường 1 worker sẽ cần 2 cái approve (system:serviceaccount và system:node) Đứng tại okd4-services, thực hiện lệnh sau:
$ oc get csr
NAME        AGE     SIGNERNAME                                    REQUESTOR                                                                   CONDITION
csr-rwn9j   18m     kubernetes.io/kube-apiserver-client-kubelet   system:serviceaccount:openshift-machine-config-operator:node-bootstrapper   Pending
csr-tgpg7   3m28s   kubernetes.io/kube-apiserver-client-kubelet   system:serviceaccount:openshift-machine-config-operator:node-bootstrapper   Pending
$ oc get csr | grep okd4-compute-1
csr-skdpp   119s    kubernetes.io/kubelet-serving                 system:node:okd4-compute-1.cloud.okd.local                                  Pending
Thực hiện approve:
$ oc get csr -ojson | jq -r '.items[] | select(.status == {} ) | .metadata.name' | xargs oc adm certificate approve
Sau khi approve xong, kiểm tra lại xem worker đã được join vào cluster chưa:
$ oc get node
NAME                                       STATUS   ROLES    AGE     VERSION
okd4-compute-1.cloud.okd.local             Ready    worker   5s      v1.19.2+f173eb4-1049
okd4-control-plane-1.cloud.okd.local       Ready    master   6m33s   v1.19.2+f173eb4-1049
okd4-control-plane-2.cloud.okd.local       Ready    master   5m23s   v1.19.2+f173eb4-1049
okd4-control-plane-3.cloud.okd.local       Ready    master   2m23s   v1.19.2+f173eb4-1049
Nếu thấy status Ready là hoàn thành việc cài đặt compute-1 Thực hiện cài đặt tương tự cho compute-2. Sau khi compute-2 thực hiện xong sẽ có bức tranh như bên dưới đây.
$ oc get node
NAME                                       STATUS   ROLES    AGE        VERSION
okd4-compute-1.cloud.okd.local             Ready    worker   3m5s    v1.19.2+f173eb4-1049
okd4-compute-2.cloud.okd.local             Ready    worker   12s     v1.19.2+f173eb4-1049
okd4-control-plane-1.cloud.okd.local       Ready    master   9m33s   v1.19.2+f173eb4-1049
okd4-control-plane-2.cloud.okd.local       Ready    master   8m23s   v1.19.2+f173eb4-1049
okd4-control-plane-3.cloud.okd.local       Ready    master   5m23s   v1.19.2+f173eb4-1049
Pheww, bài viết quá dài luôn. Đến đây là đã thực hiện xong việc cài đặt okd4.6.
Tuy nhiên đừng vội sử dụng mà hãy đọc tiếp bài thứ hai “PRIVATE CLOUD OPENSHIFT – P2: Nâng cấp”
All rights reserved
