[Phần 2] Spring Security 6 with JWT, Oauth2
Bài đăng này đã không được cập nhật trong 2 năm
1. Giới thiệu
Tiếp nối phần 1 trong series, phần này mình sẽ thêm Security vào project và giải thích về lý thuyết Spring Security. Mọi người có thể đọc lại phần 1 ở đây: https://viblo.asia/p/phan-1-xay-dung-project-rest-api-co-ban-7ymJXPdRJkq.
2. Thêm dependency vào project
Bây giờ chúng ta sẽ thêm dependency Spring Security vào project:
Trong trường hợp mọi người sử dụng Intellij Ultimate thì có thể vào file pom.xml, chọn Edit Starters và thêm Spring Security vào project.
<dependency>
    <groupId>org.springframework.boot</groupId>
    <artifactId>spring-boot-starter-security</artifactId>
</dependency>
<dependency>
    <groupId>org.springframework.security</groupId>
    <artifactId>spring-security-test</artifactId>
    <scope>test</scope>
</dependency>
3. Spring Security Internal Flow
Trước khi thêm Security vào project, mình sẽ giải thích sơ qua về flow của Spring Security:
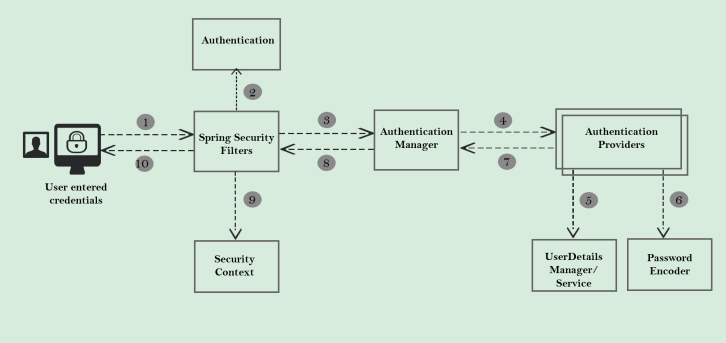
Mình có một lưu ý nhỏ trước khi đọc flow là mọi người hãy mở từng file mà mình đề cập ra để đọc chi tiết để có thể hiểu rõ nhất flow của Spring Security.
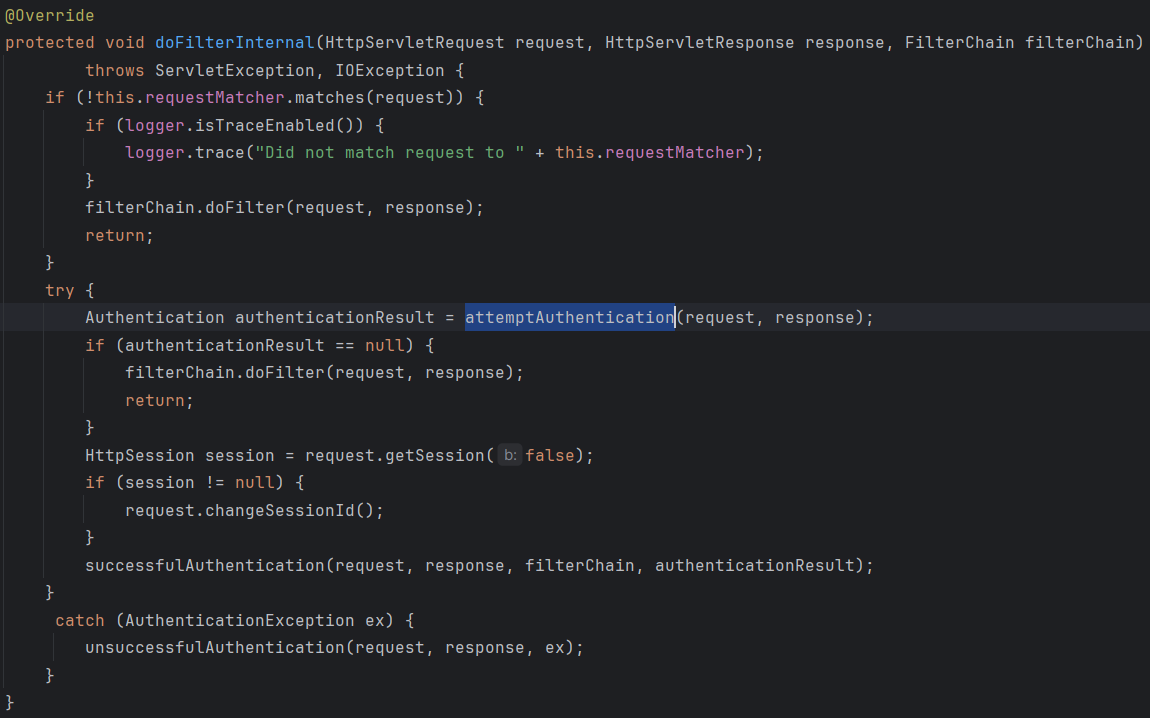
Bước 1: Spring Security Filters
- Khi user gửi đi thông tin đăng nhập đến backend, SpringBoot sẽ gọi đến class AuthenticationFilter.java(class này nằm ở bên trong package org.springframework.security.web.authentication) và chạy đến method doFilterInternal.
![image.png]()
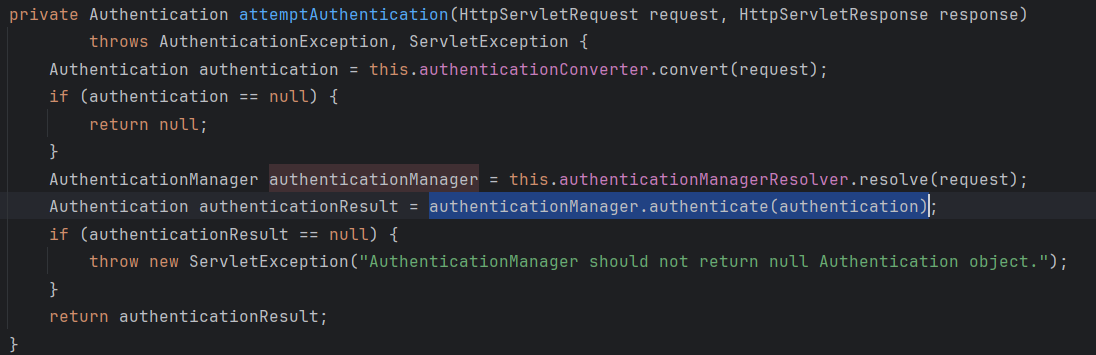
Bước 2: Authentication
- Tiếp theo, ở bên trong method doFilterInternal nó sẽ gọi đến method attemptAuthentication, ở trong này tiếp tục gọi đến method authenticationManager.authenticate(authentication)
![image.png]()
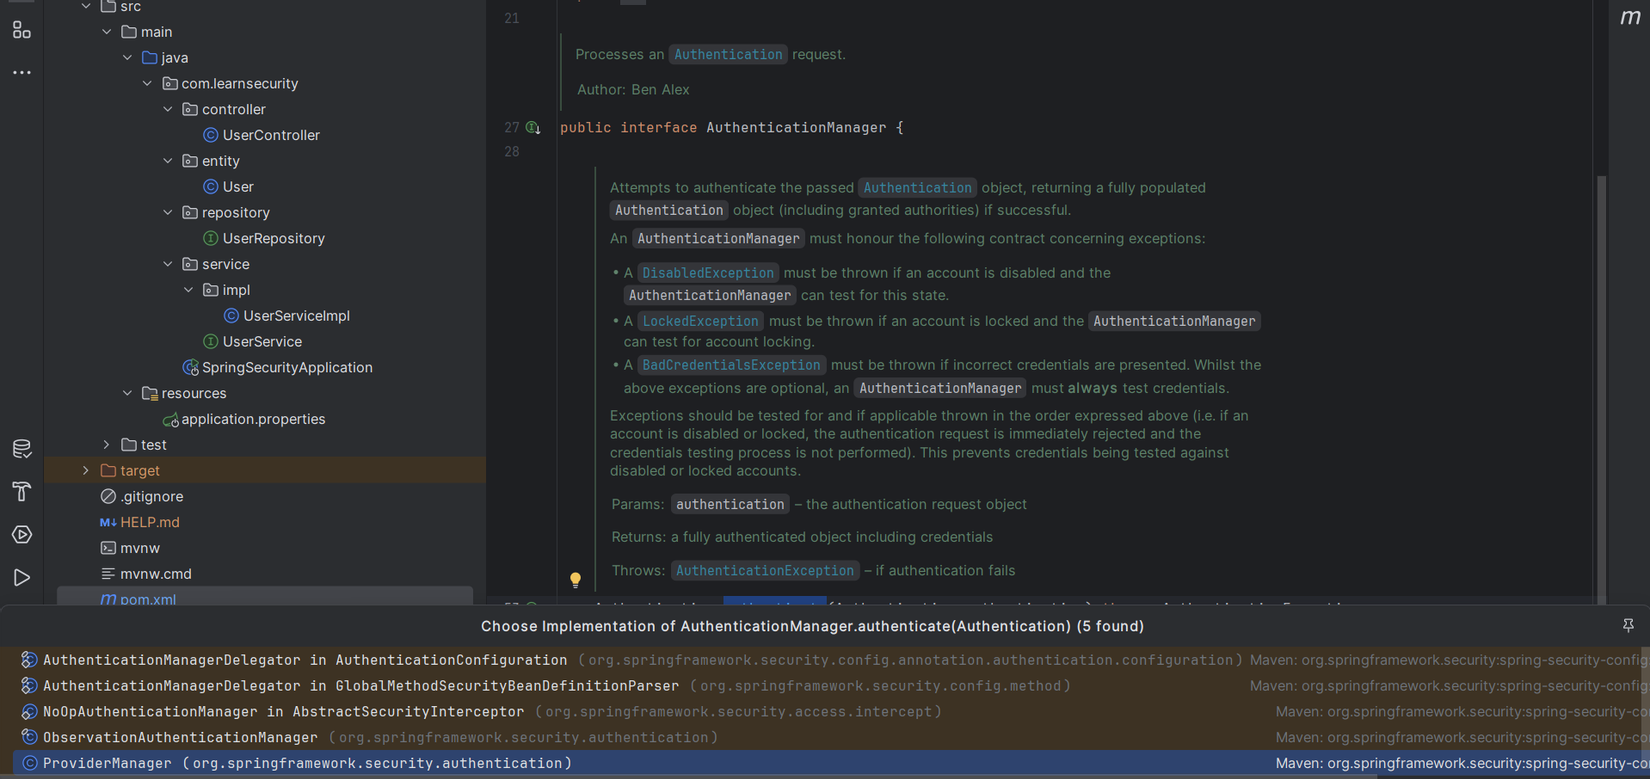
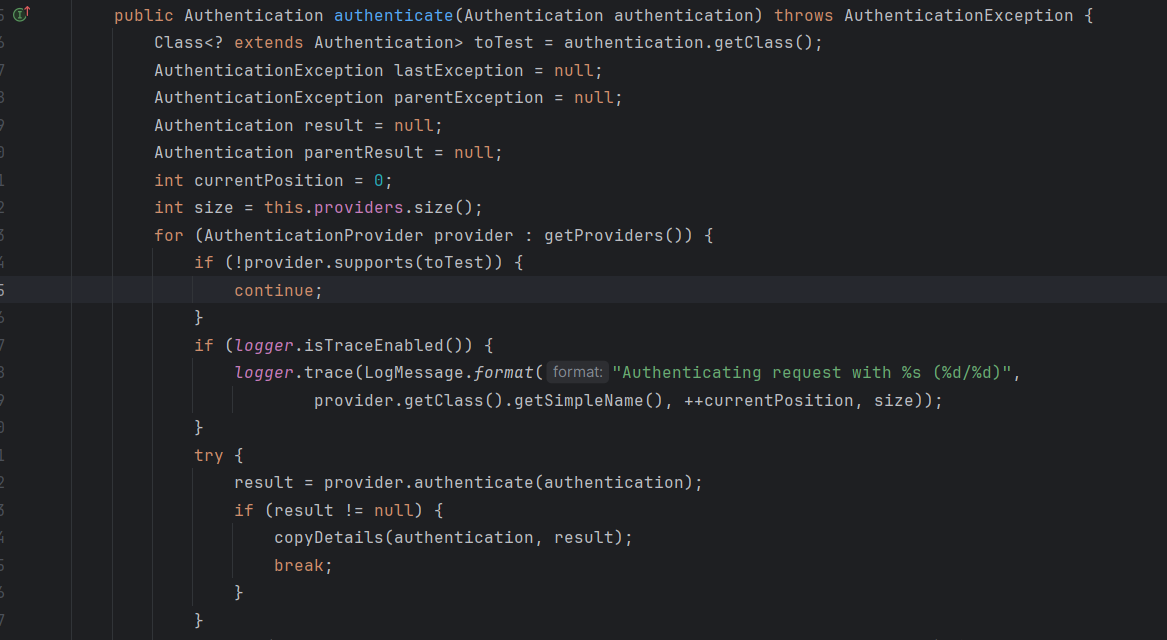
Bước 3: Authentication Manager
- Ở bên trong interface AuthenticationManager chúng ta có một method là authenticate, có nhiều class implement từ interface này, nhưng ở đây chúng ta sẽ chỉ đề cập đến class ProviderManager.java
![image.png]()
![image.png]()
- Nếu mọi người để ý ở trong method này, Spring Security sử dụng vòng lặp for (AuthenticationProvider provider : getProviders()) {...}. Ở đây gọi đến tất cả provider bởi vì AuthenticationManager có nhiệm vụ quản lý nhiều provider khác nhau, ví dụ như OAuth2AuthenticationProvider, DaoAuthenticationProvider,...
- Tiếp theo gọi đến method result = provider.authenticate(authentication);
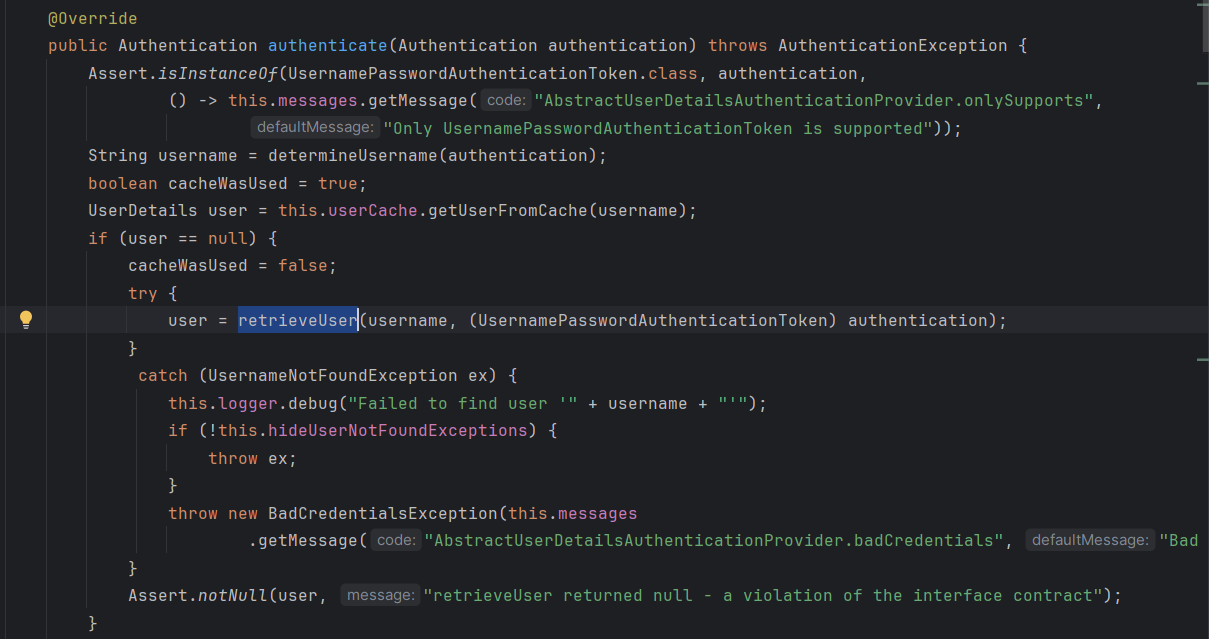
Bước 4: AuthenticationProvider
- Sau khi click vào method authenticate, nó gọi đến interface AuthenticationProvider, click vào abstract method thì gọi đến class AbstractUserDetailsAuthenticationProvider. File này được implement từ AuthenticationProvider.java.
![image.png]()
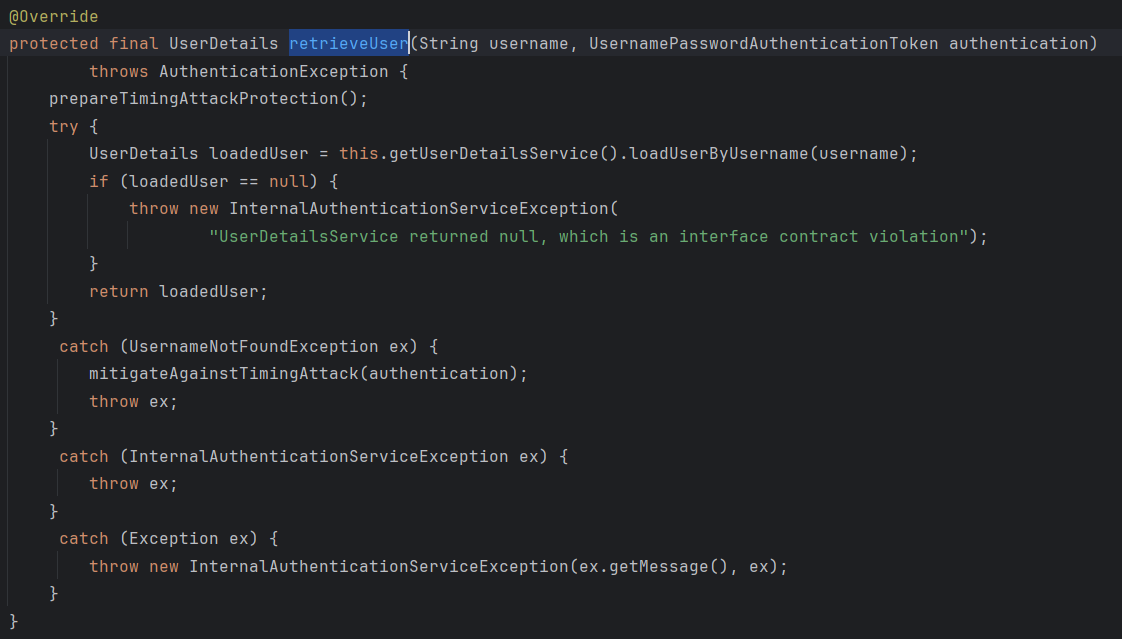
- Ở bên trong class này, nó sẽ lại tiếp tục gọi đến method retrieveUser(...). method này trỏ đến method bên trong class DaoAuthenticationProvider.java
![image.png]()
- Ở đây lại tiếp tục gọi đến method loadUserByUsername(username)
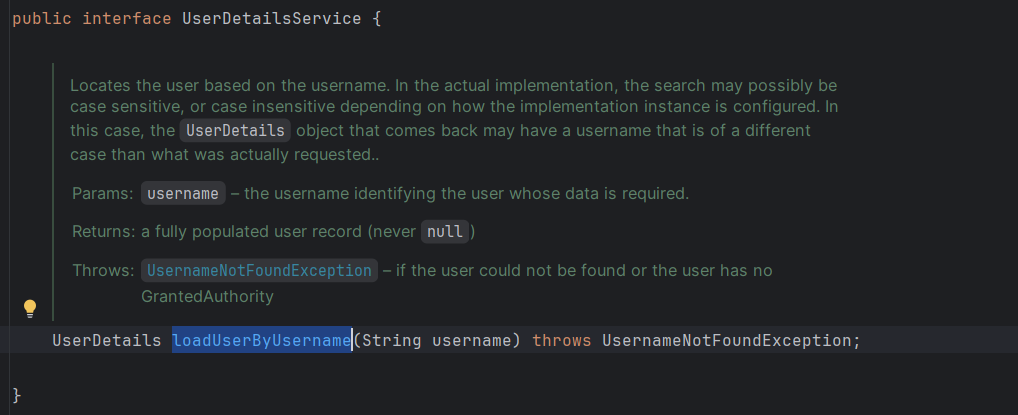
Bước 5: UserDetailService
- Khi click vào method loadUserByUsername(username), Intellij gọi đến interface UserDetailService
![image.png]()
- Ở đây Spring Security sẽ gọi đến class InMemoryUserDetailsManager được implement từ UserDetailService interface và lấy ra thông tin của user.
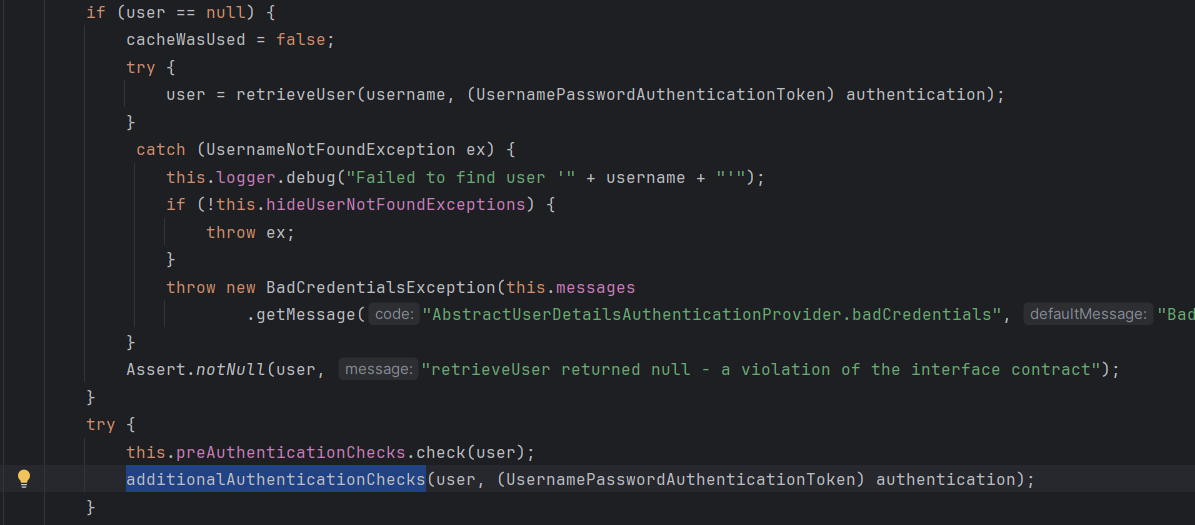
Bước 6: PasswordEncoder
- Ngoài ra sau khi retrieveUser ở bước 4 trong class AbstractUserDetailsAuthenticationProvider xong thì chạy tiếp đến logic additionalAuthenticationChecks
![image.png]()
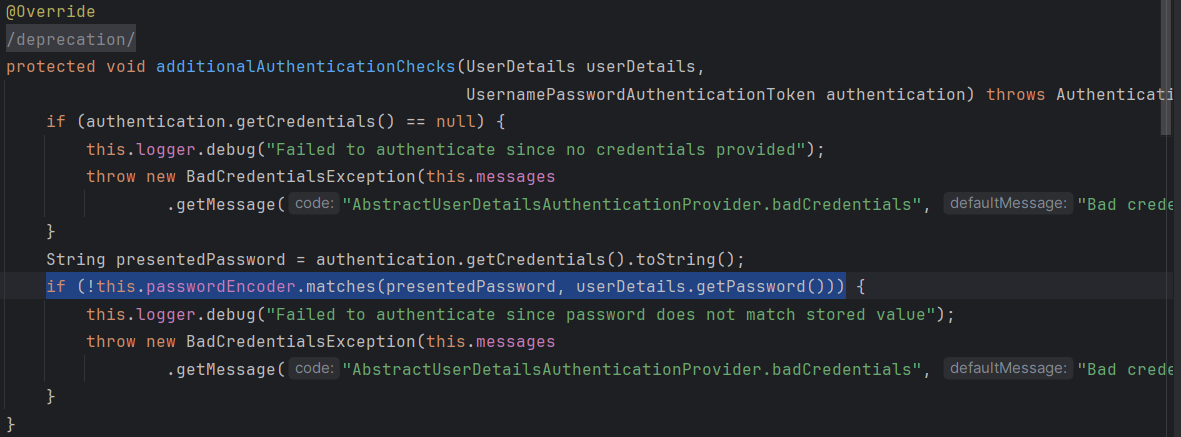
- Method này gọi đến class DaoAuthenticationProvider, ở đây có nhiệm vụ kiểm tra xem password user nhập vào sau khi encode có khớp với mật của user hay không
![image.png]()
Bước 7, 8, 9: Complete Security Check
- Sau khi đã kiểm tra xong tất cả các bước thì data sẽ trả ngược lại như trên hình và thêm thông tin User vào SecurityContextHolder: SecurityContextHolder.getContext().setAuthentication(auth);
4. Kết
- Do bài viết này khá nhiều kiến thức mới, nên mình sẽ để bài viết triển khai Security ở phần sau. Hy vọng mọi người sẽ nghiền ngẫm bài này thật kỹ vì đây chính là phần thông tin quan trọng nhất của Serie này, và phải hiểu được phần lý thuyết này thì khi implement code mới có thể hiểu tại sao lại thực hiện như vậy. Cám ơn mọi người đã theo dõi ạ.
All rights reserved
