Passing Data in iOS: Delegates, Notifications, and Closures
Bài đăng này đã không được cập nhật trong 6 năm
Bài viết này mình sẽ viết về chủ để làm thế nào để bạn thực hiện giao tiếp nội bộ trong ứng dụng và trao đổi htoong điệp đúng cách giữa các lớp hoặc các thực thể khác trong cùng 1 project. Việc sử dụng các kĩ thuật để truyền dữ liệu không phải thực hiện tuỳ ý, mà phải tuỳ từng bối cảnh mà áp dụng các loại khác nhau. Mình sẽ giới thiệu 3 loại khá phổ biển sau:
- Delegation pattern
- Notifications
- Closures và action handlers
Mình đã sưu tầm sẵn 1 project có đầy đủ các kĩ thuật trên. (Link https://github.com/oHaThiHoan/IOSExample/tree/master/Starter Project) Bạn download về và chạy thử trên Xcode. App này được gọi là shopping list app, bao gồm các chức năng sau:
- Tạo shopping list.
- Giữ và hiển thị collection của tất cả các shopping list được add vào app.
- Chọn 1 item trên shopping list và hiển thị item đó
- Sửa 1 item trên shopping list
- Đổi tên và xoá shopping list
- Thêm, sửa, xoá shoping list items.
Các controller trong project cụ thể như sau:
AllListsViewController: Đây là nơi mà tất cả các shopping list được tập hợp và hiển thị. Từ controller này bạn có thể tạo 1 list mới, sửa một item đã tồn tại, đổi tên và xoá chúng.EditItemViewController: Bạn tạo, sửa hoặc xoá shopping list items. File ShoppingList.swift chứa 2 struct như sau:ShoppingList: đại diện cho shopping list, chứa các thuộc tính sau:* id, name, edited timestamp, và items.*ShoppingListManager: quản lý 1 tập hợpShoppingListitems và một số function. Instance của struct này được sử dụng ỏAllListsViewController. Nó được gọi làlistManagervà là công cụ để xử lý shopping lists.
Bạn có thể thấy file NotificationNameExtension.swift. File này hiện tại đang trống, nhưng nó sẽ được thêm vào sau
Cuối cùng là một vào custom cell và custom view được implement. Một view có nhiều chức năng đó là RenameListView, dùng để cho phép đổi tên danh sách mua sắm. Chúng ta sẽ nói đến custom view này khi nói về closures và action handlers. Bây giờ chúng ta sẽ cùng đi vào từng kĩ thuật một
Delegation Pattern
Ví dụ ta có 2 class sau: ClassA và ClassB
ClassA khởi tạo 1 đối tượng ClassB nhằm sử dụng các dịch vụ mà ClassB cung cấp. Chúng ta biết được rằng passing messages từ ClassA sang ClassB là đơn giản, miễn là có các thuộc tính hoặc phương thức công khai để truy cập, ví dụ:
 class ClassA {
        init() {
            super.init()

            let classBObject = ClassB()
            classBObject.someProperty = 5
            classBObject.runThis(withFlag: true)
        }
    }
Vấn đề ở đây là làm sao để truyền được messages từ ClassB quay lại ClassA?
Để giải quyết vẫn đề này chúng ta sử dụng Delegation Pattern.
Bước 1
Bước đầu tiền yêu cầu để gửi message từ ClassB quay về ClassA là thực hiện 1 custom protocol. Nó sẽ chứa các function như sau:
- Được implement bởi
ClassAdo đó bạn có thể thực hiện action cụ thể nào đó từ class này. - Được gọi bởi
ClassB, do đóClassBcó thể bắt các action trongClassAhoặc truyền data qua bằng các giá trị tham số truyền vào của function.
protocol ClassBDelegate {
       func dummyFunction()
       func dummyFunction(withParameter param: String)
   }
Tuân theo convention chung, protocol có hậu tố là delegate, ngoài ra nó thường bắt đầu với tên của class liên quan.
Bước 2
ClassB khai báo thuộc tính custom protocol:
class ClassB {
        var delegate: ClassBDelegate!

        // ... more stuff
    }
Chúng ta đặt tên là delegate cho dễ hiểu.
Bước 3
ClassA chúng ta sẽ implement custom protocol trên:
extension ClassA: ClassBDelegate {
        func dummyFunction() {
            // Do something...
        }

        func dummyFunction(withParameter param: String) {
            // Do something and use param...
        }
    }
Bước 4
ClassB sử dụng function của protocol để giao tiếp với delegate của nó, ở đây là ClassA. Chú ý đảm bảo thuộc tính delegate không được bằng nil.
if let delegate = delegate {
        delegate.dummyFunction()
    }
Vậy là đã thực hiện xong Delegation Pattern. Ở đây chỉ thực hiện với 2 class, trên thực tế bất kì class nào implement custom protocol thì đều có thể thiết lập giao tiếp với chúng.
Delegate in Action
Hãy cùng xem delegation thực hiện action như thế nào. Chúng ta sẽ thực hiện các bước dưới đây:
- Thêm item mới được tạo ở
EditItemViewControllervà tập hợp cácitemscủa shoppingList trongShoppingListViewController - Upate item đã sửa ở
EditItemViewControllerđể tập hợp items trongshoppingListcủaShoppinhListViewController. - Gỡ 1 item từ
itemcủashoppingListtrongShoppingListViewControllerđã được xoá từ trước trongEditItemViewController. Chúng ta sẽ bắt đầu bằng việc tạp một custom protocolEditItemViewControllerDelegate. Và chúng ta sẽ làm điều này trong EditItemViewControllerDelegate.swift Function đầu tiên của protocol sẽ cho phépEditItemViewControllernói vớiShoppingListViewControllerrằng có một item mới được add vàoitems:
protocol EditItemViewControllerDelegate {
    func shouldAdd(item: String)
}
Tuy nhiên, EditItemViewController không thể truy cập vào bất kì function nào của EditItemViewControllerDelegate mà không khái báo delegate. Do đó, cần bước tiếp theo như sau:
class EditItemViewController: UIViewController {

    var delegate: EditItemViewControllerDelegate!

    // Rest implementation...
}
Trước khi chúng ta sử dụng thuộc tính delegate, mở file ShoppingListViewController.swift . Chúng ta sẽ tạo ShoppingListViewController class implement EditItemViewControllerDelegate protocol. Trong function đó sẽ truyền items của shoppingList object, và chúng ta sẽ refresh table view thì sẽ thấy item mới được hiển thị.
    func shouldAdd(item: String) {
        shoppingList.items.append(item)
        tableView.reloadData()
    }
}
Với đoạn thêm item như trên, chúng ta có thể dễ dàng lưu và hiển thị một item mới được tạo bởi EditItemViewController. Nhưng vẫn chưa xong, chúng ta cần set delegate của EditItemViewController trong ShoppingListViewController. Để làm điều này, chúng ta vào hàm prepare(for:sender), thêm đoạn editItemVC.delegate = self như sau:
override func prepare(for segue: UIStoryboardSegue, sender: Any?) {
    if let identifier = segue.identifier {
        if identifier == "idShowEditItemViewControllerSegue" {
            if let editItemVC = segue.destination as? EditItemViewController {

                editItemVC.delegate = self

                // Rest of content...
            }
        }
    }
}
Quay lại file EditItemViewController.swift, nơi mà thực hiện Save button. Mục đích của chúng ta là nhập mục tên trong trường textfield và tap vào Save button để gửi item đó tới ShoppingListViewController, sau đó nó sẽ thêm item và thực hiện hiển thị trên table view.
Đến phương thức saveItem(_:) IBAction và update như sau:
@IBAction func saveItem(_ sender: Any) {
    guard let text = textField.text else { return }

    if text != "" {
        if let delegate = delegate {
            delegate.shouldAdd(item: text)
        }

        navigationController?.popViewController(animated: true)
    }
}
Điều gì sẽ xảy ra:
- Đầu tiên, bạn chắc chắn user đã nhập gì đó vào textfield, và chúng không cố gắng lưu trong khi tên item vẫn đang trống.
- Tiếp theo, chắc chắn
delegatenot nil. - Tiếp nữa, chúng ta gọi function
shouldAdd(item:)củaEditItemViewControllerDelegateprotocol, cung cấptextnhư một tham số để thêm item mới. - Cuối cùng, chúng ta dismiss view controller bằng poping it from the navigation stack và chúng ta quay lại shopping list.
Vậy là đã thực hiện xong delegation pattern.
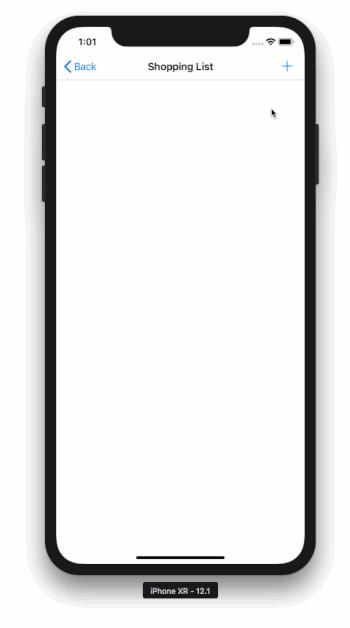
Tuy nhiên, điều gì sẽ xảy ra nếu chúng ta muốn thêm 2 hoặc nhiều lần cùng một lúc
Sử dụng Delegate method cho collect data
Đứng về phía người dùng, ứng dụng không nên thêm một item nếu nó đã tồn tại. Nó sẽ không có ý nghĩa nếu shopping list có thể thêm sữa 15 lần hoặc cà chua 10 lần.
Thử fix nó. Nhưng vấn đề ở đây là: Chúng ta khônh có thông tin của tất cả item đã tồn tại hoặc chưa tại thời điểm saving để tránh không cho nó thêm vào lần nữa.
Ý tưởng truyền toàn bộ items từ ShoppingListViewController đến EditItemViewController thực sự ko tốt. Vậy chúng ta có thể làm gì?
Chúng ta thêm một hàm như sau vào custom protocol
protocol EditItemViewControllerDelegate {
    // ...

    func isItemPresent(item: String) -> Bool
}
Function này trả lại giá trị Bool. Khi nó bằng true, item mà chúng ta đang cố gắng thêm vào đã tồn tại, do đó đừng giữ nó. Khi bằng false. item chưa tồn tại và chúng ta có thể thêm nó vào items collection.
Ở đoạn back lại trong file ShoppingListViewController.swift, nơi mà chúng ta cần thực hiện fuction trên. Đơn giản check như sau:
extension ShoppingListViewController: EditItemViewControllerDelegate
{

    func isItemPresent(item: String) -> Bool {
        if let _ = shoppingList.items.firstIndex(of: item) {
            return true
        } else {
            return false
        }
    }


    // Rest content...
}
Thông tin chúng ta cần có thể được gửi từ ShoppingListViewController đến EditItemViewController khi được yêu cầu. Tuy nhiên chúng ta vẫn phải cập nhật đoạn code saving trước trong EditItemViewController, do đó chúng ta có thể sử dụng chúng.
Quay lại hàm saveItem(_:) IBAction trong EditItemViewController.swift. Chúng ta sẽ update shouldAdd(item:) delegate function để gọi nếu isItemPresent(item:) trả lại false.
@IBAction func saveItem(_ sender: Any) {
    guard let text = textField.text else { return }

    if text != "" {
        if let delegate = delegate {
            if !delegate.isItemPresent(item: text) {
                // Item doesn't exist in the items collection,
                // so let's add it now.
                delegate.shouldAdd(item: text)
                navigationController?.popViewController(animated: true)

            } else {
                // Item exists already in the items collection.
                // Show an alert to indicate that.
                let alert = UIAlertController(title: "Item exists", message: "\(text) already exists in your shopping list.", preferredStyle: .alert)
                alert.addAction(UIAlertAction(title: "OK", style: .default, handler: nil))
                present(alert, animated: true, completion: nil)
            }
        }

    }
}
Chạy app 1 lần nữa là thấy vấn đề của bạn đã được giải quyết. Với item đã tồn tại rồi thì sẽ được show 1 thông báo như sau:
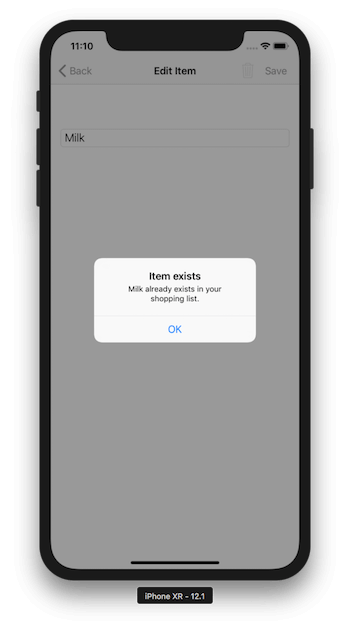
Chú ý: Method mới của delegate trả lại giá trị bool. Tuy nhiên trên thực tế bạn có thể trả lại bất kì giá trị nào mà bạn muốn.
Nhiều delegate functions
Ngoài ra trong demo của chúng ta còn có nhiều tính năng nữa:
- Sửa và thay thế item đã tồn tại
- Remove item.
Cả 2 action trên đều được khởi tạo ở EditItemViewController, nhưng chúng đều có liên quan tới ShoppingListViewControler class. Do đó, bởi vị EditItemViewController phải nói một gì đó với ShoppingListViewController nên chúng ta cần thêm 2 delegate function mới.
Chúng ta bắt đầu bằng việc thực hiện function sửa và thay thế. Những gì chúng ta cần làm ở đây là thực hiện ở EditItemViewController và truyền item đã tồn tại cho nó, do đó user có thể update nó và lưu lại. item cần ở đây chính là item được tap từ table view trong ShoppingListViewController.
Bất kì những item nào được chọn từ table view trong ShoppingListViewController đều được gán cho thuộc tính editItem trong EditItemViewController.
Quay lại lần nữa vào delegate function bạn muốn thêm, thêm 1 function như sau:
protocol EditItemViewControllerDelegate {
    ...
    ...

    func shouldReplace(item: String, withItem newItem: String)
}
Ở file ShoppingListViewController thực hiện như sau:
extension ShoppingListViewController: EditItemViewControllerDelegate {
    // Previous function definitions...

    func shouldReplace(item: String, withItem newItem: String) {
        if let index = shoppingList.items.firstIndex(of: item) {
            shoppingList.items[index] = newItem
            tableView.reloadData()
        }
    }
}
Nếu item được tìm thấy, sau đó chúng ta sẽ thay thế nó với 1 giá trị mới và tableview được reload lại.
Chúng ta sẽ tới hàm saveItem(_:) IBAction trong EditItemViewController để sửa.
Chúng ta sẽ tập trung và case kiểm tra xem item được edit có tồn tại hay không. Nếu mà item đó khác nil thì chúng ta sẽ sửa item đã tồn tại, mặt khác chúng ta sẽ lưu như 1 item mới.
@IBAction func saveItem(_ sender: Any) {
    guard let text = textField.text else { return }

    if text != "" {
        if let delegate = delegate {
            if !delegate.isItemPresent(item: text) {

                // This is the point of interest.
                // If the editedItem is not nil, then an item is being edited.
                if let editedItem = editedItem {
                    delegate.shouldReplace(item: editedItem, withItem: text)
                } else {
                    delegate.shouldAdd(item: text)
                }

                navigationController?.popViewController(animated: true)

            } else {
                let alert = UIAlertController(title: "Item exists", message: "\(text) already exists in your shopping list.", preferredStyle: .alert)
                alert.addAction(UIAlertAction(title: "OK", style: .default, handler: nil))
                present(alert, animated: true, completion: nil)
            }
        }
    }
}
Hàm xoá một item cũng làm tương tự.
protocol EditItemViewControllerDelegate {
    // Previous delegate functions...

    func shouldRemove(item: String)

}
Thực hiện trong ShoppingListViewController.swift như sau:
extension ShoppingListViewController: EditItemViewControllerDelegate {
    // Previous function definitions...

    func shouldRemove(item: String) {
        if let index = shoppingList.items.firstIndex(of: item) {
            shoppingList.items.remove(at: index)
            tableView.reloadData()
        }
    }
}
Trong EditItemViewController gọi phương thức deleteItem(_:) như sau:
@IBAction func deleteItem(_ sender: Any) {
    guard let text = textField.text else { return }

    if let delegate = delegate {
        delegate.shouldRemove(item: text)
        navigationController?.popViewController(animated: true)
    }
}
Test lại app để thấy hết tất cả các tính năng
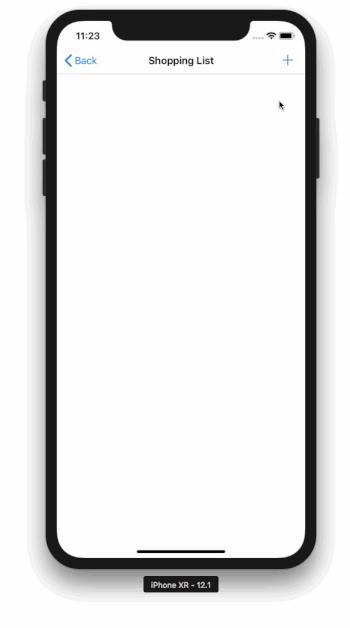
Vậy là đã giới thiệu xong delegate. Tiếp theo sẽ tới Notification.
Notifications
Sử dụng SDK NotificationCenter class để gửi thông báo là các tốt để truyền dữ liệu trong app. Notifications có thể chứa hoặc ko chứa data, nó là cách tốt để hỗ trợ giao tiếp giữa nhiều phần khác nhau trong app có liên quan trực tiếp hay không liên quan gì.
Một điều đặc biệt thú vị với notification đó là sender (Người tạo thông báo) phát đi 1 message, bất kì ai quan sát đều có thể nhận được nó và thực hiện hành động của chính mình. Tuy nhiên bạn nên hiểu về những trường hợp nào thì cần đến nó.
Luồng thực hiện như sau:
- Post the notifition Việc này xảy ra ở phía sender, được đặt ở nơi mà chúng ta thêm data có thể được yêu cầu bởi người nhận thông báo.
- Observer for the notification ở bất kì class hay struct nào yêu cầu.
- Implement a function để xác định tất cả những hành động được diễn ra khi nhận được notification.
Tên được đặt cho thông báo này khá quan trọng, vì nó dùng để phân biệt thông báo. Hãy nhớ điều này, vì thông báo trong dự án lớn có thể trở nên khó hiểu nếu đặt tên mập mờ, việc đặt tên rõ ràng dễ phân biệt giúp bạn tiết kiệm thời gian tìm kiếm xung quanh mỗi thông báo là gì.
Implementing Notification on Demo project
Quay trở lại demo project. Như ở trên, chúng ta có thể thêm item vào shopping list, tuy nhiên chúng ta không giữ list này vào dnah sách trong AllListsViewController. Điều chúng ta đang thiếu là làm cho lớp ShoppingListViewController có khả năng nói với AllListsViewController rằng có một danh sách mới được tạo. Theo như trên, chúng ta hoàn toàn có thể sử dụng delegate pattern cho trường hợp này. Nhưng không, đây là thời điểm chúng ta làm việc với notifications.
Chúng ta sẽ tạo 2 custom notification:
- Đầu tiên thông báo cho
AllListsViewControllerrằng có một shopping list mới đã được taọ. - Tiếp theo thông báo
AllListsViewControllerrằng một shopping list đã bị sửa đổi.
Sender của cả 2 notification sẽ được để ở ShoppingListViewController class. AllListsViewController sẽ nhận chúng và thực hiện những action ứng với sự kiện đó.
Tên của Notification
Trước khi bắt đầu thực hiện, chúng ta cần chú ý vào tên của notification. Tên thông báo thuộc Notification.Name, đây là một struct trong Notification class. khai báo tên như sau:
extension Notification.Name {
    static let didCreateShoppingList = Notification.Name("didCreateShoppingList")
    static let didUpdateShoppingList = Notification.Name("didUpdateShoppingList")
}
Cả 2 tên đều mô tả xem bạn đang làm cái gì. Chúng được khai báo là thuộc tính static, do đó chúng trở thành 1 phần của type và không cần phải tạo instances của Notification.Name, vậy nên chúng ta có thể sử dụng nó.
Posting a Notification
Bây giờ custom notification name đã tồn tại, bắt đầu tạo notification đầu tiên. Ở file ShoppingListViewController.swift, tìm tới hàm updateParent(). Hàm nay được gọi mỗi khi back bar button được tap, do đó nó là nơi tốt nhất để AllListsViewController biết được rằng chúng ta đã hoàn thành xong việc tạo hoặc sửa shopping list.
Cách rõ ràng nhất để gửi thông báo là khởi tạo một đối tượng Notification và sau đó post nó. Tên của notification và bất kì data nào có thể được truyền thông qua khởi tạo. Đây là cách khởi tạo không có data.
let notification = Notification(name: .didCreateShoppingList)
Và đây là cách khởi tạo khi có data
let notification = Notification(name: .didCreateShoppingList, object: AnOptionalObject, userInfo: AnOptionalDictionary)
object là có kiểu là Any và có thể nil
userInfo là một giá trị optional và nó là kiểu dictionary mà bạn có thể có nhiều dữ liệu như bạn muốn.
Để gửi notification, đơn giản gọi như sau:
NotificationCenter.default.post(notification)
Hoặc có thể viết gọn lại như sau:
post(name:object:): Tạo và post notification với optional object (Anyobject). Để nó bằng nil nếu bạn không muốn post bất kì data nào theo notificationpost(name:object:userInfo:): Tạo và post notification với optional object hoặc dictionary. Tương tự giống như việc khởi tạo bên trên. Để nil nếu như bạn không gửi data.
ĐIều cuối cùng, chỉnh sửa phương thức updateParent()
func updateParent() {
    if shoppingList.items.count > 0 {
        NotificationCenter.default.post(name: .didCreateShoppingList,
                                        object: shoppingList.items,
                                        userInfo: nil)
    }
}
Phương thức trên sẽ post .didCreateShoppingList
(Notification.Name.didCreateShoppingList) thông báo và nó sẽ bao gồm items collection giống như một notification object tại mỗi lần tap vào back button trong ShoppingListViewController. Chúng ta set nil cho userInfo dictionary, như vậy thì không có gì để post.
Handling the Notification
Vào file AllListsViewController.swift để xử lý sự kiện. Trong hàm viewDidLoad() thêm dòng sau:
override func viewDidLoad() {
    super.viewDidLoad()

    NotificationCenter.default.addObserver(self, selector: #selector(handleDidCreateShoppingList(notification:)), name: .didCreateShoppingList, object: nil)

}
Với dòng trên, chúng ta đã thêm vào class một observer của didCreateShoppingList notification đến Notification Center, và nói cho app biết bằng phương thức handleDidCreateShoppingList(notification:) sẽ được gọi khi nhận được thông báo. Vì phương thức này chưa tồn tại nên chúng ta phải tạo nó như sau:
@objc func handleDidCreateShoppingList(notification: Notification) {
    if let items = notification.object as? [String] {
        let newShoppingList = ShoppingList(id: listManager.getNextListID(),
                                           name: "Shopping List",
                                           editTimestamp: Date.timeIntervalSinceReferenceDate,
                                           items: items)

        listManager.add(list: newShoppingList)
        tableView.reloadData()
    }
}
Điều đầu tiên chắc chắn thuộc tính object của notification phải có giá trị. Luôn phải kiểm tra và không được sử dụng thuộc tính object trực tiếp nếu bạn muốn an toàn và tránh app bị crash. Đồng thời, nếu object not nil, chúng ta cast chúng về kiểu mảng String object, ví dụ như didCreateShoppingList notification sẽ mang theo các items được thêm vào shopping list.
Phần còn lại của đoạn code trên để thực hiện chức năng thêm shopping list nhận được vào all list và reload table view.
Chạy lại app và thấy kết quả như sau:
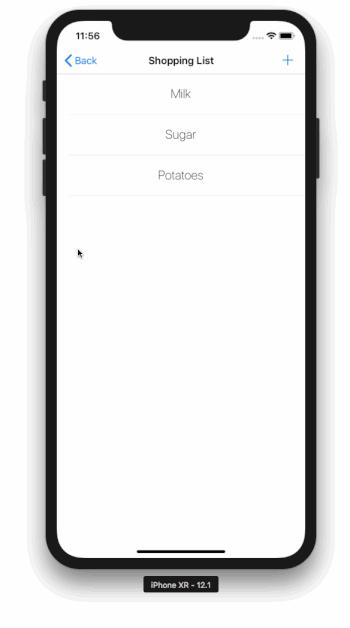
Bây giờ chúng ta đã có thể lưu và hiển thị shopping lít mới trên AllListsViewController, giữ nguyên logic này và tạo mới một notification để thông báo khi chúng ta update shopping list. Như chức năng đã làm ở trên, chúng ta có thể sửa một shopping list đã tồn tại, tuy nhiên mỗi lần back về màn hình ban đầu thì list không được update.
Để giải quyết vấn đề này, chúng ta vào file ShoppingListViewController.swift, sửa lại hàm updateParent().
Khi một shopping list mới được tạo, thuộc tính shoppingList trong ShoppingListViewController sẽ không có id. Nhưng khi shopping list được edited thì id của thuộc tính shoppingList có giá trị not nil.
Bạn có thể verify điều này trong hàm prepare(for:sender:) trong AllListsViewController class, nơi mà nếu list đã được chọn (selectedListIndex khác nil), id của shopping list sẽ được truyền qua ShoppingListViewController thông qua thuộc tính shoppingList như sau:
override func prepare(for segue: UIStoryboardSegue, sender: Any?) {
    if let identifier = segue.identifier {
        if identifier == "idEditShoppingListSegue" {
            if let shoppingListVC = segue.destination as? ShoppingListViewController {
                if let index = selectedListIndex {
                    shoppingListVC.shoppingList.id = listManager.lists[index].id
                    shoppingListVC.shoppingList.name = listManager.lists[index].name
                    shoppingListVC.shoppingList.items = listManager.lists[index].items
                }
            }
        }
    }
}
Bây giờ, chúng ta sẽ thay đổi hàm updateParent() như sau:
func updateParent() {
    if let id = shoppingList.id {
        NotificationCenter.default.post(name: .didUpdateShoppingList, object: nil, userInfo: ["id": id, "items": shoppingList.items])
    } else {
        if shoppingList.items.count > 0 {
            NotificationCenter.default.post(name: .didCreateShoppingList, object: shoppingList.items, userInfo: nil)
        }
    }
}
Đoạn code trên thực hiện như sau, nếu mà shopping list có giá trị id, có nghĩa là chúng ta đang update nó và thực hiện post didUpdateShopList notification như sau:
NotificationCenter.default.post(name: .didUpdateShoppingList, object: nil, userInfo: ["id": id, "items": shoppingList.items])
Notification này có sự khác biệt như sau:
- Đầu tiên là tên, nó phải có cái name khác với notification trước
- Tiếp theo là không có
object. Thay vào đó chúng ta dùnguserInfodictionary và chúng ta sẽ pass 2 giá trị: một là id của shopping list đã edit, và items collection.
Trong AllListsViewController.swift, update hàm viewDidLoad() để có thể observer notification mới:
override func viewDidLoad() {
    // ...

    NotificationCenter.default.addObserver(self, selector: #selector(handleDidUpdateShoppingList(notification:)), name: .didUpdateShoppingList, object: nil)

}
Và đồng thời cũng phải thực hiện hàm handleDidUpdateShoppingList(notification:) khi nhận được didUpdateShoppingList notification như sau:
@objc func handleDidUpdateShoppingList(notification: Notification) {
    if let userInfo = notification.userInfo {
        if let id = userInfo["id"] as? Int, let items = userInfo["items"] as? [String] {
            listManager.updateItems(inListWithID: id, items: items)
            tableView.reloadData()
        }
    }
}
Chú ý rằng chắc chắng userInfo phải không bằng nil trước khi thực hiện công việc. Sau đó, chúng ta mới được update list trong tập hợp shopping list của listManager, và chúng ta reload lại table.
Build và run lại app. Kết quả như sau:
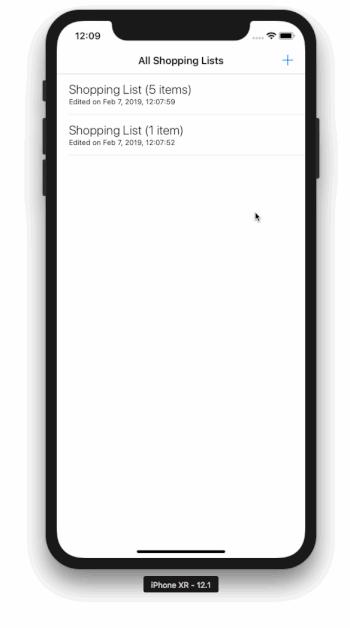
Một điều nữa cần chú ý: Phải dừng lại việc observing notification đối tượng bị huỷ. Trong demo này chúng ta cần viết vào class AllListsViewController như sau:
deinit {
    NotificationCenter.default.removeObserver(self)
}
Closure
Ngoài 2 kĩ thuật đã giới thiệu ở trên, chúng ta còn 1 cách để gửi message thông qua các class trong app bằng Closure và action handlers.
Chúng ta quay lại ví dụ giao tiếp giữa ClassA và ClassB như phần delegation pattern đã giới thiệu.
Có một cách đơn giản, ClassB thực hiện method như sau:
func myMethod(handler: @escaping () -> Void) {

}
Hiểu như sau: Bạn truyền fuction giống như một tham số đến 1 functio khác. Trong ví dụ này, handler:()-> Void là một tham số. Trong trường hợp này nó không có đối số truyền vào và hàm thuộc loại void.
Tại sao lại dùng @escaping?? Hiểu đơn giản là để chúng ta có thể truy cập vào action handler (closure) sau khi thực hiện method được hoàn thành.
Tiếp theo, myMethod(handler:) giữ một tham chiếu đến tham số handler, do đso nó có thể được gọi đến trong trường hợp ClassB cần giao tiếp với ClassA.
Thực hiện như sau:
class ClassB {

    var actionHandler: (() -> Void)?

}
Sau đso myMethod(handler:) giữ một tham chiếu đến handler function:
class ClassB {
    // ...

    func myMethod(handler: @escaping () -> Void) {
        actionHandler = handler
    }

}
Cuối cùng, ClassB gọi action handler khi muốn giao tiếp với ClassA. Cần đảm bảo rằng thuộc tính handler khác nil:
class ClassB {
    // ...

    // A hypothetical method that processes data and then
    // notifies ClassA that its work is complete.
    func process() {
        // process data

        if let actionHandler = actionHandler {
            actionHandler()
        }
    }
}
Về phía ClassA khi gọi myMethod(handler:) thông qua việc khởi tạo ClassB, nó sẽ thực hiện closure, có nghĩa là khối code sẽ được thực hiện khi mà handler function được gọi trong ClassB:
var classBObject = ClassB()

classBObject.myFunction {
    // This is the closure. This is also the place where ClassA implements
    // any code that should be executed when the action handler is called
    // in ClassB. When this block of code is executed, then ClassB has
    // successfully "talked back" to ClassA.
}
Dữ liệu có thể được truyền từ ClassB sang ClassA bằng cách:
func myMethod(handler: @escaping(_ success: Bool) -> Void) {

}
Gọi nó như sau:
classBObject.myFunction(handler: { (success) in
    if success {
        // Do this...
    } else {
        // Do that...
    }
})
Bây giờ sẽ tìm hiểu trong demo project để hiểu rõ hơn về closure.
Tình huống xảy ra khi chúng ta muốn đổi tên của shopping lists. Trong AllListsViewController, vuốt sang trái từng item sẽ hiển thị 2 tuỳ chọn là Delete và Rename. Custom view được gọi là RenameListView sẽ show khi tap vào tuỳ chọn rename.
Vào file RenameListView.swift, thêm khai báo sau:
var cancelHandler: (() -> Void)?
Thuộc tính trên sẽ giữ tham chiếu đến action handler như sau:
func handleCancelRenaming(handler: @escaping () -> Void) {
    cancelHandler = handler
}
Hàm handleCancelRenaming(handler:) sẽ được gọi ở AllListsViewController class.
Bước cuối cùng là gọi cancelHandler khi Cancel button được tap. Đi tới cancel(_:) IBAction và sửa như sau:
@IBAction func cancel(_ sender: Any) {
    if let handler = cancelHandler {
        handler()
    }
}
Vì cancelHandler được khai báo kiểu optional, nên phải đảm bảo rằng nó not nil trước khi sử dụng.
Tương tự mở file AllListsViewControlelr.swift, vào hàm showRenameListView(), sau khi khởi tạo renameListView, thêm đoạn code sau để xử lý trường hợp cancel:
renameListView?.handleCancelRenaming {
    self.renameListView?.removeFromSuperview()
    self.renameListView = nil
}
Tương tự làm với case thực hiện rename. Kết qủa như sau:
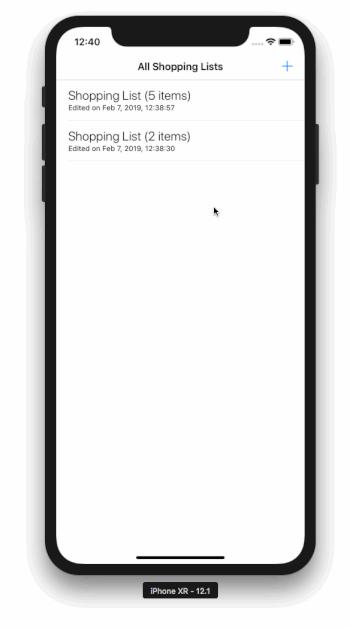
Kết luận
Trên đây mình đã giới thiệu xong 3 kĩ thuật delegation, notification và closure. Tuỳ vào mục đích mà bạn có thể lựa chọn kĩ thuật nào cho phù hợp.
Delegation có thể được sử dụng nhiều nơi nhất, nhưng notification có vẻ đợn giản và thực hiện nhanh hơn, ví dụ khi data lấy từ server xong và bạn muốn thông báo tới viewcontroller để hiển thị chúng. Closure cũng rất mạnh mẽ và được sử dụng khi cảm thấy việc thực hiện notification hoặc delegate là quá mức cho những mục tiêu nhỏ.
Tài liệu tham khảo:
All rights reserved