Override rails admin gem, authenticate and authorize it with devise
Bài đăng này đã không được cập nhật trong 4 năm
Rails admin gem is a popular gem for creating admin interface on the resources. It provides a quick way of the following operations:
- CRUD operation
- Export data to CSV/EXCEL
- Easily query the data
- Automatic form validation
- Authentication and authorization via devise and cancancan
But at the same time it is relatively difficult to override the default functionality of the rails admin. In this post we will look on how easily we can use rails admin, override some functionality of the rails admin and finally we will look on how we can integrate it with devise. Lets first create our rails application quickly. You just need to run the following commands.
-> rails new rails_admin_demo
-> rails g scaffold user name email  address:text
-> rails g scaffold post title content:text user:references
-> rails g scaffold comment content:text post:references user:references
-> rails db:migrate
Add the rails_admin gem in the gemfile, then run the following command.
gem 'rails_admin', '~> 1.2'
-> bundle install
 -> rails g rails_admin:install
When you run the above command, it will ask you to give namespace for the route of the rails admin.

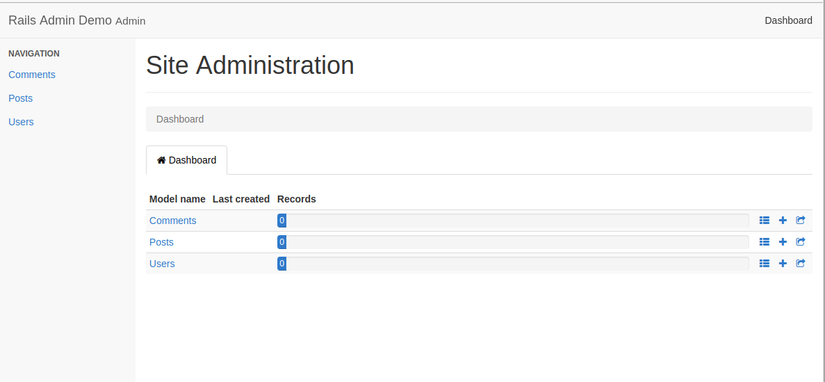
If you don’t provide anything, by default it will take /admin as the default route for the rails admin. Open the browser and hit the url http://localhost:3000/admin . You will see the beautiful admin dashboard as in following snap shot.
Change app name: First I would like to change the default app name on the admin dashboard. You can see the default app name is “Rails Admin Demo”. I would like to change it to “Rails Admin Blog”. To do this, we need to add the following codes to the config/initializers/rails_admin.rb file.
 # Provide application name
  config.main_app_name = ["Experiment With Rails Admin", ""]
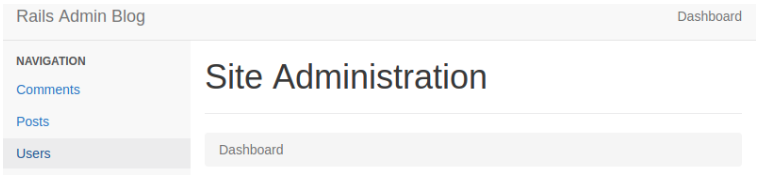
Restart the server and now you can see that application name has changed.
If you have an eagerness, how this works, you can have a look on the source code of the following file from the rails admin and the rails admin wiki base configuration
Include/remove models from the dashboard: By default, RailsAdmin automatically discovers all the models in the system and adds them to its list of models to be accessible through RailsAdmin. If there is a case, you want to remove a model from the admin dashboard or you want to add a model to the dashboard, you can use the following DSL. For our case I want to remove the comment model from the dashboard.
# Include the models in the navigation
config.included_models = ["User", "Post"]
Again restart the server, reload the page and then you can see the comment model has removed from the left sidebar. There is also many ways to do that. You can see more about it from the following wiki. https://github.com/sferik/rails_admin/wiki/Navigation
Actions: Rails admin has different group of actions. Now we will override the default behavior with the rails admin actions. By default all of the actions are added to the rails admin interface. If inspect initializer file for the rails admin rails_admin.rb, you can see the following:
config.actions do
    dashboard                     # mandatory
    index                         # mandatory
    new
    export
    bulk_delete
    show
    edit
    delete
    show_in_app

    ## With an audit adapter, you can add:
    # history_index
    # history_show
  end
Here dashboard and index actions are mendatory. You can’t remove them. Now we want to remove the delete action for the user, edit action for the article and comment and export option for the comment model. We just need to specify it in the initializers file like as follows.
config.actions do
 dashboard                     # mandatory
 index                         # mandatory
 new
 export do
   only ["User", "Post"]
 end
 bulk_delete
 show do
 end
 edit do
   only ["User"]
 end
 delete do
   only ["Post", "Comment"]
 end
 show_in_app
 ## With an audit adapter, you can add:
 # history_index
 # history_show
end
You can get more information for the base actions form here. here
Fields visibility and ordering: By default all of the fields are visible. You can change the visibility, ordering and the label of the attributes. Right now our user model is showing all of the attributes. We don’t want to show the id and updated_at attribute and we also want to change the “name”label to “user name” in both of the show and list template. To do this, configure the “User” model like as follows in the rails_admin.rb:
RailsAdmin.config do |config|
 config.model "User" do
   list do
     exclude_fields :id, :created_at
     fields :name do
       label "User name"
     end
   end
   fields :name do          # adding and configuring
     label "User name"
   end
 end
end
Authenticate with devise: Now we will implement authentication in the rails admin dashboard using devise. Before that, devise gem need to be added.
gem 'devise'
Run the following command
-> bundle install
-> rails generate devise:install
-> rails generate devise user
You can (each is optional) provide 2 things for the authentication:
- An authenticate_with block that will trigger your authentication logic before any action in RailsAdmin.
- A current_user_method block that will yield a user model (for UI purposes)
If your resource is user to authenticate, open the initializers/rails_admin.rb, add the following code snippet
## == Devise ==
config.authenticate_with do
 warden.authenticate! scope: :user
end
config.current_user_method(&:current_user)
Now if try to access any resource, it will redirect you to the login page. And after login, you can see a log out button is added at the top right corner if your application responds to a route helper named logout_path.
Authorization: Suppose, we want to authorize the localhost:3000/admin path to the employee who has the role as admin(the role you defined in the database), add the following to the initializers/rails_admin.rb
RailsAdmin.config do |config|
    config.authorize_with do
      redirect_to main_app.root_path unless current_employee.role === "admin"
    end
  End
Before that, we need to add an attribute named “role” in the user table by running the migration.
-> rails generate migration AddRoleToUsers role
-> rails db:migrate
Please note that, to set this authorization, you also need to define the root route, else the application will through error. There is a lot of supported features from the rails admin like as association support, bulk delete, file upload, editor, I18n etc and the rails admin has a rich wiki. You can get more information from here. That’s all from this post. Happy coding.
All rights reserved
