Nodejs API với FaaS trên Firebase Cloud Functions: Authentication
Bài đăng này đã không được cập nhật trong 6 năm
Giới thiệu
Tiếp nối về Serverless, FaaS từ bài bài trước trong phần này, mình sẽ xây dựng demo API hoạt động trên Firebase Cloud Functions
Stack sử dụng lần này:
- Firebase Authentication: Hỗ trợ Authentication
- Firebase Cloud Functions: Serverless (FaaS) Platform
- Express: Nodejs framework (router, middleware)
Note: Ở demo này với scope nhỏ và không cần mở rộng về sau này nên mình có sử dụng để làm router, nhưng với scope lớn hơn chúng ta nên deploy mỗi function thành một API để đảm bảo tính tách biệt cho từng service 
Bắt đầu
Để bắt đầu bài này, hãy tạo project mới qua Firebase CLI các bạn nhé
Cách tạo project các bạn có thể xem tại bài viết phần trước tại đây
File index.js sau khi tạo project
const functions = require("firebase-functions")
const express = require('express')
const app = express()
firebaseAdmin.initializeApp(functions.config().firebase)

const api = functions.https.onRequest(app)

module.exports = {
  api,
}
Authentication
Firebase Authentication sử dụng JWT để định danh người dùng, để tìm hiểu rõ hơn về cách Firebase định danh nguời dùng, các bạn có thể tìm hiểu tại đây
Trước hết bước vào phần này chúng ta cần phân biệt rõ 2 module:
- Firebase Admin: Module phía admin của firebase (Project owner) sẽ bao gồm việc định danh user, đăng ký, quản lý user,...
- Firebase Client: Từ client sẽ xử lý việc login/logout
Register
Trước hết chúng ta sẽ tạo file auth.js
import vào file index.js
const auth = require('./auth')
app.use('/authentication', auth)
const express = require('express')
const router = express.Router()
const firebaseAdmin = require('firebase-admin')
const firebaseClient = require('firebase')

const firebaseConfig = {
  ...
};

firebaseClient.initializeApp(firebaseConfig);

module.exports = router
Phương thức register
router.post('/register', (req, res) => {
  const { email, password } = req.body
  const user = {
    email: email,
    password: password,
  }

  firebaseAdmin.auth().createUser(user).then(createdUser => {
    res.status(200)
    res.send({
      message: `User registered: ${createdUser.uid}`,
    })
  }).catch(exception => {
    res.status(400)
    res.send(exception)
  })
})
Cách lấy Firebase Client config các bạn có thể tham khảo tại đây
Phía client sẽ gửi lên thông tin đăng ký bao gồm email và password, sau đó module FirebaseAdmin sẽ xử lý việc thêm record vào DB
Test thử với Postman
 Check thử trên Firebase console, đã thấy tạo user thành công

Login
Sau khi làm chức năng đăng ký, tiếp đến là đăng nhập, trước hết chúng ta cần tách biệt rõ ràng nhiệm vụ của 2 module
- Firebase Admin: Sẽ verify JWT từ phía client gửi lên để định danh người dùng
- Firebase Client: Gửi request login lên phía FirebaseAdmin qua email/password để lấy IdToken, IDToken này chính là JWT mà phía client sẽ đính kèm vào HEADER của HTTP request
router.post('/login', (req, res) => {
  const { email, password } = req.body

  firebaseClient.auth()
  .signInWithEmailAndPassword(email, password)
  .then(authenticatedUser => {
    return firebaseClient.auth().currentUser.getIdToken()
  }).then(idToken => {
    res.status(200)
    res.send({
      token: idToken,
    })
  }).catch(exception => {
    res.status(422)
    res.send({
      data: exception
    })
  })
})
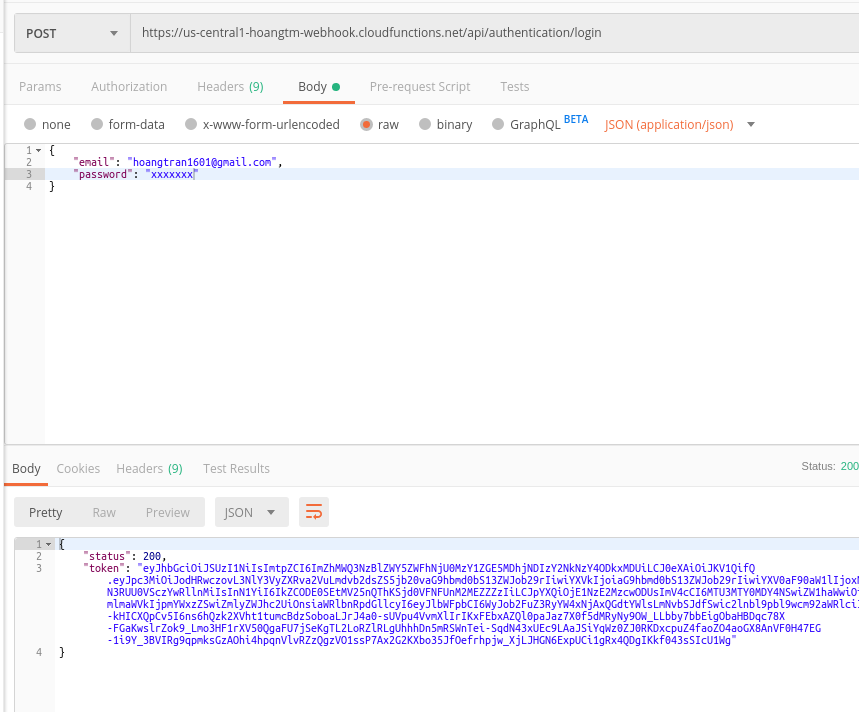
Token được trả về sau khi login thành công
Verify Token
Sau khi đăng nhập, chúng ta đã có Token rồi, vậy bây giờ cần phải có một bước nữa để định danh người dùng qua Token. Chúng ta tạo file authenticate.js, sau đó import vào file index.js
const authenticate = require('./authenticate')
app.use(authenticate)
Như mình đã trình bày ở trên, phía FirebaseAdmin lúc này sẽ thực hiện verify token để định danh người dùng. Tại file authenticate.js:
const firebaseAdmin = require('firebase-admin')

module.exports = async (req, res, next) => {
  try {
    if (!req.headers.authorization || !req.headers.authorization.startsWith('Bearer ')) {
      throw 'Unauthorized'
    }
    const idToken = req.headers.authorization.split('Bearer ')[1];
    req.user = await firebaseAdmin.auth().verifyIdToken(idToken);
    next();
  } catch(e) {
    res.status(401)
    res.send('Unauthorized');
  }
}
Về cơ bản, đây là một middleware, mình đã áp dụng với toàn bộ router được định nghĩa sau khi middleware (phía dưới dòng app.use(authenticate)), nếu request gửi lên kèm theo token và được verify thành công, request sẽ được đi qua, nếu không sẽ trả về một response với status code = 401 với message = Unauthorized
Logout
Phần logout đơn giản này chúng ta chỉ cần trả về response kèm theo message đã logout thành công
router.get('/logout', (async (req, res) => {
  try {
    await firebaseClient.auth().signOut()
    res.status(200)
    res.send({
      message: 'You are logged out'
    })
  } catch (e) {
    res.send(e)
  }
}))
Test thử
Sau khi xây dựng xong phần Authentication cơ bản, lúc này mình sẽ tạo thử 1 API đơn giản, trong đó:
- Nếu đã đăng nhập, sẽ có string
Hi xxx@yyyy.zzz from Google cloud, you are logged - Nếu chưa đăng nhập, sẽ có string
Unauthorized
Tại file index.js, add thêm một router
app.get("/check", (req, res) => {
  res.send(`Hi ${req.user.email} from Google cloud, you are logged`)
})
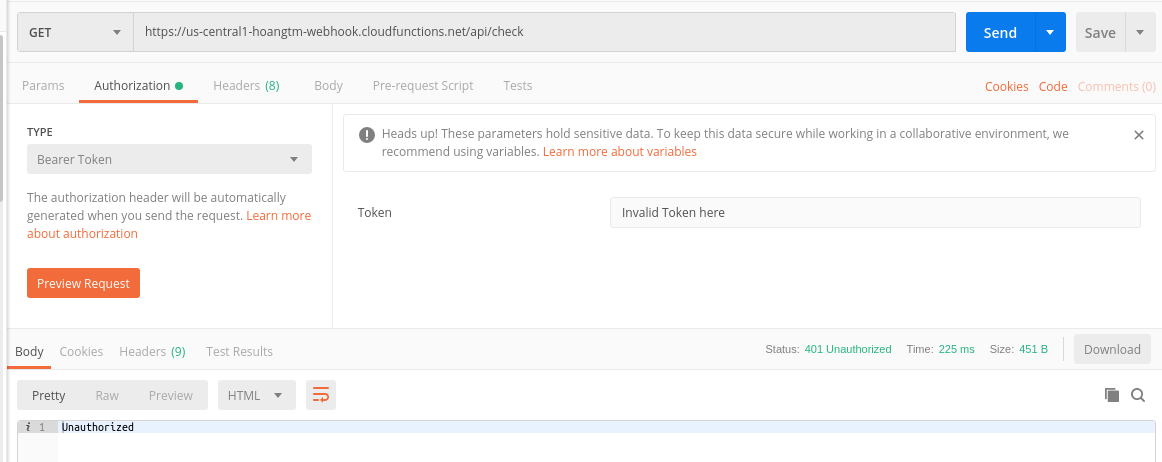
Response với trường hợp token sai
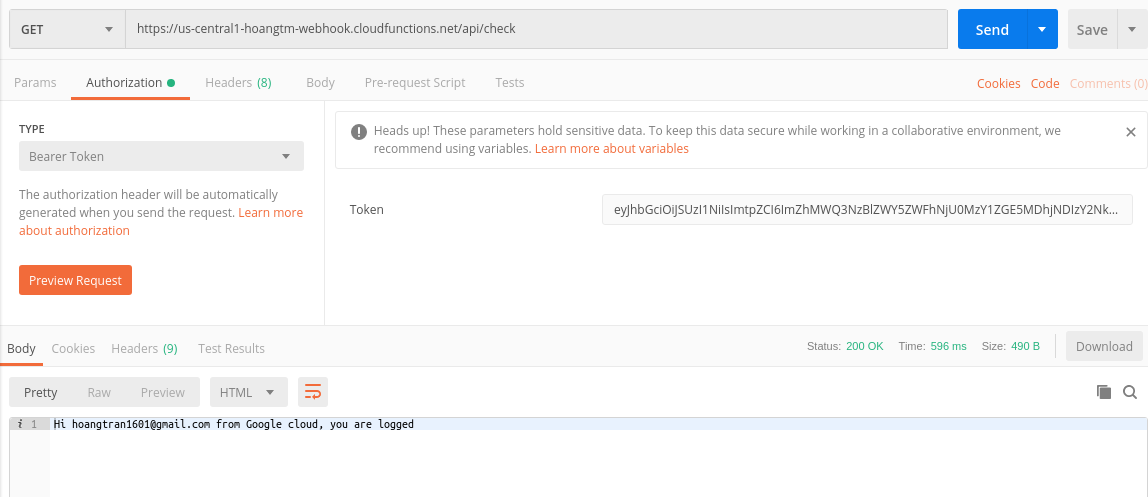
Response với token hợp lệ
Kết
Trên đây là cách định danh người dùng với Firebase Authencation trên Firebase Cloud Function. Ví dụ lần này với phía Client là Web, Firebase còn hỗ trợ rất nhiều nền tảng client khác như Unity, iOS, Android. Mình nghĩ đây là một dịch vụ rất tiện ích với anh em phía client khi không cần backend quá phức tạp: Không cần VPS, chỉ cần tạo endpoint và chạy
All rights reserved
