Nhận dữ liệu POST trong Express
Bài đăng này đã không được cập nhật trong 4 năm
Hi all! Xin chào các bạn.
Trong bài này mình sẽ hướng dẫn các bạn cách thêm cấu hình trong Express để chúng ta có thể nhận dữ liệu từ form với method POST nhé (POST trong Express).
1. Body parser - Tan rồi hợp
Các phiên bản trước của Express có rất nhiều middleware đi kèm với nó, bodyParser là một trong số đó. Khi phát hành Express 4.0, vì một lý do nào đó, cả 2 đã chia tay nhau. Express lạnh lùng không còn đi cùng với middleware này nữa, trong khi body-parser vẫn còn thương nên trở thành một module riêng, luôn luôn bên cạnh, âm thầm giúp đỡ Express.
Vào một ngày đẹp trời, chính xác là ngày 28/8/2017 - Express release phiên bản 4.16.0, sau bao sóng gió, cả 2 đã quay trở lại với nhau. Nhưng vì một lần tan vỡ, lần này body-parser dè chừng, không trao hết tình cảm cho Express, thành ra khi sử dụng Express 4.16.0, ta chỉ mới dùng được middleware express.json() và express.urlencoded(). Mãi tới tận phiên bản Express 4.17.0, body-parser mới hoàn toàn thuộc về Express với thêm express.raw() và express.text(), tình yêu nối lại, nồng nàn hơn xưa :)).
Kể từ đây, khi dùng Express 4.17.0 trở đi, ta không cần phải cài đặt thêm module middleware body-parser để nhận dữ liệu method POST nữa.
2. Cấu hình body parser trong express
Với phương thức GET, khi lấy dữ liệu ta sẽ dùng req.params.ten_param, ví dụ với route GET “user/:username”, ta sẽ lấy dữ liệu từ route này bằng cách: req.params.username
Thông thường khi client submit dữ liệu từ form, ta sẽ dùng phương thức POST vì tính an toàn và hữu dụng của nó để lấy dữ liệu. Ta sử dụng cú pháp: req.body.<name> để lấy dữ liệu tương ứng.
Từ Express 4.16.0, khi tạo ứng dụng express bằng express-generator, mặc định body parser đã được cấu hình sẵn trong file app.js:
app.use(express.json())
app.use(express.urlencoded({ extended: true }));
Như đã nói ở phần 1, để sử dụng được express.raw() và express.text() ta phải nâng cấp express lên bản 4.17.0, (thường thì bản express bản 4.16.0 đã đủ sống rồi :v)
Với những project chỉ gọi module express thì ta chỉ cần copy 2 dòng này vào là được, khá là gọn lẹ.
3. Ví dụ minh họa
Để cho nhanh gọn mình sẽ sử dụng lại project firstapp của bài trước (các bạn xem lại ví dụ bài 8, 9 tại đây).
Ta sẽ tạo ra 1 trang đăng nhập, khi client submit form đăng nhập gồm username và password bằng method POST, phía server sẽ nhận dữ liệu và so sánh với username và password do chúng ta định nghĩa ra (thông thường sẽ kiểm tra trong database, nhưng đây chỉ là ví dụ đơn giản nên mình sẽ làm như cách này cho nhanh). Nếu đúng, ta sẽ redirect sang route “user/:username” (bài trước), nếu sai ta sẽ quay lại trang đăng nhập.
File app.js sẽ như thế này (do ứng dụng này ta tạo từ express-generator nên việc cấu hình body parser là giữ nguyên chứ chẳng làm gì hết):
//app.js
var createError = require('http-errors');
var express = require('express');
var path = require('path');
var cookieParser = require('cookie-parser');
var logger = require('morgan');

var indexRouter = require('./routes/index');
var usersRouter = require('./routes/users');

var app = express();

// view engine setup
app.set('views', path.join(__dirname, 'views'));
app.set('view engine', 'ejs');

app.use(logger('dev'));
app.use(express.json());
app.use(express.urlencoded({ extended: true}));
app.use(cookieParser());
app.use(express.static(path.join(__dirname, 'public')));

app.use('/', indexRouter);
app.use('/users', usersRouter);

// catch 404 and forward to error handler
app.use(function(req, res, next) {
  next(createError(404));
});

// error handler
app.use(function(err, req, res, next) {
  // set locals, only providing error in development
  res.locals.message = err.message;
  res.locals.error = req.app.get('env') === 'development' ? err : {};

  // render the error page
  res.status(err.status || 500);
  res.render('error');
});

module.exports = app;
routes/index.js:
var express = require('express');
var router = express.Router();

/* GET home page. */
router.get('/', function(req, res, next) {
  res.render('index', { title: 'Express', name: 'Chauit' });
});

// show tên username bằng params :username
router.get('/user/:username', function(req, res, next) {
  const username = req.params.username;
  res.render('user', { title: 'Express', name: username });
});

/* Bài 10 - Nhận dữ liệu POST với body parser*/

// get login (hiện thị form cho client)
router.get('/login', function(req, res, next) {
  res.render('login', {title: 'Đăng nhập'});
});

//post login để lấy data từ form (get login) và xử lý
router.post('/login', function(req, res, next) {
  //tạo 2 giá trị gốc để so sánh với dữ liệu từ form
  const userRoot = 'chauit';
  const pwdRoot = '123456';

  /*
    Lấy giá trị gửi lên server từ form
    Các bạn chú ý: tại file login.ejs, với 2 input Tên đăng nhập và Password ta có 2 thuộc tính name,
    để lấy giá trị 2 input này, ta sử dụng req.body.<input_name> tương ứng.
    Trong ứng dụng này sẽ là req.body.username và req.body.password.
  */

 const {username, password} = req.body;
 /*
    Dòng trên tương đương với:
    const username = req.body.name;
    const password = req.body.password;
 */

 //Kiểm tra data
  if (username === userRoot && password === pwdRoot)
    return res.redirect(`/user/${username}`);
  else return res.redirect('/login');
});


module.exports = router;
Ta thực hiện tạo routes “/login” gồm 2 phương thức get và post (với get thì khi client request vào sẽ hiện thị giao diện đăng nhập, với post thì sau khi client submit form, ta sẽ lấy dữ liệu này và đi xử lý).
Do mình có sử dụng bootstrap để hỗ trợ làm giao diện form đăng nhập nên ta thêm đường dẫn sử dụng bootstap tại views/header.ejs:
 <!DOCTYPE html>
<html>
  <head>
    <title><%= title %></title>
    <link rel='stylesheet' href='/stylesheets/style.css' />
     <!-- bootstrap-->
    <link href="https://cdn.jsdelivr.net/npm/bootstrap@5.1.1/dist/css/bootstrap.min.css" rel="stylesheet" integrity="sha384-F3w7mX95PdgyTmZZMECAngseQB83DfGTowi0iMjiWaeVhAn4FJkqJByhZMI3AhiU" crossorigin="anonymous">
    <script src="https://cdn.jsdelivr.net/npm/bootstrap@5.1.1/dist/js/bootstrap.bundle.min.js" integrity="sha384-/bQdsTh/da6pkI1MST/rWKFNjaCP5gBSY4sEBT38Q/9RBh9AH40zEOg7Hlq2THRZ" crossorigin="anonymous"></script>
  </head>
  <body>
Ta sẽ tạo thêm file login.ejs tại views/login.ejs:
    <% include header %>
    <div class="login">
        <form method="POST">
          <h3>Login form</h3>
            <div class="mb-3">
              <label for="username" class="form-label">Tên đăng nhập</label>
              <input type="text" class="form-control" id="username" name="username">
            </div>
            <div class="mb-3">
              <label for="inputPassword" class="form-label">Password</label>
              <input type="password" class="form-control" id="inputPassword" name="password">
            </div>
            <button type="submit" class="btn btn-primary">Submit</button>
          </form>
    </div>
    <% include footer %>
Các bạn lưu ý: tại 2 element input của Tên đăng nhập và Password, phải có thuộc tính name để chúng ta lấy dữ liệu ở backend nhé. (name=”username” và name=”password”)
File public/stylesheets/style.css:
*{
  margin: 0;
  padding: 0;
 }

 html{
     width: 100vw;
     height: 100vh;
 }

 /* CSS which you need for blurred box */
 body{
  background-repeat: no-repeat;
  background-attachment: fixed;
  background-size: cover;
  background-position: top;
  background-image:url(https://images.unsplash.com/photo-1477346611705-65d1883cee1e?dpr=0.800000011920929&auto=format&fit=crop&w=1199&h=800&q=80&cs=tinysrgb&crop=);
  width: 100%;
  height: 100%;
  font-family: Arial, Helvetica;
  letter-spacing: 0.02em;
   font-weight: 400;
  -webkit-font-smoothing: antialiased;
  overflow: hidden;
 }

 .blurred-box{
   position: relative;
   width: 250px;
   height: 350px;
   top: calc(50% - 175px);
   left: calc(50% - 125px);
   background: inherit;
   border-radius: 2px;
   overflow: hidden;
 }

 .blurred-box:after{
  content: '';
  width: 300px;
  height: 300px;
  background: inherit;
  position: absolute;
  left: -25px;
  right: 0;
  top: -25px;
  bottom: 0;
  box-shadow: inset 0 0 0 200px rgba(255,255,255,0.05);
  filter: blur(10px);
 }


 /* Form which you dont need */
 .user-box{
   position: relative;
   margin-top: 100px;
   text-align: center;
   z-index: 1;
 }
 .user-box > *{
   display: inline-block;
   width: 200px;
 }

 .user-name{
   margin-top: 15px;
   margin-bottom: 15px;
   color: white;
 }

 input.user-password{
   width: 120px;
   height: 18px;
   opacity: 0.4;
   border-radius: 2px;
   padding: 5px 15px;
   border: 0;
 }

p {
  font-size: 30px;
    color: #fff;
    line-height: 30px;
}

.hello-user {
  margin-bottom: 20px;
}

footer {
  text-align: center;
  position: absolute;
  bottom: 0;
  width: 100%;
}

/* custom login form*/
.login form {
  margin: auto;
  margin-top: 50px;
  width: 50%;
  color: #fff;
}
Khởi động server (npm start). Kết quả trang login sẽ là:
 Đăng nhập thành công (Username: chauit, password: 123456):
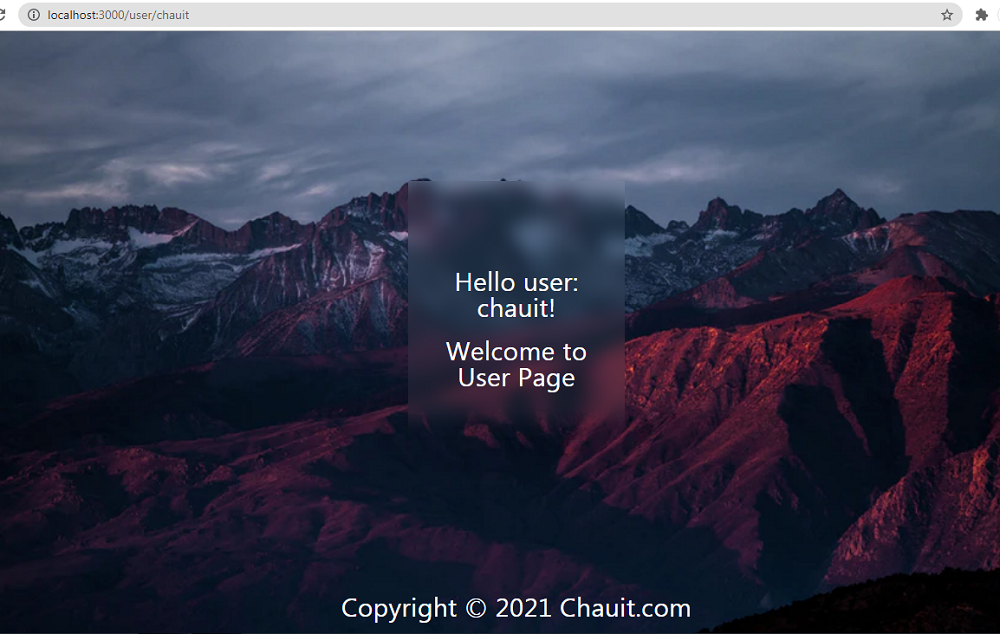
Bạn hãy thử các thông tin đăng nhập khác để kiểm tra thành quả nhé.
Full source code trên github: https://github.com/chauitcode/firstapp
Đến đây mình cũng xin kết thúc. Nếu các bạn có thắc mắc gì hãy để comment phía dưới, mình sẽ cố gắng phản hồi trong thời gian sớm nhất.
Hẹn mọi người vào bài tiếp theo!!!
(Bài viết gốc: https://chauit.com/nhan-du-lieu-post-trong-express/)
All rights reserved
