Navigation nhiều module trong Android
Bài đăng này đã không được cập nhật trong 7 năm
Trong một project có nhiều module thì đó là điều đương nhiên . Và việc chuyển qua lại giữa các module đó là điều mà mỗi dev chúng ta làm mỗi ngày .
Trong bài này mình sẽ nói về chia nhiều module trong dự án Android .
Giả sử chúng ta chỉ có một module duy nhất trong một project . Và tất nhiên mọi thứ đều chạy tốt .Nhưng chỉ có một vấn đề là thời gian build project đó . Và khi project này càng phình to ra thì đường nhiên thời gian build sẽ càng lâu .
Chính vì thế chúng ta nên tách project thành nhiều module riêng biệt .Có thể chia module theo tình năng . Chẳng hạn như tính năng đăng nhập , tính năng đăng ký ....
Nhưng việc tách như thế này cũng khá khó khăn và phức tạp bởi vì mỗi module riêng chúng ta đều phải cấu hình lại ở trong build gradle , các logic cũng phải tách riêng . Thêm vào đó trong Android chúng ta thường xuyên sử dụng Fragment .Nhưng thật không may các Fragment liên kết với nhau chặt chẽ , và mỗi Fragment cần biết về các Fragment khác. Do đó điều này đã phá vỡ nguyên tắc độc lập của từng module .
Bên trên là một số vấn đề khi chúng ta chia project thành nhiều module độc lập .
Tiếp theo là giải pháp cho vấn đề trên !
Để cho trực quan thì sẽ có một project sample như thế này.
Chúng ta có 3 module được chia theo tính năng như sau :
App module : đây là module chính của ứng dụng và để cấu hình nhưng phần chính của ứng dụng .
ListQuestion module đây là module sẽ chứa danh sách các câu hỏi . Và sẽ tách biệt cũng như không biết gì về module App và các module khác .Và tất nhiên cũng sẽ có phần giao diện riêng của nó . Module này sẽ có một QuestionsFragment và một interface là QuestionsNavigation
Tương tự như Questions module chúng ta cũng có hai module khác là
Question module đây là module cho từng câu hỏi . Module này sẽ có môt fragment là QuestionFragment và interface QuestionNavigation
Result module đây là module sẽ thực hiện chức năng đáp án cho câu hỏi . Module này sẽ có 2 Frangment là RightAnswerFragment và WrongAnswerFragment . Cùng với 2 interfacr là RightAnswerNavigation và WrongAnswerNavigation
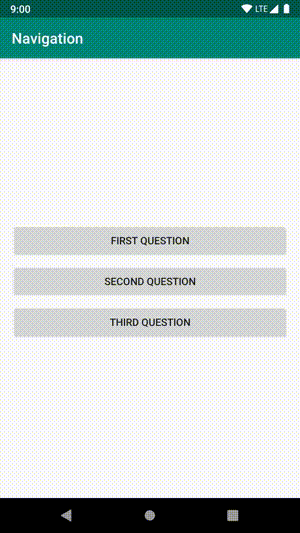
Giao diệnvà chức năng của app sẽ như thế này :
Trong ví dụ này mình sẽ dùng thêm thư viện ComponentsManager mục đích để điều hướng giữa các module với nhau .
ListQuestion Module
Chúng ta sẽ tạo một module có tên là listquestion . Với việc cấu hình Kotlin , ConstraintLayout , và ComponentsManager như sau :
// file listquestions.gradle
apply plugin: 'com.android.library'
apply plugin: 'kotlin-android'
apply plugin: 'kotlin-android-extensions'
android { ... }
dependencies {
    ...
    implementation "org.jetbrains.kotlin:kotlin-stdlib-jdk7:$kotlin_version"
    implementation 'androidx.appcompat:appcompat:1.1.0-alpha01'
    implementation 'androidx.constraintlayout:constraintlayout:1.1.3'
    implementation "com.github.valeryponomarenko.componentsmanager:androidx:2.0.1"
    ...
}
Thay thế việc dùng Route or Navigator của Fragment . Chúng ta sẽ tạo ra một interface QuestionsNavigatior , định nghĩa phương thức transitions cần thiết ở trong này .Do đó, đối với Fragment, việc chuyển đổi sẽ được thực hiện như thế nào không quan trọng, nó chỉ cần giao diện và dựa vào khi phương thức được gọi, màn hình cần thiết sẽ được mở.
interface QuestionsNavigation {
    fun openQuestion(questionId: Long)
}
Để mở một màn hình với một câu hỏi, chúng ta chỉ cần gọi function openQuestion (qiestionId: Long). Chúng ta không quan tâm màn hình sẽ được mở như thế nào, thậm chí không quan tâm đó là Frangment hay Activity .
Phần layout của chức năng câu hỏi sẽ đơn giản như thế này frm_list_question.xml
Phần QuestionsFragment sẽ như thế này :
class QuestionsFragment : Fragment() {

    private val navigation: QuestionsNavigation by lazy {
        XInjectionManager.findComponent<QuestionsNavigation>()
    }

    override fun onCreateView(inflater: LayoutInflater, container: ViewGroup?, savedInstanceState: Bundle?): View? =
        inflater.inflate(R.layout.fragment_questions, container, false)

    override fun onViewCreated(view: View, savedInstanceState: Bundle?) {
        super.onViewCreated(view, savedInstanceState)
        button_first_question.setOnClickListener { navigation.openQuestion(1) }
        button_second_question.setOnClickListener { navigation.openQuestion(2) }
        button_third_question.setOnClickListener { navigation.openQuestion(3) }
    }
}
Tuơng tự chúng ta cũng có thêm Question Module với tên gọi là question Với file build gradle như sau :
// question.gradle
apply plugin: 'com.android.library'
apply plugin: 'kotlin-android'
apply plugin: 'kotlin-android-extensions'
android { ... }
dependencies {
    ...
    implementation "org.jetbrains.kotlin:kotlin-stdlib-jdk7:$kotlin_version"
    implementation 'androidx.appcompat:appcompat:1.1.0-alpha01'
    implementation 'androidx.constraintlayout:constraintlayout:1.1.3'
    implementation "com.github.valeryponomarenko.componentsmanager:androidx:2.0.1"
    ...
}
Sau đó, chúng ta tạo ra một interface xác định điều hướng của module. Từ câu hỏi người dùng có thể mở một màn hình trả lời sai hoặc một màn hình trả lời đúng để interface sẽ có hai phương thức như sau
interface QuestionNavigation {
    fun openWrongAnswer()
    fun openRightAnswer()
}
Phần layout sẽ như thế này : frm_question.xml
Phần QuestionFragment sẽ như thế này :
class QuestionFragment : Fragment() {

    companion object {
        private const val EXTRA_QUESTION_ID = "EXTRA_QUESTION_ID"

        fun createBundle(questionId: Long) =
            Bundle().apply { putLong(EXTRA_QUESTION_ID, questionId) }
    }

    private val navigation: QuestionNavigation by lazy {
        XInjectionManager.findComponent<QuestionNavigation>()
    }

    private val questionId: Long by lazy {
        arguments?.getLong(EXTRA_QUESTION_ID) ?: throw IllegalStateException("no questionId")
    }

    override fun onCreateView(inflater: LayoutInflater, container: ViewGroup?, savedInstanceState: Bundle?): View? =
        inflater.inflate(R.layout.fragment_question, container, false)

    override fun onViewCreated(view: View, savedInstanceState: Bundle?) {
        super.onViewCreated(view, savedInstanceState)
        text_question.text = getString(R.string.question, questionId)
        button_right_answer.setOnClickListener { navigation.openRightAnswer() }
        button_wrong_answer.setOnClickListener { navigation.openWrongAnswer() }
    }
}
Cuối cùng là Result module Với file build.gradle
apply plugin: 'com.android.library'
apply plugin: 'kotlin-android'
apply plugin: 'kotlin-android-extensions'
android { ... }
dependencies {
    ...
    implementation "org.jetbrains.kotlin:kotlin-stdlib-jdk7:$kotlin_version"
    implementation 'androidx.appcompat:appcompat:1.1.0-alpha01'
    implementation 'androidx.constraintlayout:constraintlayout:1.1.3'
    implementation "com.github.valeryponomarenko.componentsmanager:androidx:2.0.1"
    ...
}
Chúng ta sẽ có phần đó là câu trả lời đúng và câu trả lời sai Từ màn hình này chúng ta có thể quay lại về màn hình chính chứa danh sách các câu hỏi vì thế chúng ta sẽ có một interface có một function như sau .
interface RightAnswerNavigation {
    fun openAllQuestions()
}
Layout sẽ như thế này : frm_right.xml
Phần fragment RightAnswerFrangment sẽ như thế này :
class RightAnswerFragment : Fragment() {

    private val navigation: RightAnswerNavigation by lazy {
        XInjectionManager.findComponent<RightAnswerNavigation>()
    }

    override fun onCreateView(inflater: LayoutInflater, container: ViewGroup?, savedInstanceState: Bundle?): View? =
        inflater.inflate(R.layout.fragment_right, container, false)

    override fun onViewCreated(view: View, savedInstanceState: Bundle?) {
        super.onViewCreated(view, savedInstanceState)
        button_all_questions.setOnClickListener { navigation.openAllQuestions() }
    }
}
Tương tự với câu trả lời sai cũng thế
Cuối cùng là App module là phần kết nối các module khác lại với nhau .
Đầu tiền chúng ta sẽ có một file build.gradlevới việc implement các module trên .Như code dưới đây .
// build.gradle
apply plugin: 'com.android.application'
apply plugin: 'kotlin-android'
apply plugin: 'kotlin-android-extensions'
android { ... }
dependencies {
    ...
    implementation project(':questions')
    implementation project(':question')
    implementation project(':result')

    implementation "org.jetbrains.kotlin:kotlin-stdlib-jdk7:$kotlin_version"
    implementation 'androidx.appcompat:appcompat:1.1.0-alpha01'
    implementation 'com.github.valeryponomarenko.componentsmanager:androidx:2.0.1'
    implementation 'android.arch.navigation:navigation-fragment-ktx:1.0.0-alpha11'
    ...
}
Tiếp theo làm cách nào để các module có thể điều hướng đến nhau . Ở đây chúng ta sẽ dùng Navigation Component để thực hiện nó
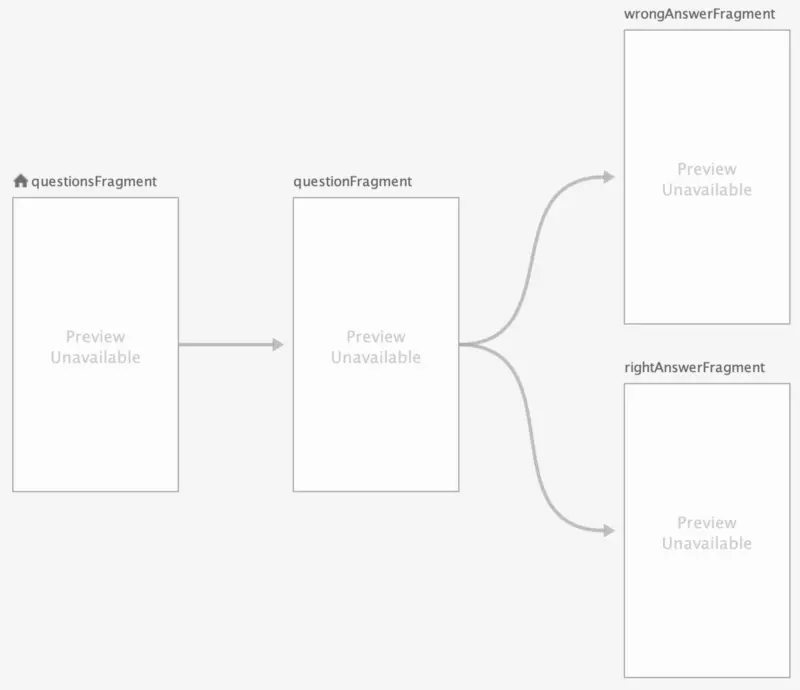
Tạo một file navigation và gọi nó là nav_graph.xml. Sẽ có ba kết nối:
Cụ thể code sẽ như thế này :
<?xml version="1.0" encoding="utf-8"?>
<navigation xmlns:android="http://schemas.android.com/apk/res/android"
    xmlns:app="http://schemas.android.com/apk/res-auto"
    android:id="@+id/nav_graph"
    app:startDestination="@id/questionsFragment">
    <fragment
        android:id="@+id/questionsFragment"
        android:name="me.vponomarenko.modular.navigation.questions.QuestionsFragment"
        android:label="QuestionsFragment">
        <action
            android:id="@+id/action_questionsFragment_to_questionFragment"
            app:destination="@id/questionFragment" />
    </fragment>
    <fragment
        android:id="@+id/questionFragment"
        android:name="me.vponomarenko.modular.navigation.question.QuestionFragment"
        android:label="QuestionFragment">
        <action
            android:id="@+id/action_questionFragment_to_wrongAnswerFragment"
            app:destination="@id/wrongAnswerFragment" />
        <action
            android:id="@+id/action_questionFragment_to_rightAnswerFragment"
            app:destination="@id/rightAnswerFragment"
            app:popUpTo="@+id/questionsFragment" />
    </fragment>
    <fragment
        android:id="@+id/wrongAnswerFragment"
        android:name="me.vponomarenko.modular.navigation.result.wrong.WrongAnswerFragment"
        android:label="WrongAnswerFragment" />
    <fragment
        android:id="@+id/rightAnswerFragment"
        android:name="me.vponomarenko.modular.navigation.result.right.RightAnswerFragment"
        android:label="RightAnswerFragment" />
</navigation>
Tiếp theo là phần quan trong nhất Navigation .
Class này có trách nhiệm thực hiện chuyển tiếp giữa các frangment . Nó thực hiện tất cả các giao diện điều hướng từ các module mà ta đã định nghĩa ở trên . Ngoài ra, class còn có các phương thức để liên kết navController và hủy liên kết nó.
class Navigator : QuestionsNavigation, QuestionNavigation, RightAnswerNavigation, WrongAnswerNavigation {

    private var navController: NavController? = null

    override fun openQuestion(questionId: Long) {
        navController?.navigate(
            R.id.action_questionsFragment_to_questionFragment,
            QuestionFragment.createBundle(questionId)
        )
    }

    override fun openWrongAnswer() {
        navController?.navigate(R.id.action_questionFragment_to_wrongAnswerFragment)
    }

    override fun openRightAnswer() {
        navController?.navigate(R.id.action_questionFragment_to_rightAnswerFragment)
    }

    override fun openAllQuestions() {
        navController?.popBackStack()
    }

    override fun tryAgain() {
        navController?.popBackStack()
    }

    fun bind(navController: NavController) {
        this.navController = navController
    }

    fun unbind() {
        navController = null
    }
}
Sau đó tạo một lớp NavApplication để bind Navigator vào trong giao diện
class NavApplication : Application() {
    override fun onCreate() {
        super.onCreate()
        XInjectionManager.bindComponentToCustomLifecycle(object : IHasComponent<Navigator> {
            override fun getComponent(): Navigator = Navigator()
        })
    }
}
Và việc cuối cùng là thay đổi MainActivity
class MainActivity : AppCompatActivity() {

    private val navigator: Navigator by lazy {
        XInjectionManager.findComponent<Navigator>()
    }

    override fun onCreate(savedInstanceState: Bundle?) {
        super.onCreate(savedInstanceState)
        setContentView(R.layout.activity_main)
    }

    override fun onResume() {
        super.onResume()
        navigator.bind(findNavController(R.id.nav_host_fragment))
    }

    override fun onPause() {
        super.onPause()
        navigator.unbind()
    }

    override fun onSupportNavigateUp(): Boolean = findNavController(R.id.nav_host_fragment).navigateUp()
}
Vơi phần layout như sau :
<?xml version="1.0" encoding="utf-8"?>
<fragment xmlns:android="http://schemas.android.com/apk/res/android"
    xmlns:app="http://schemas.android.com/apk/res-auto"
    android:id="@+id/nav_host_fragment"
    android:name="androidx.navigation.fragment.NavHostFragment"
    android:layout_width="match_parent"
    android:layout_height="match_parent"
    app:defaultNavHost="true"
    app:navGraph="@navigation/nav_graph" />
Ok ! Như thế là đã xong giờ chúng ta có thể run project và xem thành quả thôi ! Cảm ơn các bạn đã theo dõi .
Refer : https://proandroiddev.com/navigation-in-multi-module-projects-9a5c53ad219
All rights reserved
