Mongo Replica Set on Docker
Bài đăng này đã không được cập nhật trong 6 năm
Mongo Replica Set
-
Một Replica Set (một bộ các bản sao) là một nhóm các thể hiện (instance)
mongod, các thể hiện này lưu trữ bộ dữ liệu ( data set) giống nhau. -
Trong môi trường product các tính dự phòng và sẵn sàng cao ( redundancy and high available) mà mongo replica set cung cấp là hết sức cần thiết. Không giống như khi chúng ta chạy thử với môi trường
devhoặctestthì có thể chỉ cần mộtmongodchạy là đủ. -
Một mongo replica set sẽ chứa các node mang dữ liệu (
data bearing node) và có thể có một node trọng tài (arbiter), riêngarbiterkhông mang dữ liệu nhiệm vụ duy nhất của nó dành cho bình bầu. -
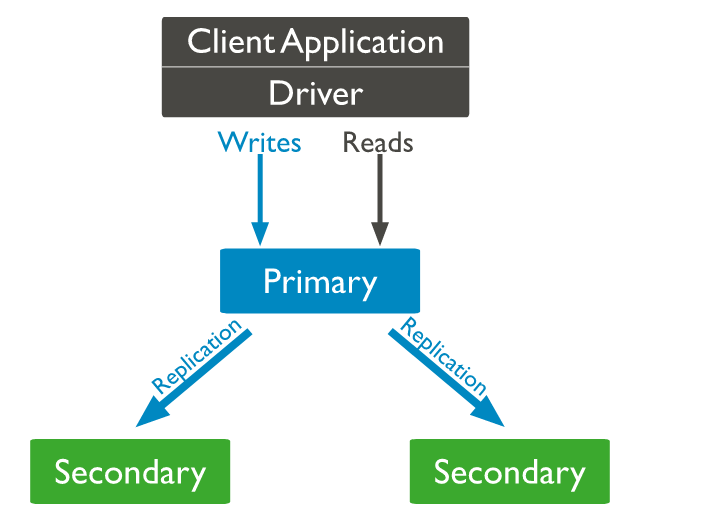
Trong số các
data bearing nodecó duy nhất một nodeprimarycó quyền ghi dữ liệu. Trong quá trình ghi dữ liệu node primary này ghi lại toàn bộ thay đổi lên dữ liệu của nó vào trong operation log hay còn gọi oplog. -
Trong
data bearing nodengoàiprimarysẽ còn lại cácsecondarynode, cácsecondariesnày sao chépoplogcủa primary và thao tác trên bộ dữ liệu của mình, đó là cách các node lưu trữ bộ dữ liệu giống nhau.![mongo replica set: primary and secondaries]()
-
Automatic Failover: là khi
primarynode down. Cácsecondariescòn lại sẽ bình bầu để một node lên làm primary. Chúng ta sẽ không thể ghi dữ liệu cho tới khi quá trình này hoàn tất. Replica set có thể tiếp tục phục vụ đọc dữ liệu nếu được cấu hình run on secondaries khi primary offline. -
Write concern: Mô tả số node cần acknowledge cho việc ghi dữ liệu hoàn tất trước khi việc ghi dữ liệu được thông báo lại phía client là thành công( default 1).
-
Read Operations ( Trade off): Có tất cả 5 tùy chọn cho việc đọc dữ liệu và đây là một sự đánh đổi chúng ta nên xem xét để có cấu hình phù hợp với ứng dụng của mình nhất:
-
primary: Mặc định luôn là đọc dữ liệu từ nodeprimary. Multi-document transactions transactions thao tác trên nhiều bản ghi có chứa thao tác đọc phải sử dụng đọc từ primary. Các thao tác trong một transaction cần được thực hiện trên cùng một node. (Transaction vừa có thao tác đọc, ghi cần thao tác trên cùng node B. Không thể đọc trên node B, ghi trên node C). -
primaryPreferred: Thông thường sẽ đọc từ node primary nhưng nếu primary offline thì có thể đọc từsecondaries. -
secondary: Luôn đọc từ các node secondaries. -
secondaryPreferred: Mặc định sẽ đọc từ secondaries nhưng nếu không có node nào available thì sẽ đọc từ node primay. -
nearest: Sẽ đọc từ node gần nó nhất. Trong mongo replica set. Các node sẽ được lưu trữ trên các Data center khác nhau ( theo thiết kế) thậm chí khác cả khu vực địa lý ( châu Âu, châu Á). Tùy chọn này sẽ cho phép client lấy dữ liệu từ node nó kết nối mạng nhanh nhất.
-
-
Nhận xét (quan điểm cá nhân):
-
Set đọc primary only có thể tăng tải trên node primay ( vừa đọc vừa ghi). Nếu primary down không chỉ không ghi được dữ liệu lúc này việc đọc dữ liệu cũng tạm thời không thực hiện được ( cho tới khi primary mới lên).
-
primaryPreferred: Vẫn là tăng tải trên primary ( vừa đọc vừa ghi), khắc phục được khi primary down ( sẽ chuyển qua đọc từ secondaries). -
Nếu đọc từ secondaries giảm tải cho primay node ( lúc này chỉ cần ghi), tuy nhiên có thể xảy ra trường hợp dữ liệu chưa được cập nhật. ( dữ liệu đã thay đổi trên primary nhưng chưa cập nhật trên secondaries)
-
Run mongo replica set on Docker
-
Phần này mình sẽ chạy thử 1 replica set đơn giản trên docker.
-
Dĩ nhiên trên PC của mình đã cài docker
 . Kiểm tra đã có image của
 mongo( như bên dưới mongo version latest còn product chúng ta sẽ chỉ rõ version nào (bow) ).root:~# docker images | grep mongo mongo latest bcef5fd2979d 4 weeks ago 386MB -
Create network bằng lệnh:
root:~# docker network create my-mongo-cluster -
Chắc chắn chúng ta đã có:
root:~# docker network ls | grep my d4b0ed47349c my-mongo-cluster bridge local -
Here we go, cùng chạy
mongo1đầu tiên:docker run --name mongo1 --net my-mongo-cluster mongo mongod --replSet my-mongo-set-
docker run: Start một container từ một image -
--name mongo1: đặt tên cho container đầu tiên này là :mongo1. -
--net my-mongo-cluster: thêm container này vào networkmy-mongo-cluster. -
mongo: file ảnh để chạy các container. -
mongod --replSet my-mongo-set: join mongo1 vào replSet có tênmy-mongo-set.
-
-
Ok! Giờ con thứ 2 và thứ 3 sẽ được chạy (ở đây mình chạy trên 3 cửa sổ terminal khác nhau):
docker run --name mongo1 --net my-mongo-cluster mongo mongod --replSet my-mongo-set docker run --name mongo2 --net my-mongo-cluster mongo mongod --replSet my-mongo-set docker run --name mongo3 --net my-mongo-cluster mongo mongod --replSet my-mongo-set -
Sau khi chạy chúng ta có thể thấy log báo chưa config replSet:
Sessions collection is not set up; waiting until next sessions refresh interval: Replication has not yet been configured -
Cùng kiểm tra ip các container này đã(nếu muốn xem full thông tin network thì bỏ cái grep thôi
 ):
):root:~# docker network inspect my-mongo-cluster | grep 'mongo\|IPv4Address' "Name": "my-mongo-cluster", "Name": "mongo3", "IPv4Address": "172.21.0.4/16", "Name": "mongo2", "IPv4Address": "172.21.0.3/16", "Name": "mongo1", "IPv4Address": "172.21.0.2/16", -
Ok thấy ip rồi thì connect vào rồi setup replSet thoai
 . ( terminal dưới là đang connect vào mongo1 theo IP như show ở trên)
root:~# mongo --host 172.21.0.2 MongoDB shell version v4.0.16 connecting to: mongodb://172.21.0.2:27017/?gssapiServiceName=mongodb Implicit session: session { "id" : UUID("0a408390-5cb6-4972-a326-3e54011cbd17") } -
Thêm cấu hình cho replica set
> config = { ... "_id": "my-mongo-set", ... "members": [ ... { ... "_id": 0, ... "host": "mongo1:27017" ... }, ... { ... "_id": 1, ... "host": "mongo2:27017" ... }, ... { ... "_id":2, ... "host": "mongo3:27017" ... } ... ] ... } { "_id" : "my-mongo-set", "members" : [ { "_id" : 0, "host" : "mongo1:27017" }, { "_id" : 1, "host" : "mongo2:27017" }, { "_id" : 2, "host" : "mongo3:27017" } ] } -
Phần còn lại là start replSet thôi. Vẫn đang trên con mongo1 nhé. Sau khi start replSet nó sẽ chuyển trạng thái Secondary và chờ 1 lát nó sẽ trở thành Primary như dưới.
> rs.initiate(config) { "ok" : 1, "$clusterTime" : { "clusterTime" : Timestamp(1584870808, 1), "signature" : { "hash" : BinData(0,"AAAAAAAAAAAAAAAAAAAAAAAAAAA="), "keyId" : NumberLong(0) } }, "operationTime" : Timestamp(1584870808, 1) } my-mongo-set:SECONDARY> my-mongo-set:SECONDARY> my-mongo-set:PRIMARY> -
Phần dưới đây lần lượt với con mongo2 và mongo3
root:~# docker network inspect my-mongo-cluster | grep 'mongo\|IPv4Address' "Name": "my-mongo-cluster", "Name": "mongo3", "IPv4Address": "172.21.0.4/16", "Name": "mongo2", "IPv4Address": "172.21.0.3/16", "Name": "mongo1", "IPv4Address": "172.21.0.2/16", root:~# mongo --host 172.21.0.3 MongoDB shell version v4.0.16 connecting to: mongodb://172.21.0.3:27017/?gssapiServiceName=mongodb Implicit session: session { "id" : UUID("01c176bf-58bf-4d0e-b018-564b76a0d2ca") } MongoDB server version: 4.2.3 WARNING: shell and server versions do not match Server has startup warnings: 2020-03-22T09:26:44.184+0000 I STORAGE [initandlisten] 2020-03-22T09:26:44.184+0000 I STORAGE [initandlisten] ** WARNING: Using the XFS filesystem is strongly recommended with the WiredTiger storage engine 2020-03-22T09:26:44.184+0000 I STORAGE [initandlisten] ** See http://dochub.mongodb.org/core/prodnotes-filesystem 2020-03-22T09:26:44.857+0000 I CONTROL [initandlisten] 2020-03-22T09:26:44.857+0000 I CONTROL [initandlisten] ** WARNING: Access control is not enabled for the database. 2020-03-22T09:26:44.858+0000 I CONTROL [initandlisten] ** Read and write access to data and configuration is unrestricted. 2020-03-22T09:26:44.858+0000 I CONTROL [initandlisten] --- Enable MongoDB's free cloud-based monitoring service, which will then receive and display metrics about your deployment (disk utilization, CPU, operation statistics, etc). The monitoring data will be available on a MongoDB website with a unique URL accessible to you and anyone you share the URL with. MongoDB may use this information to make product improvements and to suggest MongoDB products and deployment options to you. To enable free monitoring, run the following command: db.enableFreeMonitoring() To permanently disable this reminder, run the following command: db.disableFreeMonitoring() --- my-mongo-set:SECONDARY> bye ############################################################################################## root:~# mongo --host 172.21.0.4 MongoDB shell version v4.0.16 connecting to: mongodb://172.21.0.4:27017/?gssapiServiceName=mongodb Implicit session: session { "id" : UUID("e4bf5607-ecef-450a-9b9c-9254533444b9") } MongoDB server version: 4.2.3 WARNING: shell and server versions do not match Server has startup warnings: 2020-03-22T09:26:57.550+0000 I STORAGE [initandlisten] 2020-03-22T09:26:57.550+0000 I STORAGE [initandlisten] ** WARNING: Using the XFS filesystem is strongly recommended with the WiredTiger storage engine 2020-03-22T09:26:57.550+0000 I STORAGE [initandlisten] ** See http://dochub.mongodb.org/core/prodnotes-filesystem 2020-03-22T09:26:58.232+0000 I CONTROL [initandlisten] 2020-03-22T09:26:58.232+0000 I CONTROL [initandlisten] ** WARNING: Access control is not enabled for the database. 2020-03-22T09:26:58.232+0000 I CONTROL [initandlisten] ** Read and write access to data and configuration is unrestricted. 2020-03-22T09:26:58.232+0000 I CONTROL [initandlisten] --- Enable MongoDB's free cloud-based monitoring service, which will then receive and display metrics about your deployment (disk utilization, CPU, operation statistics, etc). The monitoring data will be available on a MongoDB website with a unique URL accessible to you and anyone you share the URL with. MongoDB may use this information to make product improvements and to suggest MongoDB products and deployment options to you. To enable free monitoring, run the following command: db.enableFreeMonitoring() To permanently disable this reminder, run the following command: db.disableFreeMonitoring() --- my-mongo-set:SECONDARY> -
Có thể sẽ có câu hỏi tại sao phần này ko thấy expose port ra như 1 số tutorial (?)
-p 30001:27017. Mình nghĩ nếu hiểu mô hình triển khai bạn sẽ thấy việc expose port ra hơi thừa.
One more thing (@@)
-
Phần trên đã chạy thành công replica set nhưng nếu gom lại 1 file docker-compose thì sẽ nhanh hơn.
-
Note:
- Do triển khai thực tế các container chạy instance `mongo` sẽ chạy trên các host khác nhau, khác Data center thậm chí khác cả khu vực địa lý. -> File docker-compose như dưới sẽ sai so với kiến trúc triển khai trên trang chủ (chạy các node trên cùng 1 host ( mất hết ý nghĩa dự phòng, sẵn sàng cao của replSet)). - [For production deployments](https://docs.mongodb.com/manual/tutorial/deploy-replica-set/#requirements), you should maintain as much separation between members as possible by hosting the mongod instances on separate machines. When using virtual machines for production deployments, you should place each mongod instance on a separate host server serviced by redundant power circuits and redundant network paths. -
Mình xóa hết các container trước đó đã tạo đi. Trước:
root:~# docker container ls -a | grep mongo 74a7b8a326da mongo "docker-entrypoint.s…" 37 minutes ago Exited (0) About a minute ago mongo3 82b240631505 mongo "docker-entrypoint.s…" 37 minutes ago Exited (0) About a minute ago mongo2 dde102aa23bd mongo "docker-entrypoint.s…" 38 minutes ago Exited (0) About a minute ago mongo1 -
Sau:
root:~# docker container rm 74a7b8a326da 82b240631505 dde102aa23bd 74a7b8a326da 82b240631505 dde102aa23bd root:~# docker container ls -a | grep mongo -
Network được tạo ở trên vẫn còn nhé:
docker network create my-mongo-cluster -
File
docker-compose.ymlnhư dưới:# docker-compose.yml file version: "3.5" services: mongo_one: container_name: mongo1 image: mongo #should specify version mongo here command: mongod --replSet my-mongo-set mongo_two: container_name: mongo2 image: mongo #should specify version mongo here command: mongod --replSet my-mongo-set mongo_three: container_name: mongo3 image: mongo #should specify version mongo here command: mongod --replSet my-mongo-set networks: default: external: name: my-mongo-cluster -
Giờ cd vào thư mục chứa file
dockercompose.ymlchạy lệnh:docker-compose uplên thôi nếu bị như dưới là chưa có quyền nhé.sudo -slên$ docker-compose up ERROR: Couldn't connect to Docker daemon at http+docker://localhost - is it running? If it's at a non-standard location, specify the URL with the DOCKER_HOST environment variable. -
Chúng ta sẽ có log ntn:
# docker-compose up Creating mongo3 ... done Creating mongo2 ... done Creating mongo1 ... done Attaching to mongo3, mongo2, mongo1 -
Kiểm tra lại các container đã chạy:
root:~# docker container ls -a | grep mongo c0805b44781a mongo "docker-entrypoint.s…" About a minute ago Up About a minute 27017/tcp mongo1 f4a0f2608a5a mongo "docker-entrypoint.s…" About a minute ago Up About a minute 27017/tcp mongo2 a569175dd493 mongo "docker-entrypoint.s…" About a minute ago Up About a minute 27017/tcp mongo3 -
Kiểm tra lại IP và chạy các lệnh config như phần trên là chúng ta sẽ có replSet trên local để test. Điểm lợi của docker-compose là khi chạy lệnh
docker-compose downtự động các container được tạo bởidocker-compose upcũng sẽ bị remove luôn. Gom các cấu hình vào trong file .yml luôn như thế chính xác hơn là chạy lệnh terminal như phần trên.
P/s
-
Phần trên chỉ là note lại phần tìm hiểu của mình về mongo replica set trên docker và thử chạy nó với docker-compose. Vẫn còn tồn tại nhiều vấn đề cần phải thực hiện thêm trước khi chạy product:
-
Bảo mật netowrk với docker ( chỉ các host cụ thể mới truy cập được vào các replica set của mongo)
-
File docker compose nên thêm 1 bước chạy tự động cấu hình - phần trên vẫn đang làm bằng tay( cái này làm được đã thấy trên mạng có - nhưng chưa thử
) -
Định làm nodejs app nhỏ test thử khi primary down và vẫn đọc ghi được sau khi 1 secondary lên.(có thể sẽ bổ sung sau)
-
Bảo mật khi triển khai replica set ( vẫn đang `mongo --host <IP_INSTANCE> vẫn đang vào thoải mái
) -
Happy using docker
 and mongoDB (F)(F)(F)
-
All rights reserved
