Mobile Testing - Selendroid Framework
Bài đăng này đã không được cập nhật trong 4 năm
Selendroid là một framework kiểm thử tự động để thử nghiệm các ứng dụng native và hybrid của Android. Kiểm tra Selendroid được viết bằng cách sử dụng API client Selenium Webdriver.
I. Ưu điểm của Selendroid:
- Hoàn toàn tương thích với JSON Wire Protocol / Selenium 3 Ready.
- Không sửa đổi các ứng dụng theo thử nghiệm cần thiết để tự động hoá nó.
- Kiểm tra các trang web điện thoại di động sử dụng bằng được build trong Android điều khiển webview app.
- Cùng ý tưởng cho việc tự động hóa các ứng dụng native hoặc hybrid.
- Các yếu tố giao diện người dùng có thể được tìm thấy bằng các loại định vị khác nhau.
- Các cử chỉ được hỗ trợ: Tương tác Advanced User API.
- Emulators hiện đang bắt đầu tự động.
- Selendroid hỗ trợ hot plugging thiết bị phần cứng.
- Tích hợp đầy đủ như một nút vào Selenium Grid cho rộng và thử nghiệm song song.
- Nhiều Android hỗ trợ target API (10-19).
- Được built trong Inspector để đơn giản hóa phát triển trường hợp kiểm thử.
- Selendroid có thể được mở rộng trong thời gian chạy với phần mở rộng của riêng bạn.
- Selendroid có thể tương tác với nhiều thiết bị Android (emulators hoặc các thiết bị phần cứng) cùng một lúc.
II. Nhược điểm của Selendroid:
- Hạn chế của công cụ này là khá chậm và trên một số máy có < 4GB RAM thì không sử dụng được.
III. Cách sử dụng Selendroid:
Step 1:
-
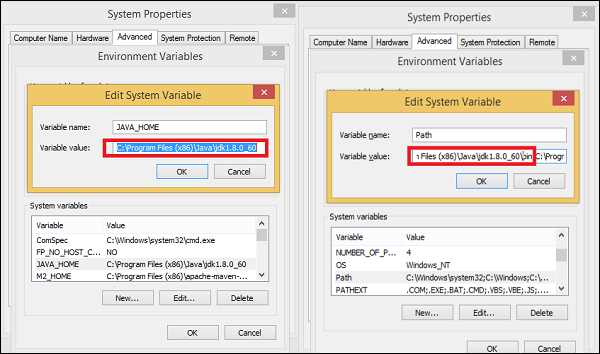
Các điều kiện tiên quyết để sử dụng Robotium là Java SDK (tối thiểu 1.6). Nếu bạn không có cài đặt Java trên hệ thống của bạn, hãy làm theo các bước dưới đây:
- Download JDK and JRE from Oracle JavaSE
- Chấp nhận điều kiện cấp phép
- Cài đặt JDK and JRE.
- Đặt biến môi trường như thể hiện trong hình dưới đây.
Step 2:
- Download Android Studio from SDK Android (Nó sẽ mất nhiều thời gian do size của file).
- Double click the exe and run the installer.
- Tiếp tục cùng với các lựa chọn mặc định
- Set the ANDROID_HOME.
Step 3:
- Download Selenium jar files and test application from Selendroid
- Download selenium jar file and test app.
- Đặt nó vào bất kì thư mục nào ví dụ: D:\SelendroidJars.
Step 4:
- Thiết bị vật lí với cap USB
- Chắc chắn rằng thiết bị của bạn được làm việc với dây cap USB
- Chắc chắn rằng USB ở chế độ debug( setttings → Developer options).
IV. Test an App with Robotium
- Để test 1 app với Robotium, cần thực hiện các bước sau:
Step 1: Cài đặt Eclipse
Step 2: Tạo một project Java
Step 3: Thêm tải file jar Selendroid cho dự án mới được tạo ra.
Step 4: Thêm tải file jar Selenium cho dự án mới được tạo ra.
Step 5: Cấu hình TestNG trong Eclipse.
Step 6: Kết nối các thiết bị di động với các hệ thống sử dụng cáp USB. Thiết lập chế độ debug USB từ các tùy chọn phát triển theo các thiết lập.
Step 7: Chạy máy chủ Selendroid. Mở dấu nhắc lệnh và viết code dưới đây và nhấn Enter -
java -jar selendroid-standalone-0.17.0-with-dependencies.jar -app selendroid-test-app-0.17.0.apk
Selendroid-stangalone sẽ bắt đầu một máy chủ http trên cổng 4444 và sẽ quét tất cả các thiết bị Android ảo (AVD) mà người dùng đã tạo ra (~ / .android / avd /).
Mở trình duyệt và đi tới: http://localhost:4444/wd/hub/status.
Step 8: Tạo một dự án Java; thêm Selendroid Standalone libraries, Selenium jars, và JUnit libraries trong con đường xây dựng.
Step 9: Tạo package under the Java project.
Step 10: Tạo 1 class và viết các mã code sau đây:
`
package selTest;

import io.selendroid.SelendroidDriver;
import io.selendroid.common.SelendroidCapabilities;
import io.selendroid.standalone.SelendroidConfiguration;
import io.selendroid.standalone.SelendroidLauncher;

import org.openqa.selenium.By;
import org.openqa.selenium.WebDriver;
import org.openqa.selenium.WebElement;

import org.testng.Assert;
import org.testng.annotations.AfterSuite;
import org.testng.annotations.BeforeSuite;
import org.testng.annotations.Test;

public class SelendroidTest {

   private WebDriver driver ;

   @BeforeSuite
   public void setUp() throws Exception {
      SelendroidConfiguration config = new SelendroidConfiguration();
      config.addSupportedApp("selendroid-test-app-0.9.0.apk");
      SelendroidLauncher selendroidServer = new SelendroidLauncher(config);
      selendroidServer.launchSelendroid();

      SelendroidCapabilities caps = new
         SelendroidCapabilities("io.selendroid.testapp:0.9.0");
      driver = new SelendroidDriver(caps);
   }

   @Test
   public void selendroidTest() throws Exception {
      WebElement inputField = driver.findElement(By.id("my_text_field"));
      Assert.assertEquals("true", inputField.getAttribute("enabled"));
      inputField.sendKeys("Selendroid");

      Assert.assertEquals("Selendroid", inputField.getText());

      WebElement button = driver.findElement(By.id("buttonTest"));
      button.click();

      button = driver.findElement(By.id("button2"));
      button.click();

      Thread.sleep(5000);

      button = driver.findElement(By.id("startUserRegistration"));
      button.click();

      Thread.sleep(10000);

      WebElement element = driver.findElement(By.id("label_username"));

      String text = element.getText();
      System.out.println(text);
      element = driver.findElement(By.id("inputUsername"));
      element.sendKeys("bob");

      element = driver.findElement(By.id("inputEmail"));
      element.sendKeys("test@gmail.com");

      element = driver.findElement(By.id("inputPassword"));
      element.clear();
      element.sendKeys("test1233");

      element = driver.findElement(By.id("inputName"));
      element.clear();
      element.sendKeys("My Name ");

      element = driver.findElement(By.id("input_preferedProgrammingLanguage"));
      element.click();

      element = driver.findElement(By.id("text1"));
      element.click();

      element = driver.findElement(By.id("input_adds"));
      element.click();

      element = driver.findElement(By.id("btnRegisterUser"));
      element.click();

      element = driver.findElement(By.id("buttonRegisterUser"));
      element.click();
   }

   @AfterSuite
   public void tearDown(){
      driver.quit();
   }
}
`
Step 11: Chạy class và cấu hình TestNG.
Link tham khảo: http://www.tutorialspoint.com/mobile_testing/mobile_testing_selendroid_framework.htm
All rights reserved
