MediaEffects với OpenGL ES
Bài đăng này đã không được cập nhật trong 4 năm
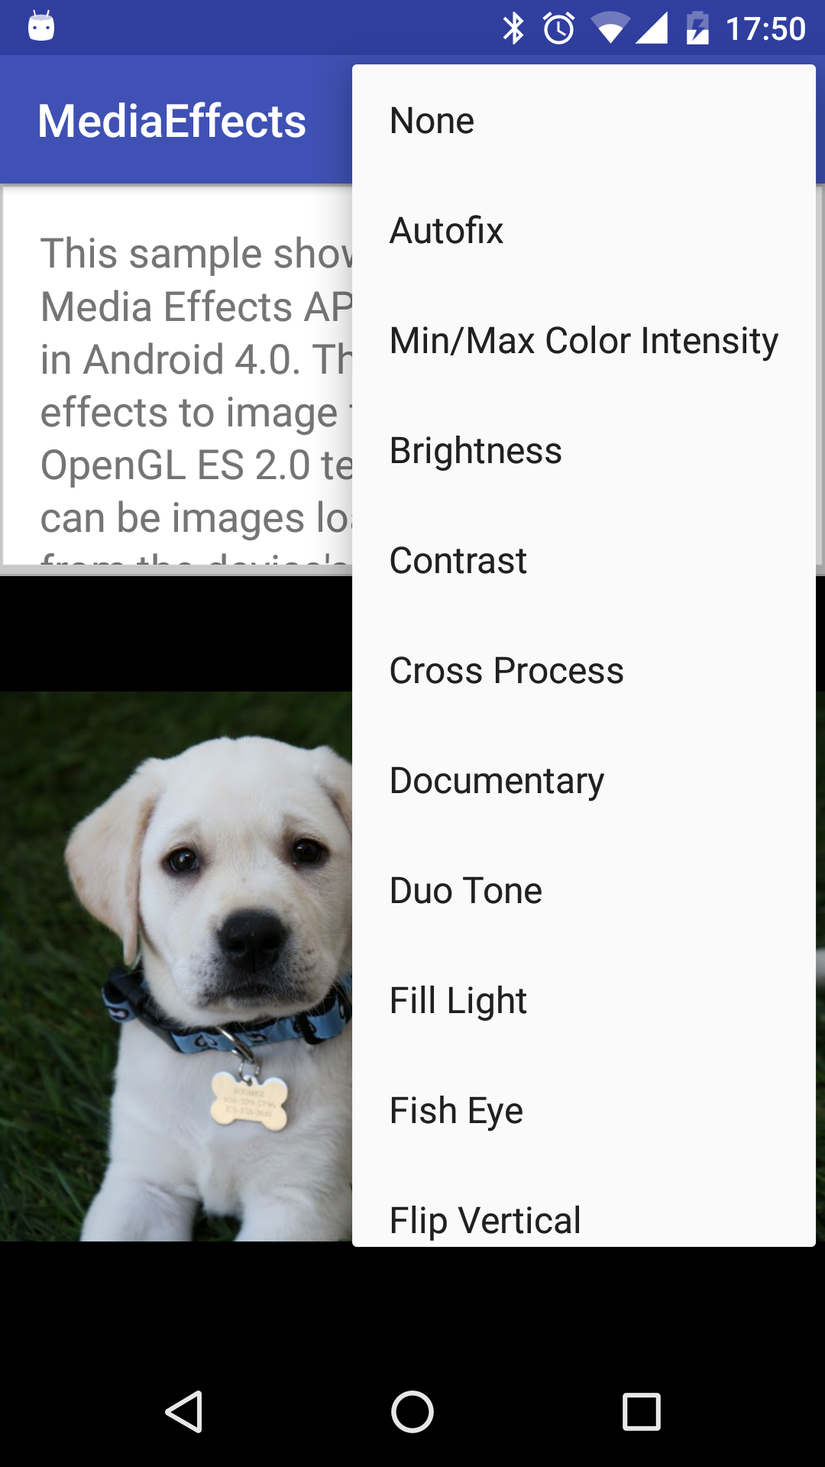
MediaEffects là framework cho phép developer dễ dàng chỉnh sửa và tuỳ chỉnh những bức ảnh, videos theo những màu sắc, hiệu ứng khác nhau một cách dễ dàng thông qua đầu vào sử dụng OpenGL ES. Ở bài viết này mình giới thiệu cách sử dụng OpenGL ES cho việc tuỳ chỉnh bức ảnh với các hiệu ứng hay được sử dụng trên các camera (default hay camera 360) và trả lời tại sao cùng với bức ảnh đầu vào người dùng có thể dễ dàng thay đổi hiệu ứng bức ảnh ra một cách dễ dàng và nhanh chóng.
Các hiệu ứng được giới thiệu trong bài viết bao gồm Tuỳ chỉnh bức ảnh đầu vào với các hiệu ứng
- Giữ nguyên
- Autofix
- Min/Max Color
- Brightness
- Contrast
- Cross Process
- Documentary
- Duo Tone
- Fill Light
- Fish Eye
- Flip Vertical
- Flip Horizontal
- Grain
- Grayscale
- Lomoish
- Negative
- Posterize
- Rotate
- Saturate
- Sepia
- Sharpen
- Temperature
- Tint
- Vignette
Ngoài ra một số hiệu ứng các bạn hoàn toàn có thể sử dụng và thay đổi trên Android Canvas hoặc SurfaceView bạn cũng dễ dàng nhận thấy thời gian thực hiện sẽ khác biệt rất nhiều trên nếu sử dụng OpenGL ES.
- Bước đầu tiên: Tạo
GLSurfaceView
Để làm việc với OpenGL ES việc đầu tiên ta cần tạo GLSurfaceView cho việc làm nền để thực hiện các thao tác GL cũng giống như tạo Surface cho việc Custom MediaPlayer hay Camera trên Canvas 2D
Trong ví dụ này ta load GLSurface từ XML trong Fragment
<?xml version="1.0" encoding="utf-8"?>
<LinearLayout xmlns:android="http://schemas.android.com/apk/res/android"
    android:layout_width="fill_parent"
    android:layout_height="fill_parent"
    android:orientation="vertical">

    <!-- Tạo đối tượng GLSurfaceView cho bắt đầu thực hiện với các tuỳ chỉnh của GLES -->

    <android.opengl.GLSurfaceView
        android:id="@+id/effectsview"
        android:layout_width="fill_parent"
        android:layout_height="0dp"
        android:layout_weight="0.93" />
</LinearLayout>
Load GLSurfaceView từ XML và cài đặt cho nó 1 số các thuộc tính cơ bản
        mEffectView = (GLSurfaceView) view.findViewById(R.id.effectsview);
        // Sử dụng version 2 cho GL hay GLES 20
        mEffectView.setEGLContextClientVersion(2);

        // Thực hiện Render callback  tại Fragment
        mEffectView.setRenderer(this);

        // Thuộc tính Render Mode để default DIRTY

        mEffectView.setRenderMode(GLSurfaceView.RENDERMODE_WHEN_DIRTY);

        // Load lại trạng thái effects trước đó nếu có
        if (null != savedInstanceState && savedInstanceState.containsKey(STATE_CURRENT_EFFECT)) {
            setCurrentEffect(savedInstanceState.getInt(STATE_CURRENT_EFFECT));
        } else {
            setCurrentEffect(R.id.none);
        }
- Tạo
TextureRender
Trong Render việc khó nhất đó là định nghĩa shader, nó là lớp trùi tượng được thực hiện bởi code Native để hiểu sâu hơn về shader mình sẽ có bài viết về shader và tuỳ chỉnh ở bài viết sau
Trong tuỳ chỉnh shader ta cần tạo 2 thuộc tính để đổ bóng hay căn chỉnh cho GLES20 trong lệnh GLES20.glCreateShader(shaderType)
Dưới đây là 2 dạng shader dùng để cấu tạo lên GLES20 hay căn chỉnh 2 thuộc tính Vertex Shader và Pixel Shader
private static final String VERTEX_SHADER =
        "attribute vec4 a_position;\n" +
        "attribute vec2 a_texcoord;\n" +
        "varying vec2 v_texcoord;\n" +
        "void main() {\n" +
        "  gl_Position = a_position;\n" +
        "  v_texcoord = a_texcoord;\n" +
        "}\n";

    private static final String FRAGMENT_SHADER =
        "precision mediump float;\n" +
        "uniform sampler2D tex_sampler;\n" +
        "varying vec2 v_texcoord;\n" +
        "void main() {\n" +
        "  gl_FragColor = texture2D(tex_sampler, v_texcoord);\n" +
        "}\n";
Trong TextureRender chủ yếu là thực hiện vẽ cũng giống như onDraw ở View 2D. Vậy lớp draw ở trong textureview thường được sử dung thông qua hàm GLES20.glDrawArrays của GLES20 với dữ liệu dạng color arrays
Dưới đây là lớp vẽ của TextureRender
public void renderTexture(int texId) {
        // Bind default FBO
        GLES20.glBindFramebuffer(GLES20.GL_FRAMEBUFFER, 0);

        // Use our shader program
        GLES20.glUseProgram(mProgram);
        GLToolbox.checkGlError("glUseProgram");

        // Set viewport
        GLES20.glViewport(0, 0, mViewWidth, mViewHeight);
        GLToolbox.checkGlError("glViewport");

        // Disable blending
        GLES20.glDisable(GLES20.GL_BLEND);

        // Set the vertex attributes
        GLES20.glVertexAttribPointer(mTexCoordHandle, 2, GLES20.GL_FLOAT, false,
                0, mTexVertices);
        GLES20.glEnableVertexAttribArray(mTexCoordHandle);
        GLES20.glVertexAttribPointer(mPosCoordHandle, 2, GLES20.GL_FLOAT, false,
                0, mPosVertices);
        GLES20.glEnableVertexAttribArray(mPosCoordHandle);
        GLToolbox.checkGlError("vertex attribute setup");

        // Set the input texture
        GLES20.glActiveTexture(GLES20.GL_TEXTURE0);
        GLToolbox.checkGlError("glActiveTexture");
        GLES20.glBindTexture(GLES20.GL_TEXTURE_2D, texId);
        GLToolbox.checkGlError("glBindTexture");
        GLES20.glUniform1i(mTexSamplerHandle, 0);

        // Draw
        GLES20.glClearColor(0.0f, 0.0f, 0.0f, 1.0f);
        GLES20.glClear(GLES20.GL_COLOR_BUFFER_BIT);
        GLES20.glDrawArrays(GLES20.GL_TRIANGLE_STRIP, 0, 4);
    }
Như trong hàm trên các bạn thấy có thuộc tính mProgram, vậy mProgram là 1 chương trình khởi tạo cho việc bắt đầu thực hiện một GLES
Khởi tạo Program với 2 thuộc tính được khai báo ở trên là VERTICAL_SHADER và FRAGMENT_SHADER
public static int createProgram(String vertexSource, String fragmentSource) {
		// load shader vertex
        int vertexShader = loadShader(GLES20.GL_VERTEX_SHADER, vertexSource);
        if (vertexShader == 0) {
            return 0;
        }

        // load shader pixel
        int pixelShader = loadShader(GLES20.GL_FRAGMENT_SHADER, fragmentSource);
        if (pixelShader == 0) {
            return 0;
        }

        int program = GLES20.glCreateProgram();
        if (program != 0) {
            GLES20.glAttachShader(program, vertexShader);
            checkGlError("glAttachShader");
            GLES20.glAttachShader(program, pixelShader);
            checkGlError("glAttachShader");
            GLES20.glLinkProgram(program);
            int[] linkStatus = new int[1];
            GLES20.glGetProgramiv(program, GLES20.GL_LINK_STATUS, linkStatus,
                    0);
            if (linkStatus[0] != GLES20.GL_TRUE) {
                String info = GLES20.glGetProgramInfoLog(program);
                GLES20.glDeleteProgram(program);
                throw new RuntimeException("Could not link program: " + info);
            }
        }
        return program;
    }
Như vậy ta đã tạo xong các bước chuẩn bị để Render 1 đối tượng lên trên GLSurfaceView. Để thực hiện với các effects như ban đầu đề ra thực tế ta chỉ cần tuỳ chỉnh đối tượng effects trong khi vẽ
private Effect mEffect;
Tuỳ chỉnh effects với mỗi hiệu ứng ta đã thay đổi các giá trị trong EffectFactory được hỗ trợ sẵn bởi GLES20
switch (mCurrentEffect) {

            case R.id.none:
                break;

            case R.id.autofix:
                mEffect = effectFactory.createEffect(EffectFactory.EFFECT_AUTOFIX);
                mEffect.setParameter("scale", 0.5f);
                break;

            case R.id.bw:
                mEffect = effectFactory.createEffect(EffectFactory.EFFECT_BLACKWHITE);
                mEffect.setParameter("black", .1f);
                mEffect.setParameter("white", .7f);
                break;

            case R.id.brightness:
                mEffect = effectFactory.createEffect(EffectFactory.EFFECT_BRIGHTNESS);
                mEffect.setParameter("brightness", 2.0f);
                break;

            case R.id.contrast:
                mEffect = effectFactory.createEffect(EffectFactory.EFFECT_CONTRAST);
                mEffect.setParameter("contrast", 1.4f);
                break;

            case R.id.crossprocess:
                mEffect = effectFactory.createEffect(EffectFactory.EFFECT_CROSSPROCESS);
                break;

            case R.id.documentary:
                mEffect = effectFactory.createEffect(EffectFactory.EFFECT_DOCUMENTARY);
                break;

            case R.id.duotone:
                mEffect = effectFactory.createEffect(EffectFactory.EFFECT_DUOTONE);
                mEffect.setParameter("first_color", Color.YELLOW);
                mEffect.setParameter("second_color", Color.DKGRAY);
                break;

            case R.id.filllight:
                mEffect = effectFactory.createEffect(EffectFactory.EFFECT_FILLLIGHT);
                mEffect.setParameter("strength", .8f);
                break;

            case R.id.fisheye:
                mEffect = effectFactory.createEffect(EffectFactory.EFFECT_FISHEYE);
                mEffect.setParameter("scale", .5f);
                break;

            case R.id.flipvert:
                mEffect = effectFactory.createEffect(EffectFactory.EFFECT_FLIP);
                mEffect.setParameter("vertical", true);
                break;

            case R.id.fliphor:
                mEffect = effectFactory.createEffect(EffectFactory.EFFECT_FLIP);
                mEffect.setParameter("horizontal", true);
                break;

            case R.id.grain:
                mEffect = effectFactory.createEffect(EffectFactory.EFFECT_GRAIN);
                mEffect.setParameter("strength", 1.0f);
                break;

            case R.id.grayscale:
                mEffect = effectFactory.createEffect(EffectFactory.EFFECT_GRAYSCALE);
                break;

            case R.id.lomoish:
                mEffect = effectFactory.createEffect(EffectFactory.EFFECT_LOMOISH);
                break;

            case R.id.negative:
                mEffect = effectFactory.createEffect(EffectFactory.EFFECT_NEGATIVE);
                break;

            case R.id.posterize:
                mEffect = effectFactory.createEffect(EffectFactory.EFFECT_POSTERIZE);
                break;

            case R.id.rotate:
                mEffect = effectFactory.createEffect(EffectFactory.EFFECT_ROTATE);
                mEffect.setParameter("angle", 180);
                break;

            case R.id.saturate:
                mEffect = effectFactory.createEffect(EffectFactory.EFFECT_SATURATE);
                mEffect.setParameter("scale", .5f);
                break;

            case R.id.sepia:
                mEffect = effectFactory.createEffect(EffectFactory.EFFECT_SEPIA);
                break;

            case R.id.sharpen:
                mEffect = effectFactory.createEffect(EffectFactory.EFFECT_SHARPEN);
                break;

            case R.id.temperature:
                mEffect = effectFactory.createEffect(EffectFactory.EFFECT_TEMPERATURE);
                mEffect.setParameter("scale", .9f);
                break;

            case R.id.tint:
                mEffect = effectFactory.createEffect(EffectFactory.EFFECT_TINT);
                mEffect.setParameter("tint", Color.MAGENTA);
                break;

            case R.id.vignette:
                mEffect = effectFactory.createEffect(EffectFactory.EFFECT_VIGNETTE);
                mEffect.setParameter("scale", .5f);
                break;

            default:
                break;
        }
Apply với thay đổi Effect
mEffect.apply(mTextures[0], mImageWidth, mImageHeight, mTextures[1]);
Như vậy cơ bản thực hiện thay đổi Effect của hình ảnh, ta chỉ cần thay đổi trong thuộc tính EfectFactory của GLES20
Dưới đây là full code và 1 số hình ảnh được capture
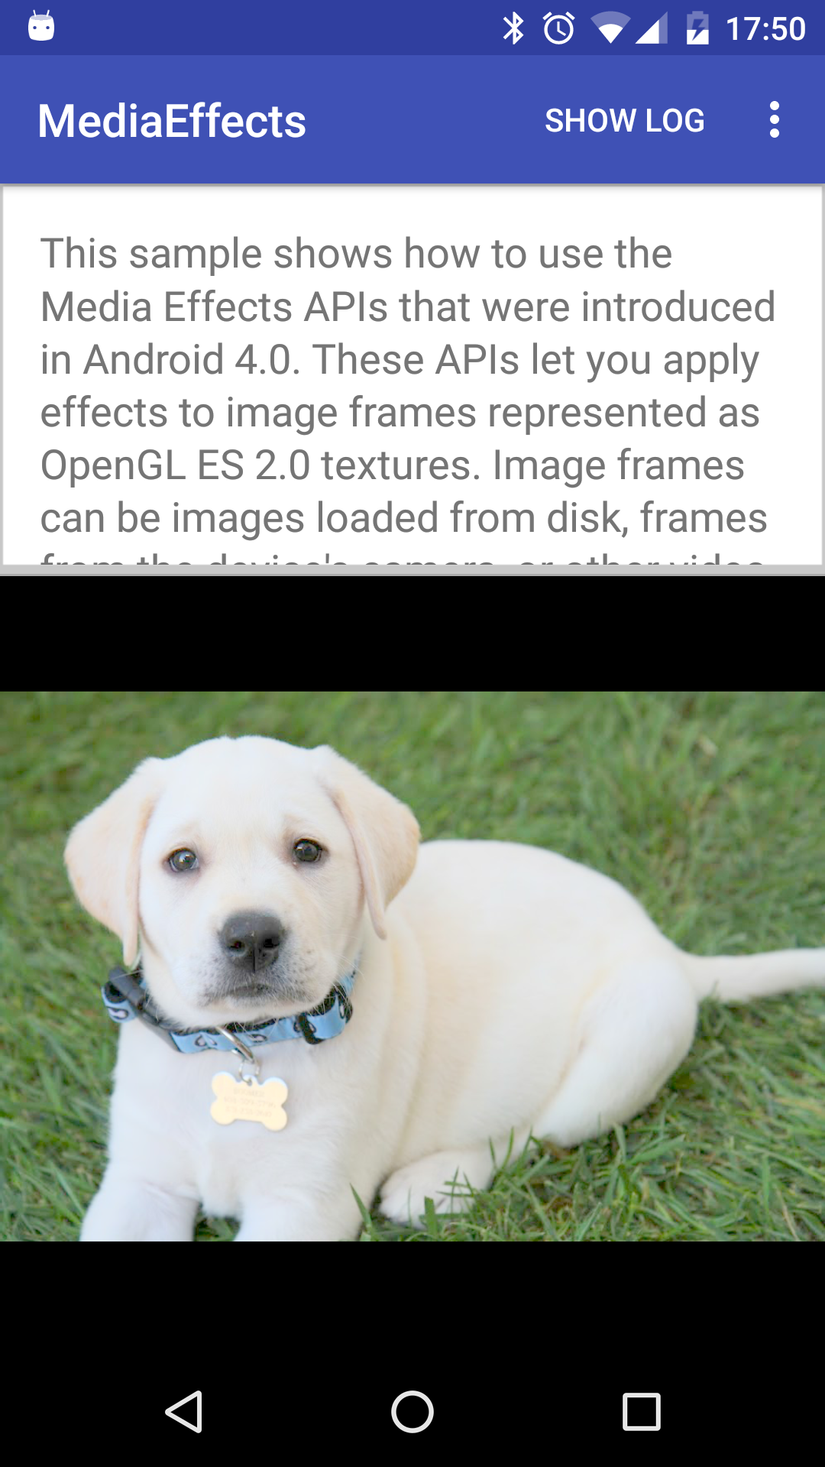

- Code Sample Link: https://www.dropbox.com/s/rabklw1sska6tet/MediaEffect.zip?dl=0
All rights reserved
