Material Design cho Android ( phần 1 )
Bài đăng này đã không được cập nhật trong 6 năm
Bạn vẫn đang sử dụng cùng một thư viện hỗ trợ thiết kế cũ? Không có vấn đề gì, đây là thời điểm thích hợp để di chuyển từ thư viện cũ sang thư viện Thiết kế Materia mới của Google.
Khi bắt đầu sử dụng thư viện Material Design cho Android, tôi thực sự không thích nó. Bạn có thể nói tôi đã có thói quen nhìn thấy những thiết kế cũ. Nhưng khi ứng dụng đã sẵn sàng và tôi so sánh cả màn hình một với hỗ trợ thiết kế cũ với Material Design, tôi đã rất ngạc nhiên. Thiết kế Vật liệu mới trông đẹp hơn nhiều so với thiết kế mà tôi đã sử dụng
Bắt đầu nào !! . Set up
Mở 1 project mới trong android studio và click Refactor và chọn Migrate to AndroidX Bây giờ thêm Material Design dependencies vào app bằng cách thêm vào build.gradle file sau đó sync project của bạn :
implementation "com.google.android.material:material:1.1.0-alpha02"
Sau đó thêm theme cho app của bạn bằng cách thêm con của thành phần Material như sau
<style name="AppTheme"
            parent = "Theme.MaterialComponents.Light.DarkActionBar">

    .....
</style>
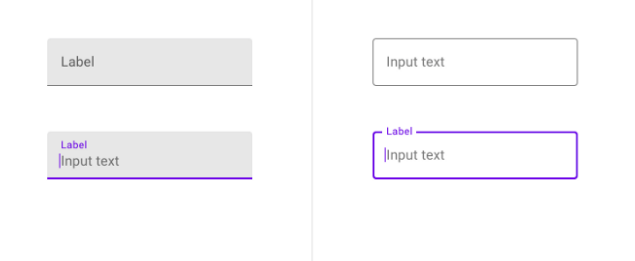
Material Text Fields
Để tạo 1 Material Text Fields , trước tiên add TextInputLayout vào file Xml như sau
<com.google.android.material.textfield.TextInputLayout
    android:layout_width="match_parent"
    android:layout_height="wrap_content"
    android:hint="@string/hint_text">

  <com.google.android.material.textfield.TextInputEditText
      android:layout_width="match_parent"
      android:layout_height="wrap_content"/>

</com.google.android.material.textfield.TextInputLayout>
Tiếp đến là Material Style
Để sử dụng được style outline trên thì phải thêm style :
<style name="AppTextField" parent="Widget.MaterialComponents.TextInputLayout.OutlinedBox">

       <item name="boxBackgroundColor">@android:color/white</item>
</style>
Để xử dụng style FilledBox Thì chung ta thực hiên thay :
style="@style/Widget.MaterialComponents.TextInputLayout.FilledBox"
Bottom App Bar
Một trong những feature tốt nhất của Mterial Design là BottomAppBar . để implement nó thì chúng ta phải dùng CoordinatorLayout như 1 tag Cha
    <com.google.android.material.bottomappbar.BottomAppBar
        android:id="@+id/bar"
        android:layout_width="match_parent"
        android:layout_height="wrap_content"
        style="@style/Widget.MaterialComponents.BottomAppBar"
        android:layout_gravity="bottom"
        app:backgroundTint="@color/skyBlue"
        app:navigationIcon="@drawable/ic_dehaze_black_24dp"/>
Nó sẽ trông như thế này :

Và tiếp theo chúng ta sẽ thêm 1 button fab để nó thêm sinh động
<com.google.android.material.floatingactionbutton.FloatingActionButton
    android:id="@+id/fab"
    android:layout_width="wrap_content"
    android:src="@drawable/ic_add_black_24dp"
    android:layout_height="wrap_content"
    app:backgroundTint="@color/colorAccent"
    app:layout_anchor="@id/bar"/>
Nó sẽ trông như thế này :
 Và chúng ta có thể custom 1 chút :
app:fabAlignmentMode="end"
app:fabCradleMargin="20dp"
Nó sẽ ra thế này :
 Tiếp theo chúng ta sẽ có 1 số handle cho navigator :
@Override
public boolean onCreateOptionsMenu(Menu menu) {
    getMenuInflater().inflate(R.menu.home_menu,menu);
    return super.onCreateOptionsMenu(menu);
}
Sau đó hanle như sau :
bar.setNavigationOnClickListener(new View.OnClickListener() {
            @Override
            public void onClick(View v) {
                Toast.makeText(getApplicationContext(),"Home Clicked",Toast.LENGTH_LONG).show();
            }
});

bar.setOnMenuItemClickListener(new Toolbar.OnMenuItemClickListener() {
    @Override
    public boolean onMenuItemClick(MenuItem item) {
        switch (item.getItemId()){
          case R.id.edit:
            Toast.makeText(getApplicationContext(),"Edit Clicked",Toast.LENGTH_LONG).show();
            break;
          case R.id.home:
            Toast.makeText(getApplicationContext(),"Home Clicked",Toast.LENGTH_LONG).show();
            break;
          case R.id.contact:
            Toast.makeText(getApplicationContext(),"Contact Clicked",Toast.LENGTH_LONG).show();
            break;
         }
     return false;
    }
});
Trên đây là 1 số thành phần của Material design. Hy vọng nó có thể làm project của bạn thêm sinh động hơn .See you !!
All rights reserved
