Login Function Laravel with Firebase
Bài đăng này đã không được cập nhật trong 6 năm
Một chút tóm tắt về Firebase
Firebase là một dịch vụ giao tiếp thời gian thực cung cấp luồng dữ liệu thời gian thực cho các ứng dụng chat, mobile và web. Nó cung cấp một số dịch vụ thời gian thực bao gồm Cloud message, hệ thống xác thực, cơ sở dữ liệu PHP Firebase, hệ thống thông báo, Storage và Firebase Hosting, làm cho nền tảng của nó trở thành một loạt các công cụ và dịch vụ để phát triển ứng dụng chất lượng cao. Trước khi đến với bài của mình mời bạn đọc qua bài này nhé
Mình xin giới thiệu chức năng Login sử dụng Firebase và Laravel
Đầu tiên mình cần tạo một seed để có dữ liệu trong database:
php artisan make:seeder UsersTableSeeder
Sau khi seed sẽ ra được màn hình thế này
<?php

use Illuminate\Database\Seeder;

class UsersTableSeeder extends Seeder
{
    /**
     * Run the database seeds.
     *
     * @return void
     */
    public function run()
    {
        //
    }
}
Ta khai báo service FirebaseService để có thể truy vấn dữ liệu từ Firebase
<?php

use Illuminate\Database\Seeder;
use Kreait\Firebase\Factory;
use Carbon\Carbon;
use Faker\Factory as Faker;
use App\Services\FirebaseService;

class UsersTableSeeder extends Seeder
{
    protected $firebase;
    protected $database;

    public function __construct(FirebaseService $firebaseService)
    {
        $this->firebase = $firebaseService->firebase;
        $this->database = $this->firebase->getDatabase();
    }

    /**
     * Run the database seeds.
     *
     * @return void
     */
    public function run()
    {
        $faker = Faker::create();
        $limit = 10;
        for ($i = 0; $i < $limit; $i++) {
            $now  = Carbon::now();
            $userRef = $this->database->getReference('users')->push([
                'email' => $faker->unique()->email,
                'password' => bcrypt('1234567'),
                'created_at' => $now,
                'updated_at' => '',
                'deleted_at' => '',
            ]);
        }
    }
}
Sau đó ta chạy:
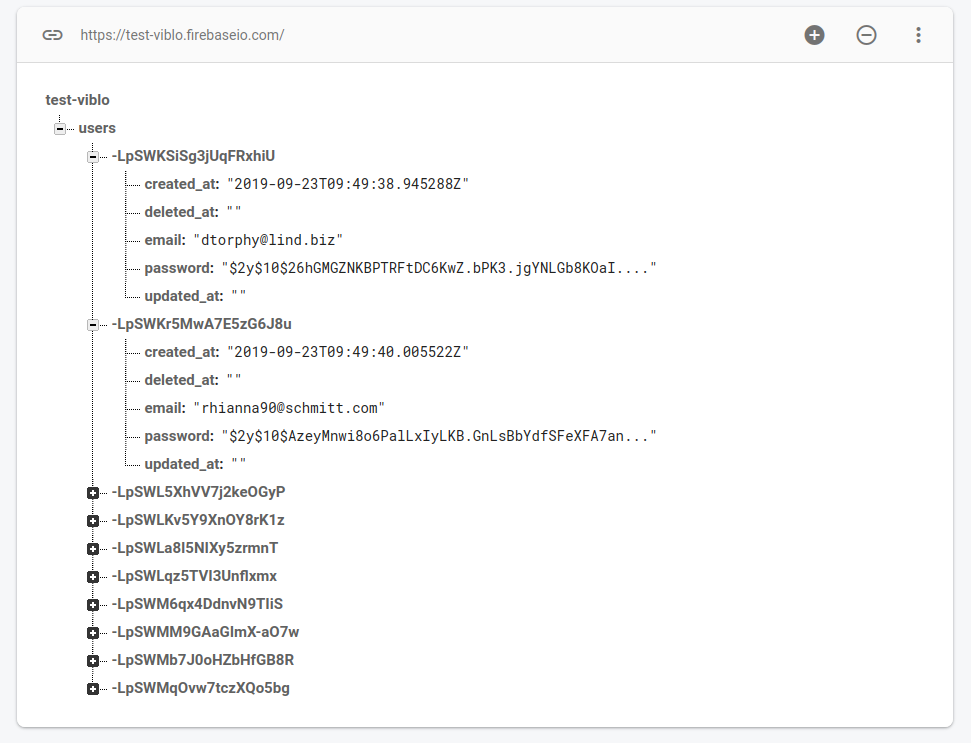
php artisan db:seed UsersTableSeeder
Vào database trong filebase ta đã config như trong bài Tích hợp Firebase Realtime Database vào Laravel Ta sẽ thấy dữ liệu được sinh ra gần giống như này:

Tiếp đến ta tạo màn hình view login nhé
Trong file Http/Controllers/Auth/LoginController.php tạo hàm getLogin để show ra view:
public function getLogin(Request $request)
{
    if ($request->session()->get('user')) {
        return redirect('/');
    }

    return view('auth.login');
}

public function postLogin()
{
    //
}
Tạo form trong view /resources/views/auth/login.blade.php gồm hai ô input email và password
<form method="POST" action="{{ url('login') }}">
    @csrf
    <div class="input-group mb-3">
        <div class="input-group-prepend">
            <span class="input-group-text">@</span>
        </div>
        <input id="email" type="email" class="form-control{{ $errors->has('email') ? ' is-invalid' : '' }}" name="email" value="{{ old('email') }}" placeholder="Email" required autofocus>

        @if ($errors->has('email'))
        <span class="invalid-feedback" role="alert">
            <strong>{{ $errors->first('email') }}</strong>
        </span>
        @endif
    </div>
    <div class="input-group mb-3">
        <div class="input-group-prepend">
            <span class="input-group-text">
                <i class="icon-lock"></i>
            </span>
        </div>
        <input id="password" type="password" class="form-control{{ $errors->has('password') ? ' is-invalid' : '' }}" name="password" placeholder="Password" required>

        @if ($errors->has('password'))
        <span class="invalid-feedback" role="alert">
            <strong>{{ $errors->first('password') }}</strong>
        </span>
        @endif
    </div>
    <div class="row">
        <div class="col-4">
            <button type="submit" class="btn btn-primary px4">
                Login
            </button>
        </div>
    </div>
</form>
Trong /routes/web.php thêm route:
Route::get('login', 'Auth\LoginController@getLogin');
Route::post('login', 'Auth\LoginController@postLogin');
Bây giờ bạn hãy chạy
php artisan serve
vào /login để xem nhé.
Tiếp đến xử lý phần gửi email và password để check xem có không nhé
Trong Http/Controllers/Auth/LoginController.php thêm:
public function postLogin(LoginRequest $request, UserService $userService)
{
    $email = $request->input('email');
    $password = $request->input('password');

    $users = $userService->getUserByEmail($email);

    $user = reset($users);

    if (sizeof($users) <= 0 || $user['deleted_at']) {
        $errors = new MessageBag(['email' => 'Email not exists.']);

        return redirect()->back()->withInput()->withErrors($errors);
    }

    if (!Hash::check($password, $user['password'])) {
        $errors = new MessageBag(['password' => 'Password wrong.']);

        return redirect()->back()->withInput()->withErrors($errors);
    }

    return redirect('/');
}
Tạo file /app/Http/Requests/LoginRequest.php để check validate đầu vào khi nhập email và password
<?php

namespace App\Http\Requests;

use Illuminate\Foundation\Http\FormRequest;

class LoginRequest extends FormRequest
{
    /**
     * Determine if the user is authorized to make this request.
     *
     * @return bool
     */
    public function authorize()
    {
        return true;
    }

    /**
     * Get the validation rules that apply to the request.
     *
     * @return array
     */
    public function rules()
    {
        return [
            'email' =>'required|email',
            'password' => 'required|min:6',
        ];
    }

    /**
     * Get the error messages for the defined validation rules.
     *
     * @return array
     */
    public function messages()
    {
        return [
            'email.required' => 'Email is not required',
            'email.email' => 'Format email error',
            'password.required' => 'Password is not required',
            'password.min' => 'Password cannot be less than 6 characters',
        ];
    }
}
Trong Service cũng tạo thêm file /app/Services/UserService.php:
<?php

namespace App\Services;

use Carbon\Carbon;
use App\Http\Controllers\Controller;

class UserService extends Controller
{
    public function getUserByEmail($email)
    {
        $user = $this->database->getReference('users')
            ->orderByChild('email')
            ->equalTo($email)
            ->getSnapshot()
            ->getValue();

        return $user;
    }
}
Nếu bạn muốn lưu thông tin user vào session thì thêm đoạn này vào trước return trong hàm postLogin() nữa nhé
$userRef = [
        'id' => array_key_first($users),
        'email' => $user['email'],
        'name' => $user['name'],
    ];

$request->session()->put('user', $userRef);
Đây là cách tạo bằng cơm, trong phần tiếp theo mình sẽ hướng dẫn sử dụng Authentication trong Firebase luôn nha
Source: https://firebase-php.readthedocs.io/en/4.32.0/realtime-database.html
All rights reserved