Login bằng Facebook, Google sử dụng Devise và Omniauth trên Rails
Bài đăng này đã không được cập nhật trong 4 năm
Giới thiệu
Đối với một website thương mại thì ngoài việc cho phép khách hàng của mình đăng nhập trên chính website thì còn cho phép khách hàng đăng nhập bằng tài khoản mạng xã hội như Facebook hoặc Google là điều cần thiết. Sau đây tôi xin hướng dẫn các bạn thiết lập chức năng login trên website bằng mạng xã hội
cài đặt gem
Đầu tiên chúng ta phải cài đặt 2 gem là devise và omniauth
//Gemfile
gem "devise"
gem "omniauth"
gem "omniauth-google-oauth2"
gem "omniauth-facebook"
sau đó chạy lệnh: bundle install
cấu hình Devise
tiếp theo chúng ta tiến hành install devise:
rails generate devise:install
tiến hành tạo một model User:
rails g devise User
tạo phần view của devise
rails g devise:view
Cuối cùng là chạy lệnh rake db:migrate để update lại database sau khi intstall devise
cấu hình Omniauth
chúng ta truy cập vào đường dẫn config/initializers/devise.rb config như sau:
 config.omniauth :google_oauth2, ENV['GOOGLE_OAUTH2_APP_ID'], ENV['GOOGLE_OAUTH2_APP_SECRET'], { scope: "email" }
 config.omniauth :facebook, ENV['FACEBOOK_APP_ID'], ENV['FACEBOOK_APP_SECRET'], { scope: "email" }
việc đặt những giá trị có tính nhạy cảm vào trong những biến môi trường chúng ta sử dụng thêm gem figaro để hiểu rõ hơn về biến môi trường các bạn có thể đọc ở ĐÂY
kết nối Devise và Omniauth
chúng ta truy cập vào đường dẫn model User đã tạo trước đó app/models/user.rb thêm vào :omniauthable, omniauth_providers: [:facebook, :google_oauth2]
devise :database_authenticatable, :registerable,
    :recoverable, :rememberable, :trackable, :validatable,
    :omniauthable, omniauth_providers: [:facebook, :google_oauth2]
tiếp chúng ta tiến thành tạo controller để xữ lý dữ liệu:
tạo file app/controllers/user/omniauth_callbacks_controller.rb
class Users::OmniauthCallbacksController < Devise::OmniauthCallbacksController
  def facebook
    generic_callback("facebook")
  end

  def google_oauth2
    generic_callback( "google_oauth2" )
  end

  def generic_callback(provider)
    @identity = User.from_omniauth(request.env["omniauth.auth"])

    @user = @identity || current_user
    if @user.persisted?
      sign_in_and_redirect @user, :event => :authentication
      set_flash_message(:notice, :success, kind: provider.capitalize) if is_navigational_format?
    else
      session["devise.#{provider}_data"] = request.env["omniauth.auth"]
      redirect_to new_user_registration_url
    end
  end
end
Tiếp theo chúng ta đến phần xữ lý của model :
mở app/models/user.rb và thêm vào đoạn code sau
def self.new_with_session params, session
    super.tap do |user|
      if data = session["devise.facebook_data"] &&
        session["devise.facebook_data"]["extra"]["raw_info"]
        user.email = data["email"] if user.email.blank?
      end
    end
  end

  def self.from_omniauth auth
    where(provider: auth.provider, uid: auth.uid).first_or_create do |user|
      user.email = auth.info.email
      user.password = Devise.friendly_token[0,20]
      user.name = auth.info.name
    end
  end
2 scope này sẽ nhận nhiệm vụ tạo mới session tìm kiếm hoặc tạo mới một user trong database của bạn.
Testing
để test thử bắt đầu chúng ta phải thiết lập trong route cho Devise contfig/routes.rb:
 devise_for :users,
    controllers:{omniauth_callbacks: "users/omniauth_callbacks"}
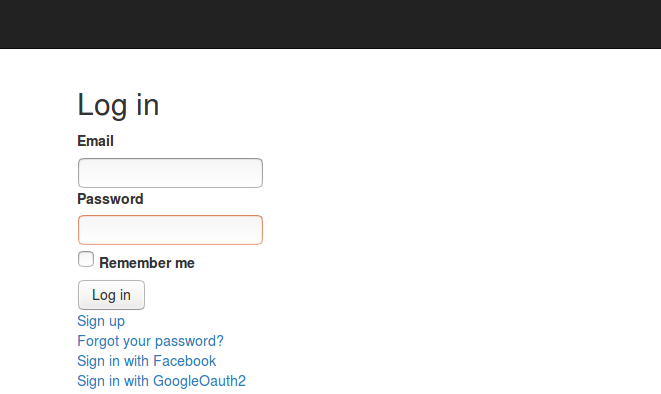
Chúng ta khởi động Rails và truy cập vào đường dẫn http://localhost:3000/users/sign_in
Truy cập thành công ta là ta đã cài đặt thành công Devise:
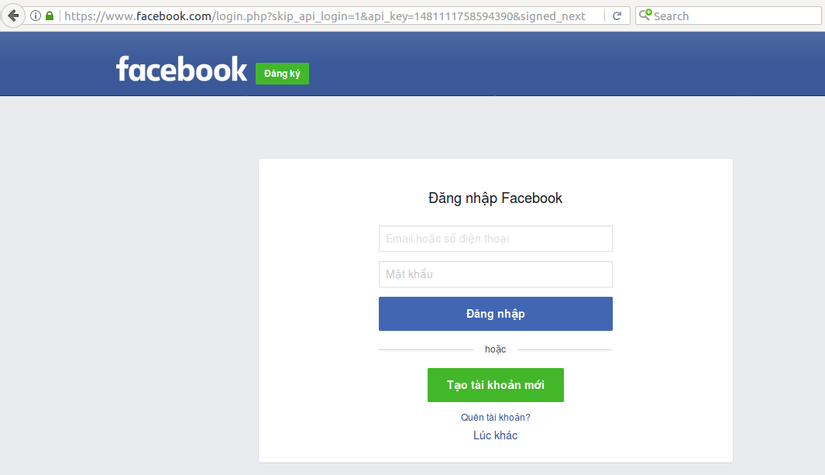
 ở đây chúng ta tiến hành đăng nhập vào facebook:
click vào sign in with facebook chúng ta sẽ được di chuyển đến trang login của facebook (nếu bạn chưa login trước đó) :
ở đây chúng ta tiến hành đăng nhập vào facebook:
click vào sign in with facebook chúng ta sẽ được di chuyển đến trang login của facebook (nếu bạn chưa login trước đó) :
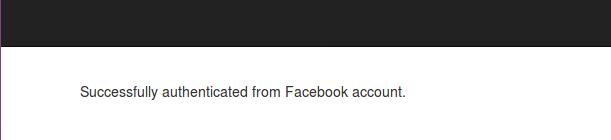
 tiến hành đăng nhập nếu thành công chúng ta sẽ nhận được thông báo như sau :
 bạn tự tiến hành đăng nhập bằng google nhé. Good luck
All rights reserved
