LibGDX Tutorial 11: Scene2D Phần 3 - Quản lý đối tượng trong scene
Bài đăng này đã không được cập nhật trong 4 năm
Ở các tutorials trước, chúng ta đã sử dụng Scene2D để làm việc với các Actors, Actions, cũng như xử lý đầu vào, bây giờ chúng ta sẽ tìm hiểu xem nó quản lý các đối tượng trong scene như thế nào? Một trong những khả năng mạnh mẽ của Scene2D là grouping (nhóm đối tượng). Chúng ta hãy bắt đầu ngay với một ví dụ. Trong ví dụ này, tôi sử dụng 2 hình ảnh.


Bằng cách nào đó, với 2 hình ảnh khác nhau. Một nhân vật và một thanh gươm. Chúng ta sẽ nhóm chúng lại như một thực thể duy nhất, bạn vẫn thường thấy những thứ như thế này trong các trò chơi.
package com.thinhhung.game;

import com.badlogic.gdx.ApplicationListener;
import com.badlogic.gdx.Gdx;
import com.badlogic.gdx.graphics.GL20;
import com.badlogic.gdx.graphics.Texture;
import com.badlogic.gdx.graphics.g2d.Batch;
import com.badlogic.gdx.graphics.g2d.TextureRegion;
import com.badlogic.gdx.scenes.scene2d.Actor;
import com.badlogic.gdx.scenes.scene2d.Group;
import com.badlogic.gdx.scenes.scene2d.Stage;
import static com.badlogic.gdx.scenes.scene2d.actions.Actions.*;

public class SceneManagementSample implements ApplicationListener {
	private Stage stage;
	private Group group;

	@Override
	public void create () {
		stage = new Stage();
		final TextureRegion personTexture = new TextureRegion(new Texture("dante.png"));
		final TextureRegion swordTexture = new TextureRegion(new Texture("sword.png"));

		final Actor person = new Actor(){
			public void draw(Batch batch, float alpha){
				batch.draw(personTexture, getX(), getY(), getOriginX(), getOriginY(), getWidth(), getHeight(),
						getScaleX(), getScaleY(), getRotation());
			}
		};
		person.setBounds(person.getX(), person.getY(), personTexture.getRegionWidth(), personTexture.getRegionHeight());

		final Actor sword = new Actor(){
			public void draw(Batch batch, float alpha){
				batch.draw(swordTexture, getX(), getY(), getOriginX(), getOriginY(), getWidth(), getHeight(),
						getScaleX(), getScaleY(), getRotation());
			}
		};
		sword.setBounds(0, 0, swordTexture.getRegionWidth(), swordTexture.getRegionHeight());
		sword.setPosition(person.getWidth() - 55, 10);

		group = new Group();
		group.addActor(person);
		group.addActor(sword);

		group.addAction(parallel(moveTo(200,0,5),rotateBy(90,5)));

		stage.addActor(group);
	}

	@Override
	public void resize(int width, int height) {

	}

	@Override
	public void render () {
		Gdx.gl.glClear(GL20.GL_COLOR_BUFFER_BIT);
		stage.act(Gdx.graphics.getDeltaTime());
		stage.draw();
	}

	@Override
	public void pause() {

	}

	@Override
	public void resume() {

	}

	@Override
	public void dispose() {
		stage.dispose();
	}
}
Khi bạn chạy, bạn sẽ thấy:

Như bạn thấy, một khi đã nhóm lại, bạn sẽ thấy các actors sẽ kế thừa bất kỳ biến đổi nào áp dụng cho group. Đoạn code trong ví dụ trên không quá mới mẻ. Đầu tiên chúng ta load 2 hình ảnh bằng các TextureRegions. Sau đó chúng ta tạo từng actor, thiết lập danh giới cho cả 2 bằng hàm setBounds(). Đối với từng Actors, chúng ta cần cài đặt đầy đủ hàm batch.draw() để đảm bảo khi rotation hay scaling được render đúng. Cuối cùng chúng ta thiết lập vị trí thanh gươm so với nhân vật.
Sau đó, chúng ta tạo một Group object mới, đây là bí mật đằng sau Scene2D grouping. Sau đó thay vì thêm 2 Actors vào Scene, chúng ta thêm chúng vào Group, và thêm vào Scene. Vì vậy chúng ta có thể nhìn thấy một thứ gì đó xảy ra trong ví dụ này, chúng ta áp dụng moveTo và rotateBy vào group của chụng ta.
Một khía cạnh khác của Scene2D là xác định nếu một hit xảy ra. Trở lại tutorial Scene2D phần 1 chúng ta đã thấy touchDown function được gọi khi một Actor trong một Scene được touch. Bây giờ chúng ta sẽ xem xét logic trong xử lý này. hit() method của Stage được gọi, nó sẽ gọi hit() method của mỗi Actor trong Stage. hit() method được gọi không cần biết toạ độ khiến cho các developer làm việc dễ dàng hơn. hit() method mặc định kiểm tra phần bao quanh Actor. Chúng ta cùng xem ví dụ sau đây:
package com.thinhhung.game;

import com.badlogic.gdx.ApplicationListener;
import com.badlogic.gdx.Gdx;
import com.badlogic.gdx.graphics.GL20;
import com.badlogic.gdx.graphics.Texture;
import com.badlogic.gdx.graphics.g2d.Batch;
import com.badlogic.gdx.graphics.g2d.TextureRegion;
import com.badlogic.gdx.scenes.scene2d.Actor;
import com.badlogic.gdx.scenes.scene2d.InputEvent;
import com.badlogic.gdx.scenes.scene2d.InputListener;
import com.badlogic.gdx.scenes.scene2d.Stage;
import com.badlogic.gdx.scenes.scene2d.Touchable;

import java.util.Random;

public class SceneManagementSample implements ApplicationListener {
	// Create an Actor "Person" that displays the TextureRegion passed in
	class Person extends Actor {
		private TextureRegion _texture;

		public Person(TextureRegion texture){
			_texture = texture;
			setBounds(getX(),getY(),_texture.getRegionWidth(), _texture.getRegionHeight());

			this.addListener(new InputListener(){
				public boolean touchDown(InputEvent event, float x, float y, int pointer, int buttons){
					System.out.println("Touched" + getName());
					setVisible(false);
					return true;
				}
			});
		}

		// Implement the full form of draw() so we can handle rotation and scaling.
		public void draw(Batch batch, float alpha){
			batch.draw(_texture, getX(), getY(), getOriginX(), getOriginY(), getWidth(), getHeight(),
					getScaleX(), getScaleY(), getRotation());
		}

		// This hit() instead of checking against a bounding box, checks a bounding circle.
		public Actor hit(float x, float y, boolean touchable){
			// If this Actor is hidden or untouchable, it cant be hit
			if(!this.isVisible() || this.getTouchable() == Touchable.disabled)
				return null;

			// Get center point of bounding circle, also known as the center of the rect
			float centerX = getWidth()/2;
			float centerY = getHeight()/2;

			// Calculate radius of circle
			float radius = (float) Math.sqrt(centerX * centerX +
					centerY * centerY);

			// And distance of point from the center of the circle
			float distance = (float) Math.sqrt(((centerX - x) * (centerX - x))
					+ ((centerY - y) * (centerY - y)));

			// If the distance is less than the circle radius, it's a hit
			if(distance <= radius) return this;

			// Otherwise, it's not
			return null;
		}
	}

	private Person[] people;
	private Stage stage;

	@Override
	public void create() {
		stage = new Stage();
		final TextureRegion personTexture = new TextureRegion(new Texture("dante.png"));

		people = new Person[100];

		// Create/seed our random number for positioning people randomly
		Random random = new Random();

		// Create 100 Person objects at random on screen locations
		for(int i = 0; i < 100; i++){
			people[i] = new Person(personTexture);

			//Assign the position of the jet to a random value within the screen boundaries
			people[i].setPosition(random.nextInt(Gdx.graphics.getWidth() - (int) people[i].getWidth())
					, random.nextInt(Gdx.graphics.getHeight() - (int) people[i].getHeight()));

			// Set the name of the Person to it's index within the loop
			people[i].setName(Integer.toString(i));

			// Add them to the stage
			stage.addActor(people[i]);
		}

		Gdx.input.setInputProcessor(stage);
	}

	@Override
	public void dispose() {
		stage.dispose();
	}

	@Override
	public void render() {
		Gdx.gl.glClear(GL20.GL_COLOR_BUFFER_BIT);
		stage.act(Gdx.graphics.getDeltaTime());
		stage.draw();
	}

	@Override
	public void resize(int width, int height) {
	}

	@Override
	public void pause() {
	}

	@Override
	public void resume() {
	}
}
Sau khi chúng ta chạy, 100 nhân vật sẽ được nằm ngẫu nhiên trên màn hình.
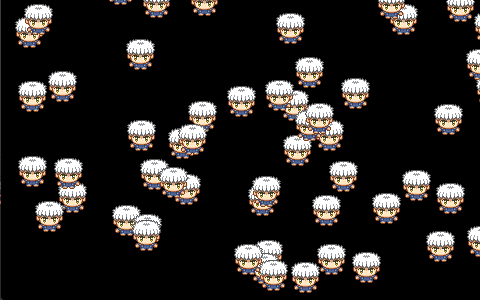
Khi bạn click vào, nó sẽ biến mất. Một điều quan trọng khi bạn nhấn vào vùng có nhiều đối tượng được tạo ra, đối tượng được thêm vào sau đó sẽ nằm ở lớp trên, vì vậy hit() method của nó sẽ được gọi trước. hit() hoạt động bằng cách tạo ra một đường tròn xung quanh phù hợp với hình ảnh ở bên trong, sau đó kiểm tra xem con trỏ chuột có trong phạm vi của vòng tròn đó hay không. Khi một hit xảy ra, chúng ta trả về đối tượng được hit, nếu không chúng ta trả về null.
Điều tuyệt vời của cách này là các developer không cần phải lo lắng về việc làm thế nào để xác định được toạ độ của nó hay đối tượng bao bên ngoài nào cả. Nếu bạn bỏ đoạn code override hit() method, nó sẽ còn làm việc tốt hơn. Bạn không cần phải viết hit() method trong Actor class, trừ khi mặc định không phù hợp với nhu cầu của bạn. Ví dụ này chỉ đơn thuần là để cho bạn thấy Scene2D phát hiện 1 hit như thế nào, và làm thế nào để tuỳ biến nó. Nếu bạn muốn phát hiện theo từng điểm ảnh, bạn hãy làm theo cách này, nó sẽ hoạt động tốt.
Source code
Bạn có có thể tham khảo source code của project này tại đây.
All rights reserved
