Làm quen với Cloud FireStore trong android ( phần 1 )
Bài đăng này đã không được cập nhật trong 7 năm
Tổng quan và giới thiệu về Firestore
Có thể các bạn không còn xa lạ gì với Firebase nữa nên hôm nay chúng ta cùng tìm hiểu về 1 tiện ích mới của firebase . Nó khác với RealTime trước đó về việc cung cấp các hàm where như là whereEqualTo(), whereLessThan(), whereGreaterThanOrEqualTo, whereLessThanOrEqualTo, ... làm cho việc truy vấn trở nên hiệu quả hơn và dễ dàng hơn . Dữ liệu trong Firestore phân cấp khiến dữ liệu dễ dàng tổ chức hớp để sắp xếp bên trong nó
Nâng cấp gradle dependencies trong ứng dụng của bạn
Tạo 1 project mới trong firebase theo hướng dẫn được đưa ra ở đây : Tiếp theo đó bạn hãy nâng cấp build.gradle của app bằng cách thêm dòng sau :
implementation 'com.google.firebase:firebase-core:16.0.7'
implementation 'com.google.firebase:firebase-firestore:18.1.0'
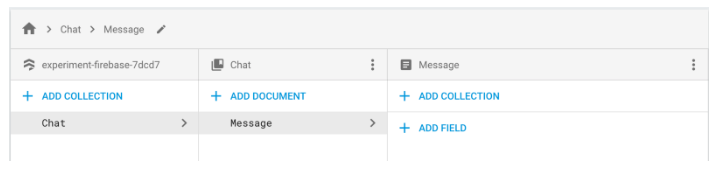
Tiếp theo , cài đặt các collection trên Cloud Firestore bằng cách tạo các collection name :
Tiếp theo tập thực hiện các truy vấn thông thường
**Tạo các record trong 1 Collection , Ví dụ : **
Map<String, Object> user = new HashMap<>();
        user.put("name", name);

        user.put("pass", pass);
        user.put("address", address);
        user.put("email", email);

        db.collection(Collection_name)
                .document(name)
                .set(user)
                .addOnSuccessListener(new OnSuccessListener<Void>() {
                    @Override
                    public void onSuccess(Void aVoid) {
                        Log.d("log", "thanh cong1");
                    }
                })
                .addOnFailureListener(new OnFailureListener() {
                    @Override
                    public void onFailure(@NonNull Exception e) {
                        Log.d("log", "that bai" + e.getMessage());
                    }
                });
Nào chúng ta cùng thử lấy vể các record đã lưu trong cơ sở dữ liệu nào !! Hãy lưu ý hàm toObject Giúp ích rất nhiều trong việc chúng ta convert các record về các model trong app nhé !!
db.collection("user").get().addOnCompleteListener(new OnCompleteListener<QuerySnapshot>() {
            @Override
            public void onComplete(@NonNull Task<QuerySnapshot> task) {
                for (DocumentSnapshot doc : task.getResult()) {
                    if (doc.exists()) {
                        // convert document to POJO
                        Account mAccount112 = doc.toObject(Account.class)
                    }
                    Account mAccount = new Account(doc.getString("name"), doc.getString("pass"));
                    listAccount.add(mAccount);
           }
            }
        }).addOnFailureListener(new OnFailureListener() {
            @Override
            public void onFailure(@NonNull Exception e) {
            }
        });
Tiếp đến là hàm delete trong firestore , ví dụ :
   db.collection(collection_name)
                .document(name)
                .delete()
                .addOnSuccessListener(new OnSuccessListener<Void>() {
                    @Override
                    public void onSuccess(Void aVoid) {
                        Snackbar.make(mImageButtonLike, "Bỏ thích bài hát thành công !! ",
                                Snackbar.LENGTH_SHORT).show();
                    }
                })
                .addOnFailureListener(new OnFailureListener() {
                    @Override
                    public void onFailure(@NonNull Exception e) {
                    }
                });
Lưu ý : ở firestor có cho phép người dùng tạo các subColecion con bên trong các collection để tạo dựng các mối quan hệ giữa các thực thể , ví dụ :
db.collection("user")
                .document(name)
                .collection(name)
                .document(mPlayMusicService.getSongName())
                .delete()
                .addOnSuccessListener(new OnSuccessListener<Void>() {
                    @Override
                    public void onSuccess(Void aVoid) {
                        Snackbar.make(mImageButtonLike, "Bỏ thích bài hát thành công !! ",
                                Snackbar.LENGTH_SHORT).show();
                    }
                })
                .addOnFailureListener(new OnFailureListener() {
                    @Override
                    public void onFailure(@NonNull Exception e) {
                    }
                });
Vậy là cũng ta đã đi qua xong các phương thức truy vấn cũng như cách thức để cấu hình firebase trong app và sdk của firebase . Ở phần sau sẽ có nhiều dịch vụ hơn của fire store , tạm biệt mọi người và hẹn gặp lại
All rights reserved
