Kiểm thử tự động với Selenium_P3
Bài đăng này đã không được cập nhật trong 4 năm
Kiểm thử tự động với Selenium_P2 (Refer: https://viblo.asia/p/kiem-thu-tu-dong-voi-selenium-p2-Eb85oE64Z2G)
I. Hướng dẫn run Selenium IDE trên trình duyệt Chrome/ IE
Step 01:
Tải về bản Selenium Server Standalone lưu vào 1 thư mục cố định (Trong demo mình lưu tại ổ C): Selenium Server Standalone version 2.53.1: http://selenium-release.storage.googleapis.com/2.53/selenium-server-standalone-2.53.1.jar
Step 02:
Tải về bản Chrome Driver và IE Driver lưu vào 1 thư mục cố định (Lưu ý là lưu cùng thư mục với Selenium Server Standalone – ổ C) Chrome Driver version 2.23: http://chromedriver.storage.googleapis.com/2.23/chromedriver_win32.zip IE Driver version 2.53.1: http://selenium-release.storage.googleapis.com/2.53/IEDriverServer_Win32_2.53.1.zip
Sau khi tải về xả nén ra 2 file (chromedriver.exe và IEDriverServer.exe) , mục đích của 2 file này để khởi tạo 2 trình duyệt Chrome và IE lên.
Step 03:
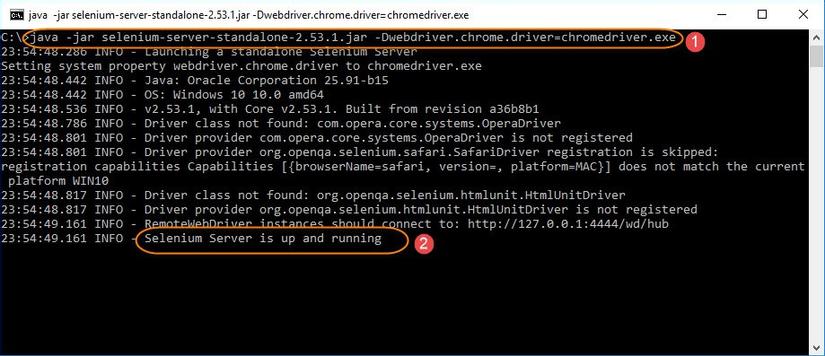
Bật Selenium Server Standalone lên và khởi tạo cùng lúc driver của trình duyệt: Tại ổ C, nhấn đồng thời phím Shift + chuột phải và chọn <Open command window here> Paste đoạn code sau vào command line: Cho Chrome: java -jar selenium-server-standalone-2.53.1.jar -Dwebdriver.chrome.driver=chromedriver.exe Cho IE: java -jar selenium-server-standalone-2.53.1.jar -Dwebdriver.ie.driver=IEDriverServer.exe
Sau khi bật thành công nó sẽ có giao diện như sau:
Step 04:
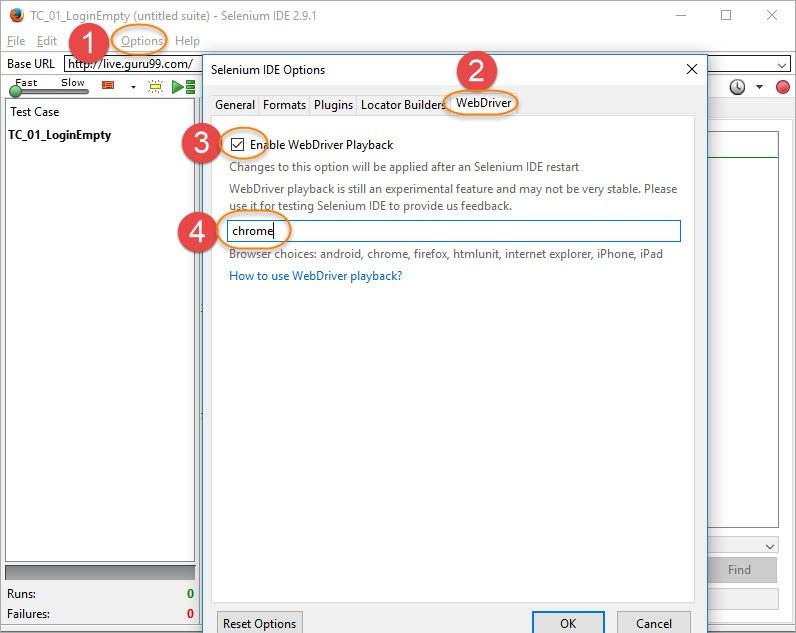
Config trong Selenium IDE:
Option > WebDriver > Check vào checkbox: Enable WebDriver Playback > Truyền vào browser thích hợp (chrome, internet explorer)
 !
!
Step 05:
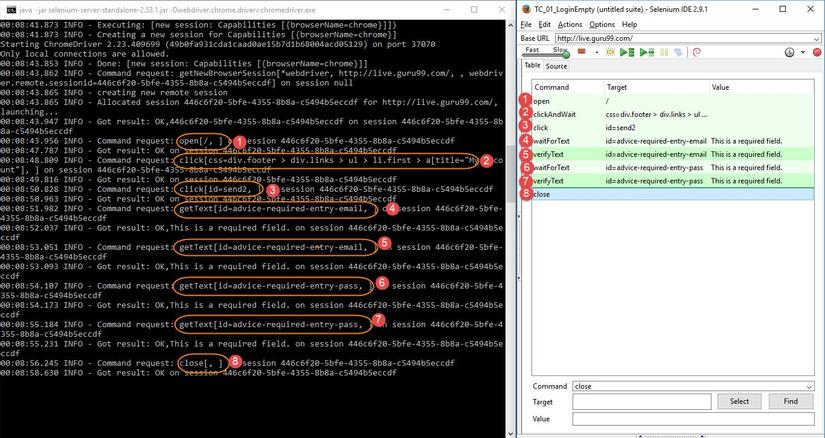
Chạy testcase như thông thường
Sau khi click run testcase, Selenium Server sẽ tạo mới 1 session và bật trình duyệt lên để thực thi testcase
Lưu ý:
– Để cho phép run lại testcase trên trình duyệt Firefox thì tại Step 04 cần click vào button Reset Option trong hình (nằm dưới cùng ở giữa) để đưa config browser về mặc định. – Các step liên quan đến vòng lặp hoặc sử dụng các chức năng liên quan đến extension (Report/ Flow Control/ Screenshot/…) sẽ không chạy được trên Chrome/ IE.
II. Hướng dẫn cách get image cho những case fail:
Step 1:
Sử dụng ITestResult Interface để cung cấp status và name của test case sẽ thực thi.
Step 2: Input dòng lệnh như dưới:
// Create a package in eclipse package captureScreenshot;
// Import all classes and interface import java.io.File; import library.Utility; import org.apache.commons.io.FileUtils; import org.openqa.selenium.By; import org.openqa.selenium.OutputType; import org.openqa.selenium.TakesScreenshot; import org.openqa.selenium.WebDriver; import org.openqa.selenium.firefox.FirefoxDriver; import org.testng.ITestResult; import org.testng.annotations.AfterMethod; import org.testng.annotations.Test;
public class FacebookScreenshot {
// Create Webdriver reference WebDriver driver;
@Test public void captureScreenshot() throws Exception {
// Initiate Firefox browser driver=new FirefoxDriver();
// Maximize the browser driver.manage().window().maximize();
// Pass application url driver.get("http://www.facebook.com");
// Here we are forcefully passing wrong id so that it will fail our testcase driver.findElement(By.xpath(".//*[@id='emailasdasdas']")).sendKeys("Learn Automation");
}
// It will execute after every test execution @AfterMethod public void tearDown(ITestResult result) {
// Here will compare if test is failing then only it will enter into if condition if(ITestResult.FAILURE==result.getStatus()) { try { // Create refernce of TakesScreenshot TakesScreenshot ts=(TakesScreenshot)driver;
// Call method to capture screenshot File source=ts.getScreenshotAs(OutputType.FILE);
// Copy files to specific location here it will save all screenshot in our project home directory and // result.getName() will return name of test case so that screenshot name will be same FileUtils.copyFile(source, new File("./Screenshots/"+result.getName()+".png"));
System.out.println("Screenshot taken"); } catch (Exception e) {
System.out.println("Exception while taking screenshot "+e.getMessage()); }
} // close application driver.quit(); }
}
Step 3:
Sau khi thực thi đoạn code trên. Check vào item như dưới

Step 4:
Thực hiện input dòng lệnh dưới dể đặt tên cho image Utility.captureScreenshot(driver,"name of screenshot");
III. Reference:
All rights reserved
