IOS - Truyền dữ liệu giữa các ViewController sử dụng Segue
Bài đăng này đã không được cập nhật trong 6 năm
Xin chào các bạn, hôm nay trong bài viết này mình sẽ đưa ra các để truyền dữ liệu từ một VC A -> VC B và ngược lại sử dụng segue.
Truyền dữ liệu từ A -> B
Sử dụng SHOW SEGUE
Mình là một người thiên về việc sử dụng file xib, storyboard. Như trong 1 dự án, khi mình muốn di chuyển đến một màn hình thì mình sẽ kéo segue trên storyboard cho nhanh. Sau khi đã kéo xong mình sẽ đặt tên cho segue identifier (sử dụng để xác định xem đó là storyboard segue nào).
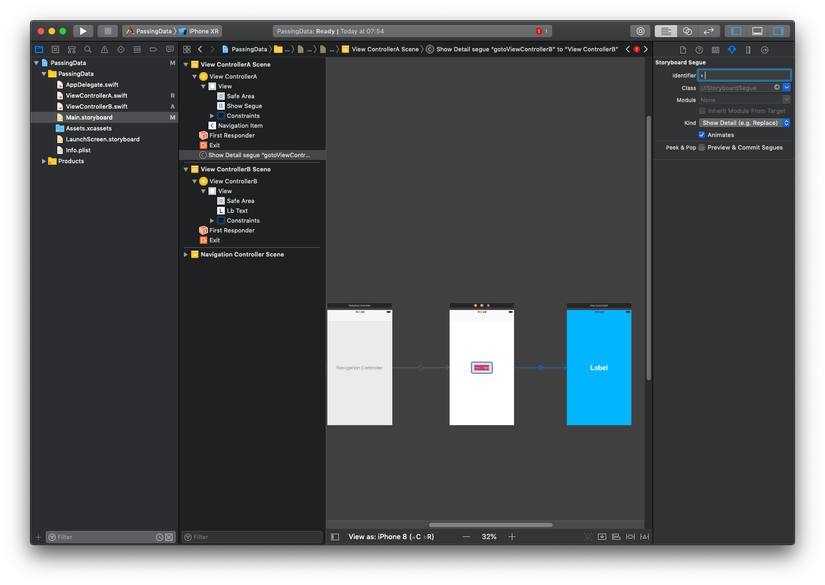 Hiện giờ mình đang có 2 VC là A và B. Từ VC A mình bấm vào button sẽ di chuyển sang VC B và truyền theo 1 đoạn text thì mình sẽ làm như sau:
- Trong VC A mình override lại func prepare for segue, ở trong function này mình hoàn toàn có thể check theo segue identifier hoặc không, mình có thể truyền dữ liệu đến VC mà segue trỏ đến.,
import UIKit

class ViewControllerA: UIViewController {

    override func viewDidLoad() {
        super.viewDidLoad()
        // Do any additional setup after loading the view, typically from a nib.
    }

    override func prepare(for segue: UIStoryboardSegue, sender: Any?) {
            guard let vcB = segue.destination as? ViewControllerB else {
                    return
            }
            vcB.initData(text: "Demo")
    }
}
- Trong VC B, mình khởi tạo một function initData và một property tên là text để hứng dữ liệu từ VC A. Hàm initData sẽ được gọi trươc khi viewDidLoad đc gọi vậy nên chúng ta luôn lấy đc text khác rỗng.
import UIKit

class ViewControllerB: UIViewController {

    var text = ""

    @IBOutlet weak var lbText: UILabel!
    override func viewDidLoad() {
        super.viewDidLoad()

        // Do any additional setup after loading the view.
        self.lbText.text = text
    }

    func initData(text: String) {
        self.text = text
    }

}
Sử dụng modal segue
Trong dự án, việc sử dụng modal segue thường là bạn muốn present lên một VC B được embed trong navigation controller riêng biệt với VC hiện tại. Dựa vào ví dụ trên, mình sẽ sửa lại storyboard và code trong VC A.
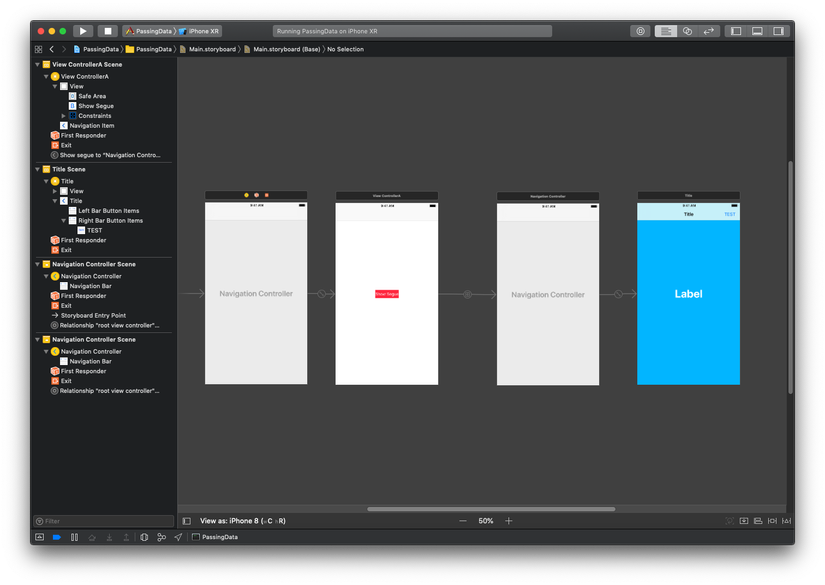
- Trong VC A lúc này mình sẽ sửa code lại như sau:
import UIKit

class ViewControllerA: UIViewController {

    override func viewDidLoad() {
        super.viewDidLoad()
        // Do any additional setup after loading the view, typically from a nib.
    }

    override func prepare(for segue: UIStoryboardSegue, sender: Any?) {
        if let navigationController = segue.destination as? UINavigationController,
            let editContactViewController = navigationController.viewControllers.first as? ViewControllerB {
            vcB.initData(text: "Demo")
        }
    }
}
Sử dụng code thay vì dùng segue
Hai cách ở trên là mình thường hay sử dụng vì mình là người có thói quen dùng những gì đã được cấp cung cấp sẵn. Ngoài ra, chúng ta cũng có thể viết code để truyền data từ VC A - > VC B
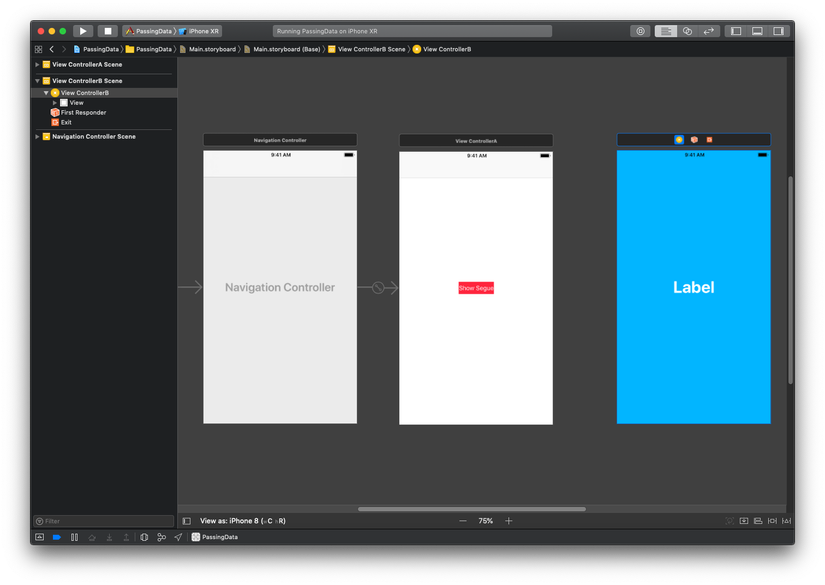 Lúc này mình sẽ xoá đi segue đã tạo trước đó, và sửa code trong VC A như sau:
import UIKit

class ViewControllerA: UIViewController {

    override func viewDidLoad() {
        super.viewDidLoad()
        // Do any additional setup after loading the view, typically from a nib.
    }

    @IBAction func actionGoToVCB(_ sender: Any) {
        let storyboard = UIStoryboard(name: "Main", bundle: nil)
        if let vcB = storyboard.instantiateViewController(withIdentifier: "ViewControllerB") as? ViewControllerB {
            vcB.initData(text: "Demo")
            let navigationViewController = UINavigationController(rootViewController: vcB)
            show(navigationViewController, sender: nil)
        }
    }
}
Truyền dữ liệu từ B -> A
Sử dụng unwind segue.
Lúc này chúng ta cần truyền dữ liệu ngược từ B -> A. Mình thấy việc sử dụng segue này đã có khá lâu, tuy nhiên rất ít bạn biết đến nó. Thì đầu tiên, để sử dụng unwind segue, chúng ta cần tạo 1 action ở trong VC A như sau:
import UIKit

class ViewControllerA: UIViewController {

    @IBOutlet weak var lbPassBackText: UILabel!
    override func viewDidLoad() {
        super.viewDidLoad()
        // Do any additional setup after loading the view, typically from a nib.
    }

    override func prepare(for segue: UIStoryboardSegue, sender: Any?) {
        if let navigationController = segue.destination as? UINavigationController,
            let vcB = navigationController.viewControllers.first as? ViewControllerB {
            vcB.initData(text: "Demo")
        }
    }

    @IBAction func unwindToVCA(_ unwindSegue: UIStoryboardSegue) {
        if let vcB = unwindSegue.source as? ViewControllerB {
            lbPassBackText.text = vcB.text
        }
    }
}
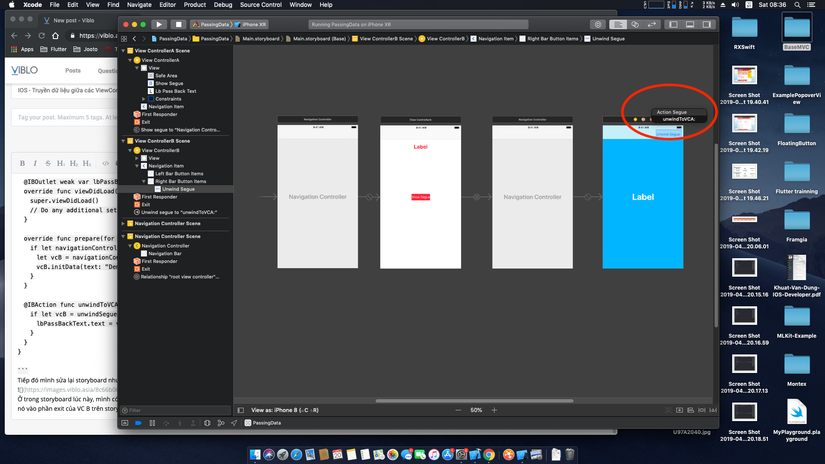
Tiếp đó mình sửa lại storyboard như ảnh sau:
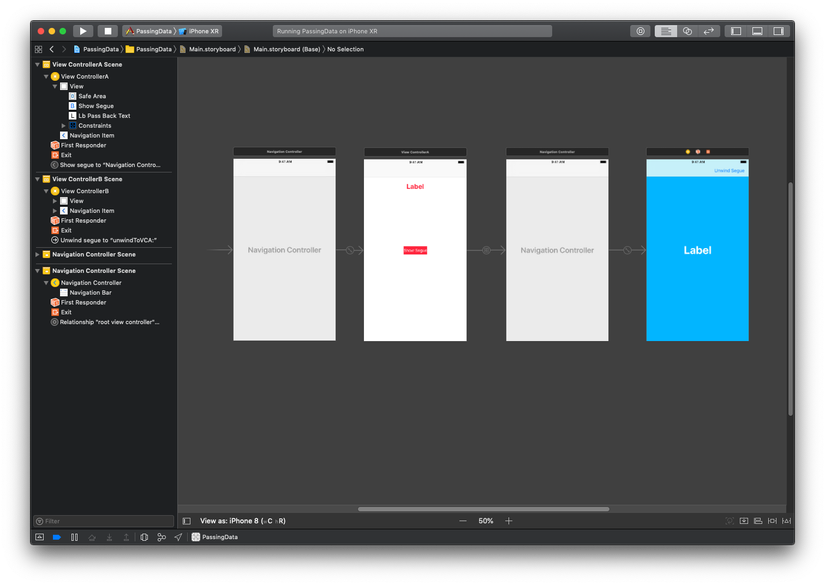 Ở trong storyboard lúc này, mình có một bar button item có tên là Unwind Segue, mình sẽ cần kéo action của nó map với action "unwindToVCA" trong ViewControllerA. Để làm đc thì mình sẽ giữ Ctrl và kéo nó vào phần exit của VC B trên storyboard.
- Giờ trong VC B mình sẽ override thêm func prepare for segue
import UIKit

class ViewControllerB: UIViewController {

    var text = ""

    @IBOutlet weak var lbText: UILabel!
    override func viewDidLoad() {
        super.viewDidLoad()

        // Do any additional setup after loading the view.
        self.lbText.text = text
    }

    func initData(text: String) {
        self.text = text
    }

    override func prepare(for segue: UIStoryboardSegue, sender: Any?) {
        self.text = "LALALAALALA"
    }

}
=> Như vậy là mình đã có thể truyền dữ liệu ngược từ B -> A.
Kết
Như ở trên mình đã đưa ra cách để sử dụng segue trong việc truyền dữ liệu giữa 2 Vc A và B. Ngoài cách sử dụng unwind segue thì chúng ta còn có thể sử dụng các cách khác như: delegate, closure... Cảm ơn các bạn đã đọc đến đây, hy vọng những gì mình chia sẻ ở trên sẽ có thể giúp các bạn được 1 chút.
All rights reserved