Install Git Server Private Repository on AWS with Ubuntu
Bài đăng này đã không được cập nhật trong 4 năm
Note: Install specific OS is ubuntu 14.04 (Install Git Server with the most stability)
This document describes how to install and configure Git and GitHub. These are great tools to manage and administer a whole host of Git repositories and the associated permissions. So, these remain true blessings for users writing open source software, however, when writing a closed source software may not be comfortable in trusting the code to a third party server. To gain the much-needed flexibility and control on stuff like Github/BitBucket without hosting the git repositories on servers that lie external to the control of users, GitLab remains a Godsend!
GitLab is a wonder tool that offers a simple and user-friendly yet potent web-based interface to the Git repositories on your server, viz., GitHub. Users are free to host it on their own cloud server, control access in a custom-built manner, and the only factor limiting the repo size is the inbuilt storage space of the server.
I do not issue any guarantee that this will work for you!
1. We will first install the pre-configurations before configurations of the Git Hub.
The process for installation of required packages has been explained below.
apt-get update
apt-get install -y build-essential zlib1g-dev libyaml-dev libssl-dev libgdbm-dev libreadline-dev libncurses5-dev libffi-dev curl git-core openssh-server redis-server checkinstall libxml2-dev libxslt-dev libcurl4-openssl-dev libicu-dev
# installing python 2.7 and pip for it
sudo apt install python2.7 python-pip
# installing python-pip for 3.6
sudo apt install python3-pip
You can call python pip the following way:
# for python 2.7
pip2 install <package>
# for python 3.6
pip install <package>
You can check your Python version as follows(in my case it is Python 2.7.6):
root@server1:~# python --version
Python 2.7.6
root@server1:~#
This can be done as shown below, installing Ruby 2.3.1, Ruby can be installed as follows:
sudo su
mkdir /tmp/ruby && cd /tmp/ruby
wget http://ftp.ruby-lang.org/pub/ruby/2.1/ruby-2.1.2.tar.gz
tar zxvf ruby-2.1.2.tar.gz
cd ruby-2.1.2
./configure
make
make install
If you are installing display this error:
$ rbenv install 2.3.1
Downloading ruby-2.3.1.tar.bz2...
-> https://cache.ruby-lang.org/pub/ruby/2.3/ruby-2.3.1.tar.bz2
Installing ruby-2.3.1...

BUILD FAILED (Ubuntu 16.10 using ruby-build 20160602)

Inspect or clean up the working tree at /tmp/ruby-build.20161019161109.7468
Results logged to /tmp/ruby-build.20161019161109.7468.log

Last 10 log lines:
    from /tmp/ruby-build.20161019161109.7468/ruby-2.3.1/lib/rubygems/package.rb:44:in `<top (required)>'
    from /tmp/ruby-build.20161019161109.7468/ruby-2.3.1/lib/rubygems/core_ext/kernel_require.rb:55:in `require'
    from /tmp/ruby-build.20161019161109.7468/ruby-2.3.1/lib/rubygems/core_ext/kernel_require.rb:55:in `require'
    from /tmp/ruby-build.20161019161109.7468/ruby-2.3.1/lib/rubygems/installer.rb:10:in `<top (required)>'
    from /tmp/ruby-build.20161019161109.7468/ruby-2.3.1/lib/rubygems/core_ext/kernel_require.rb:55:in `require'
    from /tmp/ruby-build.20161019161109.7468/ruby-2.3.1/lib/rubygems/core_ext/kernel_require.rb:55:in `require'
    from ./tool/rbinstall.rb:657:in `<module:RbInstall>'
    from ./tool/rbinstall.rb:585:in `<main>'
uncommon.mk:260: recipe for target 'do-install-all' failed
make: *** [do-install-all] Error 1
This solve solution:
- Ubuntu 16.10
- Ruby 2.3.1
Further we will check the ruby version as:
root@server1:/tmp/ruby/ruby-2.1.2# ruby -v
ruby 2.1.2p95 (2014-05-08 revision 45877) [x86_64-linux]
root@server1:/tmp/ruby/ruby-2.1.2#
Next we will install the Bundler Gem to manage libary on Ruby as follows:
root@server1:/tmp/ruby/ruby-2.1.2# gem install bundler --no-ri --no-rdoc
Fetching: bundler-1.6.5.gem (100%)
Successfully installed bundler-1.6.5
1 gem installed
root@server1:/tmp/ruby/ruby-2.1.2#
Now we will create a user=git user (git is group name)for Gitlab to be used in further configurations,as follows:
adduser --disabled-login --gecos 'GitLab' git
2. Installation of the GitLab Shell
We will download the GitLab shell using the following command :
cd /home/git
sudo -u git -H git clone https://github.com/gitlabhq/gitlab-shell.git
cd gitlab-shell
sudo -u git -H git checkout v1.7.0
sudo -u git -H cp config.yml.example config.yml
Further we will make a backup of original file config.yml.example and copy it into config.yml. Edit the file as follows:
vi config.yml
Now we need to change the value from gitlab_url: "http://localhost/" to git value as shown:
# GitLab user. git by default
user: git

# Url to gitlab instance. Used for api calls. Should end with a slash.
#gitlab_url: "http://localhost/"
gitlab_url:     "http://server1.example.com"

[....]
Now we will run the GitLab shell installed as follows:
sudo -u git -H ./bin/install
It will have output like this:
root@server1:/home/git/gitlab-shell# sudo -u git -H ./bin/install
mkdir -p /home/git/repositories: true
mkdir -p /home/git/.ssh: true
chmod 700 /home/git/.ssh: true
touch /home/git/.ssh/authorized_keys: true
chmod 600 /home/git/.ssh/authorized_keys: true
chmod -R ug+rwX,o-rwx /home/git/repositories: true
find /home/git/repositories -type d -print0 | xargs -0 chmod g+s: true
root@server1:/home/git/gitlab-shell#
3. Mariadb installation for GitLab
Now, we will set up the GitLab to use a Mariadb to be used in backend. The first step is to install Mariadb with the command given below. During the installation process, it will prompt you for setting up a MySQL root password, which you may set as per personal preference, however you must make a note of the same for use in the subsequent steps.
sudo apt-get install software-properties-common
sudo apt-key adv --recv-keys --keyserver keyserver.ubuntu.com 0xcbcb082a1bb943db
sudo add-apt-repository 'deb [arch=amd64,i386,ppc64el] http://mirror.netinch.com/pub/mariadb/repo/10.0/debian jessie main'
sudo apt-get update
sudo apt-get install mariadb-server mariadb-client libmariadbclient-dev
New password for the MariaDB "root" user: admin1234 Repeat password for the MariaDB "root" user: admin1234
Gitlab database creation:
mysql -u root -p
In Mariadb prompt use database=gitlabdb user=gitlabadmin and password=gitlabadmin1234:
CREATE DATABASE gitlabdb DEFAULT CHARACTER SET utf8 COLLATE utf8_unicode_ci;
GRANT SELECT, LOCK TABLES, INSERT, UPDATE, DELETE, CREATE, DROP, INDEX, ALTER ON gitlabdb.* TO 'gitlabadmin'@'localhost' IDENTIFIED BY 'gitlabadmin1234';
flush privileges;
quit
Now we wil proceed for the installation as follows:
cd /home/git
sudo -u git -H git clone https://github.com/gitlabhq/gitlabhq.git gitlab
cd /home/git/gitlab
sudo -u git -H git checkout 6-0-stable
sudo -u git -H cp config/gitlab.yml.example config/gitlab.yml
Just as with the GitLab shell set up, if you have a domain configured for the VPS, you must edit the config.yml to use that domain (as shown in the command given below):
sudo -u git -H vi config/gitlab.yml
[...]
 ## GitLab settings
#  gitlab:
#    ## Web server settings
#    host: localhost
#    port: 80
#    https: false

// Config here

  gitlab:
    ## Web server settings
    host: server1.example.com
    port: 80
    https: false
[...]
Here, you are also required to set a few Linux file permissions, configure the git user's Gitconfig, and set up some GitLabconfig and directories for the git user (as shown below):
cd /home/git/gitlab
chown -R git log/
chown -R git tmp/
chmod -R u+rwX  log/
chmod -R u+rwX tmp/
sudo -u git -H mkdir /home/git/gitlab-satellites
sudo -u git -H mkdir tmp/pids/
sudo -u git -H mkdir tmp/sockets/
chmod -R u+rwX tmp/pids/
chmod -R u+rwX tmp/sockets/
sudo -u git -H mkdir public/uploads
chmod -R u+rwX  public/uploads
sudo -u git -H cp config/unicorn.rb.example config/unicorn.rb
sudo -u git -H git config --global user.name "GitLab"
sudo -u git -H git config --global user.email "gitlab@localhost"
sudo -u git -H git config --global core.autocrlf input
sudo -u git cp config/database.yml.mysql config/database.yml
Next, we need to tell GitLab to use the gitlab Mariadb user that you had set up earlier. For this, we will edit the file config/database.yml file (as shown below):
sudo -u git -H vi config/database.yml
[...]
#production:
#  adapter: mysql2
#  encoding: utf8
#  reconnect: false
#  database: gitlabhq_production
#  pool: 10
#  username: root
#  password: "secure password"


// Config here

production:
  adapter: mysql2
  encoding: utf8
  reconnect: false
  database: gitlabdb
  pool: 10
  username: gitlabadmin
  password: "gitlabadmin1234"
[...]
Please put the values as you gave at the time of database creation, the above values may differ if you have used other values at the time of database creation. Change the file permissions as:
sudo -u git -H chmod o-rwx config/database.yml
Now, we can install a few more needed gems, and this may be a fairly long step (as shown below):
cd /home/git/gitlab
gem install charlock_holmes --version '0.6.9.4'
Download the package and install it:
wget https://downloads-packages.s3.amazonaws.com/ubuntu-14.04/gitlab_7.1.1-omnibus-1_amd64.deb
sudo apt-get install openssh-server
sudo apt-get install postfix

# Select 'Internet Site', using sendmail instead also works, exim has problems
Here it will ask for some user input, please select Internet Site,use system mail as server1.example.com. You can also use sendmail instead installing postfix. Next install the git lab:
dpkg -i gitlab_7.1.1-omnibus-1_amd64.deb
Edit the configuration file to add our hostname i.e. hostname=server1.example.com:
vi /etc/gitlab/gitlab.rb
[....]
#external_url 'http://gitlab.example.com'
external_url 'http://server1.example.com'
We will then reconfigure the start the GitLab as follows:
gitlab-ctl reconfigure
- You have some error when execute:
Error executing action `create` on resource 'user[git]'
By default, omnibus-gitlab uses the user name git for Git gitlab-shell login, ownership of the Git data itself, and SSH URL generation on the web interface. Similarly, git group is used for group ownership of the Git data. You can change the user and group by adding the following lines to /etc/gitlab/gitlab.rb.
vi /etc/gitlab/gitlab.rb
user['username'] = "gitlab"
user['group'] = "gitlab"
- You have error:
Error executing action `run` on resource 'execute[migrate database]'**:
Run sudo gitlab-ctl reconfigure for the change to take effect.
You can browse the login page at http://192.168.0.100/users/sign_on use the credentials as username=root and password=5iveL!fe
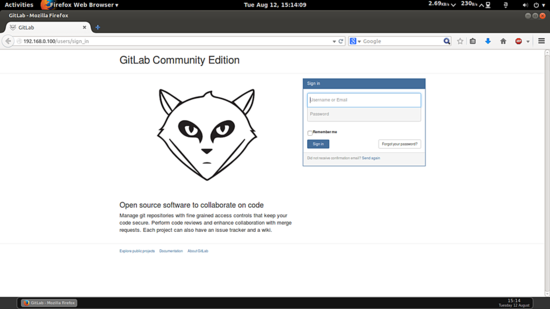
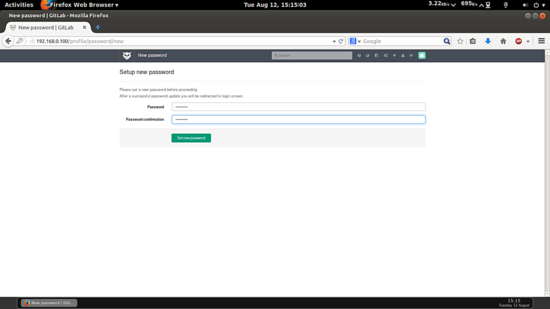
Change the original password:
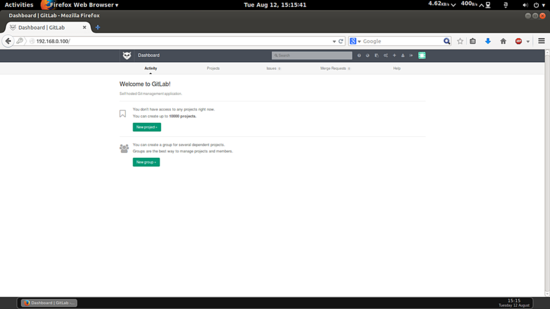
This will be your default welcome page.
If you have some error: Gitlab 'fatal: repository '…' not found' - unable to push to a newly created project when you're using to command git clone, git push then references the following bellow:
- You need SSH Key and Add SSH before create project and clone it.

Create SSH key with your gmail address.


Copy SSH Key from terminal to your box

- You can start create project, clone it, push to repositories


All rights reserved
