Implement Google Inbox Style Animation on Android
Bài đăng này đã không được cập nhật trong 7 năm
Là người dùng và là developer, tôi luôn bị thu hút bởi các ứng dụng tuyệt vời với animation đẹp và ý nghĩa. Đối với tôi những ứng dụng như vậy không chỉ cung cấp các tính năng tuyệt vời để giúp cuộc sống của người dùng dễ dàng hơn mà còn thể hiện sự nhiệt tình đưa trải nghiệm người dùng của họ lên cấp độ tiếp theo từ đội ngũ đằng sau chúng. Một trong những ứng dụng đó là Google Inbox của Google cung cấp animation đóng mở email được hiển thị như bên dưới

Trong bài viết này, tôi sẽ đưa bạn qua hành trình sao chép animation như bên trên 
Setup
Để làm được animation đấy, tôi đã xây dựng một ứng dụng đơn giản với 2 fragment, EmailListFragment và EmailDetailFragment như bên dưới
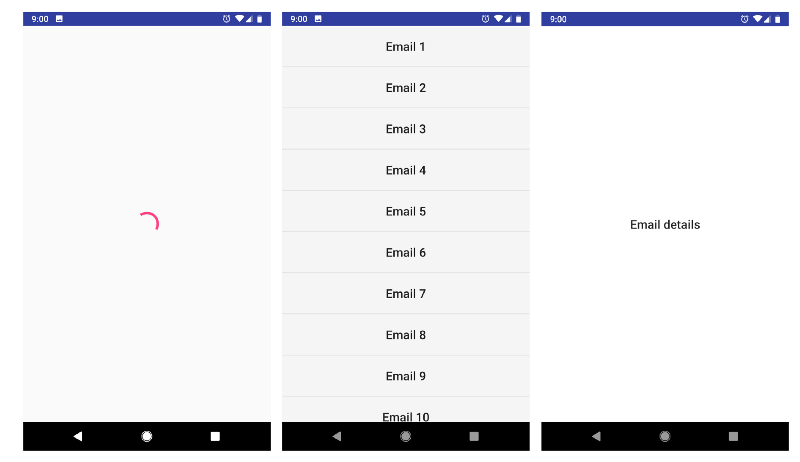
Để mô phỏng yêu cầu mạng fetching emails, tôi đã tạo một ViewModel cho EmailListFragment với 2 trạng thái. InProgress cho biết dữ liệu emails đang được fetching và Success cho biết dữ liệu email đã được tải thành công và sẵn sàng để hiển thị (Mô phỏng request là 2s)
sealed class State {
  object InProgress : State()
  data class Success(val data: List<String>) : State()
}
EmailListFragment có một method để hiển thị các trạng thái
private fun render(state: State) {
    when (state) {
      is InProgress -> {
        emailList.visibility = GONE
        progressBar.visibility = VISIBLE
      }

      is Success -> {
        emailList.visibility = VISIBLE
        progressBar.visibility = GONE
        emailAdapter.setData(state.data)
      }
}
1 - đó là animation nào?
Người ta có thể ngay lập thức nói rằng đó là một loại Explode transition vì các item bên trên và bên dưới item được nhấn vào đang di chuyển ra khỏi nó. Nhưng chờ chút, EmailDetailFragment cũng được chuyển đổi và mở rộng từ item email khác. Điều đó có nghĩa là cũng có một shared element transition. Với những gì đã nói, dưới đây là những gì tôi đã làm
override fun onBindViewHolder(holder: EmailViewHolder, position: Int) {
      fun onViewClick() {
        val viewRect = Rect()
        holder.itemView.getGlobalVisibleRect(viewRect)

        exitTransition = Explode().apply {
          duration = TRANSITION_DURATION
          interpolator = transitionInterpolator
          epicenterCallback = object : Transition.EpicenterCallback() {
                override fun onGetEpicenter(transition: Transition) = viewRect
              }
        }

        val sharedElementTransition = TransitionSet()
            .addTransition(ChangeBounds())
            .addTransition(ChangeTransform())
            .addTransition(ChangeImageTransform()).apply {
              duration = TRANSITION_DURATION
              interpolator = transitionInterpolator
            }

        val fragment = EmailDetailsFragment().apply {
          sharedElementEnterTransition = sharedElementTransition
          sharedElementReturnTransition = sharedElementTransition
        }

        activity!!.supportFragmentManager
            .beginTransaction()
            .setReorderingAllowed(true)
            .replace(R.id.container, fragment)
            .addToBackStack(null)
            .addSharedElement(holder.itemView, getString(R.string.transition_name))
            .commit()
      }

      holder.bindData(emails[position], ::onViewClick)
    }
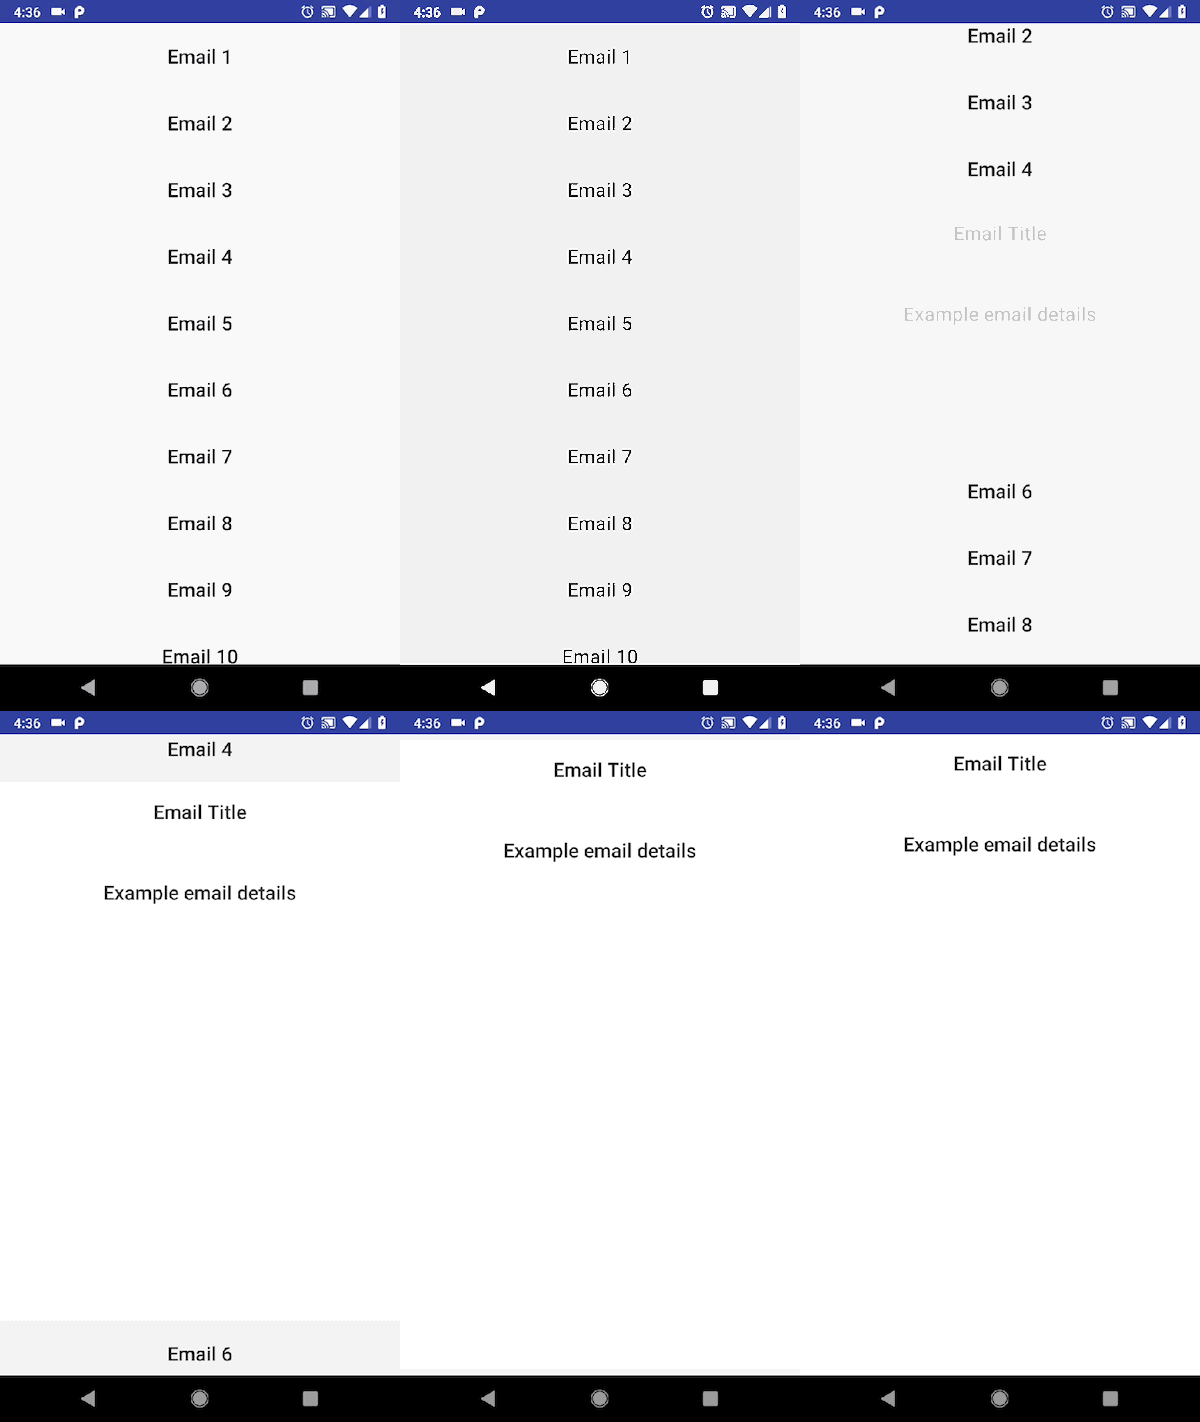
Và đây là thành quả (background của EmailDetailFragment được đặt là màu xanh để thể hiện rõ sự chuyển đổi)
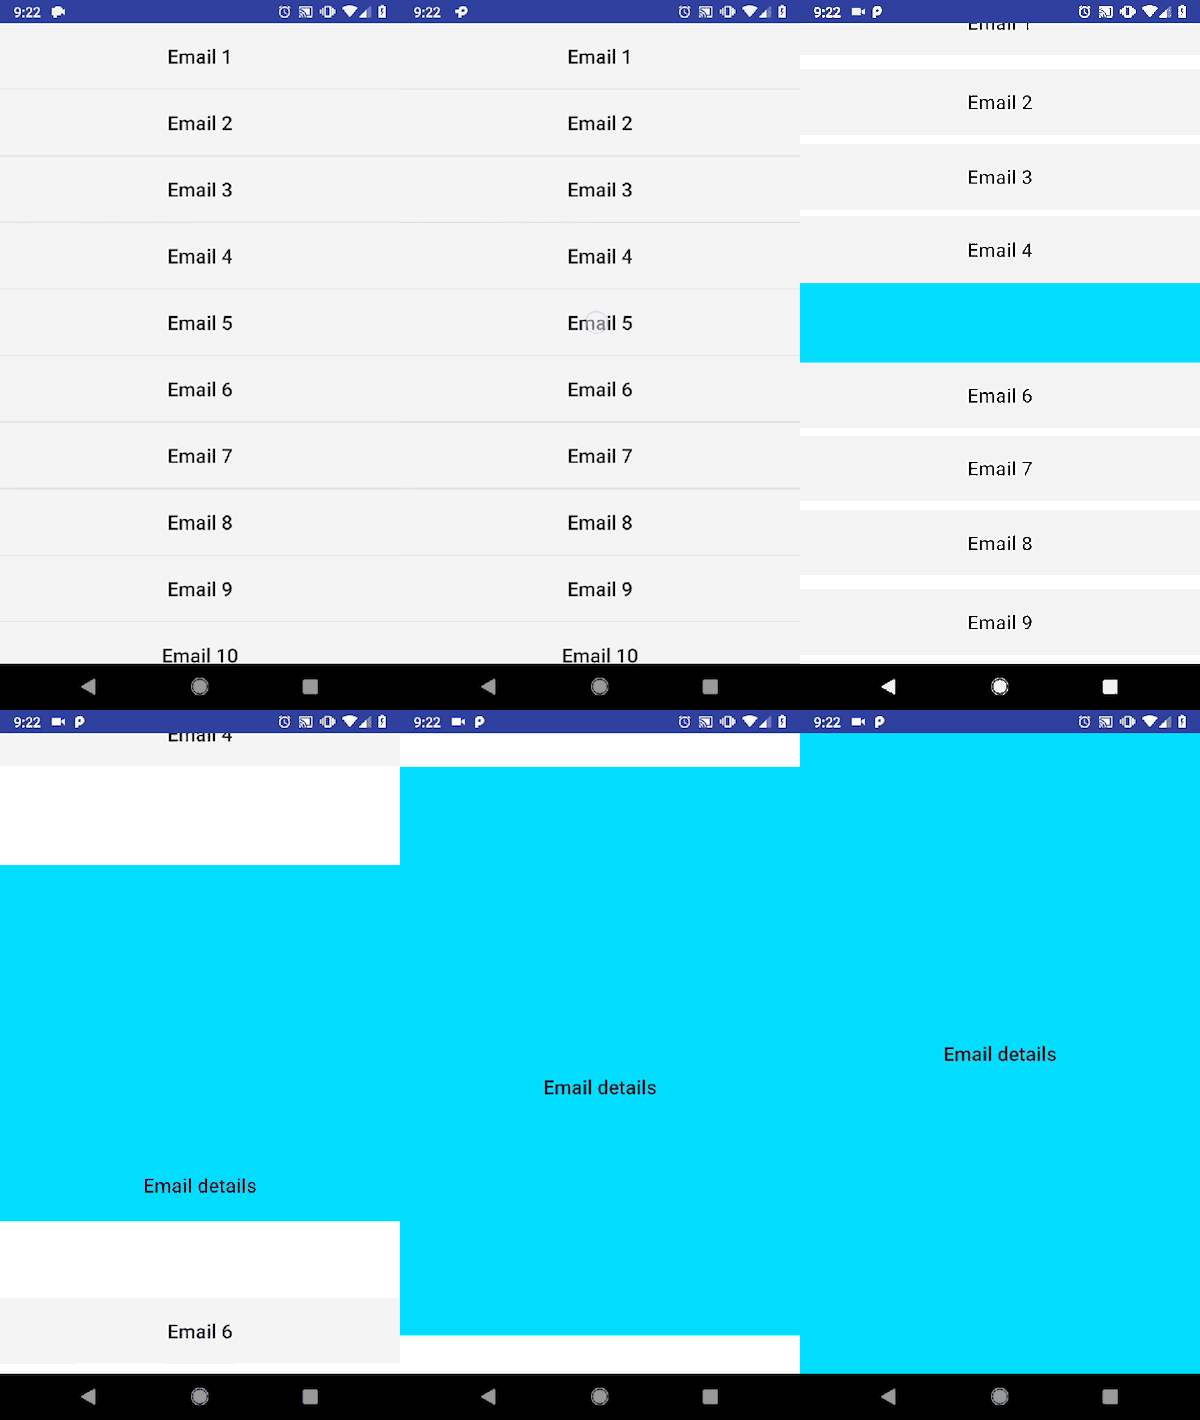
Chắc chắn đó không phải là điều tôi muốn. Có 2 vấn đề
- Các item email không bắt đầu chuyển đổi cùng lúc. Các item xa hơn từ những những item được chạm bắt đầu chuyển đổi sớm hơn
- Shared Element Transition trên item email được chạm không được đồng bộ hóa với các transition của những item khác.
Email 4vàEmail 6phải luôn được dán ở cạnh trên và dưới của hình chữ nhật màu xanh khó nó được mở rộng. Nhưng hiện tại thì không!
Vậy sai ở đâu?
2: the out-of-the-box Explode transition không phải là điều tôi muốn
Sau khi đào sâu vào source code của Explode, tôi đã tìm thấy 2 sự thật thú vị:
- Nó sử dụng
CircularPropagationđể thực thi quy tắc rằng các views xa hơn từ tâm sẽ chuyển đổi sớm hơn các view đóng tới tâm khi chúng biến mất khỏi màn hình. Tâm của Explode transition được đặt thành hình chữ nhật bao gồm item email đã chạm. Điều này giải thích tại sao các item email chưa được chạm không chuyển đổi cùng nhau như đã đề cập ở trên - Khoảng cách mà các item bên trên và bên dưới chuyển đổi không phải là khoảng cách từ item đã chạm đến đầu và cuối màn hình. Trong tình huống cụ thể này, khoảng cách đó được xác định là dài nhất trong số các khoảng cách từ điểm trung tâm của item được chạm đến từng góc của màn hình
Vì vậy tôi đã quyết định viết Explode transition của riêng tôi. Tôi đặt tên nó là SlideExplode vì nó rất giống với Slide transition ngoại trừ có 2 phần di chuyển theo 2 hướng ngược nhau
import android.animation.Animator
import android.animation.ObjectAnimator
import android.graphics.Rect
import android.transition.TransitionValues
import android.transition.Visibility
import android.view.View
import android.view.ViewGroup

private const val KEY_SCREEN_BOUNDS = "screenBounds"

/**
 * A simple Transition which allows the views above the epic centre to transition upwards and views
 * below the epic centre to transition downwards.
 */
class SlideExplode : Visibility() {
  private val mTempLoc = IntArray(2)

  private fun captureValues(transitionValues: TransitionValues) {
    val view = transitionValues.view
    view.getLocationOnScreen(mTempLoc)
    val left = mTempLoc[0]
    val top = mTempLoc[1]
    val right = left + view.width
    val bottom = top + view.height
    transitionValues.values[KEY_SCREEN_BOUNDS] = Rect(left, top, right, bottom)
  }

  override fun captureStartValues(transitionValues: TransitionValues) {
    super.captureStartValues(transitionValues)
    captureValues(transitionValues)
  }

  override fun captureEndValues(transitionValues: TransitionValues) {
    super.captureEndValues(transitionValues)
    captureValues(transitionValues)
  }

  override fun onAppear(sceneRoot: ViewGroup, view: View,
                        startValues: TransitionValues?, endValues: TransitionValues?): Animator? {
    if (endValues == null) return null

    val bounds = endValues.values[KEY_SCREEN_BOUNDS] as Rect
    val endY = view.translationY
    val startY = endY + calculateDistance(sceneRoot, bounds)
    return ObjectAnimator.ofFloat(view, View.TRANSLATION_Y, startY, endY)
  }

  override fun onDisappear(sceneRoot: ViewGroup, view: View,
                           startValues: TransitionValues?, endValues: TransitionValues?): Animator? {
    if (startValues == null) return null

    val bounds = startValues.values[KEY_SCREEN_BOUNDS] as Rect
    val startY = view.translationY
    val endY = startY + calculateDistance(sceneRoot, bounds)
    return ObjectAnimator.ofFloat(view, View.TRANSLATION_Y, startY, endY)
  }

  private fun calculateDistance(sceneRoot: View, viewBounds: Rect): Int {
    sceneRoot.getLocationOnScreen(mTempLoc)
    val sceneRootY = mTempLoc[1]
    return when {
      epicenter == null -> -sceneRoot.height
      viewBounds.top <= epicenter.top -> sceneRootY - epicenter.top
      else -> sceneRootY + sceneRoot.height - epicenter.bottom
    }
  }
}
Giờ tôi chuyển Explode sang SlideExplode, cùng xem kết quả:
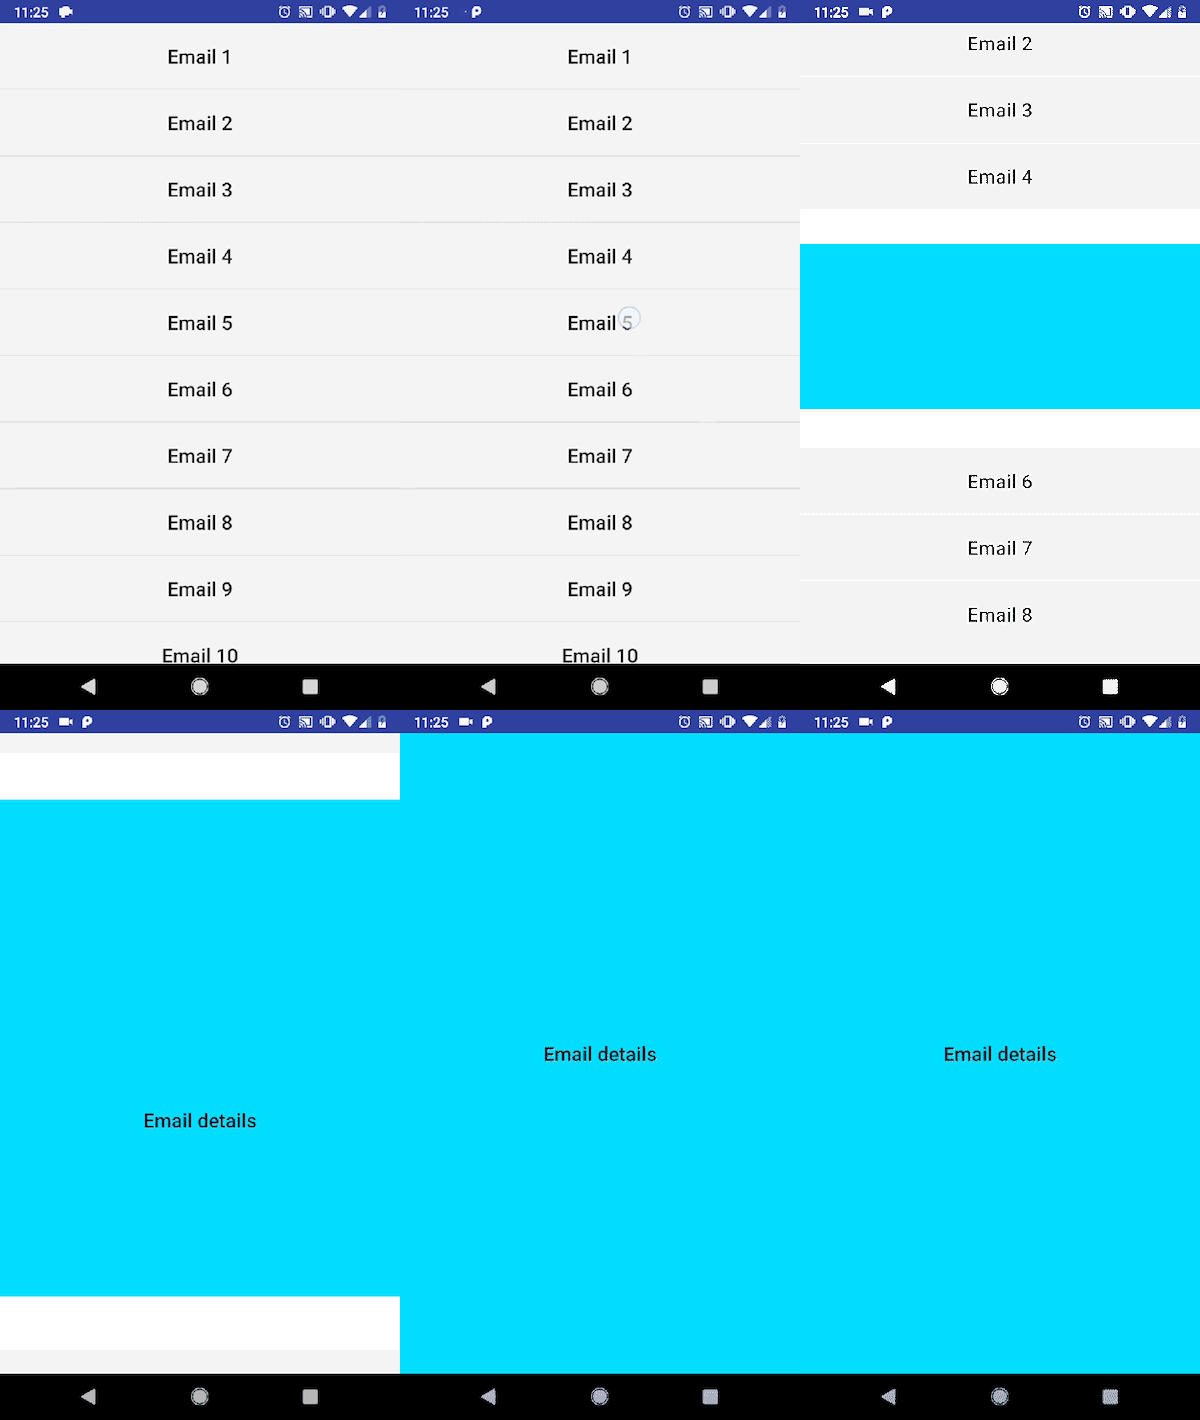
3: Đổ lỗi do TransitionSet
Tôi lại đào lại source code lần nữa. Lần này tôi tìm thấy bất cứ khi nào tôi set interpolator thành một TransitionSet, nó không phân phối interpolator cho các transtions có trong nó. Điều này chỉ xảy ra với TransitionSet. Vertion hỗ trợ (android.support.transition.TransitionSet)
hoạt động đúng. Để khắc phục nó, chúng tôi có thể chuyển sang support version hoặc chuyển đổi interpolator bằng cách sử dụng extention funtion bên dưới
 fun TransitionSet.setCommonInterpolator(interpolator: Interpolator): TransitionSet {
  (0 until transitionCount)
      .map { index -> getTransitionAt(index) }
      .forEach { transition -> transition.interpolator = interpolator }

  return this
}
Hãy thử lại sau khi cập nhập cách chúng ta set Interpolator

Ngon. Có vẻ như oke rồi. Nhưng làm thế nào để chuyển đổi ngược lại
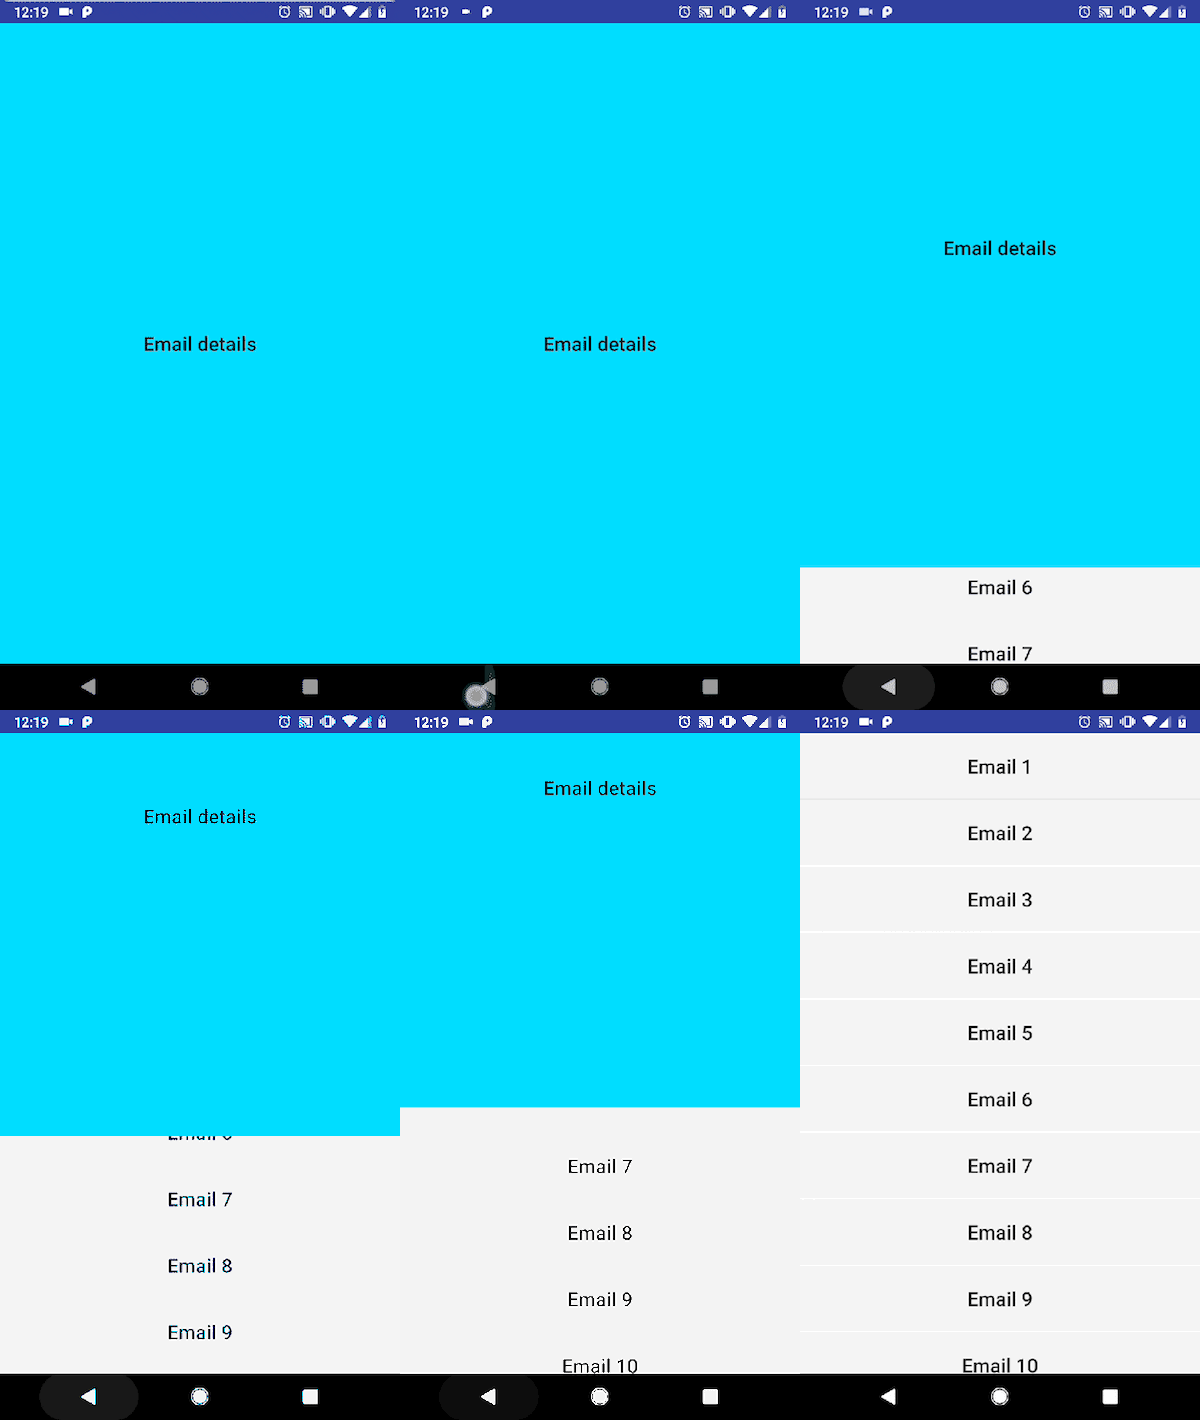
Explode transtion dường như hoạt động. Tuy nhiêm, shared element transition thì không.
4. Postpone Enter Transition
Lý do tại sao reverse transiton không hoạt động là vì nó được play quá sớm. Đồi với bất kỳ transtion hoat động, nó cần nắm bắt trạng trái bắt đầu và kết thúc (size, position, bound) của các target view, đó là EmailDetailFragment và Email 5 item. Nếu reverse transition được bắt đầu trước khi trạng thái của Email 5 tiem có sẵn, nó sẽ hoạt động đung như những gì chúng ta đã thấy.
Giảo pháp ở đây là hoãn quá trình reverse transition cho đến khi các item email được drawn. May mắn thay, transition framework cung cấp một cặp phương thức postponeEnterTransition và startPostponeEnterTransition.Lưu ý rằng startPostponedEnterTransition phải được gọi tại thời điểm sau postponeEnterTransition đc gọi. Nếu không, transition sẽ không bao giờ được play và fragment không được bật.
Các mã cập nhập lại như sau. Chúng tôi đã hoãn quá trình transition nhập vào onViewCreated
override fun onViewCreated(view: View, savedState: Bundle?) {
  super.onViewCreated(view, savedInstanceState)
  postponeEnterTransition()
  ...
}
Và bắt đầu postponed transition sau khi rendering trạng thái. Điều này được thực hiện bằng cách sử dụng doOnPreDraw
is Success -> {
  ...
  (view?.parent as? ViewGroup)?.doOnPreDraw {
    startPostponedEnterTransition()
  }
}
Bây giờ thì hoạt động rồi. Nhưng transtion tồn tại sẽ thay đổi orientation?
5. Thay đổi orientation
Sau khi rotation, không có reverse transtion với Email List Fragment. Sau khi debugging tôi đã tìm thấy các transition đã bị destroyed cùng với fragment khi orientation thay đổi. Do đó, transition nên được tạo lại sau khi fragment bị destroyed. Ngoài ra, Explode transtion thường không giống nhau ở chế độ dọc và ngang do kích thước màn hình và sự khác việt của giao diện người dùng.
Điều đó đòi hỏi chúng tôi phải theo dõi vị trí của item được chạm và khôi phục nó khi thay đổi orientation, source code được update lại như sau:
override fun onViewCreated(view: View, savedState: Bundle?) {
  super.onViewCreated(view, savedState)
  tapPosition = savedState?.getInt(TAP_POSITION, NO_POSITION) ?: NO_POSITION
  postponeEnterTransition()
   ...
}
...
private fun render(state: State) {
  when (state) {
   ...
   is Success -> {
      ...
      (view?.parent as? ViewGroup)?.doOnPreDraw {
          if (exitTransition == null) {
            exitTransition = SlideExplode().apply {
              duration = TRANSITION_DURATION
              interpolator = transitionInterpolator
            }
          }

          val layoutManager = emailList.layoutManager as LinearLayoutManager
          layoutManager.findViewByPosition(tapPosition)?.let { view ->
            view.getGlobalVisibleRect(viewRect)
            (exitTransition as Transition).epicenterCallback =
                object : Transition.EpicenterCallback() {
                  override fun onGetEpicenter(transition: Transition) = viewRect
                }
          }

          startPostponedEnterTransition()
        }
    }
  }
}
...
override fun onSaveInstanceState(outState: Bundle) {
  super.onSaveInstanceState(outState)
  outState.putInt(TAP_POSITION, tapPosition)
}
6: Xử lý Activity destroyed và xử lý death
Trong thiết lập của chúng tôi, dữ liệu email sẽ tự động được fetched khi EmailListFragment được tạo lại sau khi Activity bị destroyed or process death nên không cần phải thực hiện nhiều.
is InProgress -> {
  ...
  (view?.parent as? ViewGroup)?.doOnPreDraw {
    startPostponedEnterTransition()
  }
}
7: Đánh bóng các transition
Có nhiều cách để đánh bóng nó. Ví dụ là làm mờ dần (fade) các chi tiết trong khi nó được mở rộng, tương tự như những gì Inbox app làm. Có thể làm bằng cách:
class EmailDetailsFragment : Fragment() {
  ...
  override fun onViewCreated(view: View, savedState: Bundle?) {
    super.onViewCreated(view, savedState)

    val content = view.findViewById<View>(R.id.content).also { it.alpha = 0f }

    ObjectAnimator.ofFloat(content, View.ALPHA, 0f, 1f).apply {
      startDelay = 50
      duration = 150
      start()
    }
  }
}
All rights reserved