Implement App Shortcuts trong Android
Bài đăng này đã không được cập nhật trong 4 năm
Với mỗi phiên bản của Android, có vô số chức năng mới được thêm vào và Android Nougat 7.1 cũng không phải là ngoại lệ. 1 trong những tính năng được thêm vào trong bản này là App Shortcuts. App Shortcuts cho phép người dùng có thể truy cập trực tiếp các action trong ứng dụng của bạn ngay từ launcher bằng cách long press vào icon của ứng dụng. Người dùng cũng có thể ghim các shortcut này vào home screen để có thể truy cập nhanh hơn nữa. Trong tutorial này chúng ta sẽ tìm hiểu cách để cải thiện UX bằng cách implement App Shortcuts cho ứng dụng của bạn.
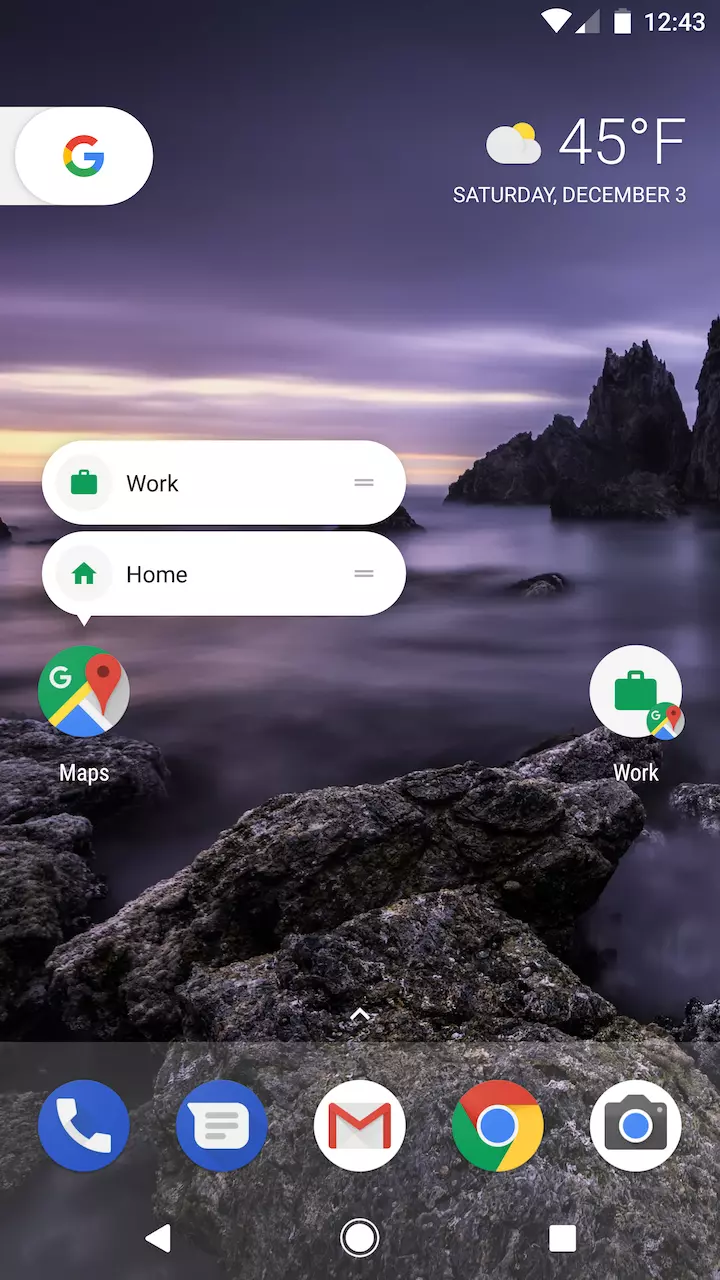
App shortcuts được hiện lên khi long press vào Google Maps. Ở bên phải thì tôi đã ghim phím tắt Work vào màn hình home. Ấn vào phím tắt Work sẽ mở chức năng dẫn đường đến nơi làm việc từ vị trí hiện tại của bạn.
Điều đầu tiên mà bạn nên biết trước khi implement App Shortcuts đó là có 2 kiểu shortcut: động và tĩnh. Shortcut tĩnh được generate từ file XML mà bạn tạo ra. Điều đó có nghĩa là nó chỉ được update khi người dùng update app của bạn. Mặt khác, shortcut tĩnh có thể được tạo ra và hủy bỏ ở runtime, tạo điều kiện cho bạn có thể hiện những shortcut khác nhau tùy thuộc vào tần suất sử dụng.
Shortcut tĩnh
Kiểu shortcut đầu tiên mà chúng ta sẽ implement là shortcut tĩnh. Trong AndroidManifest.xml, chúng ta phải add vài metadata cho activity launcher của bạn, nhưng trong thực tế thì bất cứ 1 activity nào có intent filter với action là android.intent.action.MAIN và category là android.intent.category.LAUNCHER đều được. Trong file manifest của tôi, tôi đã thêm tag <meta-data> vào launcher activity của tôi là MainActivity. Thuộc tính name sẽ được đặt là android.app.shortcuts và thuộc tính resource đặt là @xml/shortcuts.
<?xml version="1.0" encoding="utf-8"?>
<manifest xmlns:android="http://schemas.android.com/apk/res/android"
  package="com.orobator.konstellations">

  <application
    android:name=".KonstellationsApplication"
    android:allowBackup="true"
    android:icon="@drawable/app_icon"
    android:label="@string/app_name"
    android:supportsRtl="true"
    android:theme="@style/AppTheme">
    <activity android:name=".MainActivity">
      <intent-filter>
        <action android:name="android.intent.action.MAIN"/>

        <category android:name="android.intent.category.LAUNCHER"/>
      </intent-filter>

      <meta-data
        android:name="android.app.shortcuts"
        android:resource="@xml/shortcuts"/>
    </activity>
    <activity
      android:name=".ConstellationDetailActivity"
      android:parentActivityName=".MainActivity"
      android:theme="@style/DetailTheme">
    </activity>
  </application>

</manifest>
Giờ thì chúng ta sẽ tạo những file định nghĩa shortcuts. Tôi đã tạo file của mình ở res/xml-v25/shortcuts.xml. Sở dĩ tôi cho vào xml-v25 là do tính năng này chỉ có từ API 25 trở lên. Bạn có thể xem nội dung file dưới đây:
<?xml version="1.0" encoding="utf-8"?>
<shortcuts xmlns:android="http://schemas.android.com/apk/res/android">
  <shortcut
    android:enabled="true"
    android:icon="@drawable/random_constellation"
    android:shortcutDisabledMessage="@string/shortcut_disabled_message"
    android:shortcutId="random_constellation"
    android:shortcutLongLabel="@string/shortcut_long_label"
    android:shortcutShortLabel="@string/shortcut_short_label">
    <!-- Each one of these intents needs an android:action, even if you don't
         do anything with it. Otherwise you're in for a crash! -->
    <intent
      android:action="android.intent.action.VIEW"
      android:targetClass="com.orobator.konstellations.MainActivity"
      android:targetPackage="com.orobator.konstellations"/>
    <intent
      android:action="RANDOM"
      android:targetClass="com.orobator.konstellations.ConstellationDetailActivity"
      android:targetPackage="com.orobator.konstellations"/>
    <!-- If your shortcut is associated with multiple intents, include them
         here. The last intent in the list is what the user sees when they
         launch this shortcut. The previous intents will be put on the backstack -->
    <!-- You can also specify the category of the shortcut via the <categories>
         tag. As of this writing, the only supported category is
         android.shortcut.conversation, and can be specified using android:name
         like so: -->
    <!-- <categories android:name="android.shortcut.conversation"/> -->

  </shortcut>

</shortcuts>
Như bạn có thể thấy, file này cần có root tag là <shortcuts>, sau đó bạn có thể thêm tag <shortcut> (không có s) để thêm 1 shortcut. Android chỉ cho phép bạn có max là 5 shortcut, nhưng document Android khuyên bạn nên có 4 shortcut, thuộc kiểu động hay tĩnh thì tùy bạn. Hãy cùng xem những thuộc tính của tag <shortcut>.
android:enabled là 1 biến boolean thể hiện shortcut này có được enable không. Nếu disable, shortcut này sẽ không xuất hiện trong danh sách shortcut khi người dùng long press vào app icon ở launcher của họ. Thêm nữa, nếu shortcut này đã được ghim vào màn hình home screen từ trước đó, nó sẽ bị bôi xám đi, và 1 thông báo lỗi sẽ xuất hiện khi người dùng ấn vào nó. Thông báo mặc định là "Shortcut này không khả dụng", nhưng bạn cũng có thể override nó bằng cách dùng android:shortcutDisabledMessage và cung cấp 1 string resource.
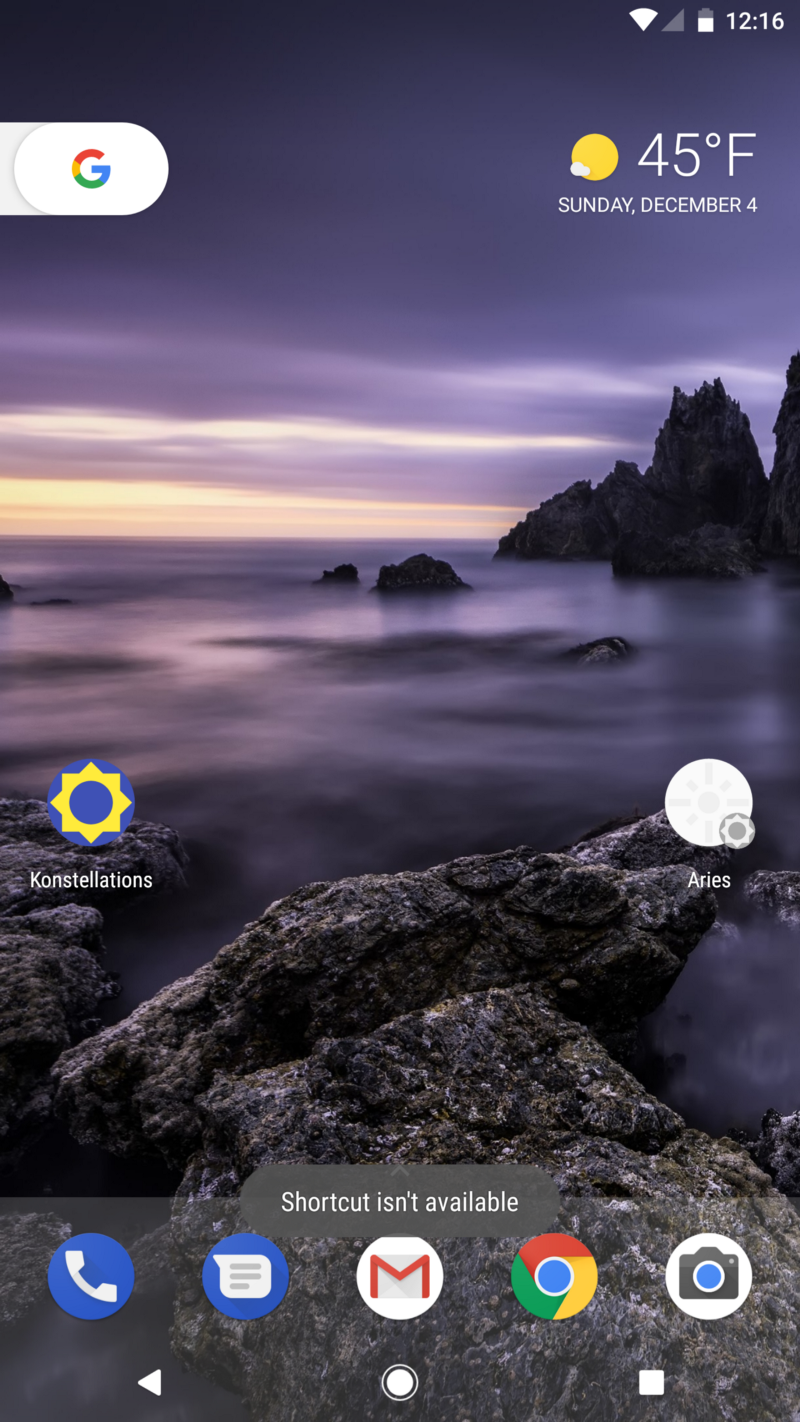
Shortcut Aries bị disable, và Toast sẽ xuất hiện thông báo là nó không khả dụng khi được ấn vào.
Dùng android:icon để cung cấp 1 icon cho shortcut của bạn. Tôi khuyên bạn nên theo design guideline khi sử dụng icon để mang đến cho người dùng trải nghiệm nhất quán qua những ứng dụng khác nhau. Về cơ bản thì, bạn sẽ cần 1 vòng tròn với size là 48dp x 48dp với nền là Material Grey 100 (#F5F5F5). Sau đó thì cho 1 icon với size 24dp x 24dp vào giữa vòng tròn đó, thế là xong.
Mỗi shortcut cần có 1 android:id độc nhất để Android có thể nhận ra chúng.
Cả android:shortcutLongLabel và android:shortcutShortLabel là label được hiển thị cho người dùng để thể hiện tên của shortcut. Nó được khuyến khích là bạn nên có ít hơn 10 kí tự cho short label và 25 cho long label. Android sẽ tự chọn label thích hợp tùy thuộc vào số không gian đang có sẵn, nhưng tôi thấy thì short label thường được dùng khi đặt trong home screen. Long label sẽ được dùng khi có khoảng trống trong menu của app shortcut.
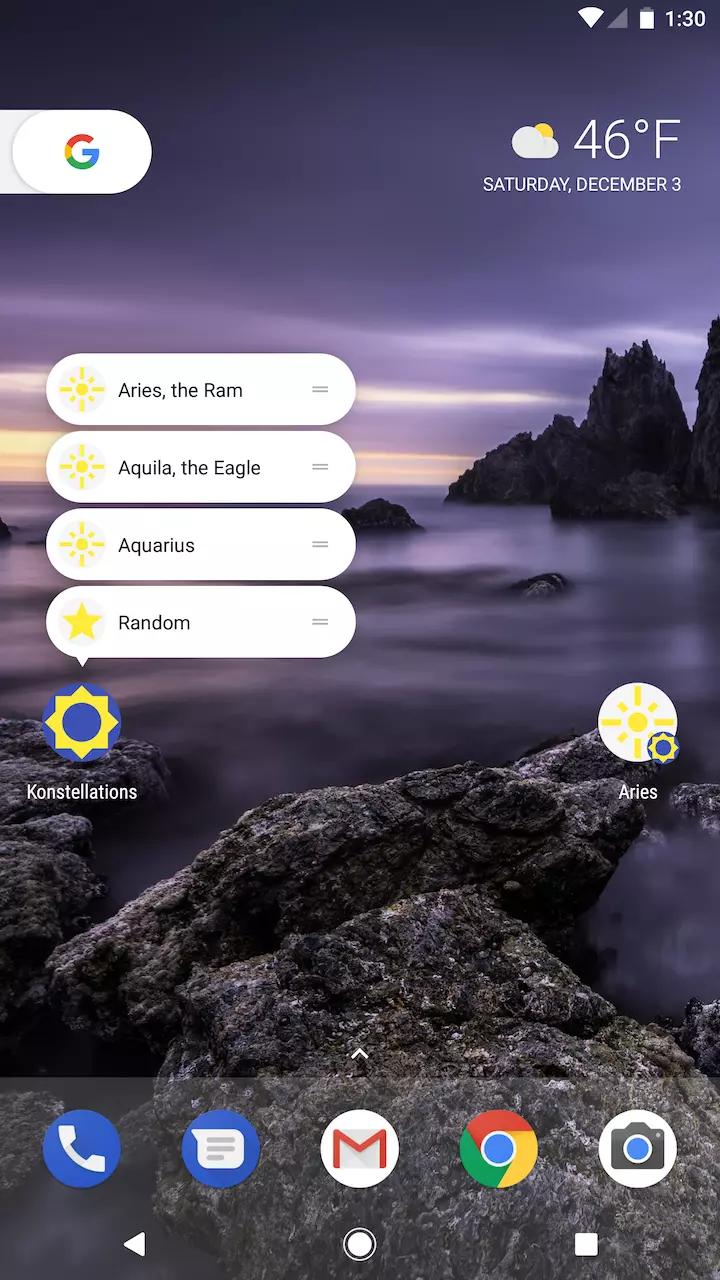
Bạn có thể nhận thấy là shortcut sử dụng long label “Aries, the Ram” cho shortcut menu, nhưng lại dùng short label “Aries” khi được ghim.
Mỗi tag <shortcut> cần có ít nhất 1 tag <intent> để quy định activity nào sẽ được chạy khi shortcut được nhấn vào. Thuộc tính android:action là bắt buộc, kể cả khi bạn không cần 1 action nào. Nếu bạn không quy định 1 action, tôi gợi ý là bạn có thể dùng android.intent.action.VIEW mặc dù string thật sự mà bạn dùng cũng không có vấn đề gì. Bạn có thể thêm nhiều tag <intent> trong 1 tag <shortcut>. Android sẽ xử lý bằng cách gọi đến tag <intent> cuối cùng, và đưa các <intent> khác vào trong backstack. Bạn cũng có thể quy định category của shortcut bằng tag <categories>, nhưng đến thời điểm này thì category duy nhất được support là android.shortcut.conversation. Tôi nghĩ là cái này chỉ hữu dụng với các app nhắn tin.
Shortcut động
Như tên gọi của nó thì shortcut động là những shortcut có thể được chỉnh sửa ở runtime mà không cần phải update hay triển khai lại app của bạn. Chắc bạn cũng có thể đoán được là shortcut này không được định nghĩa bởi 1 resource tĩnh (shortcuts.xml) như là shortcut tĩnh, mà sẽ được tạo ra bằng code.
Để thêm shortcut động vào app của bạn, trước tiên chúng ta cần phải sử dụng ShortcutManager và ShortcutInfo.Builder.
@Override
protected void onCreate(Bundle savedInstanceState) {

    ...

    ShortcutManager shortcutManager = getSystemService(ShortcutManager.class);

    ShortcutInfo webShortcut = new ShortcutInfo.Builder(this, "shortcut_web")
            .setShortLabel("catinean.com")
            .setLongLabel("Open catinean.com web site")
            .setIcon(Icon.createWithResource(this, R.drawable.ic_dynamic_shortcut))
            .setIntent(new Intent(Intent.ACTION_VIEW, Uri.parse("https://catinean.com")))
            .build();

    shortcutManager.setDynamicShortcuts(Collections.singletonList(webShortcut));
}
Ở đây chúng ta lấy ra shortcutManager và setup 1 ShortcutInfo. Bằng việc sử dụng ShortcutInfo.Builder chúng ta có thể set các thuộc tính khác nhau cho shortcut mà chúng ta muốn tạo. Tất cả các hàm builder chúng ta dùng ở trên có những thuộc tính giống với shortcut tĩnh nên tôi sẽ không giaỉ thchs lại nữa. Tuy nhiên, có 1 thuộc tính có hơi bị ẩn đi, đó là id của shortcut mà đã được định nghĩa là parameter thứ 2 trong constructor của StaticInfo.Builder (shortcut_web). Tôi đã định nghĩa Intent sẽ mở ra website của tôi. Cuối cùng thì set shortcut động cho ShortcutManager. Hãy xem những shortcut của chúng ta nhìn như thế nào:
Giờ đây chúng ta đã có 2 shortcut trong app, 1 tĩnh và 1 động.
Hãy thử thêm 1 cái nữa trỏ đến activity trong app và xem cách để chúng ta tạo backstack cho nó:
@Override
protected void onCreate(Bundle savedInstanceState) {

    ...

    ShortcutInfo dynamicShortcut = new ShortcutInfo.Builder(this, "shortcut_dynamic")
            .setShortLabel("Dynamic")
            .setLongLabel("Open dynamic shortcut")
            .setIcon(Icon.createWithResource(this, R.drawable.ic_dynamic_shortcut_2))
            .setIntents(
                    new Intent[]{
                            new Intent(Intent.ACTION_MAIN, Uri.EMPTY, this, MainActivity.class).setFlags(Intent.FLAG_ACTIVITY_CLEAR_TASK),
                            new Intent(DynamicShortcutActivity.ACTION)
                    })
            .build();

    shortcutManager.setDynamicShortcuts(Arrays.asList(webShortcut, dynamicShortcut));
}
Bạn có thể thấy rằng chúng ta dùng setIntents() vào builder để build backstack:
- intent đầu tiên tương ứng với MainActivity. Chúng ta quy định 1 flag
FLAG_ACTIVITY_CLEAR_TASKđể có thể bỏ những task đang tồn tại liên quan đến app và làm cho MainActivity thành root activity. - intent thứ 2 tương ứng với DynamicShortcutActivity (là 1 activity rỗng mà tôi đã tạo). Để làm được điều này, chúng ta cần cung cấp 1 intent với action cụ thể đã được định nghĩa như 1 static String trong DynamicShortcutActivity và tương ứng với intent-filter action được định nghĩa trong AndroidManifest.xml cho activity đó.
<activity
      android:name=".DynamicShortcutActivity"
      android:label="Dynamic shortcut activity">
      <intent-filter>
        <action android:name="com.catinean.appshortcutsdemo.OPEN_DYNAMIC_SHORTCUT" />
        <category android:name="android.intent.category.DEFAULT" />
      </intent-filter>
</activity>
Bằng việc khai báo array intent theo thứ tự này, chúng ta đảm bảo rằng khi người dùng ấn back sau khi mở DynamicShortcutActivity qua shortcut mà chúng ta đã tạo, MainActivity sẽ được mở.
Hãy xem nó nhìn như thế nào nhé:
Bài viết được dịch từ Implementing Android App Shortcuts và Exploring Android Nougat 7.1 App Shortcuts.
All rights reserved
