Hướng dẫn tích hợp Spring Framework vào Wicket Framework
Bài đăng này đã không được cập nhật trong 4 năm
Trong các dự án về Web sử dụng Wicket Framework, để việc khởi tạo các component của dự án được thực hiện tự động thì hiện tại có thể tích hợp các framework seasar hoặc spring. Trong bài viết này tôi sẽ trình bày cách tích hợp Wicket + Spring
Để tạo project wicket tự động bạn có thể tham khảo link sau Wicket QuickStart, điều kiện máy của bạn phải cài maven rồi, câu lệnh để tạo 1 project mới
mvn archetype:generate -DarchetypeGroupId=org.apache.wicket -DarchetypeArtifactId=wicket-archetype-quickstart -DarchetypeVersion=7.5.0 -DgroupId=com.mycompany -DartifactId=myproject -DarchetypeRepository=https://repository.apache.org/ -DinteractiveMode=false
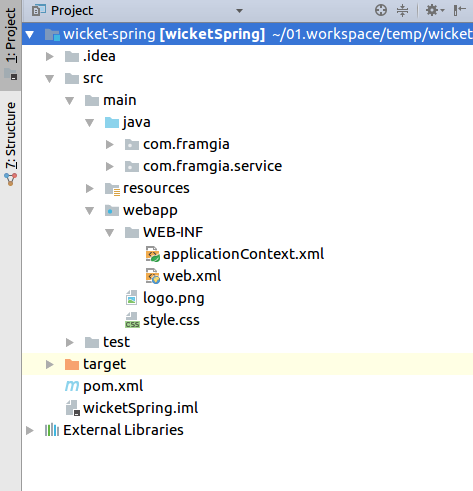
1.Cấu trúc project:
2.Những thư viện sẽ sử dụng trong project
<project>
...
<dependencies>
		<!--  WICKET DEPENDENCIES -->
		<dependency>
			<groupId>org.apache.wicket</groupId>
			<artifactId>wicket-core</artifactId>
			<version>${wicket.version}</version>
		</dependency>
		<!-- OPTIONAL DEPENDENCY
		<dependency>
			<groupId>org.apache.wicket</groupId>
			<artifactId>wicket-extensions</artifactId>
			<version>${wicket.version}</version>
		</dependency>
		-->
		<dependency>
			<groupId>org.apache.wicket</groupId>
			<artifactId>wicket-spring</artifactId>
			<version>${wicket.version}</version>
		</dependency>

		<!-- LOGGING DEPENDENCIES - LOG4J -->
		<dependency>
			<groupId>org.apache.logging.log4j</groupId>
			<artifactId>log4j-slf4j-impl</artifactId>
			<version>${log4j.version}</version>
		</dependency>
		<dependency>
			<groupId>org.apache.logging.log4j</groupId>
			<artifactId>log4j-core</artifactId>
			<version>${log4j.version}</version>
		</dependency>

		<!--  JUNIT DEPENDENCY FOR TESTING -->
		<dependency>
			<groupId>junit</groupId>
			<artifactId>junit</artifactId>
			<version>${junit.version}</version>
			<scope>test</scope>
		</dependency>

		<!--  JETTY DEPENDENCIES FOR TESTING  -->
		<dependency>
			<groupId>org.eclipse.jetty.aggregate</groupId>
			<artifactId>jetty-all</artifactId>
			<version>${jetty9.version}</version>
			<scope>test</scope>
		</dependency>

		<!-- Spring Framework dependency -->
		<dependency>
			<groupId>org.springframework</groupId>
			<artifactId>spring-web</artifactId>
			<version>4.3.4.RELEASE</version>
		</dependency>

		<dependency>
			<groupId>org.springframework</groupId>
			<artifactId>spring-context</artifactId>
			<version>4.3.4.RELEASE</version>
		</dependency>

		<dependency>
			<groupId>org.springframework</groupId>
			<artifactId>spring-core</artifactId>
			<version>4.3.4.RELEASE</version>
		</dependency>

	</dependencies>
</project>
3. Spring Bean
package com.framgia.service;

public interface SampleService {

    String getMsgHello();

}
package com.framgia.service;

import org.springframework.stereotype.Service;

'@Service
public class SampleServiceImpl implements SampleService {

    public String getMsgHello() {
        return "wicket 7.5";
    }

}
Tạo spring bean với anotation @Service, Để tìm hiểu rõ hơn về spring bean bạn có thể tham khảo thêm bên spring framework, khi thêm anotation này vào thì khi ứng dụng được depyloy thì toàn bộ sẽ được scan để khởi tạo
4.Tiêm vào Spring container
Tạo file applicationContext.xml ở nằm webapp/WEB-INF/applicationContext.xml
<beans xmlns="http://www.springframework.org/schema/beans"
       xmlns:xsi="http://www.w3.org/2001/XMLSchema-instance"
       xmlns:context="http://www.springframework.org/schema/context"
       xsi:schemaLocation="http://www.springframework.org/schema/beans
http://www.springframework.org/schema/beans/spring-beans-3.0.xsd
http://www.springframework.org/schema/context
http://www.springframework.org/schema/context/spring-context-3.0.xsd">

    <!-- Thực hiện auto scan component ở đây -->
    <context:component-scan base-package="com.framgia.service" />

</beans>
5.Tích hợp wicket với spring
Trong class khởi tạo Application của wicket, trong method init
package com.framgia;

import org.apache.wicket.markup.html.WebPage;
import org.apache.wicket.protocol.http.WebApplication;
import org.apache.wicket.spring.injection.annot.SpringComponentInjector;

public class WicketApplication extends WebApplication {
    /**
     * @see org.apache.wicket.Application#getHomePage()
     */
    @Override
    public Class<? extends WebPage> getHomePage() {
        return HomePage.class;
    }

    /**
     * @see org.apache.wicket.Application#init()
     */
    @Override
    public void init() {
        super.init();

        // Đăng ký spring framework.
        getComponentInstantiationListeners().add(new SpringComponentInjector(this));
    }
}
Trong file web.xml
<?xml version="1.0" encoding="ISO-8859-1"?>
<web-app xmlns="http://java.sun.com/xml/ns/j2ee" xmlns:xsi="http://www.w3.org/2001/XMLSchema-instance"
		 xsi:schemaLocation="http://java.sun.com/xml/ns/j2ee http://java.sun.com/xml/ns/j2ee/web-app_2_4.xsd"
		 version="2.4">
	<display-name>Wicket Web Application</display-name>

	<filter>
		<filter-name>wicket.wicketTest</filter-name>
		<filter-class>org.apache.wicket.protocol.http.WicketFilter</filter-class>
		<init-param>
			<param-name>applicationClassName</param-name>
			<param-value>com.framgia.WicketApplication</param-value>
		</init-param>
	</filter>

	<filter-mapping>
		<filter-name>wicket.wicketTest</filter-name>
		<url-pattern>/*</url-pattern>
	</filter-mapping>

	<!--Đăng ký spring framework.-->
	<listener>
		<listener-class>org.springframework.web.context.ContextLoaderListener</listener-class>
	</listener>

</web-app>
6.Sử dụng service đã được khởi tạo
package com.framgia;

import com.framgia.service.SampleService;
import org.apache.wicket.request.mapper.parameter.PageParameters;
import org.apache.wicket.markup.html.basic.Label;
import org.apache.wicket.markup.html.WebPage;
import org.apache.wicket.spring.injection.annot.SpringBean;

public class HomePage extends WebPage {
	private static final long serialVersionUID = 1L;

	'@SpringBean
	private SampleService helloService;

	public HomePage(final PageParameters parameters) {
		super(parameters);

		add(new Label("version", helloService.getMsgHello()));

    }
}
Chỉ cần thêm @SpringBean trước biến service trong mỗi Page của wicket và sử dụng, vì component đó đã được scan và khởi tao trước đó.
Trên là ví dụ đơn giản về cách tích hợp wicket và spring, source code bạn có thể down về từ đây wicket-spring
All rights reserved
