Hướng dẫn tạo app tvOS với TVML
Bài đăng này đã không được cập nhật trong 4 năm
Chào các bạn ,hôm nay tôi sẽ hướng dẫn các bạn tạo một ứng dụng tvOS sử dụng TMVL .
Để làm theo hướng dẫn này các bạn cần có xCode 7.1 trở lên , bạn có thể tải nó ở đây https://developer.apple.com/xcode/download/ . Bạn cũng nên có một vài kiến thức về JavaScript thì càng tốt không thì cứ làm theo từng bước hướng dẫn cũng được .
Choose Your Adventure
Có hai cách để tạp ra một ứng dụng tvOS :
- TVML apps: sử dụng một quá trình hoàn toàn mới gồm TVML, TVJS và TVMLKit.
- Custom Apps: sử dụng iOS quen thuộc và các khái niệm mà bạn biết và yêu mến từ trước như Storyboards, UIKit và Autolayout.
Bạn có thể chọn một trong hai cách để tạo ứng dụng tvOS tuỳ bạn thích nhưng theo tôi cách thứ nhất là dễ dàng hơn .Và dưới đây là lý do tại sao tôi chọn sử dụng TVML :
What is TVML?
phương pháp này sử dụng thông qua TVML, TVJS, và TVMLKit. dưới đây là giải thích của những từ viết tắt trên :
- TVML là một dạng XML và là viết tắt của "Television Markup Language".
- TVJS là tập hợp các API JavaScript cung cấp cho bạn các phương tiện để hiển thị các ứng dụng tạo ra với TVML.
- TVMLKit là cái để kết nối giữa TVML, JavaScript, và ứng dụng tvOS của bạn.
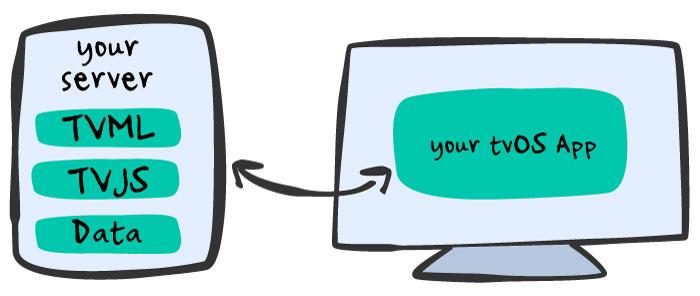
Nếu bạn là một nhà phát triển iOS cũ bạn có thể có một chút khó hiểu và không thích. Nhưng hãy giữ một tâm trí cởi mở, có một số điều tuyệt vời sẽ nhận được. Dưới đây là một trường hợp sử dụng rất điển hình cho các ứng dụng trên Apple TV. Hãy xem xét những điều sau đây: có nội dung trên một máy chủ và bạn muốn hiển thị nội dung cho người dùng. Nội dung của bạn được tổ chức theo một định hướng và nó phải là trực quan và quen thuộc. Bạn muốn ứng dụng tvOS của bạn để nhìn thấy như ở nhà với các ứng dụng khác.
Tóm lại:
- Nên thực hiện một App TVML nếu bạn chủ yếu cung cấp các menu nội dung, đặc biệt là nếu bạn đã có một máy chủ thiết lập.
- Nên thực hiện một Custom apps nếu bạn đang nhằm cung cấp một app hoàn toàn nhập vai trong ứng dụng của bạn, nơi mà người dùng của bạn sẽ dành nhiều thời gian tương tác với giao diện thay vì thụ động xem hoặc nghe nội dung.
Bắt đầu thực hiện
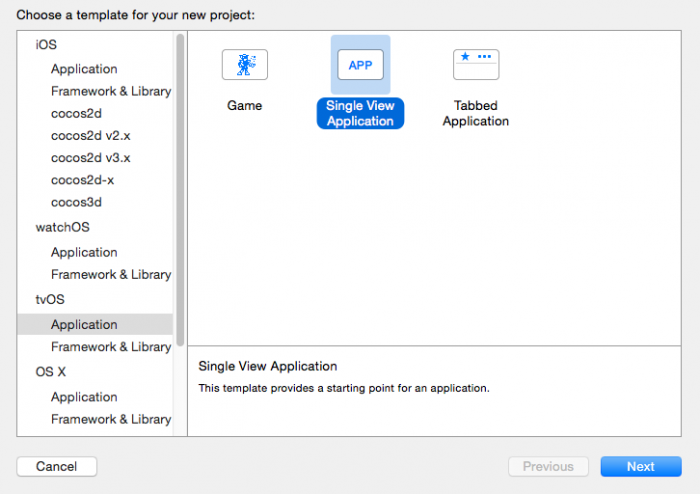
Đầu tiên hãy chắc chắn bạn đã có xCode 7 , nếu không bạn phải cài nó vào máy trước . Tiếp theo vào File\New\Project và chọn tvOS\Application\Single View Application template, sau đó click Next:
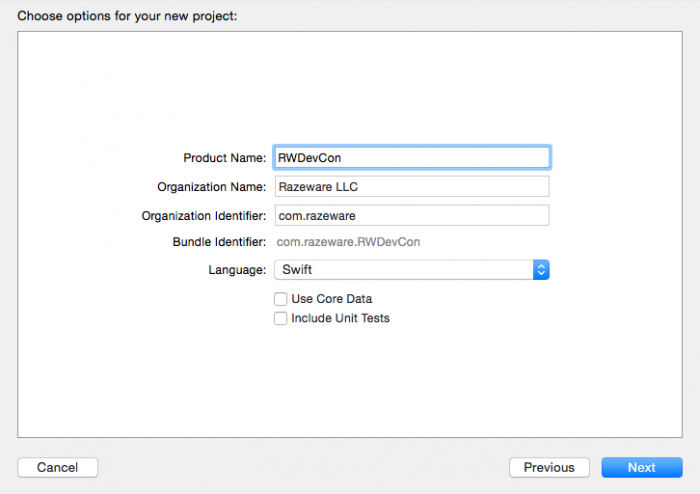
nhập tên app RWDevCon, chọn ngôn ngữ Swift, chắc chắn là cả hai được đánh dấu, và nhấn Next:
Chọn một thư mục để lưu project của bạn và nhấp vào Lưu. Xcode sẽ tạo ra một project và tạo sẵn cho bạn một Storyboard ( bạn sẽ sử dụng nếu bạn tạo một ứng dụng tvOS Custom). Tuy nhiên, bạn sẽ không cần điều đó vì bạn đang làm cho một ứng dụng TVMP, trong đó sử dụng các tập tin XML để hiển thị giao diện người dùng chứ không phải là một Storyboard . Vì vậy, xóa Main.storyboard và ViewController.swift từ dự án của bạn và chọn Di chuyển vào Thùng rác. Tiếp theo, đi vào Info.plist và loại bỏ các tập tin Main storyboard. Cuối cùng thêm một giá trị mới vào App Transport Security Settings và là con của nó là Allow Arbitrary Loads, và thiết lập giá trị là YES.

Loading your TVML
Vòng đời của ứng dụng tvOS bắt đầu với các appdelegate. Ở đây, bạn sẽ thiết lập TV ApplicationController để vượt qua kiểm soát và bối cảnh ứng dụng vào các tập tin JavaScript. Mở AppDelegate.swift và làm như sau:
- xoá tất cả method
- Import TVMLKit
- TVApplicationControllerDelegate
Tại thời điểm này tập tin của bạn sẽ trông giống như sau:
import UIKit
import TVMLKit

@UIApplicationMain
class AppDelegate: UIResponder, UIApplicationDelegate, TVApplicationControllerDelegate {

  var window: UIWindow?

}
Tiếp theo ta thêm các biến như sau :
var appController: TVApplicationController?
static let TVBaseURL = "http://localhost:9001/"
static let TVBootURL = "\(AppDelegate.TVBaseURL)js/application.js"
TVApplicationController là một lớp trong TVMLKit nó giao tiếp với máy chủ của bạn. Baseurl và TVBoot URL chứa các đường dẫn cho máy chủ của bạn và mã JavaScript, nhờ đó bạn sẽ được chạy trên localhost của bạn sau này. Tiếp theo, thêm các hàm sau đây vào class:
func application(application: UIApplication, didFinishLaunchingWithOptions launchOptions: [NSObject: AnyObject]?) -> Bool {
  window = UIWindow(frame: UIScreen.mainScreen().bounds)

  // 1
  let appControllerContext = TVApplicationControllerContext()

  // 2
  guard let javaScriptURL = NSURL(string: AppDelegate.TVBootURL) else {
    fatalError("unable to create NSURL")
  }
  appControllerContext.javaScriptApplicationURL = javaScriptURL
  appControllerContext.launchOptions["BASEURL"] = AppDelegate.TVBaseURL

  // 3
  appController = TVApplicationController(context: appControllerContext, window: window, delegate: self)
  return true
}
Ở đây bạn tạo ra một TVApplicationControllerContext , cái mà bạn sẽ sử dụng để khởi tạo TVApplicationController ,bạn cứ nghĩ nó như là một đối tượng đơn giản chứa thông tin URL server của bạn .Bạn điền vào đó hai thông tin :đường dẫn tới file javascript chính và thư mục gốc server của bạn .
The JavaScript
Trong ứng dụng tvOS client-server, mã JavaScript của bạn thường được chứa trong các server ứng dụng bạn kết nối đến. Với mục đích của hướng dẫn này, bạn sẽ thiết lập một máy chủ đơn giản trên máy Mac của bạn.
Client Code
Để thuận tiện ta sẽ đặt file javascript ở Desktop của bạn . Trong thư mục Desktop bạn tạo ra một thư mục và đặt tên là client . Trong thư mục khách hàng tạo một thư mục mới và đặt tên là js . Thư mục này sẽ phục vụ như là container cho các tập tin javascript của bạn . Với IDE bất kỳ của bạn, hãy tạo ra một tập tin JavaScript mới, đặt tên nó application.js và lưu nó vào thư mục js của bạn. Thêm phần sau đây vào application.js
App.onLaunch = function(options) {
  // 1
  var alert = createAlert("Hello World", ""); //leaving 2nd parameter with an empty string
  navigationDocument.presentModal(alert);
}

// 2
var createAlert = function(title, description) {
  var alertString = `<?xml version="1.0" encoding="UTF-8" ?>
    <document>
      <alertTemplate>
        <title>${title}</title>
        <description>${description}</description>
      </alertTemplate>
    </document>`
    var parser = new DOMParser();
    var alertDoc = parser.parseFromString(alertString, "application/xml");
    return alertDoc
}
Setting up the Server
Bạn mở Terminal lên và làm theo như sau :
cd ~/Desktop/client
python -m SimpleHTTPServer 9001
Điều này bắt đầu thiết lập một máy chủ web Python đơn giản dựa trên những gì bạn đã tạo bên trong thư mục client của bạn. Quay trở lại với dự án Xcode của bạn và build và run app. Bạn nhìn thấy được chào đón với ứng dụng tvOS TVML đầu tiên của bạn!
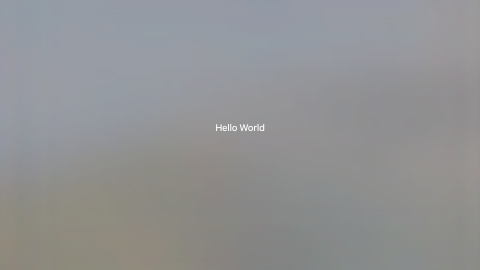
Before moving forward, I’d like to spend time to appreciate the work you’ve done so far. You created a TVApplicationController. This manages the JavaScript code. You created and attached a TVApplicationControllerContext to the TVApplicationController. The context had launchOptions that was populated with our BASEURL which contained the URL to the server. This context is also where the app finds out which server to connect to. Control is passed to the JavaScript code. App.onLaunch kicks in and you returned a TVML alert template to present “Hello World” to the screen. Note that even though you are running on your local web server, you could have put this on a live web server instead – perhaps hooked up to a database. Cool, eh?
Trước khi tiếp tục , ta tóm tắt lại một vài thứ đã hoàn thành được :
- bạn đã tạo TVApplicationController , cái này để quản lý javascript code của bạn .
- bạn đã tạo ra và attached một TVApplicationControllerContext tới TVApplicationController . cái này dùng để tìm server và connect tới nó .
- tạo ra một mã javascript để hiển thị lên dòng "Hello World" trên màn hình .
Crafting the TVML
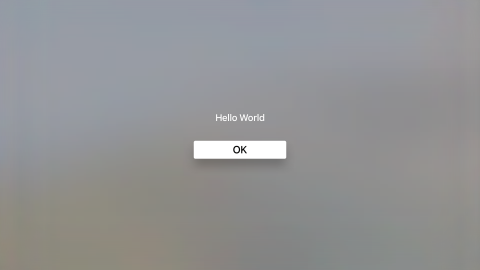
As I’ve pointed out before, createAlert is a function that returns a TVML document. There are many more properties we can manipulate in a TVML document, and as an experiment, you’ll add a button to the current alertTemplate. Head back to your JavaScript code, and take a look at your current implementation of createAlert. Add a button to the template:
như tôi đã nói, createAlert là một hàm trả về một TVML document . Có nhiều thứ chúng ta có thể tạo ra trong một TVML document , và để thử nghiệm bạn sẽ thêm vào một nút bấm vào alert hiện tại :
var alertString = `<?xml version="1.0" encoding="UTF-8" ?>
  <document>
    <alertTemplate>
      <title>${title}</title>
      <description>${description}</description>
      <button>
        <text>OK</text>
      </button>
    </alertTemplate>
  </document>`
Ok , giờ chạy lên bạn sẽ thấy màn hình như thế này :
Fleshing out the JavaScript Client
Trong phần này, bạn sẽ dành nhiều thời gian thiết kế logic vào các lớp học khác nhau cho khả năng sử dụng tốt hơn. Tạo một tập tin JavaScript mới trong thư mục client của bạn \ js đặt tên Presenter.js. Trong tập tin này, bạn sẽ khai báo các Presenter class sẽ xử lý chuyển hướng stack. Lớp này sẽ chịu trách nhiệm của popping và navigation tài liệu, và làm việc xử lý sự kiện. Thêm dòng sau vào Presenter.js:
var Presenter = {
  // 1
  makeDocument: function(resource) {
    if (!Presenter.parser) {
      Presenter.parser = new DOMParser();
    }
    var doc = Presenter.parser.parseFromString(resource, "application/xml");
    return doc;
  },
  // 2
  modalDialogPresenter: function(xml) {
    navigationDocument.presentModal(xml);
  },

  // 3
  pushDocument: function(xml) {
    navigationDocument.pushDocument(xml);
  },
}
sửa lại đoạn mã lúc ban đầu như sau :
App.onLaunch = function(options) {
  // 1
  var javascriptFiles = [
    `${options.BASEURL}js/Presenter.js`
  ];
  // 2
  evaluateScripts(javascriptFiles, function(success) {
    if(success) {
      var alert = createAlert("Hello World!", "");
      Presenter.modalDialogPresenter(alert);
    } else {
      // 3 Handle the error CHALLENGE!//inside else statement of evaluateScripts.
    }
  });
}
Building the Catalog Template
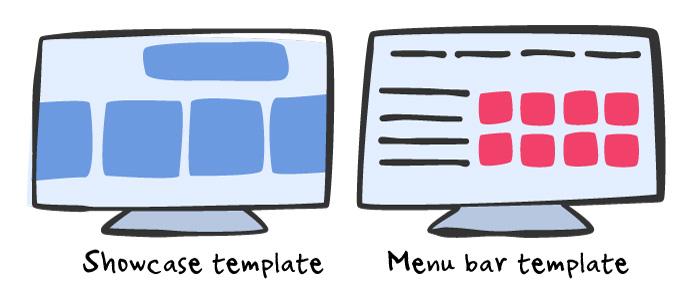
catalogTemplate là một một trong 18 mẫu có sẵn cho các nhà phát triển để sử dụng. Mục đích của Template là để hiển thị thông tin về các nhóm sản phẩm, sẽ là hoàn hảo cho trưng bày video RWDevCon yêu thích của bạn! Danh mục Template có nhiều yếu tố quan tâm:
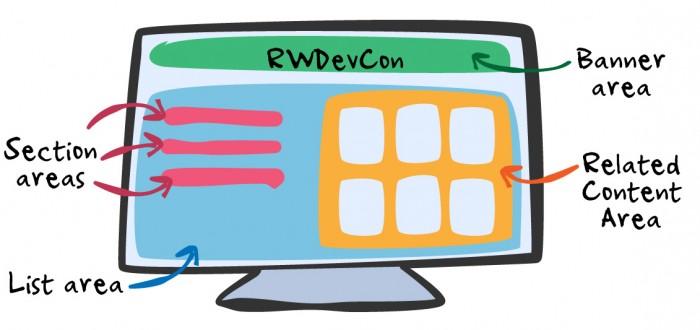
Compound and Simple Elements
Các yếu tố biểu ngữ được sử dụng để hiển thị thông tin dọc theo phía trên của trang mẫu ứng dụng. Nó chính là một Compound Element, có nghĩa là nó bao gồm một số yếu tố đơn giản.
Hãy tạo ra các thư mục sau trong thư mục client của bạn :
You’ll need images to populate the cells in our template. I’ve prepared the images for you: download them, unzip the file, and move the images to the images folder you’ve just created. Now, you’re going to display the images on screen! Create a new JavaScript file, name it RWDevConTemplate.xml.js, and save it in the templates folder.
Bạn sẽ cần các hình ảnh trong những ô template .Bạn hãy copy những ảnh cần dùng vào trong tệp images . Bây giờ bạn cần hiển thị một hình ảnh trên màn hình . Tạo một fila javascript mới có tên là RWDevConTemplate.xml.js và lưu nó vào thư mục template :
var Template = function() { return `<?xml version="1.0" encoding="UTF-8" ?>
  <document>
    <catalogTemplate>
      <banner>
        <title>RWDevConHighlights</title>
      </banner>
    </catalogTemplate>
  </document>`
}
Để bây giờ, chúng tôi sẽ cố gắng để hiển thị các biểu ngữ của các mẫu. Chúng ta cần một cách để cho các tập tin khác biết về sự tồn tại của nó. Đây là lúc để tạo ra tập tin JavaScript cuối cùng : Resource Loader.js!
ResourceLoader
Bạn hãy tạo một file javascript tên là ResourceLoader.js và lưa nó và thư mục js của bạn .Sau đó thêm đoạn mã sau vào :
function ResourceLoader(baseurl) {
  this.BASEURL = baseurl;
}

ResourceLoader.prototype.loadResource = function(resource, callback) {
  var self = this;
  evaluateScripts([resource], function(success) {
    if(success) {
      var resource = Template.call(self);
      callback.call(self, resource);
    } else {
      var title = "Resource Loader Error",
          description = `Error loading resource '${resource}'. \n\n Try again later.`,
          alert = createAlert(title, description);
      navigationDocument.presentModal(alert);
    }
  });
}
Đừng lo lắng quá nhiều về cách làm việc này; chỉ cần biết rằng bạn có thể sử dụng để tải các tập tin mẫu khác. Hãy thử nó ra bằng cách thay thế màn hình "Hello World" với RWDevConTemplate như màn hình chính. Mở application.js và thực hiện những thay đổi sau đây vào tập tin:
// 1
var resourceLoader;

App.onLaunch = function(options) {
  // 2
  var javascriptFiles = [
    `${options.BASEURL}js/ResourceLoader.js`,
    `${options.BASEURL}js/Presenter.js`
  ];

  evaluateScripts(javascriptFiles, function(success) {
    if(success) {
      // 3
      resourceLoader = new ResourceLoader(options.BASEURL);
      resourceLoader.loadResource(`${options.BASEURL}templates/RWDevConTemplate.xml.js`, function(resource) {
        var doc = Presenter.makeDocument(resource);
        Presenter.pushDocument(doc);
      });
    } else {
      var errorDoc = createAlert("Evaluate Scripts Error", "Error attempting to evaluate external JavaScript files.");
      navigationDocument.presentModal(errorDoc);
    }
  });
}

// Leave createAlert alone
Bạn đã thực hiện 3 thay đổi ở đây: Khai báo một biến resourceLoader. Thêm ResourceLoader.js vào danh sách các tập tin. Sử dụng resourceLoader để tải các mẫu TVML, và sử dụng các Presenter để trình bày nó trên màn hình.
build và chạy. Bạn sẽ thấy màn hình sau:

Xin chúc mừng, bạn đã có thể tải HTML từ một tập tin, chứ không phải là hard-coding từ Javascript của bạn!
Craft Some More TVML
sửa nội dung file RWDevConTemplate.xml.js như sau :
var Template = function() { return `<?xml version="1.0" encoding="UTF-8" ?>
  <document>
    <catalogTemplate>
      <banner>
        <title>RWDevConHighlights</title>
      </banner>
      //add stuff here
      //1.
      <list>
        <section>
          //2.
	  <listItemLockup>
	    <title>Inspiration Videos</title>
	    <decorationLabel>13</decorationLabel>
	  </listItemLockup>
        </section>
      </list>
    </catalogTemplate>
  </document>`
}
- Bạn đã xác định danh sách các khu vựa, trong đó bao gồm phần còn lại của nội dung của màn hình.
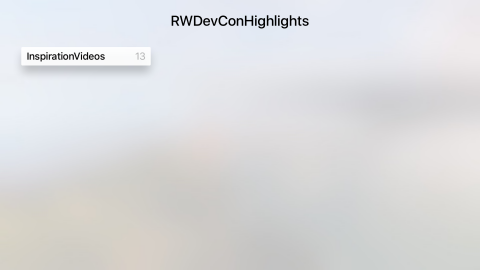
- listItemLockup đại diện cho một section cell. Mỗi cell được định nghĩa bởi một thẻ listItemLockup. Bạn đã set title là "Inspiration Videos", và bổ sung thêm một con số bên cạnh nó để cho biết số lượng các mục bạn sẽ hiển thị cho phần này. build và chạy, bạn sẽ thấy màn hình sau đây trên giả lập:
Completing the Template
sửa file RWDevConTemplate.xml.js để tạo một danh sách video:
//This file outlines the catalogTemplate.
var Template = function() { return `<?xml version="1.0" encoding="UTF-8" ?>
  <document>
    <catalogTemplate>
      <banner>
        <title>RWDevConHighlights</title>
      </banner>
      <list>
        <section>
	  <listItemLockup>
	    <title>Inspiration Videos</title>
	    <decorationLabel>13</decorationLabel>
            //1. add from here
	    <relatedContent>
	      <grid>
	        <section>
                  //2
		  <lockup videoURL="http://www.rwdevcon.com/videos/Ray-Wenderlich-Teamwork.mp4">
		    <img src="${this.BASEURL}images/ray.png" width="500" height="308" />
		  </lockup>
		  <lockup videoURL="http://www.rwdevcon.com/videos/Ryan-Nystrom-Contributing.mp4">
		    <img src="${this.BASEURL}images/ryan.png" width="500" height="308" />
		  </lockup>
	          <lockup videoURL="http://www.rwdevcon.com/videos/Matthijs-Hollemans-Math-Isnt-Scary.mp4">
		    <img src="${this.BASEURL}images/matthijs.png" width="500" height="308" />
		  </lockup>
		  <lockup videoURL="http://www.rwdevcon.com/videos/Vicki-Wenderlich-Identity.mp4">
		    <img src="${this.BASEURL}images/vicki.png" width="500" height="308" />
		  </lockup>
	          <lockup videoURL="http://www.rwdevcon.com/videos/Alexis-Gallagher-Identity.mp4">
		    <img src="${this.BASEURL}images/alexis.png" width="500" height="308" />
	          </lockup>
		  <lockup videoURL="http://www.rwdevcon.com/videos/Marin-Todorov-RW-Folklore.mp4">
		    <img src="${this.BASEURL}images/marin.png" width="500" height="308" />
		  </lockup>
		  <lockup videoURL="http://www.rwdevcon.com/videos/Chris-Wagner-Craftsmanship.mp4">
		    <img src="${this.BASEURL}images/chris.png" width="500" height="308" />
	          </lockup>
		  <lockup videoURL="http://www.rwdevcon.com/videos/Cesare-Rocchi-Cognition.mp4">
		    <img src="${this.BASEURL}images/cesare.png" width="500" height="308" />
		  </lockup>
		  <lockup videoURL="http://www.rwdevcon.com/videos/Ellen-Shapiro-Starting-Over.mp4">
		    <img src="${this.BASEURL}images/ellen.png" width="500" height="308" />
		  </lockup>
		  <lockup videoURL="http://www.rwdevcon.com/videos/Jake-Gundersen-Opportunity.mp4">
		    <img src="${this.BASEURL}images/jake.png" width="500" height="308" />
		  </lockup>
		  <lockup videoURL="http://www.rwdevcon.com/videos/Kim-Pedersen-Finishing.mp4">
		    <img src="${this.BASEURL}images/kim.png" width="500" height="308" />
		  </lockup>
	          <lockup videoURL="http://www.rwdevcon.com/videos/Tammy-Coron-Possible.mp4">
		    <img src="${this.BASEURL}images/tammy.png" width="500" height="308" />
		  </lockup>
		  <lockup videoURL="http://www.rwdevcon.com/videos/Saul-Mora-NSBrief.mp4">
		    <img src="${this.BASEURL}images/saul.png" width="500" height="308" />
		  </lockup>
		</section>
	      </grid>
	    </relatedContent>
	  </listItemLockup>
        </section>
      </list>
    </catalogTemplate>
  </document>`
}
Ok , tới đây bạn đã tìm hiểu được khá nhiều điều . Bạn đã học được những kiến trúc cơ bản của một ứng dụng client-server tvOS. Bạn đã học được làm thế nào để quản lý TVML, sử dụng TVJS, và sử dụng TVMLKit để kết nối với một máy chủ. Đối với một số bạn, đây là lần đầu tiên bạn đã xử lý các tập tin XML và JavaScript.
All rights reserved
