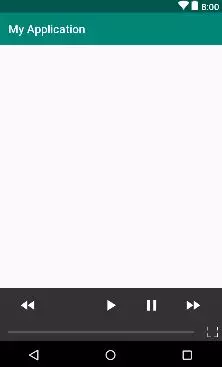
Hướng dẫn sử dụng Exoplayer
Bài đăng này đã không được cập nhật trong 6 năm
Play video và audio là một hoạt động phổ biến trên các thiết bị Android. Android framwork cung cấp MediaPlayer như một giải pháp nhanh chóng đơn giản và tiện ích nhất để thức hiện việc trên. Nó cũng cung cấp các media API cấp thấp như MediaCodec, AudioTrack và MediaDrm, cái mà có thể được sử dụng để xây dựng media tuỳ chỉnh theo mục đích người chơi. Tuy nhiên MediaPlayer không thể đáp ứng tốt các yêu cầu ví dụ như custom UI, bắt các sự kiện khi hiện thực play-list video, tối ưu tốc độ trình chiếu video
Những nhược điểm đó đã được khắc phục trên Exoplayer
ExoPlayer là gì?
ExoPlayer là thư viện phát lại phương tiện mã nguồn mở dành cho Android do Google viết bằng Java có nhiều lợi thế hơn MediaPlayer như tối ưu, linh hoạt và ổn định. Các tính năng của Exoplayer là phát video và âm thanh, xáo trộn, lặp lại, phụ đề, danh sách phát, lưu trữ / tải xuống, phát quảng cáo, phát trực tiếp, nghệ thuật album, ngoại tuyến, tiện ích mở rộng và hơn thế nữa.
Hiện nay hơn 140.000 ứng dụng trong Google Play Store đang sử dụng ExoPlayer cho phương tiện phát trong các ứng dụng này như Vevo, Twitter, BBC iPlayer, Netflix, Spotify, Facebook, Whatsapp, Twitch và nhiều ứng dụng khác
Nhưng có 1 lưu ý là ExoPlayer chỉ hỗ trợ từ API 16 trở lên
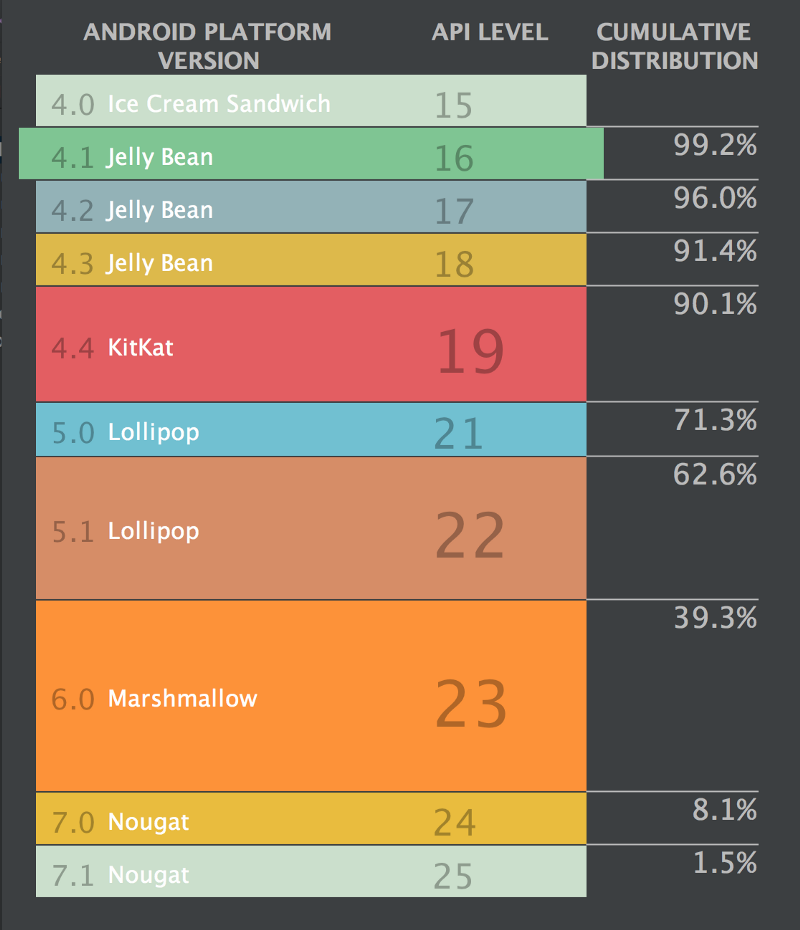
Như bạn đã thấy, phiên bản Android tối thiểu trong dự án hiện tại của bạn là API cấp 16, chiếm 99,2% thiết bị Android đang hoạt động, Nên có vẻ nó cũng nằm trong sự tính toán của Google việc chỉ hỗ trợ API 16 trở lên cũng không phải vấn đề lớn lắm.
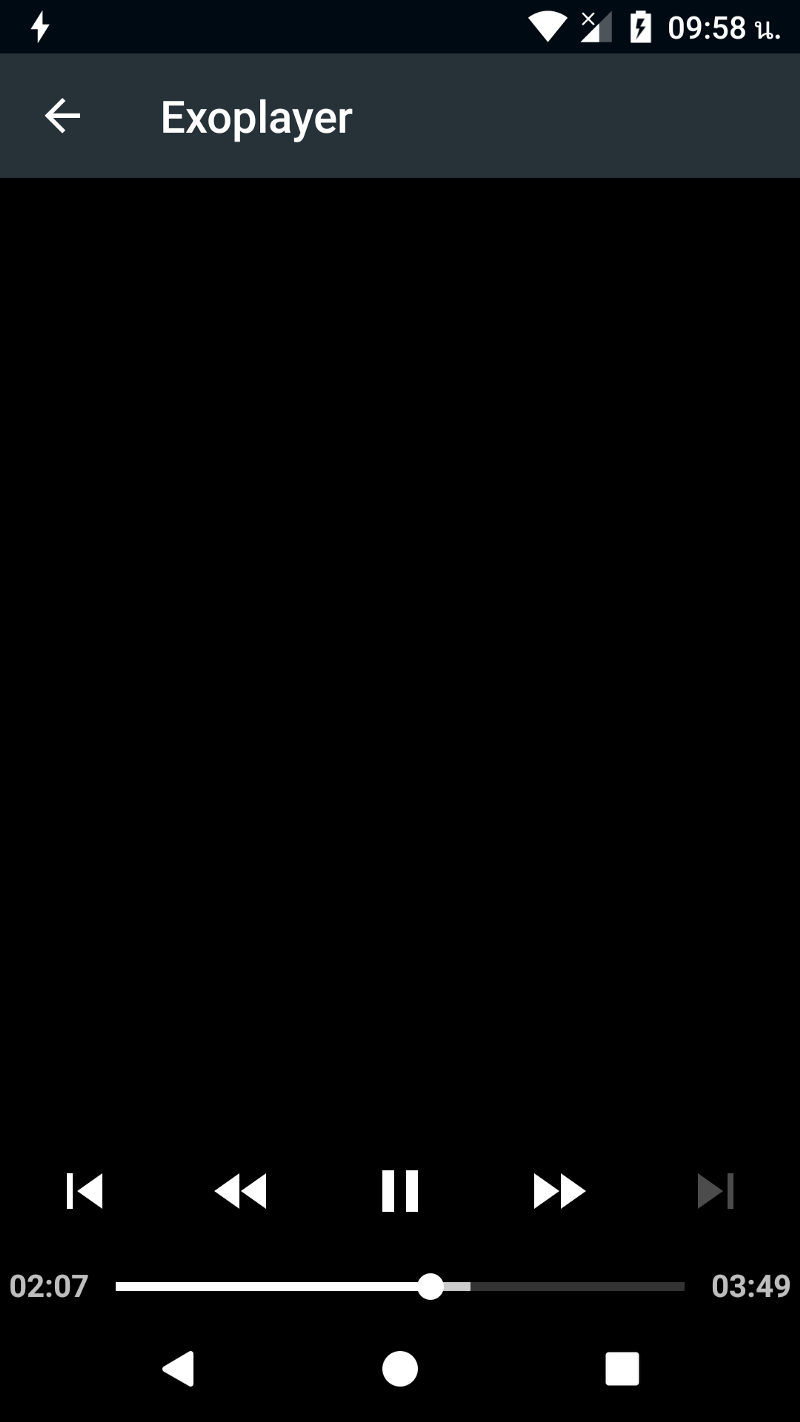
Giao diện mặc định của Exoplayer
Ngoài ra bạn có thể tùy chỉnh thêm các nút mặc định bằng việc sử dụng chính stype của exo mặc định: trước, tua lại, xáo trộn, phát, tạm dừng, chuyển tiếp, tiếp theo 1 nút đặc biệt: lặp lại
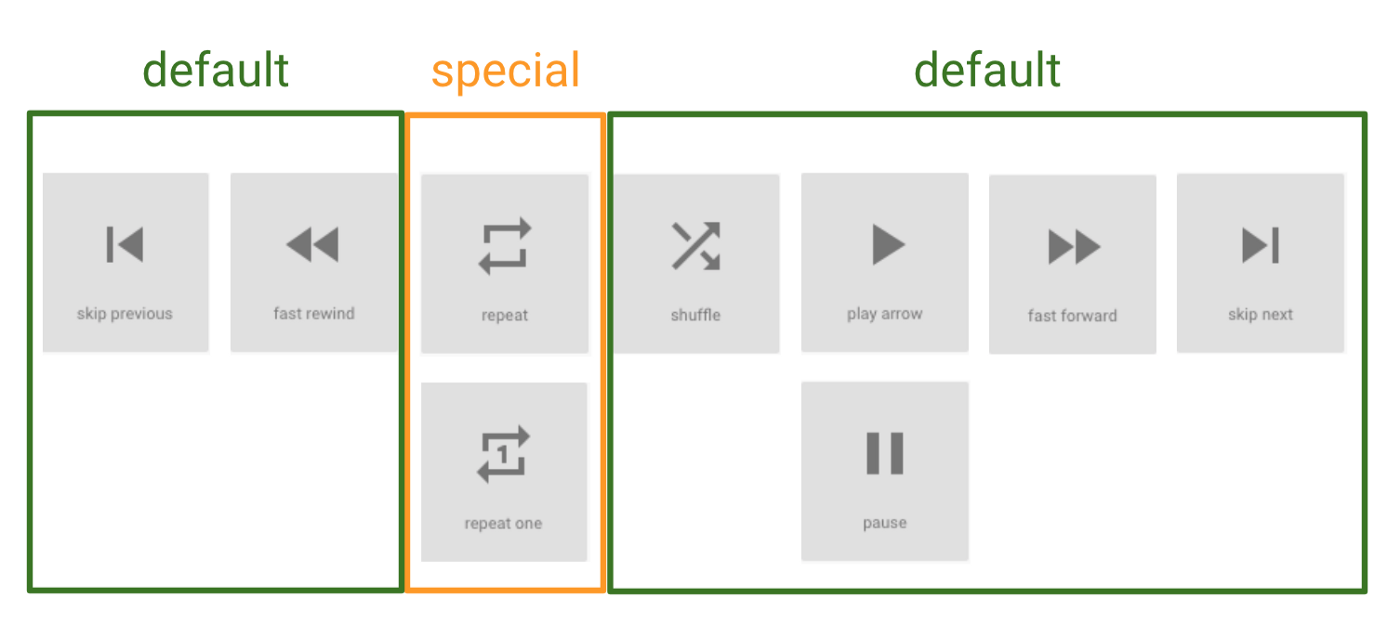
Đối với nút mặc định, thật dễ dàng để thêm từng nút trong tệp bố cục phát lại bằng cách thêm ImageButton và màu nút tùy chỉnh với tông màu, nút có thể vẽ với kiểu từ ExoPlayer
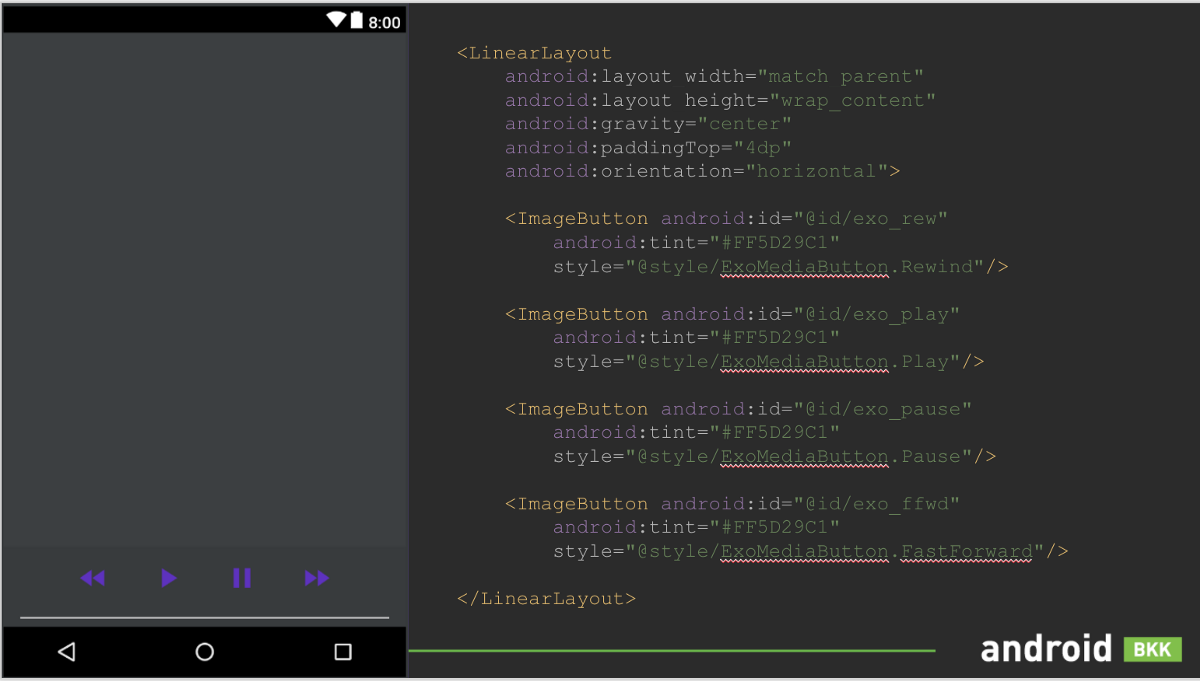
Nếu bạn xử lý phát / tạm dừng mà không phát lại, bạn có thể sử dụng mã này trong mã của mình. Sử dụng player.playWhenReady = false để tạm dừng phát phương tiện và* player.playWhenReady = true* để phát phương tiện và lưu trạng thái với playbackState.
Demo
Nào chúng ta cùng làm thử 1 demo để hiểu rõ hơn cách sử dụng của nó nhé
1. Cấu hình
Đầu tiên, thêm phụ thuộc ExoPlayer vào trong build.gradle mô-đun của bạn phiên bản hiện tại là 2.8.2
triển khai
'com.google.android.exoplayer: exoplayer: 2.8.2'
Sau đó cấp quyền truy cập internet cho thiết bị
<uses-permission android:name=”android.permission.INTERNET”/>
2. Custom lại giao diện
Bạn có thể sử dụng giao diện mặc định như mình hướng dẫn ở trên hoặc custom lại
Lưu ý: Để sử dụng được file layout thì bạn phải để tên file là 'exo_playback_control_view.xml' để ghi đè lên file gốc với các id như trên
exo_playback_control_view.xml
<?xml version="1.0" encoding="utf-8"?>
<LinearLayout xmlns:android="http://schemas.android.com/apk/res/android"
              android:layout_width="match_parent"
              android:layout_height="wrap_content"
              android:layout_gravity="bottom"
              android:layoutDirection="ltr"
              android:background="#CC000000"
              android:orientation="vertical">

    <LinearLayout
            android:layout_width="match_parent"
            android:layout_height="wrap_content"
            android:gravity="center"
            android:paddingTop="4dp"
            android:orientation="horizontal">

        <ImageButton android:id="@id/exo_prev"
                     style="@style/ExoMediaButton.Previous"/>

        <ImageButton android:id="@id/exo_rew"
                     style="@style/ExoMediaButton.Rewind"/>

        <ImageButton android:id="@id/exo_repeat_toggle"
                     style="@style/ExoMediaButton"/>

        <ImageButton android:id="@id/exo_play"
                     style="@style/ExoMediaButton.Play"/>

        <ImageButton android:id="@id/exo_pause"
                     style="@style/ExoMediaButton.Pause"/>

        <ImageButton android:id="@id/exo_ffwd"
                     style="@style/ExoMediaButton.FastForward"/>

        <ImageButton android:id="@id/exo_next"
                     style="@style/ExoMediaButton.Next"/>

    </LinearLayout>

    <LinearLayout
            android:layout_width="match_parent"
            android:layout_height="wrap_content"
            android:layout_marginTop="4dp"
            android:gravity="center_vertical"
            android:orientation="horizontal">

        <TextView android:id="@id/exo_position"
                  android:layout_width="wrap_content"
                  android:layout_height="wrap_content"
                  android:textSize="14sp"
                  android:textStyle="bold"
                  android:paddingLeft="4dp"
                  android:paddingRight="4dp"
                  android:includeFontPadding="false"
                  android:textColor="#FFBEBEBE"/>

        <com.google.android.exoplayer2.ui.DefaultTimeBar
                android:id="@id/exo_progress"
                android:layout_width="0dp"
                android:layout_weight="1"
                android:layout_height="26dp"/>

        <TextView android:id="@id/exo_duration"
                  android:layout_width="wrap_content"
                  android:layout_height="wrap_content"
                  android:textSize="14sp"
                  android:textStyle="bold"
                  android:paddingLeft="4dp"
                  android:paddingRight="4dp"
                  android:includeFontPadding="false"
                  android:textColor="#FFBEBEBE"/>

        <FrameLayout
                android:id="@+id/exo_fullscreen_button"
                android:layout_width="32dp"
                android:layout_height="32dp"
                android:layout_gravity="right">

            <ImageView
                    android:id="@+id/exo_fullscreen_icon"
                    android:layout_width="18dp"
                    android:layout_height="18dp"
                    android:layout_gravity="center"
                    android:adjustViewBounds="true"
                    android:scaleType="fitCenter"
                    android:src="@drawable/ic_fullscreen_expand"/>

        </FrameLayout>

    </LinearLayout>

</LinearLayout>
Kết quả đạt được:
3. Xử lý logic
Đầu tiên chúng ta phải khởi tạo exoplayer
override fun onResume() {
super.onResume()
if (mExoPlayerView == null) {

mExoPlayerView = findViewById(R.id.exo_player) as SimpleExoPlayerView

initFullscreenDialog()
initFullscreenButton()

val streamUrl = "http://qthttp.apple.com.edgesuite.net/1010qwoeiuryfg/sl.m3u8"
val userAgent = Util.getUserAgent(this@Activity, applicationContext.applicationInfo.packageName)
val httpDataSourceFactory = DefaultHttpDataSourceFactory(
userAgent,
null,
DefaultHttpDataSource.DEFAULT_CONNECT_TIMEOUT_MILLIS,
DefaultHttpDataSource.DEFAULT_READ_TIMEOUT_MILLIS,
true
)
val dataSourceFactory = DefaultDataSourceFactory(this@Activity, null, httpDataSourceFactory)
val daUri = Uri.parse(streamUrl)

mVideoSource = HlsMediaSource(daUri, dataSourceFactory, 1, null, null)
}

initExoPlayer()

if (mExoPlayerFullscreen) {
(exo_player.parent as ViewGroup).removeView(exo_player)
mFullScreenDialog.addContentView(
exo_player,
ViewGroup.LayoutParams(ViewGroup.LayoutParams.MATCH_PARENT, ViewGroup.LayoutParams.MATCH_PARENT)
)
mFullScreenDialog.show()
}
}
Sau đó xử lý logic thu phóng màn hình
 private fun openFullscreenDialog() {
        requestedOrientation = ActivityInfo.SCREEN_ORIENTATION_LANDSCAPE

        (exo_player.parent as ViewGroup).removeView(exo_player)
        mFullScreenDialog.addContentView(
            exo_player,
            ViewGroup.LayoutParams(ViewGroup.LayoutParams.MATCH_PARENT, ViewGroup.LayoutParams.MATCH_PARENT)
        )
        mExoPlayerFullscreen = true
        mFullScreenDialog.show()
    }


    private fun closeFullscreenDialog() {
        requestedOrientation = ActivityInfo.SCREEN_ORIENTATION_PORTRAIT

        (mExoPlayerView?.parent as ViewGroup).removeView(mExoPlayerView)
        main_media_frame.addView(mExoPlayerView)
        mExoPlayerFullscreen = false
        mFullScreenDialog.dismiss()
        exo_fullscreen_icon.setImageDrawable(
            ContextCompat.getDrawable(
                this@Activity,
                R.drawable.ic_fullscreen_expand
            )
        )
    }
Cuối cùng là xử lý khi màn hình pauser hoặc stop
override fun onPause() {
        super.onPause()
        if (exo_player != null && exo_player.player != null) {
            mResumeWindow = exo_player.player.currentWindowIndex
            mResumePosition = Math.max(0, exo_player.player.contentPosition)

            exo_player.player.release()
        }
            mFullScreenDialog.dismiss()
    }
Có một lưu ý nhở
Để ứng dụng của bạn có thể chạy mượt mà và lưu lại được state khi đang sử dụng mà không bị load lại dữ liệu khi xoay màn hình bạn nên thêm dòng code này vào Manifest
android:configChanges="orientation|screenSize|layoutDirection"
Trên đây chỉ là một số hướng dẫn cơ bản về Exoplayer ủa mình, ngoài ra nó còn rất nhiều điều thú vị nữa mà trong bài viết này mình không thể đưa ra hết được
All rights reserved
