Hướng dẫn cơ bản về cách kết hợp Laravel 5.5 với ReactJS
Bài đăng này đã không được cập nhật trong 8 năm
Chủ đề hướng dẫn Laravel 5.5 ReactJS, chúng ta sẽ tìm hiểu hôm nay. Cho một frontend framework, có nhiều nhà phát triển ReactJS ở trên internet, những người muốn tìm hiểu sâu Laravel PHP Framework. Vì vậy, hướng dẫn này được tạo ra bởi vì từ hướng dẫn này, bạn sẽ làm những điều sau:
- How to connect Laravel API to ReactJS
- How to define Laravel and ReactJS Project structure.
- How to use Laravel Mix to make ReactJS Scaffold.
Điều kiện tiền đề
Laravel 5.5 React Preset
Laravel 5.5 được tích hợp với một cái gọi là React Preset
Trên bất kỳ ứng dụng với Laravel, bạn có thể sử dụng lệnh preset với tùy chọn react:
php artisan preset react
Lệnh này sẽ tạo một Scaffold cơ bản cho chúng ta. Bây giờ, chúng ta hãy bắt đầu project ReactJS Laravel.
Laravel 5.5 ReactJS
Step 1: Cài đặt Laravel 5.5 và configure cơ sở dữ liệu
Chúng ta gõ lệnh sau để tạo project cho laravel 5.5
composer create-project --prefer-dist laravel/laravel laravel_reactjs
Sau khi cài đặt xong, chúng ta cần cài đặt các phụ thuộc Javascript project của chúng ta. Mặc định, file package.json đã có sẵn, nên chúng ta chỉ cần gõ lệnh sau để lấy các gói của NPM
npm install
Bây giờ chúng ta thay đổi database, có thể vào các tool như phpMyAdmin hay MySQL work bench và tạo một database. Tiếp đến file .env và nhập nội dung database bạn vừa tạo vào.
DB_CONNECTION=mysql
DB_HOST=127.0.0.1
DB_PORT=3306
DB_DATABASE=laravel_reactjs
DB_USERNAME=root
DB_PASSWORD=mysql
Tiếp theo, chúng ta đến thư mục root của project, mở terminal và gõ lệnh sau.
php artisan migrate
Nó sẽ tạo 2 tables mặc định có trong Laravel 5.5
Step 2: Tạo ReactJS frontend cho Laravel backend
Như chúng ta đã thảo luận, gõ lệnh sau cho React Preset
php artisan preset react
Trong terminal bạn sẽ thấy dòng thông báo sau:
React scaffolding installed successfully.
Please run “npm install && npm run dev” to compile your new scaffolding.
Tiếp theo, đến đường dẫn laravel_reactjs >> resources >> assets >> js có một folder và 2 file javascript.
Tên folder là components, nơi chứa react component và 2 file là app.js và bootstrap.js.
Đến đường dẫn resources >> views >> welcome.blade.php và copy dòng code bên dưới vào. Remove code đã tồn tại.
<!-- welcome.blade.php -->

<!doctype html>
<html lang="{{ app()->getLocale() }}">
    <head>
        <meta charset="utf-8">
        <meta http-equiv="X-UA-Compatible" content="IE=edge">
        <meta name="viewport" content="width=device-width, initial-scale=1">
        <title>Laravel</title>
        <link href="{{asset('css/app.css')}}" rel="stylesheet" type="text/css">
    </head>
    <body>
        <div id="example"></div>
        <script src="{{asset('js/app.js')}}" ></script>
    </body>
</html>
Bạn đến CMD và gõ lệnh sau:
npm run dev
Nó sẽ biên dịch tất cả các assets và đóng gói mã javascript vào file public >> js >> app.js
Lần nữa, ta vào lại CMD và gõ lệnh sau:
php artisan serve
Nó sẽ khởi động server và chạy tại port 8000

Step 3: Chúng ta cần cài đặt một số phụ thuộc liên quan đến reactjs
Đàu tiên, chúng ta sẽ cài đặt gói react-router cho đường dẫn ứng dụng. Bằng cách gõ lệnh sau.
npm install react-router@2.8.1
Để có trải nghiệm thuận tiện hơn, tôi đã cài đặt một phiên bản cũ của react-router.
Vào terminal và gõ lệnh sau:
npm run watch
Nó sẽ xem những thay đổi và tự động biên dịch lại các file js và css một cách tự động. Chúng ta chỉnh sửa ReactJS bởi scaffold và hình thành cấu trúc dự án theo nhu cầu.
Đầu tiên, sao chép đoạn mã sau và dán nó vào file App.js.
// app.js

require('./bootstrap');
import React from 'react';
import { render } from 'react-dom';
import { Router, Route, browserHistory } from 'react-router';

import Example from './components/Example';

render(<Example />, document.getElementById('example'));
Thay đổi tiếp theo là sửa component Example.js, copy paste đoạn code bên dưới vào.
// Example.js

import React, { Component } from 'react';

export default class Example extends Component {
    render() {
        return (
            <div className="container">
                <div className="row">
                    <div className="col-md-8 col-md-offset-2">
                        <div className="panel panel-default">
                            <div className="panel-heading">Example Component</div>

                            <div className="panel-body">
                                I am an example component!
                            </div>
                        </div>
                    </div>
                </div>
            </div>
        );
    }
}
Sau khi lưu file, Laravel Mix sẽ biên dịch lại tất cả các assets của chúng ta và tạo file app.js.
Khi bạn chuyển sang trình duyệt và làm mới trang, bạn sẽ thấy như nó là, không có gì thay đổi, nhưng chúng ta đang đi theo flow của chúng ta, đó là tin tuyệt vời.
Bây giờ, chúng ta cần taooj một component khác là Master.js bên trong thư mục components.
// Master.js

import React, {Component} from 'react';
import { Router, Route, Link } from 'react-router';

class Master extends Component {
  render(){
    return (
      <div className="container">
        <nav className="navbar navbar-default">
          <div className="container-fluid">
            <div className="navbar-header">
              <a className="navbar-brand" href="#">AppDividend</a>
            </div>
            <ul className="nav navbar-nav">
              <li className="active"><a href="#">Home</a></li>
              <li><a href="#">Page 1</a></li>
              <li><a href="#">Page 2</a></li>
              <li><a href="#">Page 3</a></li>
            </ul>
          </div>
      </nav>
          <div>
              {this.props.children}
          </div>
      </div>
    )
  }
}
export default Master;
Bây giờ, sửa file app.js và put components này như là root component.
require('./bootstrap');
import React from 'react';
import { render } from 'react-dom';
import { Router, Route, browserHistory } from 'react-router';

import Master from './components/Master';

render(<Master />, document.getElementById('example'));
Step 4: Configure the ReactJS routes for our application.
Tạo 3 components bên trong thư mục components.
- CreateItem.js
- DisplayItem.js
- EditItem.js
Nội dung file CreateItem.js form lưu data.
// CreateItem.js

import React, {Component} from 'react';

class CreateItem extends Component {
    render() {
      return (
      <div>
        <h1>Create An Item</h1>
        <form>
          <div className="row">
            <div className="col-md-6">
              <div className="form-group">
                <label>Item Name:</label>
                <input type="text" className="form-control" />
              </div>
            </div>
            </div>
            <div className="row">
              <div className="col-md-6">
                <div className="form-group">
                  <label>Item Price:</label>
                  <input type="text" className="form-control col-md-6" />
                </div>
              </div>
            </div><br />
            <div className="form-group">
              <button className="btn btn-primary">Add Item</button>
            </div>
        </form>
  </div>
      )
    }
}
export default CreateItem;
Trong app.js, chúng ta cần config routes.
// app.js

require('./bootstrap');
import React from 'react';
import { render } from 'react-dom';
import { Router, Route, browserHistory } from 'react-router';

import Master from './components/Master';
import CreateItem from './components/CreateItem';

render(
  <Router history={browserHistory}>
      <Route path="/" component={Master} >
        <Route path="/add-item" component={CreateItem} />
      </Route>
    </Router>,
        document.getElementById('example'));
Nếu bạn đã làm tất cả đúng và lưu tệp, thì Laravel Mix sẽ biên dịch lại nó và nếu bạn chưa bắt đầu máy chủ phát triển Laravel thì sử dụng php artisan serve
Switch the browser to this URL: http://localhost:8000/

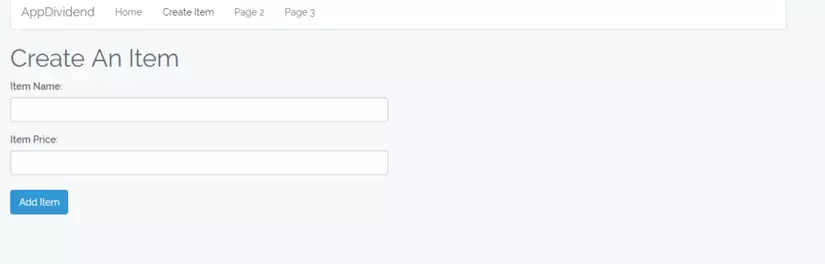
Bây giờ, click vào link CreateItem, bạn sẽ nhìn hình như bên dưới.
Link: http://localhost:8000/add-item
Step 5: Use axios to make AJAX Post request to the Laravel 5.5 Development Server.
Thêm một số sự kiện để lấy dữ liệu đầu vào từ form và gửi yêu cầu bằng AJAX post đến máy chủ.
// CreateItem.js

import React, {Component} from 'react';

class CreateItem extends Component {
  constructor(props){
    super(props);
    this.state = {productName: '', productPrice: ''};

    this.handleChange1 = this.handleChange1.bind(this);
    this.handleChange2 = this.handleChange2.bind(this);
    this.handleSubmit = this.handleSubmit.bind(this);
  }
  handleChange1(e){
    this.setState({
      productName: e.target.value
    })
  }
  handleChange2(e){
    this.setState({
      productPrice: e.target.value
    })
  }
  handleSubmit(e){
    e.preventDefault();
    const products = {
      name: this.state.productName,
      price: this.state.productPrice
    }
    let uri = 'http://localhost:8000/items';
    axios.post(uri, products).then((response) => {
      // browserHistory.push('/display-item');
    });
  }

    render() {
      return (
      <div>
        <h1>Create An Item</h1>
        <form onSubmit={this.handleSubmit}>
          <div className="row">
            <div className="col-md-6">
              <div className="form-group">
                <label>Item Name:</label>
                <input type="text" className="form-control" onChange={this.handleChange1}/>
              </div>
            </div>
            </div>
            <div className="row">
              <div className="col-md-6">
                <div className="form-group">
                  <label>Item Price:</label>
                  <input type="text" className="form-control col-md-6" onChange={this.handleChange2}/>
                </div>
              </div>
            </div><br />
            <div className="form-group">
              <button className="btn btn-primary">Add Item</button>
            </div>
        </form>
  </div>
      )
    }
}
export default CreateItem;
Step 6: Make Laravel 5.5 Backend
Bước tiếp theo là chuyển Reactjs sang Laravel và tạo một backend cho project. Chúng ta sử dụng Web routes cho project này, nên chúng ta cần đặt routes tại routes >> web.php
Chúng ta sẽ thực hiện các hoạt động CRUD trên dữ liệu items. Đầu tiên hãy các định schema cho nó. Sau chúng ta tạo controller và routes.
Chuyển sang gõ dòng lệnh sau:
php artisan make:model Item -m
Nó tạo 2 files:
- Model file.
- Migration file.
Vào file database >> migrations >> create_items_table và copy code sau vào:
<?php

// create_items_table

use Illuminate\Support\Facades\Schema;
use Illuminate\Database\Schema\Blueprint;
use Illuminate\Database\Migrations\Migration;

class CreateItemsTable extends Migration
{
    /**
     * Run the migrations.
     *
     * @return void
     */
    public function up()
    {
        Schema::create('items', function (Blueprint $table) {
            $table->increments('id');
            $table->string('name');
            $table->integer('price');
            $table->timestamps();
        });
    }

    /**
     * Reverse the migrations.
     *
     * @return void
     */
    public function down()
    {
        Schema::dropIfExists('items');
    }
}
Và sau đó gõ lệnh sau:
php artisan migrate
Để tạo ra bảng items trong db. Vậy nên một file model là Item.php được tạo trong thư mục app.
Tạo 1 controller là ItemController bằng lệnh sau:
php artisan make:controller ItemController --resource
ItemController bao gồm toàn bộ các functions của CRUD. Chúng ta chỉ cần put code vào nó như sau:
<?php

// ItemController.php

namespace App\Http\Controllers;

use Illuminate\Http\Request;
use App\Item;

class ItemController extends Controller
{
    /**
     * Display a listing of the resource.
     *
     * @return \Illuminate\Http\Response
     */
    public function index()
    {
        $items = Item::all();
        return response()->json($items);
    }

    /**
     * Show the form for creating a new resource.
     *
     * @return \Illuminate\Http\Response
     */
    public function create()
    {
        //
    }

    /**
     * Store a newly created resource in storage.
     *
     * @param  \Illuminate\Http\Request  $request
     * @return \Illuminate\Http\Response
     */
    public function store(Request $request)
    {
        $item = new Item([
          'name' => $request->get('name'),
          'price' => $request->get('price')
        ]);
        $item->save();
        return response()->json('Successfully added');
    }

    /**
     * Display the specified resource.
     *
     * @param  int  $id
     * @return \Illuminate\Http\Response
     */
    public function show($id)
    {
        //
    }

    /**
     * Show the form for editing the specified resource.
     *
     * @param  int  $id
     * @return \Illuminate\Http\Response
     */
    public function edit($id)
    {
        $item = Item::find($id);
        return response()->json($item);
    }

    /**
     * Update the specified resource in storage.
     *
     * @param  \Illuminate\Http\Request  $request
     * @param  int  $id
     * @return \Illuminate\Http\Response
     */
    public function update(Request $request, $id)
    {
        $item = Item::find($id);
        $item->name = $request->get('name');
        $item->price = $request->get('price');
        $item->save();

        return response()->json('Successfully Updated');
    }

    /**
     * Remove the specified resource from storage.
     *
     * @param  int  $id
     * @return \Illuminate\Http\Response
     */
    public function destroy($id)
    {
      $item = Item::find($id);
      $item->delete();

      return response()->json('Successfully Deleted');
    }
}
Chúng ta cần tạo trường protected $fillable trong Item.php:
<?php

// Item.php

namespace App;

use Illuminate\Database\Eloquent\Model;

class Item extends Model
{
    protected $fillable = ['name', 'price'];
}
Cập nhật routes >> web.php.
<?php

/*
|--------------------------------------------------------------------------
| Web Routes
|--------------------------------------------------------------------------
|
| Here is where you can register web routes for your application. These
| routes are loaded by the RouteServiceProvider within a group which
| contains the "web" middleware group. Now create something great!
|
*/

Route::get('/', function () {
    return view('welcome');
});
Route::resource('items', 'ItemController');
Bây giờ, nếu bạn cố gắng để chèn các giá trị trong cơ sở dữ liệu, bạn có thể phải đối mặt với vấn đề sau.
Possible Errors: XMLHttpRequest cannot load http://localhost:8000/items. No ‘Access-Control-Allow-Origin’ header is present on the requested resource. Origin ‘http://localhost:3000’ is therefore not allowed access. The response had HTTP status code 500.
Lỗi này là do bảo mật CORS. Khi Trình duyệt truy cập yêu cầu tới tên miền khác, theo mặc định, nó sẽ từ chối yêu cầu.
Possible Solutions:
Chúng ta cần cho phép nguồn gốc này đến phía máy chủ Laravel. Vì vậy, chúng ta cần tạo một middleware tại backend và áp dụng phần mềm trung gian này cho mọi yêu cầu API. Bằng cách đưa middleware này, chúng ta được nói rõ ràng với Laravel rằng chúng ta đang cho phép yêu cầu truy cập tài nguyên của chúng ta.
Tải xuống gói CORS cụ thể Laravel cụ thể để tránh vấn đề này và làm theo các bước.
composer require barryvdh/laravel-cors
Thêm Cors\ServiceProvider vào config/app.php provider array
Barryvdh\Cors\ServiceProvider::class,
Cho phép CORS tại routes của bạn, thêm HandleCors middleware và thuộc tính $middleware của app/Http/Kernel.php:
protected $middleware = [
    // ...
    \Barryvdh\Cors\HandleCors::class,
];
Bạn có thể publish config sử dụng lệnh:
php artisan vendor:publish --provider="Barryvdh\Cors\ServiceProvider"
Bây giờ, hãy thử lại, nó sẽ lưu dữ liệu vào cơ sở dữ liệu. Tôi đã không đặt chuyển hướng sau khi lưu dữ liệu nhưng sẽ đặt trong ngắn hạn, trong khi bạn có thể kiểm tra các giá trị trong cơ sở dữ liệu.
Step 7: Display the data into ReactJS Frontend
Tạo DisplayItem.js component bên trong thư mục components.
// DisplayItem.js

import React, {Component} from 'react';
import axios from 'axios';
import { Link } from 'react-router';
import TableRow from './TableRow';

class DisplayItem extends Component {
  constructor(props) {
       super(props);
       this.state = {value: '', items: ''};
     }
     componentDidMount(){
       axios.get('http://localhost:8000/items')
       .then(response => {
         this.setState({ items: response.data });
       })
       .catch(function (error) {
         console.log(error);
       })
     }
     tabRow(){
       if(this.state.items instanceof Array){
         return this.state.items.map(function(object, i){
             return <TableRow obj={object} key={i} />;
         })
       }
     }

  render(){
    return (
      <div>
        <h1>Items</h1>

        <div className="row">
          <div className="col-md-10"></div>
          <div className="col-md-2">
            <Link to="/add-item">Create Item</Link>
          </div>
        </div><br />

        <table className="table table-hover">
            <thead>
            <tr>
                <td>ID</td>
                <td>Item Name</td>
                <td>Item Price</td>
                <td>Actions</td>
            </tr>
            </thead>
            <tbody>
              {this.tabRow()}
            </tbody>
        </table>
    </div>
    )
  }
}
export default DisplayItem;
Bây giờ tạo TableRow.js component.
// TableRow.js

import React, { Component } from 'react';

class TableRow extends Component {
  render() {
    return (
        <tr>
          <td>
            {this.props.obj.id}
          </td>
          <td>
            {this.props.obj.name}
          </td>
          <td>
            {this.props.obj.price}
          </td>
          <td>
            <button className="btn btn-primary">Edit</button>
          </td>
          <td>
            <button className="btn btn-danger">Delete</button>
          </td>
        </tr>
    );
  }
}

export default TableRow;
Đăng ký route trong ứng dụng.
// app.js

import DisplayItem from './components/DisplayItem';

render(
  <Router history={browserHistory}>
      <Route path="/" component={Master} >
        <Route path="/add-item" component={CreateItem} />
        <Route path="/display-item" component={DisplayItem} />
      </Route>
    </Router>,
        document.getElementById('example'));
Một điều chúng ta cần thay đổi đó là, khi chúng ta lưu dữ liệu, chúng ta cần phải chuyển hướng đến thành phần này. Vì vậy, trong tập tin CreateItem.js, chúng ta cần phải sửa đổi một chút mã.
// CreateItem.js

import {browserHistory} from 'react-router';

axios.post(uri, products).then((response) => {
      browserHistory.push('/display-item');
    });
Step 8: Edit and Update the data.
Tạo component EditItem.js bên trong thư mục components
// EditItem.js

import React, {Component} from 'react';
import axios from 'axios';
import { Link } from 'react-router';

class EditItem extends Component {
  constructor(props) {
      super(props);
      this.state = {name: '', price: ''};
      this.handleChange1 = this.handleChange1.bind(this);
      this.handleChange2 = this.handleChange2.bind(this);
      this.handleSubmit = this.handleSubmit.bind(this);
  }

  componentDidMount(){
    axios.get(`http://localhost:8000/items/${this.props.params.id}/edit`)
    .then(response => {
      this.setState({ name: response.data.name, price: response.data.price });
    })
    .catch(function (error) {
      console.log(error);
    })
  }
  handleChange1(e){
    this.setState({
      name: e.target.value
    })
  }
  handleChange2(e){
    this.setState({
      price: e.target.value
    })
  }

  handleSubmit(event) {
    event.preventDefault();
    const products = {
      name: this.state.name,
      price: this.state.price
    }
    let uri = 'http://localhost:8000/items/'+this.props.params.id;
    axios.patch(uri, products).then((response) => {
          this.props.history.push('/display-item');
    });
  }
  render(){
    return (
      <div>
        <h1>Update Item</h1>
        <div className="row">
          <div className="col-md-10"></div>
          <div className="col-md-2">
            <Link to="/display-item" className="btn btn-success">Return to Items</Link>
          </div>
        </div>
        <form onSubmit={this.handleSubmit}>
            <div className="form-group">
                <label>Item Name</label>
                <input type="text"
                  className="form-control"
                  value={this.state.name}
                  onChange={this.handleChange1} />
            </div>

            <div className="form-group">
                <label name="product_price">Item Price</label>
                <input type="text" className="form-control"
                  value={this.state.price}
                  onChange={this.handleChange2} />
            </div>

            <div className="form-group">
                <button className="btn btn-primary">Update</button>
            </div>
        </form>
    </div>
    )
  }
}
export default EditItem;
Đăng ký lại route trong app.js
// app.js

import EditItem from './components/EditItem';

render(
  <Router history={browserHistory}>
      <Route path="/" component={Master} >
        <Route path="/add-item" component={CreateItem} />
        <Route path="/display-item" component={DisplayItem} />
        <Route path="/edit/:id" component={EditItem} />
      </Route>
    </Router>,
        document.getElementById('example'));
Chúng ta cần cập nhật lại component TableRow.js
<Link to={"edit/"+this.props.obj.id} className="btn btn-primary">Edit</Link>
Step 9: Delete The Data.
Để xóa data, chúng ta cần định nghĩa function trong TableRow.js
// TableRow.js

import React, { Component } from 'react';
import { Link, browserHistory } from 'react-router';

class TableRow extends Component {
  constructor(props) {
      super(props);
      this.handleSubmit = this.handleSubmit.bind(this);
  }
  handleSubmit(event) {
    event.preventDefault();
    let uri = `http://localhost:8000/items/${this.props.obj.id}`;
    axios.delete(uri);
      browserHistory.push('/display-item');
  }
  render() {
    return (
        <tr>
          <td>
            {this.props.obj.id}
          </td>
          <td>
            {this.props.obj.name}
          </td>
          <td>
            {this.props.obj.price}
          </td>
          <td>
            <Link to={"edit/"+this.props.obj.id} className="btn btn-primary">Edit</Link>
          </td>
          <td>
          <form onSubmit={this.handleSubmit}>
           <input type="submit" value="Delete" className="btn btn-danger"/>
         </form>
          </td>
        </tr>
    );
  }
}

export default TableRow;
Như vậy sự kết hợp Laravel 5.5 vs ReactJs về cơ bản là ok.
Tham khảo
All rights reserved
