How to Write a Sync Adapter
Bài đăng này đã không được cập nhật trong 4 năm
What is Sync Adapter
The modern smartphone apps depend on the offline-capability for getting data from the remote servers. The apps must implement a data sync mechanism with reliable connection availability, user authentication and optimum battery usage to achieve this capability.
In this case, Android Sync-Adapter is a plug-in based architecture which provides the capability of transfering data between the device and a server. It's specially designed when the application needs periodic or automatic updates even when the user is not using the application. Basically, it communicates with a remote server to obtain data to put into the local Content-Provider.
Here is a real example of a sync-adapter given below:
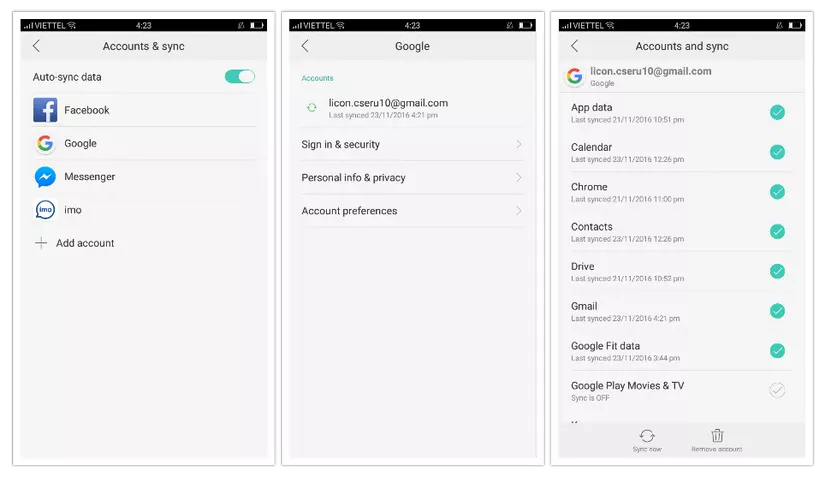
In the above screenshot, we can see that Google application has individual syncing options to keep Calendar, Chrome, Contacts, Drive or Gmail local data up-to-date with server. This article will describe about how to write a sync-adapter for the Android applications. Before going to technical implementation we need to have some basic knowledge. So, let's scroll down for it!
Why Sync Adapter
A SyncAdapter can support periodic data transferring between device & server which also can be obtained using a Service, Timer or AlarmManager. But still there are some special reasons to use the SyncAdapter which are pointed following.
- The backend REST server will work smooth with the SyncAdapter with little changes.
- SyncAdapter supports automatic, periodic & manual sync as the users demand.
- SyncAdapter can detect any changes happened in the ContentProvider, so you can observe the data changes done by anyhow in the device.
- The users can access all of the sync-adapters in the device's settings screen under the corresponding account. The sync UI in the settings screen provides option to set sync preferences.
- There is a sync-manager which allows to retry the failed syncs using an effecient timeout.
- The Android OS sets the time to sync when other syncs are running or some other request was already done on the device. So, the device won't awak from it's sleep for a single sync which saves the battery life.
That's all are enough to choose a sync-adapter to make a "lovely-date" with server!
Setup of Sync Adapter
To setup a sync-adapter you will need to create 02 more important tools are Account-Authenticator & Content-Provider.
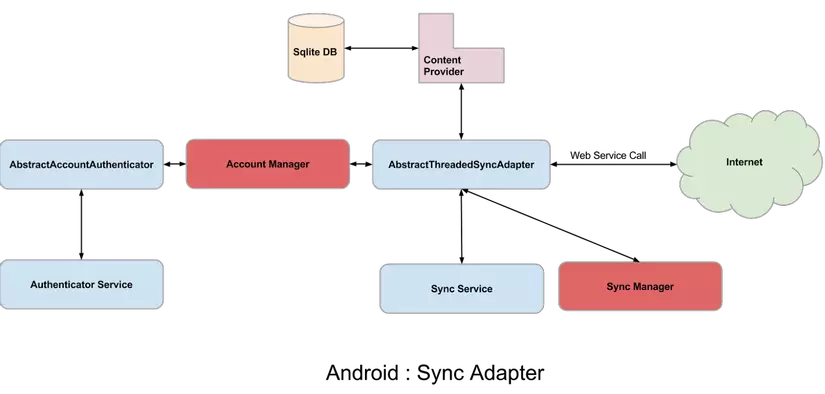
According to the above figure, you can see that how a sync-adapter is assembled with account-authenticator & content-provider. The setup is maintained as following:
-
Sync-adapter with Account-authenticator : The sync-adapter needs an auth-token to contact with the server which is provided by the Authenticator. So, technically there is a class namely AbstractThreadedSyncAdapter which is responsible to contact with the AccountManager to authenticate with one account. After authenticating with one account, it can listen the data changes of the other accounts also like exactly what Google application does.
-
Sync-adapter with Content-provider : The sync adapter needs to access the local data that means the content-provider inside device to data transferring from server to device or vice-versa.
-
Writing the Sync-adapter : After creating the authenticator & content-provider, you need to create the sync-adapter class with necessary sync logic about how you want to perform sync action.
-
Assemble all tools & run the Sync-adapter : After creating authenticator, content-provider & sync-adapter you need to connect all the tools & write necessary code to run within the application.
In the android official training site, you will get a details guideline about how to setup a sync-adapter.
There are 02 articles are already written about how to create an authenticator & content-provider as the following links:
- Account-Authenticator : https://viblo.asia/licon/posts/qzaGzNLdGyO
- Content-Provider : https://viblo.asia/licon/posts/xQMkJmxVeam
After creating the above 02 tools, let's concentrate to write the desired Sync-Adapter.
Creating the Sync Adapter
To create the sync-adapter we have to do as following:
Writing the Sync-adapter class :
A Sync-adapter class is an extension of AbstractThreadedSyncAdapter class which contains the onPerformSync(...) method with 05 parameters are Account account, Bundle extras, String authority, ContentProviderClient provider & SyncResult syncResult. There is a simple class written below with a genaral sync logic to perform sync:
import android.accounts.Account;
import android.content.AbstractThreadedSyncAdapter;
import android.content.ContentProviderClient;
import android.content.Context;
import android.content.SyncResult;
import android.os.Bundle;

public class DemoSyncAdapter extends AbstractThreadedSyncAdapter {

    public DemoSyncAdapter(Context context, boolean autoInitialize) {
        super(context, autoInitialize);
    }

    public void onPerformSync(Account account,
                              Bundle extras,
                              String authority,
                              ContentProviderClient provider,
                              SyncResult syncResult) {

        /**** basic sync logic can be written as following steps ****/

        //> Get the auth token for the current account.
        //> Get data from remote server.
        //> Get data from local content provider.
        //> See what local data are missing on remote server.
        //> See what remote data are missing on local content provider.
        //> Update data to match the remote with local data if any data change found.
        //> Finish syncing.
    }
}
Here, The method onPerformSync(...), called by the sync-manager when it’s time to sync and the method run in background to prevent network problem. By the way, the sync-logic inside of onPerformSync(...) is depends on you. You just need to add the code to check the data-set change & update with your server. The logic varies according to the application-features.
Writing the Service class to bind the sync-adapter :
Now, we need to write a service class to tie the sync-adapter inside of onBind(...) method as following:
/**
 * Service to handle Account sync. This is invoked with an intent with action
 * ACTION_AUTHENTICATOR_INTENT. It instantiates the sync-adapter and returns its
 * IBinder.
 */
public class TvShowsSyncService extends Service {

    private static final Object sSyncAdapterLock = new Object();
    private static DemoSyncAdapter sSyncAdapter = null;

    public void onCreate() {
        synchronized (sSyncAdapterLock) {
            if (sSyncAdapter == null)
                sSyncAdapter = new DemoSyncAdapter(getApplicationContext(), true);
        }
    }

    public IBinder onBind(Intent intent) {
        return sSyncAdapter.getSyncAdapterBinder();
    }
}
Assembling all the tools :
After creating Account-authenticator, Content-provider & Sync-adapter, it's time to connect all the tools together. To do this task, we have to write a xml class as following:
<?xml version="1.0" encoding="utf-8"?>
<sync-adapter xmlns:android="http://schemas.android.com/apk/res/android"
    android:accountType="account-type-written-as-authenticator"
    android:allowParallelSyncs="false"
    android:contentAuthority="content-provider-authority-name"
    android:isAlwaysSyncable="false"
    android:supportsUploading="true"
    android:userVisible="true" />
After writing the above code inside the <sync-adapter ... /> tag, the mentioned tools will be connected. There are few attributes are written like allowParallelSyncs which is responsible to run syncs for multiple accounts in a same time. Besides, userVisible will define visibility of sync-adapter UI on the device's settings screen. Also, supportUploading will initiate a sync if there is a change found in the content provider.
After completing the above file, you need to declare the xml as a meta-data of the sync-service inside AndroidManifest file as account-authenticator & content-provider. The manifest file will contain the following lines for the sync-adapter.
<?xml version="1.0" encoding="utf-8"?>
<manifest xmlns:android="http://schemas.android.com/apk/res/android"
    ...>

     <!-- Sync Adapter -->
    <uses-permission
        android:name="android.permission.READ_SYNC_STATS" />
    <uses-permission
        android:name="android.permission.READ_SYNC_SETTINGS" />
    <uses-permission
        android:name="android.permission.WRITE_SYNC_SETTINGS" />

     <application...>

     <!-- Sync adapter related service -->
        <service
            android:name="service-package-name"
            android:exported="true">
            <intent-filter>
                <action android:name="android.content.SyncAdapter" />
            </intent-filter>
            <meta-data
                android:name="android.content.SyncAdapter"
                android:resource="@xml/sync_adapter" />
                <!-- Assuming.. "sync_adapter" is the name of the xml file -->
        </service>

     </application>

</manifest>
Maintaing the Sync Adapter
To maintain the sync operations you need to learn many things which is well documented in here: https://developer.android.com/training/sync-adapters/running-sync-adapter.html
Here, I am just writing some sample code-snap to operate the sync to give a basic idea.
Requesting a sync:
To request a sync operation, you have write as following:
private Account mConnectedAccount;

Bundle bundle = new Bundle();
bundle.putBoolean(ContentResolver.SYNC_EXTRAS_MANUAL, true); // Performing a sync no matter if it's off
bundle.putBoolean(ContentResolver.SYNC_EXTRAS_EXPEDITED, true); // Performing a sync no matter if it's off
ContentResolver.requestSync(mConnectedAccount, "content-provider-authority-name", bundle);
Observing the sync-status:
To observe the sync-status, there is a built-in interface which can be used as following:
private Account mConnectedAccount;

SyncStatusObserver syncObserver = new SyncStatusObserver() {

        public void onStatusChanged(final int which) {
            runOnUiThread(new Runnable() {

                public void run() {
                    String status;
                    if (ContentResolver.isSyncActive(mConnectedAccount, "content-provider-authority-name"))
                    status = "Status: Syncing...";
                    else if (ContentResolver.isSyncPending(mConnectedAccount, "content-provider-authority-name"))
                    status = "Status: Pending...";
                    else
                    status = "Status: Idle";
                    Log.d("sync-status", "refreshSyncStatus> " + status);
                }
            });
        }
    };
Set automatic sync:
You can set auto-sync as following:
private Account mConnectedAccount;
ContentResolver.setSyncAutomatically(mConnectedAccount , "content-provider-authority-name", true);
In total, there are 03 types of sync as the benefits of using a sync-adapter:
-
Automatic sync: It means the sync can be run whenever it needs. In this case, the sync-adapter is triggered automatically in every 24 hours, also it's initiate whenever any data-set change is detected in the content-provider. You can get the auto-sync feature by using the
setSyncAutomatically(...)method as mentioned above. For example, you can observe the sync-status of several applications in the device's settings screen. -
Periodic sync: You can set a specific time to sync periodically with the remote server. To do it you have to use
addPeriodicSync(...)method. In this case, you need to have auto-syncon& syncable statustrue. -
Manual sync: If you want to add a button like "Sync now" then you can use
requestSync(...)method to sync manually. Like periodic sync, you need to have auto-synconto set a manual sync.
Note: That's all about the basic knowledge-base of a sync-adapter. It's hard to write all the information in details, also the official Android tutorial is already written in details. Sometimes, details tutorial makes us boring before starting a new thing. That's why, this article is focused on writing only the basic knowledge-base about it.
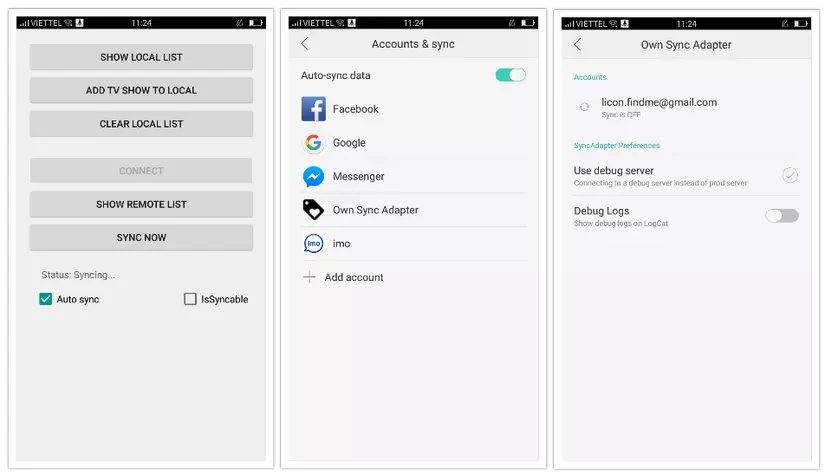
I have added a sample sync-adapter here: https://github.com/liconrepo/AndroidSyncAdapter. After running the project you will see the application as following:
References:
- http://blog.udinic.com/2013/07/24/write-your-own-android-sync-adapter
- https://developer.android.com/training/sync-adapters/index.html
- http://www.androidtutorialsworld.com/sync-adapter-example-android
- http://www.slideshare.net/aditium/rap-rely-on-android-platform/12
Now, it's your own time to create a sync-adapter, good luck!
All rights reserved
