How to custom uICollectionViewLayout
Bài đăng này đã không được cập nhật trong 4 năm
Creating Custom Collection View Layouts
- Bước đầu tiên để custom collection view layout là tạo ra một class kế thừa từ UICollectionViewLayout, trong bài viết này sẽ đặt tên là FGCollectionViewLayout. Bạn hãy chắc chắn rằng ngôn ngữ bạn chọn là Swift
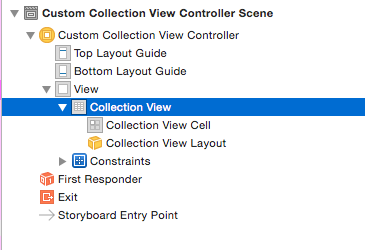
- Tiếp theo bạn cần cấu hình cho layout mà bạn custom. Để cấu hình bạn mở Main.storyboard chọn Collection View trong Custom Collection View Controller (hình vẽ)
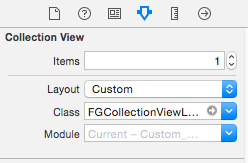
- Tiếp theo đó bạn hãy mở Attributes Inspector và chọn Custom trong danh sách layout (hình vẽ)
- Okie, giờ bạn hãy buid và chạy ứng dụng của bạn, không có gì, kết quả là một màn hình đen. Bạn cũng đừng quá lo lắng, vì bản chất class FGCollectionViewLayout mới chỉ kế thừa từ UICollectionViewLayout mà chưa hề custom.
Core Layout Process
- Trước khi tạo một custom collection view layout thì bạn có thể hiểu thêm một số khái niệm như phương thức prepareLayout(), collectionViewContentSize(), layoutAttributeForElementRect(), hay một số khái niệm về width, height.
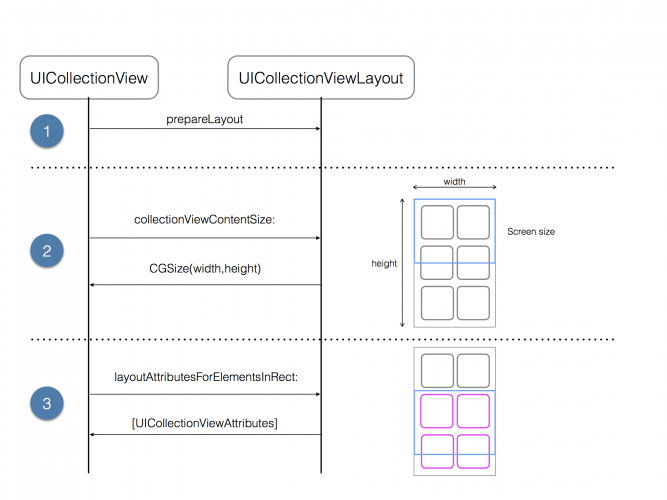
- prepareLayout(): phương thức này được gọi trước khi hoạt động của một layout được diễn ra.
- collectionViewContentSize (): phương thức này sẽ trả lại chiều rộng và chiều cao của collection view
- layoutAttributesForElementsInRect(): trong phương thức này bạn cần trả lại các thuộc tính cho layout của bạn
Okie, vậy bây giờ chúng ta cần làm gì, cần những gì để thực hiện và thực hiện custom layout thế nào?
Calculating Layout Attributes
protocol FGCollectionViewLayoutDelegate {
    // Mark: 1. Method to ask the delegate for the height of the image
    func collectionView(
        collectionView:UICollectionView,
        heightForPhotoAtIndexPath indexPath:NSIndexPath,
        withWidth:CGFloat
    ) -> CGFloat
    // Mark: 2. Method to ask the delegate for the height of the annotation text
    func collectionView(
        collectionView: UICollectionView,
        heightForAnnotationAtIndexPath indexPath: NSIndexPath,
        withWidth width: CGFloat
    ) -> CGFloat
}
- Đoạn code trên khai báo một protocol FGCollectionViewLayoutDelegate trong đó bao gồm hai phương thức yêu cầu trả lại chiều cao của ảnh và chiều cao của anotation
- Tiếp theo bạn hãy thêm đoạn code sau vào class FGCollectionViewLayout
// 1
    var delegate: FGCollectionViewLayoutDelegate!
    // 2
    var numberOfColumns = 2
    var cellPadding: CGFloat = 6.0
    // 3
    private var cache = [UICollectionViewLayoutAttributes]()
    // 4
    private var contentHeight: CGFloat  = 0.0
    private var contentWidth: CGFloat {
        let insets = collectionView!.contentInset
        return CGRectGetWidth(collectionView!.bounds) - (insets.left + insets.right)
    }
-
Giải thích một số mã
- // 1: reference delegate
- // 2: số cột và padding cho cell
- // 3: Mảng cache chứa các thuộc tính
- // 4: Hai thuộc tính là chiều cao và chiều rộng của thuộc tính. Chiều cao phụ thuộc vào chiều cao ảnh, chiều rộng phụ thuộc vào số cột item
-
Tiếp theo add đoạn code sau vào FGCollectionViewLayout.swift
override func prepareLayout() {
  // 1
  if cache.isEmpty {
    // 2
    let columnWidth = contentWidth / CGFloat(numberOfColumns)
    var xOffset = [CGFloat]()
    for column in 0 ..< numberOfColumns {
      xOffset.append(CGFloat(column) * columnWidth )
    }
    var column = 0
    var yOffset = [CGFloat](count: numberOfColumns, repeatedValue: 0)

    // 3
    for item in 0 ..< collectionView!.numberOfItemsInSection(0) {

      let indexPath = NSIndexPath(forItem: item, inSection: 0)

      // 4
      let width = columnWidth - cellPadding * 2
      let photoHeight = delegate.collectionView(collectionView!, heightForPhotoAtIndexPath: indexPath,
          withWidth:width)
      let annotationHeight = delegate.collectionView(collectionView!,
          heightForAnnotationAtIndexPath: indexPath, withWidth: width)
      let height = cellPadding +  photoHeight + annotationHeight + cellPadding
      let frame = CGRect(x: xOffset[column], y: yOffset[column], width: columnWidth, height: height)
      let insetFrame = CGRectInset(frame, cellPadding, cellPadding)

      // 5
      let attributes = UICollectionViewLayoutAttributes(forCellWithIndexPath: indexPath)
      attributes.frame = insetFrame
      cache.append(attributes)

      // 6
      contentHeight = max(contentHeight, CGRectGetMaxY(frame))
      yOffset[column] = yOffset[column] + height

      column = column >= (numberOfColumns - 1) ? 0 : ++column
    }
  }
}
-
Lưu ý: prepareLayout() được gọi khi collection view layout invalidate
-
Tiếp theo add phương thức sau vào FGCollectionViewLayout.swift
override func collectionViewContentSize() -> CGSize {
  return CGSize(width: contentWidth, height: contentHeight)
}
-
Đoạn code trên trả về kích thước nội dung trong đó có sử dụng width và height ở bước trước đó
-
Cuối cùng bạn implement phương thức sau:
override func layoutAttributesForElementsInRect(rect: CGRect) -> [AnyObject]? {

  var layoutAttributes = [UICollectionViewLayoutAttributes]()

  for attributes  in cache {
    if CGRectIntersectsRect(attributes.frame, rect) {
      layoutAttributes.append(attributes)
    }
  }
  return layoutAttributes
}
- Bước tiếp theo làm thể nào để có thể sử dụng FGCollectionViewLayoutDelegate
extension PhotoStreamViewController : FGCollectionViewLayoutDelegate {
  // 1
  func collectionView(collectionView:UICollectionView, heightForPhotoAtIndexPath indexPath:NSIndexPath,
      withWidth width:CGFloat) -> CGFloat {
    let photo = photos[indexPath.item]
    let boundingRect =  CGRect(x: 0, y: 0, width: width, height: CGFloat(MAXFLOAT))
    let rect  = AVMakeRectWithAspectRatioInsideRect(photo.image.size, boundingRect)
    return rect.size.height
  }

  // 2
  func collectionView(collectionView: UICollectionView,
      heightForAnnotationAtIndexPath indexPath: NSIndexPath, withWidth width: CGFloat) -> CGFloat {
    let annotationPadding = CGFloat(4)
    let annotationHeaderHeight = CGFloat(17)
    let photo = photos[indexPath.item]
    let font = UIFont(name: "AvenirNext-Regular", size: 10)!
    let commentHeight = photo.heightForComment(font, width: width)
    let height = annotationPadding + annotationHeaderHeight + commentHeight + annotationPadding
    return height
  }
}
-
Giải thích:
- // 1 cung cấp chiều cao của ảnh, nó có sử dụng AVMakeRectWithAspectRatioInsideRect() từ ** AVFoundation ** để tính toán chiều cao mà vẫn giữ tỉ lệ ảnh và hạn chế độ rộng từng item
- // 2 Tương tự phương thức trên, phương thức này sẽ trả lại chiều cao của anotation sau khi tính toán.
-
Để delegate có thể hoạt động, trong viewDidLoad() bạn cần:
if let layout = collectionView?.collectionViewLayout as? FGCollectionViewLayoutDelegate {
  layout.delegate = self
}
- Cuối cùng bạn build và chạy ứng dụng sẽ được kết quả các item thay đổi theo chiều cao (dạng water fall layout)
All rights reserved
