Học React qua ứng dụng search video sử dụng YouTube API
Bài đăng này đã không được cập nhật trong 4 năm
Hiện nay React là một trong những thư viện javascript khá hot và đang được ứng dụng nhiều. Về cơ bản React chỉ đơn thuần là một thư viện giúp xây dựng phần view của web tốt hơn, và hôm nay mình sẽ hướng dẫn các bạn xây dựng một ứng dụng đơn giản để hiểu hơn về React.
Về cơ bản trong tutorial này, mình sẽ không cố gắng giải thích mọi thứ về React một cách chi tiết mà sẽ tập trung làm rõ về cách thức và cấu trúc React hoạt động. Vì thế trước khi đọc tutorial này bạn nên có một lượng kiến thức cơ bản về javascript , react, html , css.
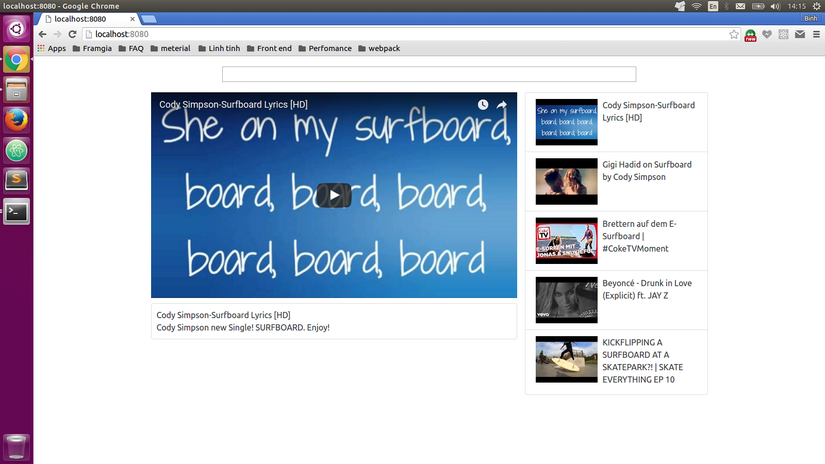
Trước khi bắt đầu tutorial , bạn cần cài đặt cho mình npm - một trình quản lý các thư viện javascript và webpack nhé.Chúng ta sẽ làm một ứng dụng web có giao diện đơn giản như thế này:
Bước 1: Khi lập trình với React , bước quan trọng nhất là việc tổ chức các thành phần component. Về component thì hiểu đơn giản là nếu như khi bạn phân chia giao diện website thì bạn sẽ phải chia nhỏ thành các vùng
Bước 2: Khởi tạo. Để tránh rắc rối mình đã config dự án sẵn ở đây.Bạn chỉ việc download về và chạy npm install để download các thư viện .
Trong thư mục dự án tạo file index.html, khởi tạo :
<!DOCTYPE html>
<html>
  <head>
    <link rel="stylesheet" href="/style/style.css">
    <link rel="stylesheet" href="https://cdn.rawgit.com/twbs/bootstrap/v4-dev/dist/css/bootstrap.css">
  </head>
  <body>
    <div class="container"></div>
  </body>
  <script src="/bundle.js"></script>
</html>
Trong thư mục src, tạo file index.js
import React, { Component } from 'react'
import ReactDOM from 'react-dom'

export default class App extends Component {
  constructor(props) {
  	super(props);
  }

  render() {
  	return (
  		<div>
           Hello world!
  		</div>
  	);
  }
}

ReactDOM.render(<App />, document.querySelector('.container'));
Để chạy ứng dụng , bạn di chuyển terminal vào thư mục project và gõ lệnh npm start.
Truy cập http://localhost:8080/. Cái này là server của webpack-dev-server.js.
Bước 3: Tạo các component, trong thư mục src , tạo thư mục components. Tạo thanh searchbar , tạo file search_bar.js.
import React, {Component} from "react";

export default class SearchBar extends Component {
	constructor(props){
		super(props)
		this.state = {term: ''}
	}

	render() {
		return (
			<div className="search-bar">
				<input
					value={this.state.term}
			</div>
		)
	}
}
Import SearchBar và thư viện YTSearch vào trong App
import SearchBar from "./components/search_bar";
import YTSearch from "youtube-api-search";
Lúc này App sẽ có state là videos để lưu trữ các videos được trả về , selectedVideo là video được select.
this.state = {
  videos: [],
  selectedVideo: null
};
Để sử dụng youtube-api-search chúng ta cần có API_KEY. Để tạo bạn vào đây. Sau khi lấy được key chúng ta khởi tạo 1 const bên ngoài class.
const API_KEY = "KEY CỦA BẠN Ở ĐÂY ";

class App extends Component {...
Tạo hàm search video , nhận đầu vào là keyword string.
videoSearch(term) {
  	YTSearch({key: API_KEY, term: term}, (videos) => {
		this.setState({
			videos: videos,
			selectedVideo: videos[0]
		});
	 });
}
Chúng ta sẽ luôn set video được selected là video đầu tiên trong kết quả search. Đây là định dạng kết quả trả về cho 1 video:
{
      "kind": "youtube#searchResult",
      "etag": "\"I_8xdZu766_FSaexEaDXTIfEWc0/Xhi5mUegmdqGi_WzKLyJTLxshCs\"",
      "id": {
        "kind": "youtube#video",
        "videoId": "9sqTOBNE8bk"
      },
      "snippet": {
        "publishedAt": "2014-03-19T14:43:25.000Z",
        "channelId": "UCsFjQTdERr6Op4v9pUUnSYQ",
        "title": "Cody Simpson-Surfboard Lyrics [HD]",
        "description": "Cody Simpson new Single! SURFBOARD. Enjoy!",
        "thumbnails": {
          "default": {
            "url": "https://i.ytimg.com/vi/9sqTOBNE8bk/default.jpg",
            "width": 120,
            "height": 90
          },
          "medium": {
            "url": "https://i.ytimg.com/vi/9sqTOBNE8bk/mqdefault.jpg",
            "width": 320,
            "height": 180
          },
          "high": {
            "url": "https://i.ytimg.com/vi/9sqTOBNE8bk/hqdefault.jpg",
            "width": 480,
            "height": 360
          }
        },
        "channelTitle": "Aaron Dela Cruz",
        "liveBroadcastContent": "none"
      }
    },
Ở đây searchbar có state là term để lưu trữ các key word khi search.Tiếp theo chúng ta sẽ tạo VideoList là danh sách các video ở bên phải , trong VideoList lại có các VideoItem nên sẽ tạo 2 component là VideoList và VideoListItem.
Tạo VideoListItem , trong src/component tạo file video_list_item.js,
import React from 'react';

const VideoListItem = ({video, onVideoSelect}) => {
	const imageUrl = video.snippet.thumbnails.default.url;

	return(
		<li className="list-group-item">
			<div className="video-list media">
				<div className="media-left">
					<img className="media-object" src={imageUrl} />
				</div>
				<div className="media-body">
					<div className="media-heading">
						{video.snippet.title}
					</div>
				</div>
			</div>
		</li>
	)
}

export default VideoListItem;
Tạo file video_list.js.
import React from "react";
import VideoListItem from "./video_list_item";
const VideoList = (props) => {
	const videoItems = props.videos.map((video) => {
		return (
			<VideoListItem
				key={video.etag}
				video={video} />
		)
	});

	return (
		<ul className="col-md-4 list-group">
			{videoItems}
		</ul>
	);
}

export default VideoList;
Tạo component video_detail.js
import React from 'react';

const VideoDetail = ({video}) => {
	if(!video){
		return<div>Loading...</div>
	}
	const videoId = video.id.videoId;
	const url = `https://www.youtube.com/embed/${videoId}`;

	return (
		<div className="video-detail col-md-8" >
			<div className="embed-responsive embed-responsive-16by9" >
				<iframe className="embed-responsive-item" src={url}></iframe>
			</div>
			<div className="details">
				<div>{video.snippet.title}</div>
				<div>{video.snippet.description}</div>
			</div>
		</div>
	)
}

export default VideoDetail;
Quay trở lại App và làm lại phần render, chúng ta sẽ sử dụng thư viện lodash, hãy import nó vào trong App
import _ from "lodash";
Để truyền tham số từ cha vào con , cách đơn giản nhất là dùng props . Ở đây để truyền hàm videoSearch của App vào SearchBar , thì chúng ta thêm props onSearchTermChange, lý do tại sao phải có
const videoSearch = _.debounce((term) => {this.videoSearch(term)}, 300);
Là vì javascript là bất đồng bộ , thế nên sẽ có trường hợp data chưa kịp trả về nhưng phần view đã render ra vì thế sẽ cần delay một khoảng thời gian cho đến khi dữ liệu trả về.
render() {
  	const videoSearch = _.debounce((term) => {this.videoSearch(term)}, 300);
  	return (
  		<div>
  	  		<SearchBar onSearchTermChange={videoSearch}/>
  	  		<VideoDetail video={ this.state.selectedVideo } />
  	  		<VideoList
  	  			onVideoSelect={ (selectedVideo) => {this.setState({selectedVideo})}}
  	  			videos={this.state.videos} />
  		</div>
  	)
  }
Trong SearchBar gọi onSearchTermChange thông qua props.
onInputChange(term) {
		this.setState({term: term});
		this.props.onSearchTermChange(term);
}
Trong VideoList , chúng ta sẽ truyền tiếp props onVideoSelect cho VideoListItem
<VideoListItem
    onVideoSelect={props.onVideoSelect}
Và trong VideoListItem ,chúng ta sẽ gọi props này trong
<li onClick={ () => onVideoSelect(video) } className="list-group-item">
Để ứng dụng luôn có dữ liệu hiển thị , khi khởi tạo ứng dụng , trong constructor của App chúng ta có thể gọi một hàm search với key word mặc định
this.videoSearch('surfboard');
Bước cuối cùng là mình sẽ đi làm đẹp website .Trong styles/style.css
.search-bar {
	margin: 20px;
	text-align: center;
}

.search-bar input {
	width: 75%;
}

.video-item img {
	max-width: 64px;
}

.video-detail .details {
	margin-top: 10px;
	padding: 10px;
	border: 1px solid #ddd;
	border-radius: 4px;
}

.list-group-item {
	cursor: pointer;
}

.list-group-item:hover {
	background-color: #eee;
}
Trên đây là một tutorial cơ bản để làm một ưng dụng đơn giản với react , có khá nhiều kiến thức mà mình không thể giải thích hết được (có lẽ để tới các bài post sau  ).
).
Nhiệm vụ: Sau khi đọc qua tutorial này bạn hãy thử tìm hiểu một số vấn đề sau :
1.Các style để  viết 1 component React trong ES5 và ES6.
2.State và props của React.
Cảm ơn các bạn đã theo dõi tutorial này , đây là source code full source.
All rights reserved
