Hệ thống phát gạo nhận diện khuôn mặt(Phần 3)
Bài đăng này đã không được cập nhật trong 6 năm
Trong phần 2, ta đã hoàn thiện phần server rồi. Và bước cuối cùng chúng ta cũng sẽ viết nốt phần giao diện bằng ReactJS.
Set up
Ở đây mình sử dụng nodejs 12.16. Các bước setup bao gồm:
cd $PROJECT: đến địa chỉ thư mục projectyarn create react-app frontend: khỏi tạo thư mục reactfrontendcd frontend && yarn ađ antd: thêm thư viện antd vào trong yarn- Viết Dockerfile với nội dung sau:
# base image
FROM node:12.16.1-alpine
WORKDIR /app/frontend
# install and cache app dependencies
COPY package*.json ./
RUN yarn
COPY . .

# start app
CMD ["yarn", "start"]
- Giờ thì bạn có thể chạy
yarn starttrong thư mục frontend hoặcdocker-compose upở ngoài thư mục chính và kiêm tra tạo giao diện cổng 3000 đã có hình dưới đây chưa? - Lưu ý, nếu sử dụng docker-compose, bạn phải sửa proxy của reactjs thành
http://flask:3500còn với chạy local thì sẽ làhttp://127.0.0.1:3500trongpackage.json. Nếu bạn không gặp vấn đề gì hãy đến bước tiếp theo nào.
Coding
Ở trong này chúng ta sẽ viết 3 component:
- 1 component hiển thị tên quận
- 1 component là form để gửi ảnh và phường
- 1 component hiển thị kết quả
Hiện thị tên quận
- Tạo file
Title.js. - Viết thêm nội dung sau vào.
import React, { useState, useEffect } from "react";

function Title() {
  const [title, setTitle] = useState();

  useEffect(() => {
    fetch("/district")
      .then((response) => response.json())
      .then((data) => {
        console.log("Title: " + data.district);
        setTitle(data.district);
      });
  }, []);

  return <div><h1>{title}</h1></div>;
}

export default Title;
- Ở đây là một hook component cơ bản với title là tên quận mà chúng ta cần.
- Ta lấy thực hiện giao thức GET với api
/district, Reactjs sẽ tự động map chúng với proxy trongpackage.json - Tại App Component return:
class App extends React.Component {
  constructor() {
    super();
  }
  render() {
    const result = <Result permission={this.state.permission} />;
    return (
      <div className="App" >
        <Title />
      </div>
    );
  }
}
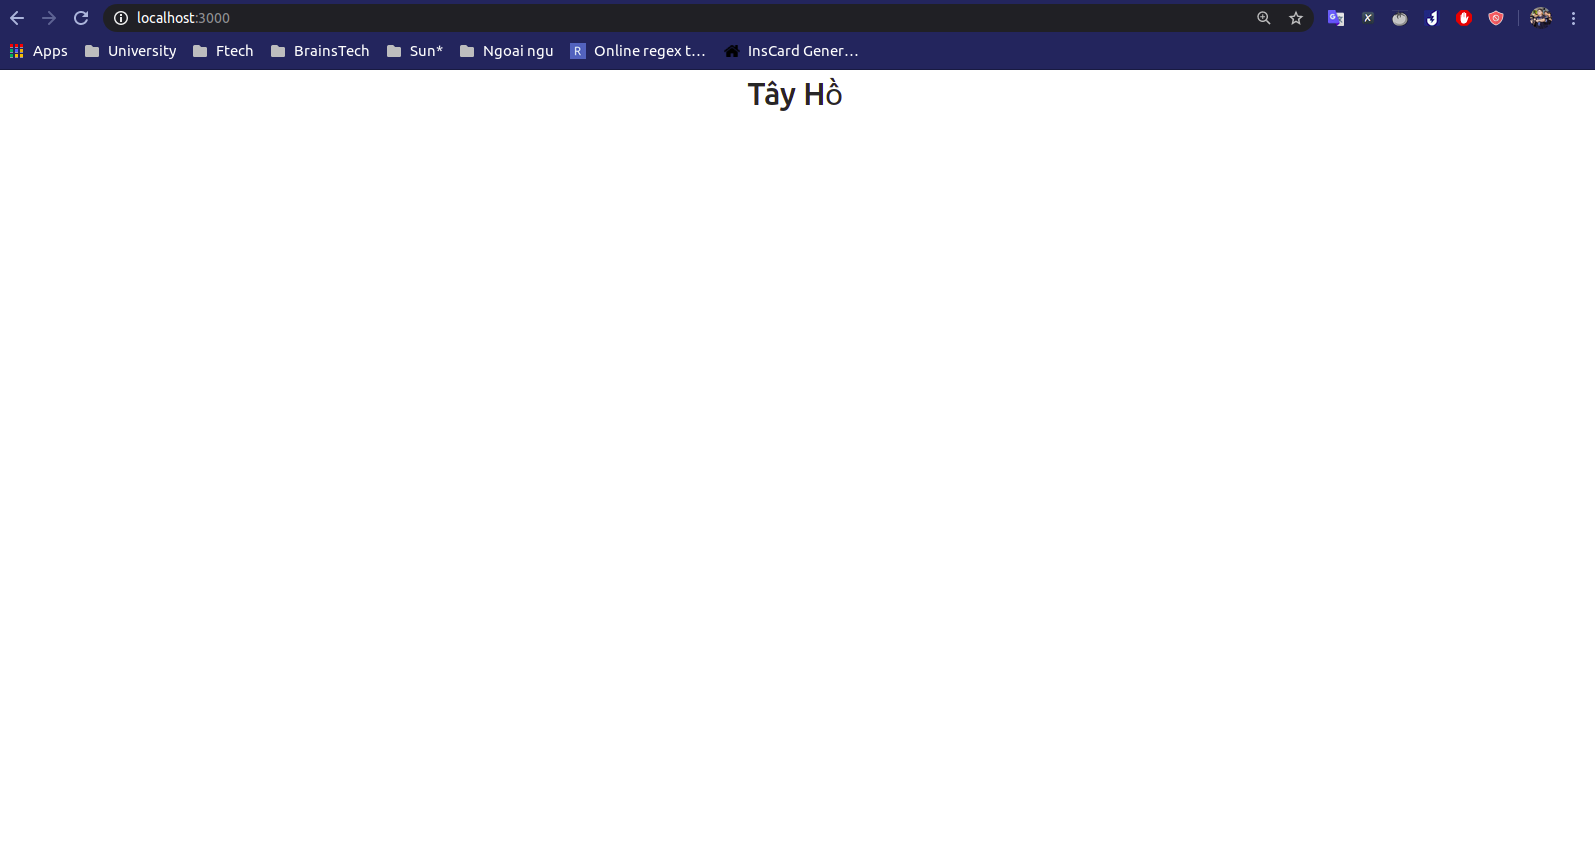
- Ta được màn hình:
![]()
Tạo Form gửi ảnh
- Tạo file ImageUpload.js
- Ta sẽ sử dụng Form component của antd.
class ImageUpload extends React.Component {
  constructor(props) {
    super(props);
    this.formItemLayout = {
      labelCol: {
        span: 6,
      },
      wrapperCol: {
        span: 14,
      },
    };
    this.state = {
      image: {
        url: null,
        file: null,
      },
      wards: [],
    };
  }
  render() {
    return (
      <Form
        name="validate_other"
        {...this.formItemLayout}
        onFinish={}
      >
        <Form.Item
          name="ward"
          label="Phường"
          hasFeedback
          rules={[
            {
              required: true,
              message: "Xin hãy chọn phường của công dân",
            },
          ]}
        >
          <Select placeholder="Chọn phường">
            {/* TODO: make gen function */}
          </Select>
        </Form.Item>
        <Form.Item
          name="image"
          label="Ảnh"
        >
          <input type="file" onChange={} /> <br />
          <img className="Image" src={} height="400" width="400" />
        </Form.Item>
        <Form.Item
          wrapperCol={{
            span: 12,
            offset: 6,
          }}
        > <br />
          <Button type="primary" htmlType="submit">
            Submit
            </Button>
        </Form.Item>
      </Form>
    );
  }
}
Ở đây ta có được màn hình của một form để upload ảnh và chọn quận với Select nhưng nó vẫn chưa hề có Data.
- Ta sẽ lấy dữ liệu quận qua api
/wards
    componentDidMount() {
        axios.get("/wards")
          .then((response) => response.data)
          .then((json_data) => this.setState({ wards: json_data.wards }));
      }
    renderWardOpt() {
        const { Option } = Select;
        let data = this.state.wards;
        let wards = data.map((item, idx) => (
          <Option value={item}>
            {item}
          </Option>
        ));
        return wards;
    }
    render() {
        const wards = this.renderWardOpt();
        ...
        <Select placeholder="Chọn phường">
            {/* TODO: make gen function */}
            {wards}
          </Select>
         ...
- Ở đây sau khi react được khởi tạo, gọi hàm
render()rồi nó sẽ lại Mount lại lần nữa và gọi đến hàmcomponentDidMount()và sẽ thay đổithis.state.wardsvới giá trị các quận từ API. VàrenderWardOptđược gọi trong render sẽ tạo ta các CardOption. - Nhưng giờ chọn ảnh vẫn chưa hiển thị vậy thì ta phải viết một hàm biến file tải lên thành
ObjectURL - Và chúng ta sẽ phải xử lý event bấm nút submit. Form của
antdcho phép ta handle event này với việc gánonFinishtrong card Form.
    ...
    handleImage = event => {
        this.setState({
          image: {
            url: URL.createObjectURL(event.target.files[0]),
            file: event.target.files[0],
          }
        });
        // console.log("URL: ", URL.createObjectURL(event.target.files[0]));
    }
    onFinish = values => {
        let image = this.state.image.file;
        let ward = values.ward;
        const config = {
          headers: { "content-type": "multipart/form-data" }
        }
        var formData = new FormData();
        formData.append("ward", ward);
        formData.append("image", image);
        axios
          .post("/face", formData, config)
          .then(res => {
            this.props.returnResult(res);
          })
          .catch(err => console.warn(err));
     };
    render() {
        const wards = this.renderWardOpt();
        return (
          <Form
            name="validate_other"
            {...this.formItemLayout}
            onFinish={this.onFinish}
          >
          ...
          <input type="file" onChange={this.handleImage} /> <br />
          <img className="Image" src={this.state.image.url} height="400" width="400" />
          ...
- Ta gửi lên một POST Request tới
/facevới data là biếnFormData(). Ở đây, chúng ta còn cóthis.props.returnResult(res)để trả kết quả về cho Parent component là App xử lý. - Cuối cùng ta đã có một form ưng ý:
![]()

Tạo kết quả trả về
- Tạo file
Result.jsvà viết nội dung sau đây:
function Result(props) {
    const [permission, setPermission] = useState();
    useEffect(() => {
        if (props.permission === true) {
            console.log("Ok");
            setPermission("Mời bạn ra lấy gạo");
        }
        else if (props.permission === false) {
            console.log("Ko ok");
            setPermission("Hôm nay bạn đã lấy gạo rồi mà");
        }
        else {
            setPermission("")
        }
    }, [props.permission]);


    return (<div>
        <h2>{permission}</h2>
    </div>);
}
- Component này nhận giá trị gửi từ Component App là permission, là kết quả trả về từ request POST bên trên.
useEffecttại đây thay đổi khi màprops.permissionthay đổi.- Sửa lại App như sau đây:
class App extends React.Component {
  constructor() {
    super();
    this.state = {
      permission: null
    }
  }

  getResult = (res) => {
    let data = res.data
    this.setState({
      permission: data.permission,
    });
    console.log(res);
  }


  render() {
    const result = <Result permission={this.state.permission} />;
    return (
      <div className="App" >
        <Title />
        <ImageUpload
          returnResult={this.getResult}
        />
        <br />
        <Result permission={this.state.permission}/>
      </div>
    );
  }
}
- Ta truyền vào component ImageUpload hàm getResult để lấy lại response của server cho App, thay đổi giá trị
this.state.permissiongán vào trong component Result.
Kết quả:
Tại đây bạn sẽ có một màn hình như dưới đây:
 Hoặc
Hoặc
 Giờ chúng ta đã hoàn thành 1 project AI đơn giản rồi. Có câu hỏi gì hoặc bình luận gì các bạn hãy để lại ở dưới nhé. Xin cảm ơn các bạn đã theo dõi đến tận đây ^_^.
All rights reserved
