Handle notification FCM Android
Bài đăng này đã không được cập nhật trong 4 năm
1. Giới thiệu
- Chào các bạn, trong bài này mình sẽ giới thiệu với các bạn về FCM (Firebase Cloud Messaging), kĩ thuật dùng để truyền tải dữ liệu, thông điệp từ server đến các thiết bị di động (Android, IOS), cụ thể ở đây mình sẽ trình bày về Android. Với kỹ thuật này, bạn có thể tạo các thông tin quảng cáo, tin tức, update dữ liệu từ server đến các thiết bị đã được cài app của mình.
- FCM yêu cầu thiết bị Android 4.0 trở lên và có cài đặt Google Play Service
2. Hướng dẫn cài đặt FCM
Đầu tiên, bạn cần đăng nhập vào trang https://firebase.google.com , sau đó tến hành tạo 1 project bằng cách click vào Add project
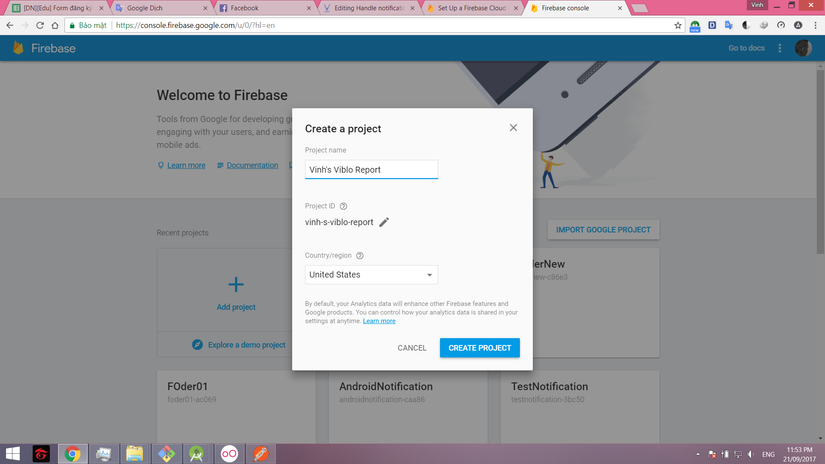 Nhập tên project và ấn Create project, bạn sẽ được chuyển đế màn hình tiếp theo
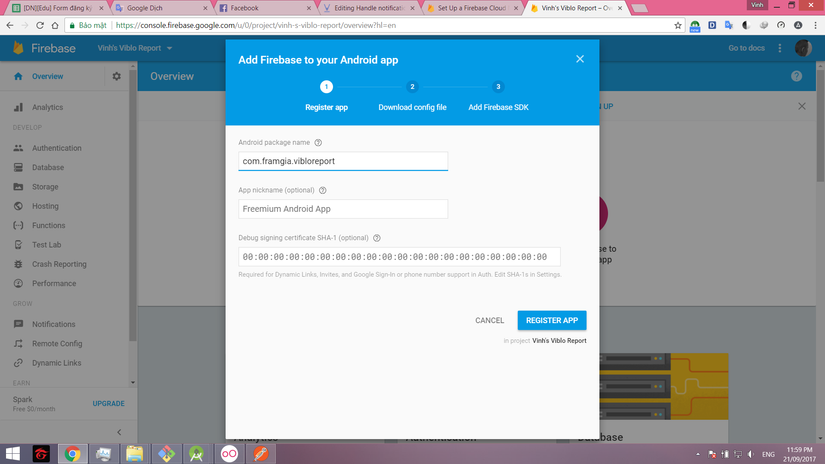
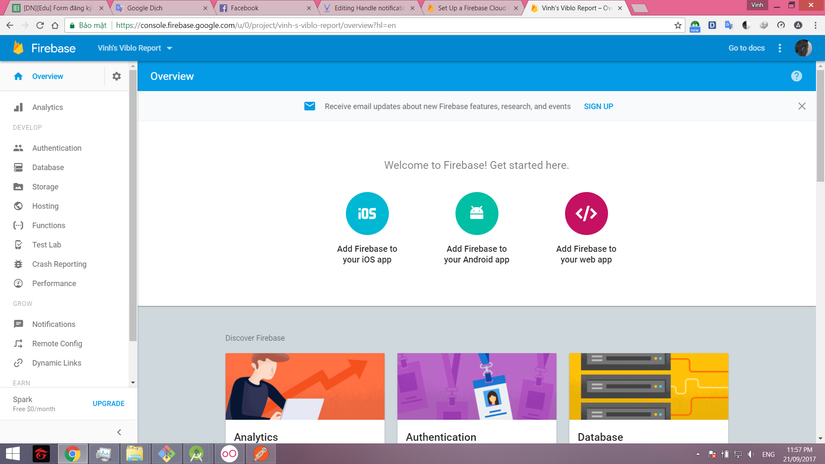 Chọn Add Firebase to your Android App, sau đó nhập chính xác Android Package name của bạn
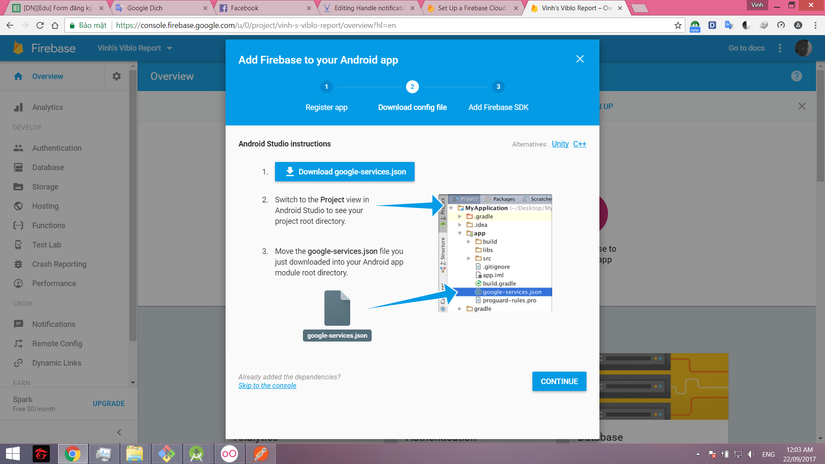
 Chọn Register App, sau đó lưu file google-services.json vào thư mục app trong app Android của bạn
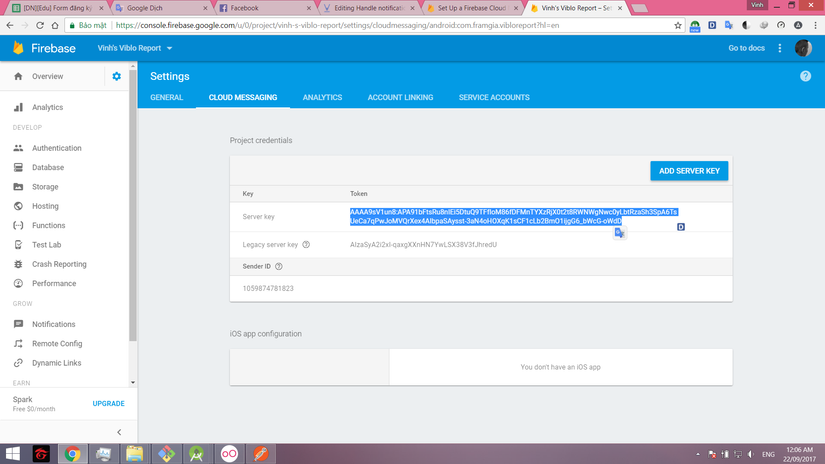
 Tại phần setting project, bạn sẽ được cung cấp Server key, server sẽ cần đến server key này để nhận diện app được cài trên các thiết bị di động
 OK, vậy là phía Firebase Console đã xong, bây giờ mình chuyển sang Android
Ở file build.gradle(Module: app) bổ sung đoạn apply plugin này vào dòng cuối của file
apply plugin: 'com.google.gms.google-services'
Tiếp tục bổ sung thêm trong phần dependencies
dependencies {
  // ...
  compile 'com.google.firebase:firebase-core:11.4.0'
  // ....
}
Tại file build.gradle(Project), bổ sung vào phần dependencies
dependencies {
 //....
    classpath 'com.google.gms:google-services:3.1.0'
//....
  }
Tại file AndroidManifest.xml Bạn cần bổ sung thêm
<service
            android:name=".FireBaseMessageService"
            tools:ignore="ExportedService">
            <intent-filter>
                <action android:name="com.google.firebase.MESSAGING_EVENT"/>
            </intent-filter>
        </service>
FireBaseMessageService là tên class cần tạo, để có thể xử lý dữ liệu truyền về, và
<service
            android:name=".FireBaseInstanceIDService"
            tools:ignore="ExportedService">
            <intent-filter>
                <action android:name="com.google.firebase.INSTANCE_ID_EVENT"/>
            </intent-filter>
        </service>
FireBaseInstanceIDService cũng là tên class cần tạo, để đăng ký id riêng biệt cho mỗi ứng dụng trên mỗi máy
Bây giờ tiến hành tạo class FireBaseInstanceIDService
public class FireBaseInstanceIDService extends FirebaseInstanceIdService {
    private static final String TAG = "FireBaseInstanceIDService";

    @Override
    public void onTokenRefresh() {
        getToken();
        Log.d(TAG, "Refreshed token: " + getToken());
    }

    public String getToken() {
        return FirebaseInstanceId.getInstance().getToken();   // Đăng ký token cho app từ Firebase
    }
}
hàm onTokenRefresh() sẽ được gọi khi
- Instance ID app đăng ký bị xóa
- App được khôi phục trên thiết bị mới
- Xóa và cài lại app
- Clear data app token sẽ được đăng ký cho mỗi app, việc của chúng ta là gửi token này cùng với Server key cho server để có thể truyền tải dữ liệu đến máy cụ thể có cài đặt app, dưới đây là đoạn code lấy token sau khi FireBaseInstanceIDService đăng ký được token, thường được viết ở màn login
private void tokenFireBaseServices() {
      FireBaseInstanceIDService fireBaseInstanceIDService = new FireBaseInstanceIDService();
        mToken = fireBaseInstanceIDService.getToken();
        Log.d(TAG, "Token FireBase: " + mDeviceId);
    }
Gửi lên server mToken cùng với tài khoản người dùng để có thể xác định người dùng cụ thể trên thiết bị cụ thể, tiến hành truyền dữ liệu theo ý muốn. Tiếp tục chúng ta sẽ tạo class FireBaseMessageService
public class FireBaseMessageService extends FirebaseMessagingService {
private static final String NOTIFICATION_NUMBER = "NOTIFICATION_NUMBER";
@Override
    public void onMessageReceived(RemoteMessage remoteMessage) {
        if (remoteMessage.getData().size() > 0) { // khi nhận được dữ liệu
        final String messageResponse = remoteMessage.getData().get("message");
            sendNotification(messageResponse); //Tiến hành gửi thông báo, tạo notification
         //.... hoặc tải dữ liệu, update dữ liệu, ra bất cứ lệnh gì cho app
        }
    }
    // ví dụ tạo notification
    private void sendNotification(String messageBody, String requestType) {
        SharedPreferences prefs =
                getSharedPreferences(MainActivity.class.getSimpleName(), Context.MODE_PRIVATE);
        int notificationNumber = prefs.getInt(NOTIFICATION_NUMBER, 0);
        Intent intent = new Intent(getApplicationContext(), MainActivity.class);
        intent.addFlags(Intent.FLAG_ACTIVITY_SINGLE_TOP | Intent.FLAG_ACTIVITY_CLEAR_TOP);

        PendingIntent pendingIntent =
                PendingIntent.getActivity(this, 0, intent,
                        PendingIntent.FLAG_UPDATE_CURRENT);  //dữ liệu dẽ được truyền đi khi nhấn vào notification

        Uri uri = RingtoneManager.getDefaultUri(RingtoneManager.TYPE_NOTIFICATION);
        NotificationCompat.Builder notificationBuilder =
                new NotificationCompat.Builder(this).setCategory(NotificationCompat.CATEGORY_PROMO)
                        .setLargeIcon(BitmapFactory.decodeResource(getResources(),
                                R.mipmap.ic_launcher_round))
                        .setAutoCancel(true)
                        .setSmallIcon(R.drawable.ic_notification_w)
                        .setContentText(messageBody)
                        .setAutoCancel(true)
                        .setColor(Color.parseColor(ColorManagers.COLOR_GREEN_DARK))
                        .setSound(uri)
                        .setContentIntent(pendingIntent)
                        .setPriority(NotificationCompat.PRIORITY_HIGH)
                        .setDefaults(NotificationCompat.DEFAULT_ALL);
        NotificationManager notificationManager =
                (NotificationManager) getSystemService(Context.NOTIFICATION_SERVICE);

        notificationManager.notify(notificationNumber, notificationBuilder.build());

        // Thông thường, chỉ với đoạn code trên, các notification khi được tạo sẽ che khuất lấy nhau, cái mới đè lên trên cái cũ (One line) ,
       // đoạn code tiếp sau đây sẽ giải quyết chuyện đó, các thanh thông báo sẽ xếp chồng lên nhau, nhưng ko che khuất lẫn nhau,
        //thông báo mới sẽ xếp lên trên thông báo cũ (Multi line), thuận tiện cho việc click chọn notification cụ thể
        SharedPreferences.Editor editor = prefs.edit();
        notificationNumber++;
        editor.putInt(NOTIFICATION_NUMBER, notificationNumber);
        editor.apply();
    }

}
OK, vậy là mình đã trình bày xong kỹ thuật FCM Android, hy vọng khi làm theo ví dụ này, app của bạn sẽ chạy ngon như cơm mẹ nấu, chúc thành công.
All rights reserved
