Giới thiệu về MotionLayout (Part 2)
Bài đăng này đã không được cập nhật trong 6 năm
Ở bài viết trước, tôi đã giới thiệu tới mọi người về MotionLayout, lý do về sao lại chọn MotionLayout, cách dùng, ConstraintSets và MotionScene (Tham khảo part 1 ở đây). Trong bài viết này, tôi sẽ tiếp tục giới thiệu về các tính năng cơ bản của MotionLayout thông qua các ví dụ, giới thiệu cách custom các thuộc tính, hoạt ảnh và các khung hình chính (keyframes).
Nội dung bài viết này sẽ gồm các phần:
1. Example 03: Giới thiệu việc custom các thuộc tính của MotionLayout
2.Example 04: Sử dụng ImageFilterView (1/2): cross-fade (Hiệu ứng làm mờ)
3.Example 05: Sử dụng ImageFilterView (2/2): saturation (Độ sáng tối của ảnh)
4. KeyFrames
4.1 Example 06: Keyframe (1/2): position
4.2 Example 07: Keyframe (2/2): attribute
Bây giờ chúng ta sẽ đi vào chi tiết từng phần.
1. Example 03 : Custom attribute
Trong part I, Example 02, chúng ta đã tạo ra MotionLayout với MotionScene độc lập. Chúng ta có thể tận dụng điều này để chỉ định việc transition trên các thuộc tính không liên quan đến vị trí.
Constraintset ban đầu chỉ gói gọn các quy tắc về layout, nhưng để motion động phong phú hơn, chúng ta thường cần chuyển đổi những thứ khác (chẳng hạn như màu nền). Trong ConstraintLayout 2.0, Constraintset cũng có thể lưu trữ trạng thái của các thuộc tính custom. Hãy theo dõi ví dụ bên dưới, đi kèm với việc di chuyển view từ phải qua trái và người lại, sẽ là việc thay đổi backgroud của view đó.
Để làm được như trên, trước đây, bạn phải viết mã trong phần code. Nhưng với ConstraintLayout 2.0, tôi chỉ cần chỉ định trực tiếp một thuộc tính trong file xml:
<Constraint
    android:id="@+id/button" ...>
    <CustomAttribute
        motion:attributeName="backgroundColor"
        motion:customColorValue="#D81B60"/>
</Constraint>
File MotionScene sẽ được update lại để có thể tạo nên được motion trên:
<?xml version="1.0" encoding="utf-8"?>
<MotionScene xmlns:android="http://schemas.android.com/apk/res/android"
    xmlns:motion="http://schemas.android.com/apk/res-auto">

    <Transition
        motion:constraintSetEnd="@+id/end"
        motion:constraintSetStart="@+id/start"
        motion:duration="1000"
        motion:interpolator="linear">
        <OnSwipe
            motion:dragDirection="dragRight"
            motion:touchAnchorId="@+id/button"
            motion:touchAnchorSide="right" />
    </Transition>

    <ConstraintSet android:id="@+id/start">
        <Constraint
            android:id="@+id/button"
            android:layout_width="64dp"
            android:layout_height="64dp"
            android:layout_marginStart="8dp"
            motion:layout_constraintBottom_toBottomOf="parent"
            motion:layout_constraintStart_toStartOf="parent"
            motion:layout_constraintTop_toTopOf="parent">
            <CustomAttribute
                motion:attributeName="backgroundColor"
                motion:customColorValue="#D81B60" />
        </Constraint>
    </ConstraintSet>

    <ConstraintSet android:id="@+id/end">
        <Constraint
            android:id="@+id/button"
            android:layout_width="64dp"
            android:layout_height="64dp"
            android:layout_marginEnd="8dp"
            motion:layout_constraintBottom_toBottomOf="parent"
            motion:layout_constraintEnd_toEndOf="parent"
            motion:layout_constraintTop_toTopOf="parent">
            <CustomAttribute
                motion:attributeName="backgroundColor"
                motion:customColorValue="#9999FF" />
        </Constraint>
    </ConstraintSet>

</MotionScene>
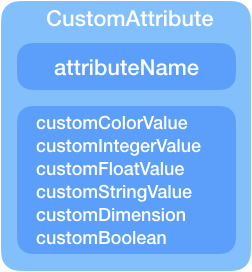
CustomAttribution được chỉ định với attributeName, cần khớp với các phương thức get/set của một đối tượng sao cho:
- getter: getName (ví dụ: getBackgroundColor)
- setter: setName (ví dụ: setBackgroundColor)
Các loại value khác khi sử dụng cũng cần phải được chỉ định ở bên dưới:
- customColorValue
- customIntegerValue
- customFloatValue
- customStringValue
- customDimension
- customBoolean
Cuối cùng, khi xác định một thuộc tính tùy chỉnh nào đó, thì cần xác định cả thuộc tính bắt đầu và kết thúc. (Như ví dụ trên thì màu background lúc bắt đầu là D81B60 và khi kết thúc motion là D81B60)
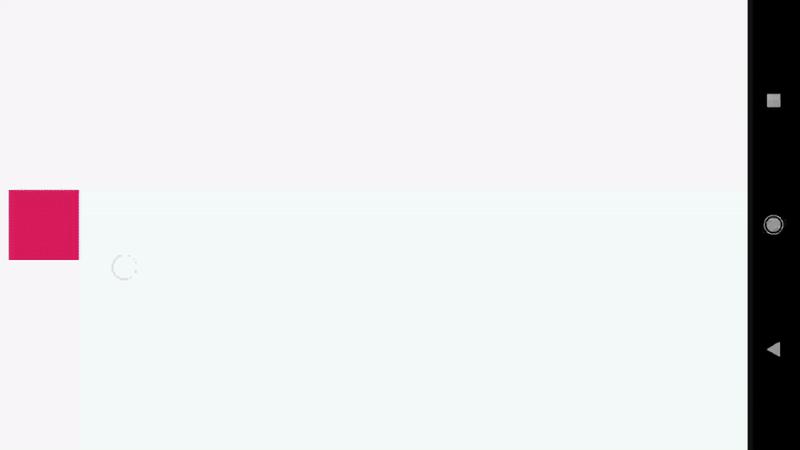
2. Example 04 : ImageFilterView (1/2): cross-fade
ConstraintLayout 2.0 cũng mang đến một lớp tiện ích nhỏ có tên ImageFilterView (là subclass của AppCompatImageView) để cho phép thực hiện dễ dàng việc thao tác và tạo hiệu ứng trên các image khi thực hiện các motion phức tạp.
Ví dụ trên thực hiện việc di chuyển một image view từ trái qua phải, đồng thời thay đổi hình ảnh hiển thị trên đó. Để àm được như trên, đầu tiên chúng ta phải tạo một file MotionLayout đi kèm với image như bên dưới:
<?xml version="1.0" encoding="utf-8"?>
<android.support.constraint.motion.MotionLayout
    xmlns:android="http://schemas.android.com/apk/res/android"
    xmlns:tools="http://schemas.android.com/tools"
    xmlns:app="http://schemas.android.com/apk/res-auto"
    android:id="@+id/motionLayout"
    app:layoutDescription="@xml/scene_04"
    android:layout_width="match_parent"
    android:layout_height="match_parent">

    <android.support.constraint.utils.ImageFilterView
        android:id="@+id/image"
        android:background="@color/colorAccent"
        android:src="@drawable/roard"
        **app:altSrc="@drawable/hoford"**
        android:layout_width="64dp"
        android:layout_height="64dp"/>

</android.support.constraint.motion.MotionLayout>
Nhìn vào đoạn code xml trên, chúng ta sẽ thấy sự khác biệt so với ImageView bình thường ở đây là thuộc tính altSrc trong ImageFilterView: File MotionScene sẽ chỉ áp dụng một thuộc tính tùy chỉnh duy nhất trên crossfade:
<?xml version="1.0" encoding="utf-8"?>
<MotionScene xmlns:android="http://schemas.android.com/apk/res/android"
    xmlns:motion="http://schemas.android.com/apk/res-auto">

    <Transition
        motion:constraintSetEnd="@+id/end"
        motion:constraintSetStart="@+id/start"
        motion:duration="1000"
        motion:interpolator="linear">
        <OnSwipe
            motion:dragDirection="dragRight"
            motion:touchAnchorId="@+id/image"
            motion:touchAnchorSide="right" />
    </Transition>

    <ConstraintSet android:id="@+id/start">
        <Constraint
            android:id="@+id/image"
            android:layout_width="100dp"
            android:layout_height="100dp"
            android:layout_marginStart="8dp"
            motion:layout_constraintBottom_toBottomOf="parent"
            motion:layout_constraintStart_toStartOf="parent"
            motion:layout_constraintTop_toTopOf="parent">
            <CustomAttribute
                motion:attributeName="crossfade"
                motion:customFloatValue="0" />
        </Constraint>
    </ConstraintSet>

    <ConstraintSet android:id="@+id/end">
        <Constraint
            android:id="@+id/image"
            android:layout_width="100dp"
            android:layout_height="100dp"
            android:layout_marginEnd="8dp"
            motion:layout_constraintBottom_toBottomOf="parent"
            motion:layout_constraintEnd_toEndOf="parent"
            motion:layout_constraintTop_toTopOf="parent">
            <CustomAttribute
                motion:attributeName="crossfade"
                motion:customFloatValue="1" />
        </Constraint>
    </ConstraintSet>

</MotionScene>
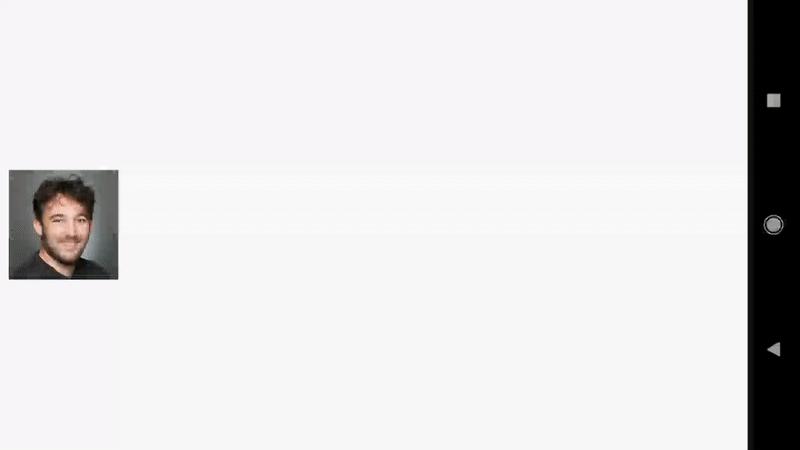
3. Example 05 : ImageFilterView (2/2): saturation (Độ sáng tối của ảnh)
ImageFilterView còn cung cấp nhiều khả năng hơn nữa:
saturation : 0 = grayscale, 1 = original, 2 = hyper saturated contrast : 1 = unchanged, 0 = gray, 2 = high contrast warmth : 1 = neutral, 2 = warm (red tint), 0.5 = cold (blue tint) crossfade (with app:altSrc)
Ví dụ kế tiếp này sẽ chỉ cho chung ta các thực hiện một motion đi kèm với việc chỉnh độ sáng-tối của ảnh:
Chỉ định độ sáng tối của ảnh có thể thực hiện đơn giản bằng cách sử dụng thuộc tính tùy chỉnh:
<CustomAttribute
    motion:attributeName="saturation"
    motion:customFloatValue="1" />
Dưới đây là file MotionLayout thay đổi để chạy được saturation:
<?xml version="1.0" encoding="utf-8"?>
<android.support.constraint.motion.MotionLayout xmlns:android="http://schemas.android.com/apk/res/android"
    xmlns:app="http://schemas.android.com/apk/res-auto"
    android:id="@+id/motionLayout"
    app:layoutDescription="@xml/scene_05"
    android:layout_width="match_parent"
    android:layout_height="match_parent">

    <android.support.constraint.utils.ImageFilterView
        android:id="@+id/image"
        android:src="@drawable/sunset2"
        android:scaleType="centerCrop"
        android:layout_width="match_parent"
        android:layout_height="300dp" />

</android.support.constraint.motion.MotionLayout>
File MotionScene tương ứng:
<?xml version="1.0" encoding="utf-8"?>
<MotionScene
    xmlns:android="http://schemas.android.com/apk/res/android"
    xmlns:motion="http://schemas.android.com/apk/res-auto">

    <Transition
        motion:constraintSetStart="@+id/start"
        motion:constraintSetEnd="@+id/end"
        motion:duration="1000">
        <OnSwipe
            motion:touchAnchorId="@+id/image"
            motion:touchAnchorSide="top"
            motion:dragDirection="dragUp" />
    </Transition>

    <ConstraintSet android:id="@+id/start">
        <Constraint
            android:id="@+id/image"
            android:layout_width="match_parent"
            android:layout_height="300dp"
            motion:layout_constraintStart_toStartOf="parent"
            motion:layout_constraintTop_toTopOf="parent">
            <CustomAttribute
                motion:attributeName="saturation"
                motion:customFloatValue="1" />
        </Constraint>
    </ConstraintSet>

    <ConstraintSet android:id="@+id/end">
        <Constraint
            android:id="@+id/image"
            android:layout_width="match_parent"
            android:layout_height="300dp"
            motion:layout_constraintBottom_toBottomOf="parent"
            motion:layout_constraintEnd_toEndOf="parent">
            <CustomAttribute
                motion:attributeName="saturation"
                motion:customFloatValue="0" />
        </Constraint>
    </ConstraintSet>

</MotionScene>
4. Keyframes
Ý tưởng chung cho MotionLayout là các trạng thái "tạm dừng" được implement dưới dạng ConstraintSets. Bằng cách này, kết quả sẽ chính xác với các kích thước màn hình khác nhau. Về cơ bản, MotionLayout sẽ hoạt động giống như một ConstraintLayout điển hình. Trong một số trường hợp, bạn có thể muốn có trạng thái trung gian - trạng thái phải trải qua, nhưng không phải là trạng thái dừng ở đó, lúc này bạn có thể chỉ định nhiều hơn hai ConstraintSets, nhưng cách tiếp cận dễ dàng hơn là sử dụng Keyframes.
Keyframes can be applied to position or to attribute values; they basically let you specify a change at a point in time during the transition.
Ví dụ: khi được 25% của quá trình transition, widget sẽ chuyển sang màu đỏ; hoặc khi được 50% của quá trình transition, widget sẽ di chuyển đi lên.
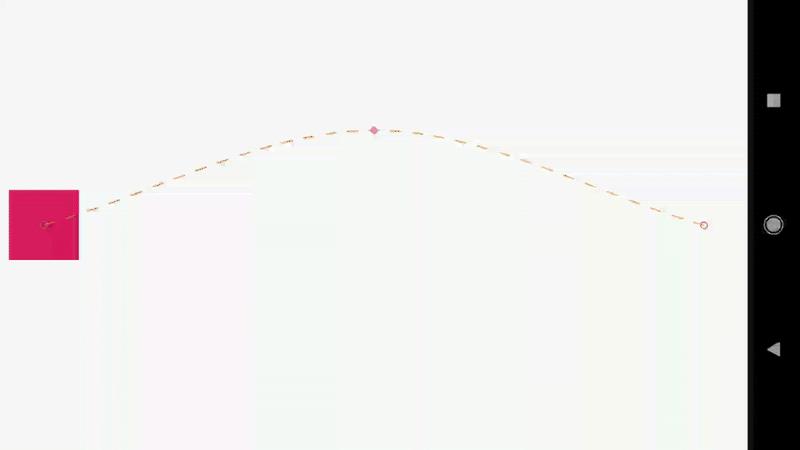
4.1 Keyframe (1/2): position
Có một số cách (pathRelative, deltaRelative, ParentRelative) có thể thiết lập vị trí chính xác của keyframe (KeyPocation), tôi sẽ đề cập chi tiết ở phần sau trong loạt bài này.
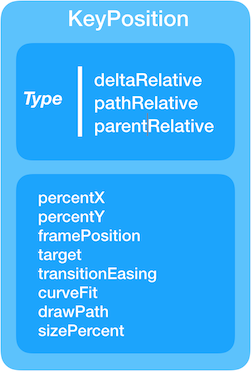
Ở đây, cách thức chỉ định một trạng thái trung gian xảy ra ở mức 50% của quá trình transition, được định vị tại vị trí 25% màn hình theo chiều Y:
<Transition ...>
    <KeyFrameSet>
        <KeyPosition
            motion:keyPositionType="parentRelative"
            motion:percentY="0.25"
            motion:framePosition="50"
            motion:target="@+id/button"/>
    </KeyFrameSet>
</Transition>
File Motion như bên dưới:
<?xml version="1.0" encoding="utf-8"?>
<android.support.constraint.motion.MotionLayout xmlns:android="http://schemas.android.com/apk/res/android"
    xmlns:tools="http://schemas.android.com/tools"
    xmlns:app="http://schemas.android.com/apk/res-auto"
    android:id="@+id/motionLayout"
    app:layoutDescription="@xml/scene_06"
    android:layout_width="match_parent"
    android:layout_height="match_parent">

    <View
        android:id="@+id/button"
        android:background="@color/colorAccent"
        android:layout_width="64dp"
        android:layout_height="64dp" />

</android.support.constraint.motion.MotionLayout>
Kết quả thu được sẽ như sau:
File MotionScene rất giống với file trước đây mà chúng ta đã thấy, cùng với phần tử KeyPocation:
<?xml version="1.0" encoding="utf-8"?>
<MotionScene
    xmlns:android="http://schemas.android.com/apk/res/android"
    xmlns:motion="http://schemas.android.com/apk/res-auto">

    <Transition
        motion:constraintSetStart="@+id/start"
        motion:constraintSetEnd="@+id/end"
        motion:duration="1000"
        motion:interpolator="linear">
        <OnSwipe
            motion:touchAnchorId="@+id/button"
            motion:touchAnchorSide="right"
            motion:dragDirection="dragRight" />

        <KeyFrameSet>
            <KeyPosition
                motion:keyPositionType="parentRelative"
                motion:percentY="0.25"
                motion:framePosition="50"
                motion:target="@+id/button"/>
        </KeyFrameSet>
    </Transition>

    <ConstraintSet android:id="@+id/start">
        <Constraint
            android:id="@+id/button"
            android:layout_width="64dp"
            android:layout_height="64dp"
            android:layout_marginStart="8dp"
            motion:layout_constraintBottom_toBottomOf="parent"
            motion:layout_constraintStart_toStartOf="parent"
            motion:layout_constraintTop_toTopOf="parent">
            <CustomAttribute
                motion:attributeName="backgroundColor"
                motion:customColorValue="#D81B60"/>
        </Constraint>
    </ConstraintSet>

    <ConstraintSet android:id="@+id/end">
        <Constraint
            android:id="@+id/button"
            android:layout_width="64dp"
            android:layout_height="64dp"
            android:layout_marginEnd="8dp"
            motion:layout_constraintBottom_toBottomOf="parent"
            motion:layout_constraintEnd_toEndOf="parent"
            motion:layout_constraintTop_toTopOf="parent">
            <CustomAttribute
                motion:attributeName="backgroundColor"
                motion:customColorValue="#9999FF"/>
        </Constraint>
    </ConstraintSet>

</MotionScene>
4.2 Example 07 : Keyframe (2/2): attribute
Theo cách tương tự với vị trí keyframes, bạn có thể chỉ định giá trị thuộc tính tại một điểm cụ thể trong quá trình transition (sử dụng KeyAttribution).
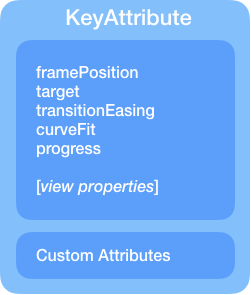
Có thể muốn chỉ định tỷ lệ scale và rotation của đối tượng mà đang thao tác ở cùng vị trí 50% để có được transition như bên dưới:
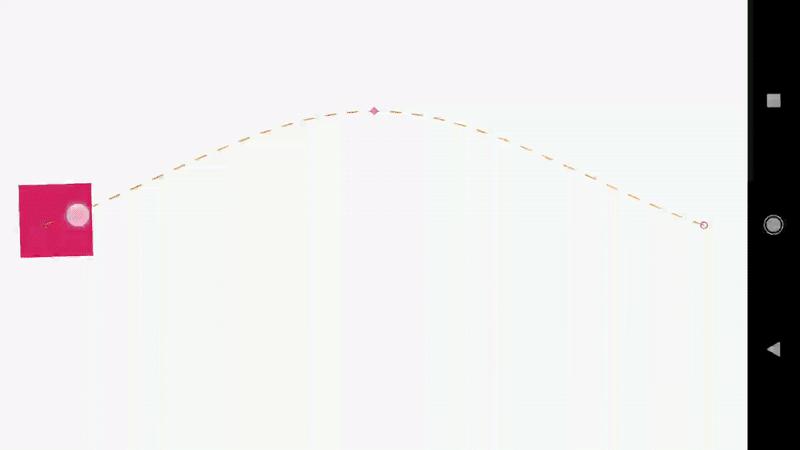
Để làm được như trên, chỉ cần thêm KeyAttribution trong KeyFrameSet:
<KeyFrameSet>
    <KeyAttribute
        android:scaleX="2"
        android:scaleY="2"
        android:rotation="-45"
        motion:framePosition="50"
        motion:target="@id/button" />
</KeyFrameSet>
File MotionLayout giống như ví dụ trên, khác biệt duy nhất là thêm KeyAttribution:
<?xml version="1.0" encoding="utf-8"?>
<MotionScene
    xmlns:android="http://schemas.android.com/apk/res/android"
    xmlns:motion="http://schemas.android.com/apk/res-auto">

    <Transition
        motion:constraintSetStart="@+id/start"
        motion:constraintSetEnd="@+id/end"
        motion:duration="1000"
        motion:interpolator="linear">
        <OnSwipe
            motion:touchAnchorId="@+id/button"
            motion:touchAnchorSide="right"
            motion:dragDirection="dragRight" />

        <KeyFrameSet>
            <KeyAttribute
                android:scaleX="2"
                android:scaleY="2"
                android:rotation="-45"
                motion:framePosition="50"
                motion:target="@id/button" />
            <KeyPosition
                motion:keyPositionType="screenRelative"
                motion:percentY="0.2"
                motion:framePosition="50"
                motion:target="@id/button"/>
        </KeyFrameSet>
    </Transition>

    <ConstraintSet android:id="@+id/start">
        <Constraint
            android:id="@+id/button"
            android:layout_width="64dp"
            android:layout_height="64dp"
            android:layout_marginStart="8dp"
            motion:layout_constraintBottom_toBottomOf="parent"
            motion:layout_constraintStart_toStartOf="parent"
            motion:layout_constraintTop_toTopOf="parent">
            <CustomAttribute
                motion:attributeName="backgroundColor"
                motion:customColorValue="#D81B60"/>
        </Constraint>
    </ConstraintSet>

    <ConstraintSet android:id="@+id/end">
        <Constraint
            android:id="@+id/button"
            android:layout_width="64dp"
            android:layout_height="64dp"
            android:layout_marginEnd="8dp"
            motion:layout_constraintBottom_toBottomOf="parent"
            motion:layout_constraintEnd_toEndOf="parent"
            motion:layout_constraintTop_toTopOf="parent">
            <CustomAttribute
                motion:attributeName="backgroundColor"
                motion:customColorValue="#9999FF"/>
        </Constraint>
    </ConstraintSet>

</MotionScene>
Bằng cách khéo léo sử dụng các chức năng nâng cao hơn của MotionLayout, bạn có thể tận dụng các attribute và keyframes để tạo ra animations hấp dẫn hơn. Tất cả source code của các ví dụ trên có thể tìm thấy tại đây.
Link bài viết gốc tại đây.
All rights reserved
