Flutter: Hiệu Ứng Chuyển Trang của Navigator giữ yên AppBar và BottomNavigationBar
Bài đăng này đã không được cập nhật trong 5 năm
Mở bài
Updated: Video hướng dẫn chi tiết với demo ở phút 18:13
Khi làm việc với Flutter các anh newbie chắc chắn gặp một vấn đề lớn về hiệu ứng Navigation. Sau đây mình xin trình bày một hướng dẫn nhỏ để giúp anh em newbie đỡ bỡ ngỡ và có cái nhìn đơn giản hơn về Navigator trong Flutter. Có rất nhiều bài hướng dẫn làm theo cách sau:
import 'package:flutter/material.dart';

void main() => runApp(const MyApp());

class MyApp extends StatelessWidget {
  const MyApp({Key key}) : super(key: key);

  @override
  Widget build(BuildContext context) {
    return const MaterialApp(
      title: 'Flutter Code Sample',
      home: MyStatefulWidget(),
    );
  }
}

class MyStatefulWidget extends StatefulWidget {
  const MyStatefulWidget({Key key}) : super(key: key);

  @override
  _MyStatefulWidgetState createState() => _MyStatefulWidgetState();
}

class _MyStatefulWidgetState extends State<MyStatefulWidget> {
  int _selectedIndex = 0;

  @override
  Widget build(BuildContext context) {
    return Scaffold(
      appBar: AppBar(
        title: const Text('Navigation Sample'),
      ),
      body: IndexedStack(
        children: [
          HomePage(),
          FavoritePage(),
        ],
        index: _selectedIndex,
      ),
      bottomNavigationBar: BottomNavigationBar(
        items: [
          BottomNavigationBarItem(
            icon: Icon(Icons.home),
            label: 'Home',
          ),
          BottomNavigationBarItem(
            icon: Icon(Icons.favorite),
            label: 'Favorite',
          ),
        ],
        backgroundColor: Colors.blueAccent,
        currentIndex: _selectedIndex,
        selectedItemColor: Colors.amber[800],
        onTap: (value) {
          return setState(() {
            _selectedIndex = value;
          });
        },
      ),
    );
  }
}

class FavoritePage extends StatelessWidget {
  @override
  Widget build(BuildContext context) {
    return Container(
      color: Colors.greenAccent,
      alignment: Alignment.center,
      child: Text('This is favorite page'),
    );
  }
}

class HomePage extends StatelessWidget {
  @override
  Widget build(BuildContext context) {
    return Container(
      color: Colors.yellowAccent,
      alignment: Alignment.center,
      child: Text('This is home page'),
    );
  }
}
Trên đây là một cách làm thường thấy, đó là dùng IndexedStack để chứa các màn hình con và thực hiện các hiệu ứng chuyển trang trong IndexedStack. Nhưng đối với mình nó có một nhược điểm lớn, vấn đề nằm ở hàm khởi tạo của các màn hình con. Phần lớn những bạn sử dụng BloC sẽ viết các logic code để gọi api trong hàm khởi tạo của các màn hình con, ngoài ra còn có nhiều logic khác đặt trong hàm khởi tạo nếu chúng ta hay sử dụng kế thừa đến StatelessWidget, vì chỉ có StatefulWidget mới có hàm initState. Để giải quyết nhược điểm này có rất nhiều cách, nhưng trong bài viết này mình sẽ bỏ qua việc giải quyết nhược điểm đó, mà thay vào đó mình sẽ tập trung vào việc thêm hiệu ứng trong khi thực hiện Navigator.push().
Flutter đã cung cấp cho chúng ta một hàm chuyển trang có hiệu ứng sẵn MaterialPageRoute (hãy xem demo bên dưới).
import 'package:flutter/material.dart';

void main() => runApp(MyApp());

class MyApp extends StatelessWidget {
  @override
  Widget build(BuildContext context) {
    return MaterialApp(
      title: 'Flutter Code Sample',
      home: HomePage(),
    );
  }
}

class FavoritePage extends StatelessWidget {
  @override
  Widget build(BuildContext context) {
    return Scaffold(
      appBar: AppBar(
        title: const Text('Navigation Sample'),
      ),
      body: Container(
        color: Colors.greenAccent,
        alignment: Alignment.center,
        child: Text('This is favorite page'),
      ),
      bottomNavigationBar: BottomNavigationBar(
        items: [
          BottomNavigationBarItem(
            icon: Icon(Icons.home),
            label: 'Home',
          ),
          BottomNavigationBarItem(
            icon: Icon(Icons.favorite),
            label: 'Favorite',
          ),
        ],
        backgroundColor: Colors.blueAccent,
        selectedItemColor: Colors.amber[800],
        onTap: (index) {
          Navigator.push(
            context,
            MaterialPageRoute(
              builder: (context) {
                Widget widget;
                if (index == 0) {
                  widget = HomePage();
                }
                if (index == 1) {
                  widget = FavoritePage();
                }
                return widget;
              },
            ),
          );
        },
      ),
    );
  }
}

class HomePage extends StatelessWidget {
  @override
  Widget build(BuildContext context) {
    return Scaffold(
      appBar: AppBar(
        title: const Text('Navigation Sample'),
      ),
      body: Container(
        color: Colors.yellowAccent,
        alignment: Alignment.center,
        child: Text('This is home page'),
      ),
      bottomNavigationBar: BottomNavigationBar(
        items: [
          BottomNavigationBarItem(
            icon: Icon(Icons.home),
            label: 'Home',
          ),
          BottomNavigationBarItem(
            icon: Icon(Icons.favorite),
            label: 'Favorite',
          ),
        ],
        backgroundColor: Colors.blueAccent,
        selectedItemColor: Colors.amber[800],
        onTap: (index) {
          Navigator.push(
            context,
            MaterialPageRoute(
              builder: (context) {
                Widget widget;
                if (index == 0) {
                  widget = HomePage();
                }
                if (index == 1) {
                  widget = FavoritePage();
                }
                return widget;
              },
            ),
          );
        },
      ),
    );
  }
}
Nhưng phần lớn chúng ta sẽ không sử dụng hiệu ứng chuyển trang của MaterialPageRoute mà sẽ viết lại hiệu ứng bằng PageRouteBuilder (đã có rất nhiều bài viết hướng dẫn cách thay đổi hiệu ứng chuyển trang tại đây). Nhưng vấn đề tiếp tục gặp phải, đó là khi chúng ta thực hiện Navigator.push() với PageRouteBuilder và hiệu ứng của chúng ta, thì toàn bộ màn hình của chúng ta sẽ nhận hiệu ứng (từ AppBar,body,bottomNavigationBar... có trên màn hình là nhận). Vậy có những trường hợp mình chỉ muốn thay đổi một phần của màn hình. Ví dụ: Hãy xem các ứng dụng Zalo, Shopee, Lazada. Mình chỉ muốn áp dụng hiệu ứng trượt sang phải cho body trong thẻ Scaffold thôi, mình muốn AppBar và bottomNavigationBar phải đứng yên, chỉ thay đổi nội dung và hiệu ứng trượt cho body.
Dưới đây là một trick nhỏ để làm việc đó.
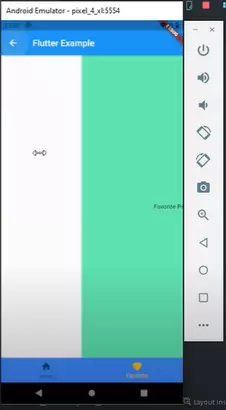
Với mong muốn kết quả như thế này
import 'package:flutter/material.dart';

void main() => runApp(MyApp());

class MyApp extends StatelessWidget {
  @override
  Widget build(BuildContext context) {
    return MaterialApp(
      title: 'Flutter Code Sample',
      home: HomePage(),
    );
  }
}

class FavoritePage extends StatelessWidget {
  final Animation<double> animation;

  FavoritePage({Key key, this.animation}) : super(key: key);

  @override
  Widget build(BuildContext context) {
    return Scaffold(
      appBar: AppBar(
        title: const Text('Navigation Sample'),
      ),
      body: AnimatedBuilder(
        child: Container(
          color: Colors.greenAccent,
          alignment: Alignment.center,
          child: Text('This is favorite page'),
        ),
        animation: animation,
        builder: (context, child) {
          return SlideTransition(
            position: Tween<Offset>(
              begin: Offset(1, 0),
              end: Offset(0, 0),
            ).animate(animation),
            child: child,
          );
        },
      ),
      bottomNavigationBar: BottomNavigationBar(
        items: [
          BottomNavigationBarItem(
            icon: Icon(Icons.home),
            label: 'Home',
          ),
          BottomNavigationBarItem(
            icon: Icon(Icons.favorite),
            label: 'Favorite',
          ),
        ],
        backgroundColor: Colors.blueAccent,
        selectedItemColor: Colors.amber[800],
        onTap: (index) {
          Navigator.push(
            context,
            PageRouteBuilder(
              pageBuilder: (context, animation, secondaryAnimation) {
                Widget widget;
                if (index == 0) {
                  widget = HomePage();
                }
                if (index == 1) {
                  widget = FavoritePage(
                    animation: animation,
                  );
                }
                return widget;
              },
            ),
          );
        },
      ),
    );
  }
}

class HomePage extends StatelessWidget {
  @override
  Widget build(BuildContext context) {
    return Scaffold(
      appBar: AppBar(
        title: const Text('Navigation Sample'),
      ),
      body: Container(
        color: Colors.yellowAccent,
        alignment: Alignment.center,
        child: Text('This is home page'),
      ),
      bottomNavigationBar: BottomNavigationBar(
        items: [
          BottomNavigationBarItem(
            icon: Icon(Icons.home),
            label: 'Home',
          ),
          BottomNavigationBarItem(
            icon: Icon(Icons.favorite),
            label: 'Favorite',
          ),
        ],
        backgroundColor: Colors.blueAccent,
        selectedItemColor: Colors.amber[800],
        onTap: (index) {
          Navigator.push(
            context,
            PageRouteBuilder(
              pageBuilder: (context, animation, secondaryAnimation) {
                Widget widget;
                if (index == 0) {
                  widget = HomePage();
                }
                if (index == 1) {
                  widget = FavoritePage(
                    animation: animation,
                  );
                }
                return widget;
              },
            ),
          );
        },
      ),
    );
  }
}
Hãy tập trung vào class FavoritePage lúc này body đã nhận được hiệu ứng trượt, và chỉ body được nhận. Với cách làm trên, chúng ta sẽ tự viết code trong hàm khởi tạo của màn hình bất kể khi nào chúng ta muốn, chúng ta có thể truyền params mà không sợ trường hợp không biết params là gì khi khởi tạo với IndexStack.
Mình xin chấm dứt bài viết tại đây. Các bạn hãy chạy thử các đoạn code trên để hiểu rõ hơn. Cảm ơn các bạn đã theo dõi. Bài viết có gì sai sót rất mong nhận được sự đóng góp của các bạn và các tiền bối. Bài viết tham khảo tại đây
All rights reserved
