Firebase Tutorial: Real-time Chat part 1
Bài đăng này đã không được cập nhật trong 4 năm
Để tạo ra 1 chat tool thì cũng không hẳn là dễ dàng. Hiện tại ko có 1 native UIKit controls nào được thiết kế đặc biệt cho chat, và bạn cũng sẽ cần 1 server để điểu phối các tin nhắn và cuộc trò chuyện giữa các users.
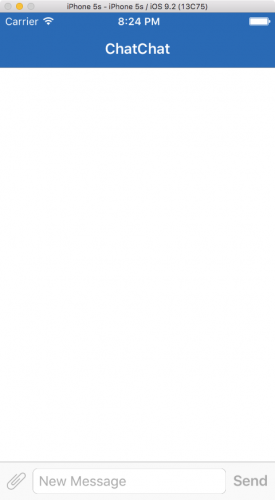
Trong tutorial này chúng ta sẽ build 1 app chat nặc danh (kiểu chat với người lạ trên haivl.com) ngày trước, tên là ChatChat với giao diện nhìn kiểu như sau:
Công việc của chúng ta sẽ như sau:
- Cài đặt Firebase SDK và JSQMessagesViewController bằng CocoaPods.
- Đồng bộ data thời gian thực với Firebase database.
- Authenticate anonymously với Firebase
- Khai thác và sử dụng JSQMessageViewController cho 1 chat UI hoàn chỉnh.
- Hiển thị cho người kia biết khi người này đang gõ ký tự.
Getting Started
Đầu tiên, bạn hãy download starter project từ đây về: chatchat
Mở Terminal lên, vào thư mục đang chứa folder project và cài đặt Pod: tạo 1 file PodFile trong root folder, bên trong Podfile, khai báo Firebase SDK và JSQMessagesViewController như sau:
platform :ios, "9.0"
use_frameworks!
target 'ChatChat' do
  pod 'Firebase'
  pod 'JSQMessagesViewController'
end
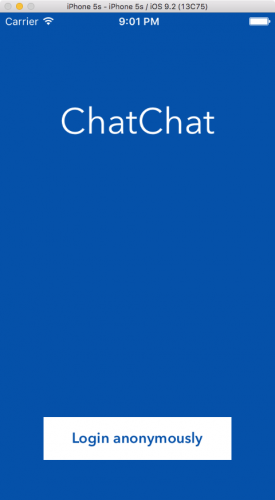
lưu file Podfile lại và run: pod install. Nó sẽ tạo ra ChatChat.xcworkspace. Open file này rồi build&run, bạn sẽ thấy app chạy với giao diện như dưới đây:
Create a Firebase Account
Truy nhập Firebase signup site để tạo 1 account mới (có thể sử dụng account gmail,...) và tạo 1 Firebase app. Để có thể Realtime chat, bạn cần phải sử dụng dịch vụ real-time database và authentication.
Enabling Anonymous Authentication
Firebase có thể để cho user login thông qua email hoặc social account, nhưng nó cũng có thể xác thực cho các user nặc danh, cụ thể sẽ cho bạn 1 unique identifier cho mỗi user mà không cần biết 1 thông tin nào về họ.
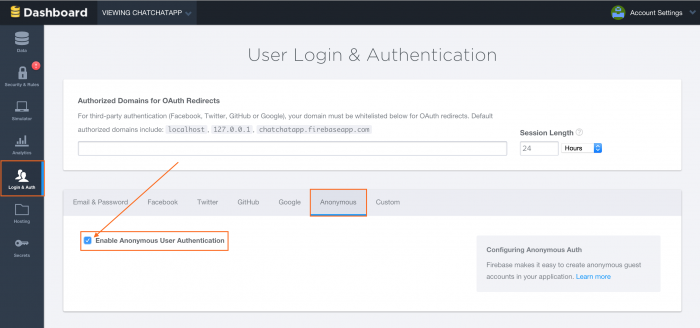
Anonymous authentication cũng giống như nói "Tao không biết mày là ai nhưng tao biết mày ở đó". Nó là giải pháp rất tốt trong trường hợp guest accounts và trial runs. Và nó rất phù hợp cho tutorial này, bởi vì mục đích của chúng ta chính là như vậy =)). Để setup anonymous authentication, mở Firebase App Dashboard, chọn tab Login&Auth, click Anonymous, và tick vào Enable Anonymous User Authentication checkbox:
Logging In
import Firebase vào trong file LoginViewController.swift Để login và chat, app cần phải mở 1 connection đến Firebase database. Thêm đoạn code sau vào LoginViewController.swift:
 class LoginViewController: UIViewController {

  // MARK: Properties
  var ref: Firebase! // 1

  override func viewDidLoad() {
    super.viewDidLoad()
    ref = Firebase(url: "https://<my-firebase-app>.firebaseio.com") // 2
  }
}
Đầu tiên, bạn tạo ra 1 tham chiếu tới Firebase database với tên là ref. Sau đó sử dụng Firebase App URL của bạn, bạn khởi tạo ref và tạo ra 1 connection tớ Firebase database.
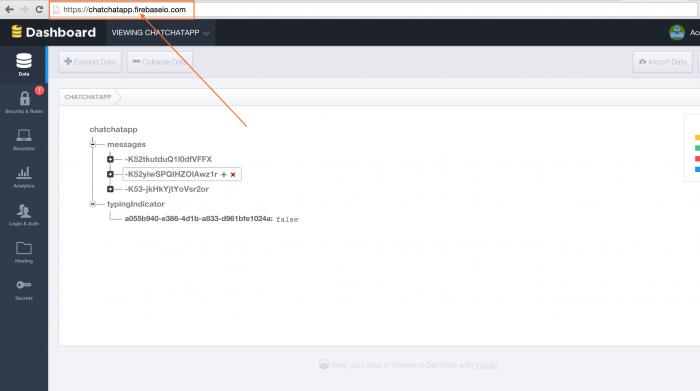
Nếu bạn không chắc URL của bạn là gì, bạn có thể tìm nó ở Firebase App Dashboard:
Để 1 user log in vào, bạn gọi authAnonymouslyWithCompletionBlock( trong database reference của bạn. Thêm đoạn code sau vào trong loginDidTouch(:
@IBAction func loginDidTouch(sender: AnyObject) {
  ref.authAnonymouslyWithCompletionBlock { (error, authData) in // 1
    if error != nil { print(error.description); return } // 2
    self.performSegueWithIdentifier("LoginToChat", sender: nil) // 3
  }
}
Từ ref, gọi method authAnonymouslyWithCompletionBlock(_ để log 1 user theo kiểu nặc danh. Tiếp theo đó là check authentication error. Bên trong closure, trigger segue để navigate tới ChatViewController. Bạn có thể thắc mắc vì sao đoạn code này không làm gì với authData. Trong khi tham số của callback này chứa 1 unique identifer cho 1 user, bạn không cần phải lo lắng về việc truyền nó đi. Sau khi đã xác thực 1 user, bạn sẽ có thể access authData như 1 property trong bất kỳ Firebase database reference nào như sau:
// if authenticated, it will print the current user information
print(ref.authData)
Creating the Chat Interface
JSQMessagesViewController có thể coi như là bản nâng cấp cả về sức mạnh và hiệu quả của UICollectionViewController trong việc sử dụng cho mục đích chat. Tutorial này sẽ tập trung vào 5 điều sau:
- Tạo message data
- Tạo bong bóng màu sắc trong mesage
- Bỏ đi avatar
- Thay đổi text color của 1 UICOllectionViewCell
- Hiển thị khi 1 user đang type.
Hầu hết mọi thứ bạn cần phải làm đòi hỏi bạn phải sử dụng override methods. JSQMessagesViewController extends từ JSQMessagesKeyboardControllerDelegate protocol, nên bạn chỉ cần override default implementations. Mở file ChatViewController.swift và import Firebase và JSQMessagesViewController, change subclass từ UIViewController thành JSQMessagesViewController.
Bây giờ, ChatViewController extends từ JSQMessagesViewController, bạn cần phải set giá trị khởi tạo cho senderId và senderDisplayName để app có thể uniquely indentify của người gửi message mặc dù nó không hề biết chính xác người đó là ai. Trong LoginViewController, bạn có thể sử dụng ref.authData để điền dữ liệu cụ thể của user trong trên ChatViewController khi chuẩn bị segue. Thêm method sau vào LoginViewController:
override func prepareForSegue(segue: UIStoryboardSegue, sender: AnyObject?) {
  super.prepareForSegue(segue, sender: sender)
  let navVc = segue.destinationViewController as! UINavigationController // 1
  let chatVc = navVc.viewControllers.first as! ChatViewController // 2
  chatVc.senderId = ref.authData.uid // 3
  chatVc.senderDisplayName = "" // 4
}
Ở đây chúng ta đã lấy ra view controller đích từ segue và cast nó sang UINavigationController. tiếp theo, cast view controller đầu tiên trong UINavigationController thành ChatViewController. Rồi gán user's ID trên local cho chatVc.senderId, đây là local ID mà JSQMessagesViewController sử dụng để hiển thị ra messages. Cuối cùng gán chatVc.senderDisplayName thành empty string bởi vì nó là anonymous chat room. Chú ý rằng bạn chỉ nhận đc 1 anonymous authentication sesion mỗi app session. Khi bạn restart app bạn sẽ nhận được 1 unique anonymous user khác. Thử start và stop simulator, bạn sẽ thấy những user IDs khác nhau. Build&Run bạn sẽ thấy:
Như vậy với việc kế thừa từ JSQMessagesViewController chugns ta đã có 1 chat UI hoàn chỉnh.
Setting Up the Data Source and Delegate
Để hiển thị messages bạn cần 1 data source để cung cấp các objects mà phù hợp với JSQMessageData, dĩ nhiên ta sẽ sử dụng JSQMessage đã được viết sẵn. Trên đầu của ChatViewController, define property sau:
// MARK: Properties
var messages = [JSQMessage]()
messages là 1 array để chứa các instances của JSQMessage trong app của bạn. Implement 2 delegates method sau trong ChatViewController:
override func collectionView(collectionView: JSQMessagesCollectionView!,
    messageDataForItemAtIndexPath indexPath: NSIndexPath!) -> JSQMessageData! {
  return messages[indexPath.item]
}

override func collectionView(collectionView: UICollectionView,
    numberOfItemsInSection section: Int) -> Int {
  return messages.count
}
Thực ra 2 method này không hề xa lạ, chính là cellForItemAtIndexPath và numberOfItemsInSection giống như trong collectionview.
Message Bubble Colors
Messages hiển thị trong collection view đơn giản chỉ có ảnh khung và text. Có 2 loại message: outgoing và incoming. Outgoing ở bên phải và icomming ở bên trái. Trong ChatViewController, thêm vào 2 properties:
var outgoingBubbleImageView: JSQMessagesBubbleImage!
var incomingBubbleImageView: JSQMessagesBubbleImage!
Và thêm vào method:
private func setupBubbles() {
  let factory = JSQMessagesBubbleImageFactory()
  outgoingBubbleImageView = factory.outgoingMessagesBubbleImageWithColor(
      UIColor.jsq_messageBubbleBlueColor())
  incomingBubbleImageView = factory.incomingMessagesBubbleImageWithColor(
      UIColor.jsq_messageBubbleLightGrayColor())
}
JSQMessagesBubbleImageFactory có methods để tạo ra images cho chat bubbles. Nó thậm chí có 1 category đuwowcj cung cấp bởi JSQMessagesViewController mà tạo ra bubble color sử dụng trong app Messages native. Sử dụng methods bubbleImageFactory.outgoingMessagesBubbleImageWithColor() và bubbleImageFactory.incomingMessagesBubbleImageWithColor(), bạn có thể tạo ra images cho outgoing và icoming messages tươgn ứng.
Thêm dòng lệnh call setupBubbles() vào viewDidLoad()
override func viewDidLoad() {
  super.viewDidLoad()
  title = "ChatChat"
  setupBubbles()
}

 ### Setting the Bubble Images

 Để set color cho bubble image ở mỗi message, bạn cần phải override 1 method của JSQMessagesColectionViewDataSource:
```swift

 override func collectionView(collectionView: JSQMessagesCollectionView!,
    messageBubbleImageDataForItemAtIndexPath indexPath: NSIndexPath!) -> JSQMessageBubbleImageDataSource! {
  let message = messages[indexPath.item] // 1
  if message.senderId == senderId { // 2
    return outgoingBubbleImageView
  } else { // 3
    return incomingBubbleImageView
  }
}
Đầu tiên bạn nhận được message dựa trên indexPath của item. Tiếp theo bạn check senderId của message để biết được nó là outgoing hay incoming message, qua đó sử dụng màu cho bubble hợp lý. Trong ChatViewController, thêm method sau:
override func collectionView(collectionView: JSQMessagesCollectionView!,
    avatarImageDataForItemAtIndexPath indexPath: NSIndexPath!) -> JSQMessageAvatarImageDataSource! {
  return nil
}
Và thêm đoạn sau vào viewDidLoad()
// No avatars
collectionView!.collectionViewLayout.incomingAvatarViewSize = CGSizeZero
collectionView!.collectionViewLayout.outgoingAvatarViewSize = CGSizeZero
JSQMessagesViewController có cung cấp việc hỗ trợ cho avatars, nhưng bạn hoàn toàn không cần avatar trong app chat anonymous. để remove avatar iamge, bạn chỉ cần đơn giản return nil cho mỗi message's avarar display và layout lại mỗi avatar ở CGSizeZero - no size. Build&Run app, sau khi login, bạn sẽ thấy blank chat screen như sau:
Creating Messages
Viết method sau trong ChatViewController:
 func addMessage(id: String, text: String) {
  let message = JSQMessage(senderId: id, displayName: "", text: text)
  messages.append(message)
}
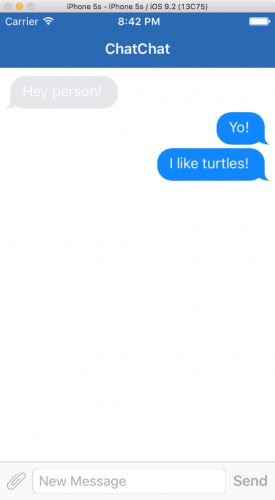
Helper method này tạo ra 1 JSQMessage với blank displayName và đưa nó vào dât source. Thêm 1 số hard code vào viewDidAppear(_ để xem cách message hiển thị ra:
override func viewDidAppear(animated: Bool) {
  super.viewDidAppear(animated)
  // messages from someone else
  addMessage("foo", text: "Hey person!")
  // messages sent from local sender
  addMessage(senderId, text: "Yo!")
  addMessage(senderId, text: "I like turtles!")
  // animates the receiving of a new message on the view
  finishReceivingMessage()
}
Build&Run app ta sẽ thấy messages xuất hiện trong conversation view như sau:
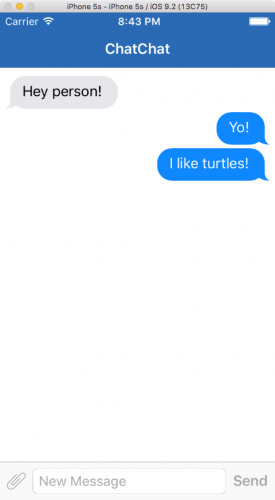
Message Bubble Text
Bạn có thể nhận ra rằng để làm hầu hết mọi việc trong JSQMessagesViewController, bạn chỉ cần override method. Để set text color, sử dụng collectionView(_:cellForItemAtIndexPath:).
 override func collectionView(collectionView: UICollectionView,
    cellForItemAtIndexPath indexPath: NSIndexPath) -> UICollectionViewCell {
  let cell = super.collectionView(collectionView, cellForItemAtIndexPath: indexPath)
      as! JSQMessagesCollectionViewCell

  let message = messages[indexPath.item]

  if message.senderId == senderId {
    cell.textView!.textColor = UIColor.whiteColor()
  } else {
    cell.textView!.textColor = UIColor.blackColor()
  }

  return cell
}
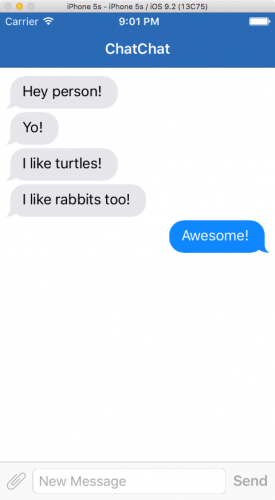
Khi đó, outgoing text sẽ có màu trắng và incomming sẽ có màu đen. Build&Run app, bạn sẽ thấy:
Part 1 kết thúc ở đây với việc hoàn thiện phần UI, part 2 chúng ta sẽ làm việc thực sự với Firebase.
All rights reserved
