
Face Detection on Custom Dataset using Detectron2 in Google Colab
Bài đăng này đã không được cập nhật trong 6 năm
Introduction
Face Detection
Face Detection là bài toán tìm vùng chứa mặt trong ảnh. Bài toán này có ứng dụng thực tế rất lớn như :
- Hệ thống an ninh ( bước đầu tiên để nhận dạng người )
- Tự đống lấy nét và phát hiện nụ cười để cho ra nhưng bức ảnh đẹp ( trong các điện thoại thông minh hiện nay,... )
- Phát hiện tuổi tác, chủng tốc và trạng thái cảm xúc để đánh dấu
Trong quá khứ, đây là một bài toán khó. Rất nhiều các phương pháp thủ công được đưa ra để cải thiện nó. Hiện nay, đã có rất nhiều mô hình deep learning đã có kết quả rất tốt trong bài toán này, các mô hình kể đến như Faster RCNN, Yolov3, Yolov4, ... Thậm chí, OPENCV còn đưa ra một tool có thể giải quyết bài toàn như Cascade Classify
Detectron2

Detetron2 là một framework để xây dựng bài toán Object Detetion and Segmentation. Được phát triển bới nhóm Facebook Research. Phiên bản Detectron2 này được cải tiến từ phiên bản trước đó. Detectron2 sử dụng Pytorch. Bạn đọc có thể tìm hiểu thêm tại đây.
Đặc biệt, điều làm Detectron2 trở lên mạnh mẽ là bởi vì nó có pre-trained models có sẵn tại Model Zoo. Bạn có thể fine-tuning model một cách dễ dàng, mình sẽ thực hiện điều này trong bài hướng dẫn dưới đây.
Trong bài hướng dẫn này, bạn đọc sẽ :
- Biết cách custom dataset để sử dụng thư viện Detectron2.
- Training một mô hình state-of-art về object detection hiện nay.
- Có thể áp dụng và mở rộng với các bài toán khác.
Installing Detectron2
Đầu tiên, chúng ta cần tải các thư viện cần thiết :
# install dependencies:
!pip install pyyaml==5.1 pycocotools>=2.0.1
import torch, torchvision
print(torch.__version__, torch.cuda.is_available())
!gcc --version
# opencv is pre-installed on colab
Sau đó, việc tiếp theo là tải thư viện Detectron2. Tại thời điểm mình viết bài viết này, phiên bản hiện tải của Detectron2 là 0.2:
# install detectron2: (colab has CUDA 10.1 + torch 1.5)
# See https://detectron2.readthedocs.io/tutorials/install.html for instructions
assert torch.__version__.startswith("1.5")
!pip install detectron2==0.2 -f https://dl.fbaipublicfiles.com/detectron2/wheels/cu101/torch1.5/index.html
Tiếp theo, import các thư viện cần thiết và các pakage từ Detectron2:
import torch, torchvision
import detectron2
from detectron2.utils.logger import setup_logger
setup_logger()

import glob

import os
import ntpath
import numpy as np
import cv2
import random
import itertools
import pandas as pd
from tqdm import tqdm
import urllib
import json
import PIL.Image as Image

from detectron2 import model_zoo
from detectron2.engine import DefaultPredictor, DefaultTrainer
from detectron2.config import get_cfg
from detectron2.utils.visualizer import Visualizer, ColorMode
from detectron2.data import DatasetCatalog, MetadataCatalog, build_detection_test_loader
from detectron2.evaluation import COCOEvaluator, inference_on_dataset
from detectron2.structures import BoxMode

import seaborn as sns
from pylab import rcParams
import matplotlib.pyplot as plt
from matplotlib import rc

%matplotlib inline
%config InlineBackend.figure_format='retina'

sns.set(style='whitegrid', palette='muted', font_scale=1.2)

HAPPY_COLORS_PALETTE = ["#01BEFE", "#FFDD00", "#FF7D00", "#FF006D", "#ADFF02", "#8F00FF"]

sns.set_palette(sns.color_palette(HAPPY_COLORS_PALETTE))

rcParams['figure.figsize'] = 12, 8

RANDOM_SEED = 42
np.random.seed(RANDOM_SEED)
torch.manual_seed(RANDOM_SEED)
Face Detection Data
Bộ dữ liệu có sẵn trên Kaggle. Được mô tả như sau: Khuôn mặt trong ảnh được đánh dấu bởi một khung giới hạn. Có khoảng gần 500 ảnh cùng với khoảng 1100 khuôn mặt đã được đánh dấu thủ công. Chúng ta cùng tải về file JSON chứa annotations của dữ liệu .
!gdown --id 1K79wJgmPTWamqb04Op2GxW0SW9oxw8KS
Load file bằng thư viện Pandas:
faces_df = pd.read_json('face_detection.json', lines=True)
Mỗi dòng chứ một annotation của một gương mặt. Nhiều dòng có thể cùng dẫn tới một ảnh (tức là một ảnh chứ nhiều gương mặt.
Data Preprocessing
Vì data lấy từ trên mạng, dữ liệu từ file JSON trên chứ link ảnh và annotations. Chúng ta cần tải về ảnh đó và cần chuẩn hóa các annotation:
os.makedirs("faces", exist_ok=True)

dataset = []

for index, row in tqdm(faces_df.iterrows(), total=faces_df.shape[0]):
    img = urllib.request.urlopen(row["content"])
    img = Image.open(img)
    img = img.convert('RGB')

    image_name = f'face_{index}.jpeg'

    img.save(f'faces/{image_name}', "JPEG")

    annotations = row['annotation']
    for an in annotations:

      data = {}

      width = an['imageWidth']
      height = an['imageHeight']
      points = an['points']

      data['file_name'] = image_name
      data['width'] = width
      data['height'] = height

      data["x_min"] = int(round(points[0]["x"] * width))
      data["y_min"] = int(round(points[0]["y"] * height))
      data["x_max"] = int(round(points[1]["x"] * width))
      data["y_max"] = int(round(points[1]["y"] * height))

      data['class_name'] = 'face'

      dataset.append(data)
Sau đó cho data thành data frame để có thể nhìn và làm việc một cách dễ dàng với các annotation:
df = pd.DataFrame(dataset)
print(df.file_name.unique().shape[0], df.shape[0])
409 1132
Như vậy, chúng ta có tổng cộng 409 ảnh và 1132 annotation. Lưu chúng vào file csv ( vì có thể sử dụng lại nó ) :
df.to_csv('annotations.csv', header=True, index=None)
Dataset
Load data và chia dữ liệu để 5% cho testing:
df = pd.read_csv('annotations.csv')

IMAGES_PATH = f'faces'

unique_files = df.file_name.unique()

train_files = set(np.random.choice(unique_files, int(len(unique_files) * 0.9), replace=False))
train_df = df[df.file_name.isin(train_files)]
test_df = df[~df.file_name.isin(train_files)]
Để biết số lượng class trong bài toán, thực hiện câu lệnh :
classes = df.class_name.unique().tolist()
Tiếp theo, chuẩn hóa dữ liệu về đúng dạng format được sử dụng trong Detectron2:
def create_dataset_dicts(df, classes):
  dataset_dicts = []
  for image_id, img_name in enumerate(df.file_name.unique()):

    record = {}

    image_df = df[df.file_name == img_name]

    file_path = f'{IMAGES_PATH}/{img_name}'
    record["file_name"] = file_path
    record["image_id"] = image_id
    record["height"] = int(image_df.iloc[0].height)
    record["width"] = int(image_df.iloc[0].width)

    objs = []
    for _, row in image_df.iterrows():

      xmin = int(row.x_min)
      ymin = int(row.y_min)
      xmax = int(row.x_max)
      ymax = int(row.y_max)

      poly = [
          (xmin, ymin), (xmax, ymin),
          (xmax, ymax), (xmin, ymax)
      ]
      poly = list(itertools.chain.from_iterable(poly))

      obj = {
        "bbox": [xmin, ymin, xmax, ymax],
        "bbox_mode": BoxMode.XYXY_ABS,
        "segmentation": [poly],
        "category_id": classes.index(row.class_name),
        "iscrowd": 0
      }
      objs.append(obj)

    record["annotations"] = objs
    dataset_dicts.append(record)
  return dataset_dicts
for d in ["train", "val"]:
  DatasetCatalog.register("faces_" + d, lambda d=d: create_dataset_dicts(train_df if d == "train" else test_df, classes))
  MetadataCatalog.get("faces_" + d).set(thing_classes=classes)

statement_metadata = MetadataCatalog.get("faces_train")
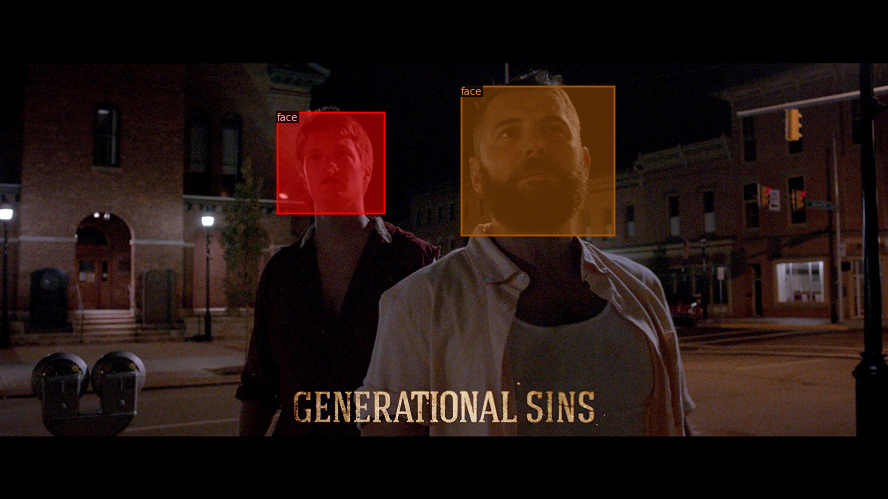
Sau đó, để xem mình đã format đúng chưa thì mình đã in ra ảnh cùng với bouding box khuôn mặt tương ứng :
from google.colab.patches import cv2_imshow
dataset_dicts = create_dataset_dicts(train_df,classes)
for d in random.sample(dataset_dicts, 3):
    img = cv2.imread(d["file_name"])
    visualizer = Visualizer(img[:, :, ::-1], metadata=statement_metadata, scale=0.5)
    out = visualizer.draw_dataset_dict(d)
    cv2_imshow(out.get_image()[:, :, ::-1])

Training
Tiếp đến, load config file và pre-trained model weights:
cfg = get_cfg()

cfg.merge_from_file(
  model_zoo.get_config_file(
    "COCO-InstanceSegmentation/mask_rcnn_X_101_32x8d_FPN_3x.yaml"
  )
)

cfg.MODEL.WEIGHTS = model_zoo.get_checkpoint_url(
  "COCO-InstanceSegmentation/mask_rcnn_X_101_32x8d_FPN_3x.yaml"
)
Chỉ định các bộ dữ liệu đã được khởi tạo ở trên, sử dụng chúng cho việc training và evaluation:
cfg.DATASETS.TRAIN = ("faces_train",)
cfg.DATASETS.TEST = ("faces_val",)
cfg.DATALOADER.NUM_WORKERS = 4
Thiết lập bộ config cho batch size, số lần lặp( MAX_ITERS) và learning rate (BASE_LR):
cfg.SOLVER.IMS_PER_BATCH = 2
cfg.SOLVER.BASE_LR = 0.001
cfg.SOLVER.WARMUP_ITERS = 1000
cfg.SOLVER.MAX_ITER = 1500
cfg.SOLVER.STEPS = (1000, 1500)
cfg.SOLVER.GAMMA = 0.05
Ngoài ra còn có giá trị:
- WARMUP_ITERS - learning rate bắt đầu từ 0 và đi đến giá trị đặt trước cho thuộc tính này
- STEPS-Số lượng lần lặp mà tại đó learning rate sẽ giảm xuống theo GAMMA Cuối cùng, thiết lập số lượng classes và thời gian đánh giá trên tập đánh giá :
cfg.MODEL.ROI_HEADS.BATCH_SIZE_PER_IMAGE = 32
cfg.MODEL.ROI_HEADS.NUM_CLASSES = len(classes)

cfg.TEST.EVAL_PERIOD = 500
Cuối cùng gọi đối tượng CocoTrainer và thực hiện training:
os.makedirs(cfg.OUTPUT_DIR, exist_ok=True)

trainer = CocoTrainer(cfg)
trainer.resume_or_load(resume=False)
trainer.train()
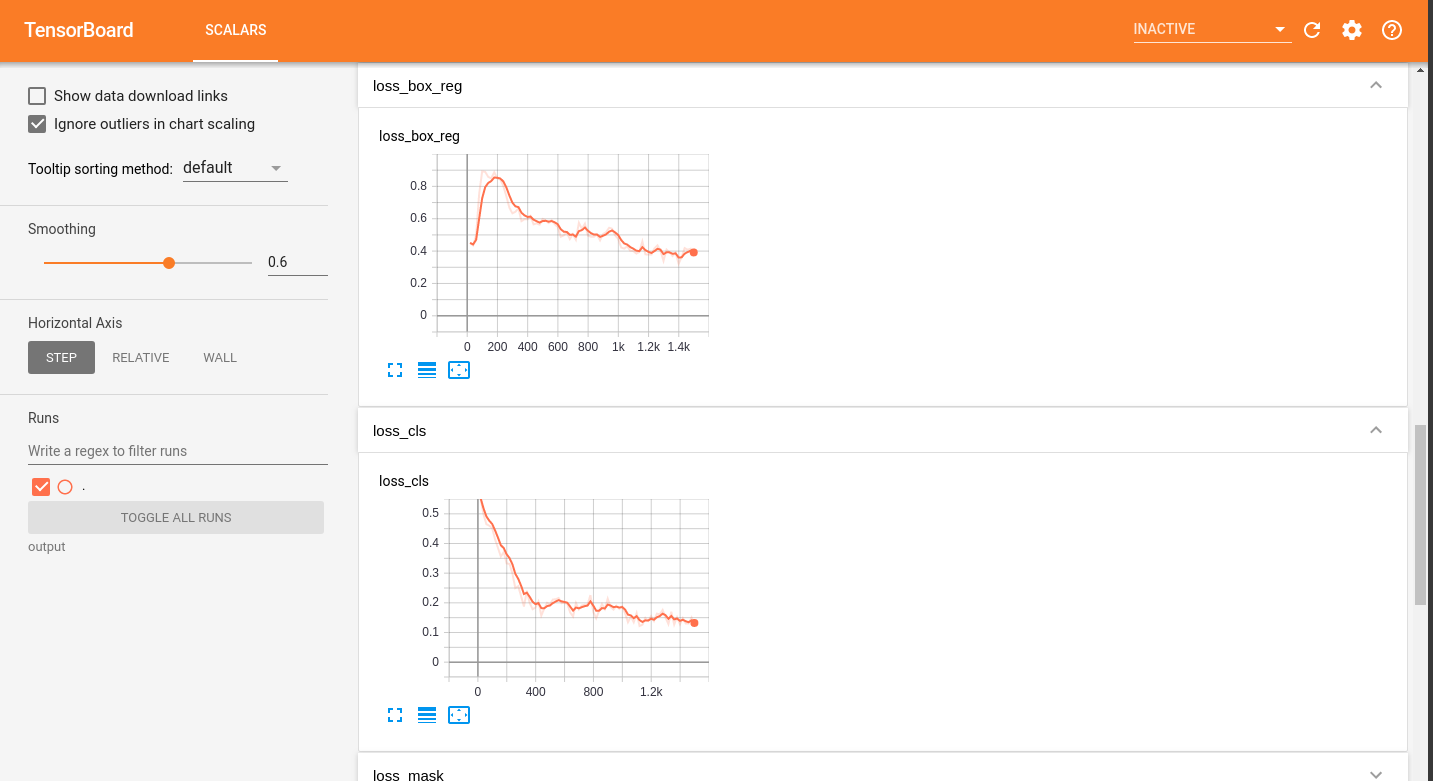
Sau khi train xong, để xem kết quả sự biến đổi các hàm loss trên tensorboard ta thực hiện câu lệnh sau:
# Look at training curves in tensorboard:
%load_ext tensorboard
%tensorboard --logdir output
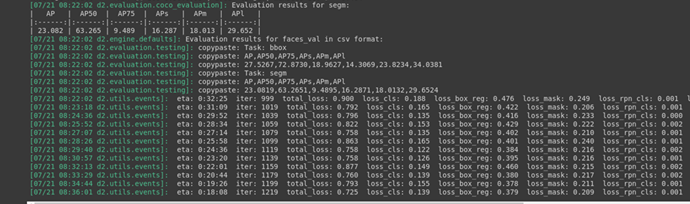
Evaluate model
Việc đánh giá mô hình object detection có khác so với mô hình phân loại hay mô hình hồi quy. Phép đo đánh giá mà bạn nên biết đó là IoU. Nó tính toán sự trùng lặp giữa 2 bouding box giữa predicted box do mô hình dự đoán mà ground truth box nhãn ban đầu. Giá trị nằm trong khoảng từ 0 đến 1.
**IoU = $\frac{area of overlap }{area of union}$**
Sử dụng IoU , bạn cần định nghĩa threshold (vd >0.5) để phân loại dự đoán là true positive (TP) hay false positive (FP).
Mình gợi ý bạn đọc tìm hiểu thêm về mAP(mean average precision) cho bài toàn object detection.
Testing
Load weight và đặt ngưỡng (threshold) cho confident score của các ouput đầu ra của mô hình :
cfg.MODEL.WEIGHTS = os.path.join(cfg.OUTPUT_DIR, "model_final.pth")
cfg.MODEL.ROI_HEADS.SCORE_THRESH_TEST = 0.85
predictor = DefaultPredictor(cfg)
evaluator = COCOEvaluator("faces_val", cfg, False, output_dir="./output/")
val_loader = build_detection_test_loader(cfg, "faces_val")
inference_on_dataset(trainer.model, val_loader, evaluator)
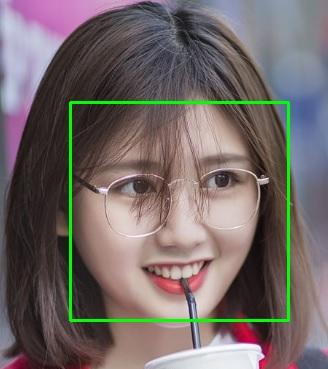
Cuối cùng phần hồi hộp nhất là đón xem kết quả mà mô hình dự đoán ra được :
os.makedirs("annotated_results", exist_ok=True)

test_image_paths = test_df.file_name.unique()
for clothing_image in test_image_paths[:2]:
  file_path = f'{IMAGES_PATH}/{clothing_image}'
  im = cv2.imread(file_path)
  outputs = predictor(im)
  v = Visualizer(im[:, :, ::-1],
                  metadata=statement_metadata,
                  scale=1.,
                  instance_mode=ColorMode.IMAGE   # remove the colors of unsegmented pixels. This option is only available for segmentation models
  )
  instances = outputs["instances"].to("cpu")
  instances.remove('pred_masks')
  out = v.draw_instance_predictions(instances)
  cv2_imshow(out.get_image()[:, :, ::-1])
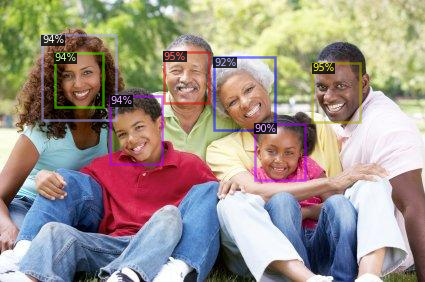
Kết quả cho ra rất tốt phải không nào
Conclusion
Vậy là bài viết của mình đến đây là kết thúc, thật dễ để custom một dataset để train detectron2 phải không nào. Bạn đọc hoàn toàn có thể tự custom lại một data và train nó một cách dễ dàng.Xin chào và hẹn gặp lại !
Reference
All rights reserved
