Deploy your website on an Ubuntu VPS with a Real Domain in Easy step
Part 2: Expanding Connectivity: Configuring Ports and Deploying Public Domain Names
1. Introduction
In Part 1, we successfully set up the localhost or LAN (Local Area Network) environment and learned basic commands for managing the Nginx server on Ubuntu.
In Part 2 we will continue to expand the accessibility of the website by:
- Configuring the network further to expose the public IP, allowing users from anywhere to access it.
- Guiding you through purchasing a domain name and pointing it to the public IP of the VPS.
This expansion will not only make your website more accessible, but it is also an essential step in deploying a fully functional website to a global audience. Let's explore some basic theory before we start setting it up!
2. Understanding IP and Port
2.1 What is a Port?
A port is a concept in computer networking that acts as a "gateway" for a computer to communicate with other devices or services over the network. Each port is associated with a specific application or service, directing data to the right place.
Common Ports
-
Port 80 (HTTP): Used for HTTP protocol, serving unencrypted (non-secure) websites. This is the default port for basic websites.
-
Port 443 (HTTPS): Used for HTTP over SSL/TLS, securing data transmitted over the network. Modern websites often use this port to ensure data safety.
-
Port 20 - 21 (FTP): Used for the File Transfer Protocol (FTP), supporting file uploads or downloads from the server.
-
Port 22 (SSH): Provides Secure Shell (SSH) protocol, allowing administrators to securely connect to a VPS for remote management.
2.2 What is an IP Address?
An IP (Internet Protocol) Address is a unique string of numbers assigned to each device on a network.
Each IP address consists of two main components:
- Network ID: Identifies the network the device belongs to.
- Host ID: Identifies the specific device within that network.
Example:
- IPv4:
192.168.1.1 - IPv6:
2001:0db8:85a3:0000:0000:8a2e:0370:7334
To check the IP on your device, use the command:
ifconfig
Example output:

eno1: flags=4163<UP,BROADCAST,RUNNING,MULTICAST>  mtu 1500
        inet 192.168.100.221  netmask 255.255.255.0  broadcast 192.168.100.255
        inet6 fe80::8e42:2ec0:47fb:6a2d  prefixlen 64  scopeid 0x20<link>
        inet6 fd00:db80::5  prefixlen 128  scopeid 0x0<global>
        inet6 fd00:db80::8e82:9b45:d8fd:1972  prefixlen 64  scopeid 0x0<global>
        inet6 2405:4802:80c3:88e0:ceea:13fb:3553:c7b5  prefixlen 64  scopeid 0x0<global>
        inet6 2405:4802:80c3:88e0::5  prefixlen 128  scopeid 0x0<global>
        inet6 2405:4802:80c3:88e0:bd52:fd58:9baf:f9a9  prefixlen 64  scopeid 0x0<global>
        inet6 fd00:db80::c173:6ff3:2152:e89b  prefixlen 64  scopeid 0x0<global>
        ether 10:e7:c6:7e:e6:0a  txqueuelen 1000  (Ethernet)
        RX packets 30445  bytes 5329671 (5.3 MB)
        RX errors 0  dropped 0  overruns 0  frame 0
        TX packets 21437  bytes 5290517 (5.2 MB)
        TX errors 0  dropped 0 overruns 0  carrier 0  collisions 0
inet 192.168.100.221 is the IPv4 address, and inet6 fe80::8e42:2ec0:47fb:6a2d is the IPv6 address.
IP Address Classification
- Private IP: Used in internal networks like home or office networks. Connections over LAN use private IPs, which cannot be accessed directly from the internet.
- Public IP: Assigned by your Internet Service Provider (ISP). It is used to identify devices or servers on the internet, allowing access from anywhere.
Once you have a clear understanding of Ports and IPs, we will proceed to configure your home router.
3. Setting Up and Configuring the Router for Public Internet Access
Note: Ensure that your ISP has enabled the Public IP for your router.
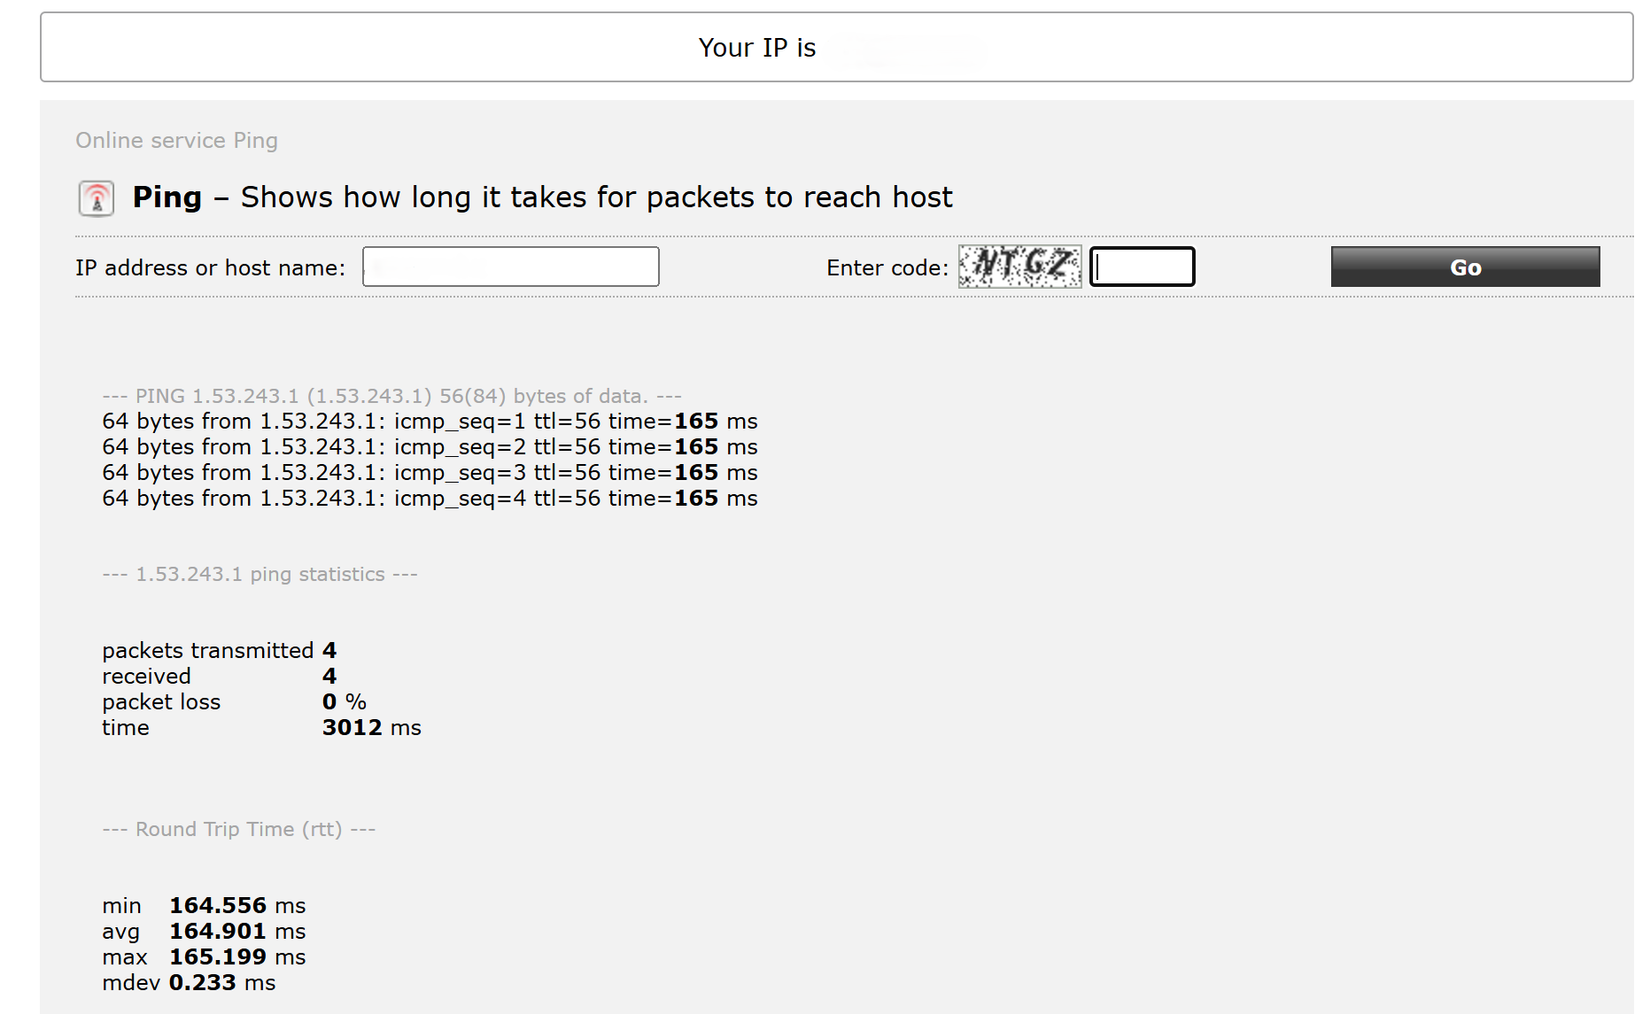
How to Check if Public IP is Open:
- Go to the ping.eu
- Look at the "Your IP" - section, which shows your public IP.
- Perform the test:
- Enter your IP address into the input field.
- Enter the verification code (Code).
- Click "Go."
- Check the result:
- If you get a response: Your public IP has been successfully opened.
- If you see "close": Your public IP is not open, and you need to contact your ISP for assistance.
Example image when successful:

3.1 Port Forwarding on the Router
Port forwarding is the process of redirecting traffic from a specific port on the Public IP to the internal IP address of the VPS or server.
Steps to Configure:
- Login to the Router Management Interface:
-
Open your browser and type the router’s IP address (usually
192.168.1.1or192.168.0.1). You can check this on your VPS with the command:ip route | grep default Example output: default via 192.168.1.1 dev wlan0 proto dhcp metric 600 -
Log in using the admin credentials (default username and password are usually printed on the back of the router).
-
- Find the Port Forwarding/Virtual Server Section:
- Depending on your router, this section may be under NAT Settings or Advanced Settings.
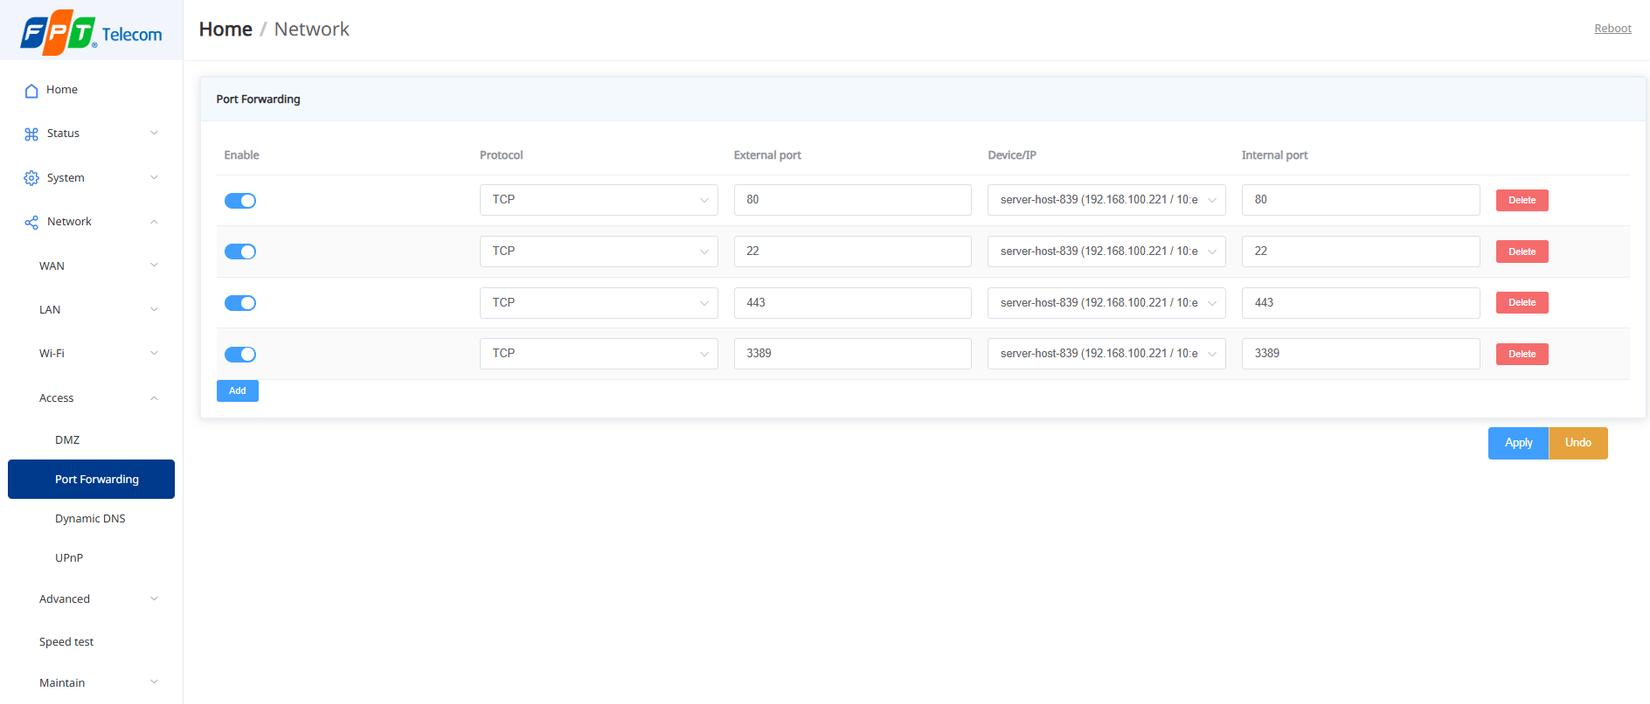
- On my router, it’s located under Network → Access → Port Forwarding.
- Add Port Configuration:
-
For example, to forward HTTP and HTTPS traffic to your VPS:
![]()
-
Protocol: TCP
-
External Port: The port users will use to access.
-
Internal IP: The internal IP address of the VPS/server.
-
Internal Port: The port the service (Nginx) is running on VPS.
-
- Save the Configuration..
3.2 Test Port Forwarding
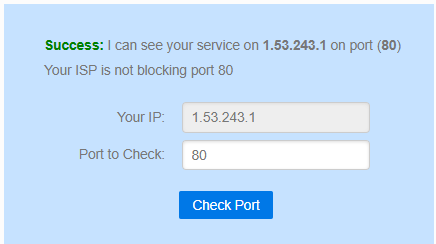
- Use online tools like canyouseeme.org to test your port.
-
Enter port
80or443to test the connection. -
If it shows "Success", the configuration is working.
![]()
-
Next, try accessing the browser using your_public_ip:80.

Now, you’ve successfully configured and opened public IP access through port 80. Next, we’ll learn about Domain Names and DNS.
4. Domain Names and DNS
4.1 What is a Domain Name?
A domain name is an easy-to-remember string of characters that is used to replace an IP address. Instead of remembering a complicated string of numbers, users can visit a website using a domain name like "example.com".
Domain Name Structure:
- Top-level domain (TLD): The last part of the domain name (e.g., .com, .org, .net, .vn).
- Second-level domain: The main name of the website (e.g., google in google.com).
- Subdomain: A prefix added to the main domain (e.g., mail in mail.google.com).
What is DNS?
DNS (Domain Name System) is the system that resolves domain names into corresponding IP addresses.
Common DNS Records:
- A Record: Links a domain to an IPv4 address.
- AAAA Record: Links a domain to an IPv6 address.
- CNAME Record: Alias for a domain (e.g., www to the root domain).
Now let's move on to the practical part: Buy a domain name at a reasonable cost to create your own website.
5. Domain Name Buying Guide
Steps to Buy a Domain Name:
🌐 Step 1: Register an Account
- Go to tenten.vn and register an account. After successfully registering, return to the homepage.
🔍 Step 2: Search for Domain Name
- Use the search bar to enter the Second-level domain (the main part of your website's name) that you want, then click search.
💡 Step 3: Choose a Top-level Domain
- Choose a Top-level domain (the suffix of the domain name). It is recommended to select inexpensive TLDs like .online or .click, which cost around 1.2$, suitable for your budget and educational purposes.
💳 Step 4: Payment
- Complete the payment for the domain. Make sure the payment is successful to secure the domain.
🖥️ Step 5: Manage Your Domain
- Go to id.tenten.vn to manage your domain. Click on "Services in Use → Domains" to see the detailed information of your domain.

When the status shows Active, you have successfully purchased the domain. Now, let’s proceed to point the domain to your public IP.
6. Pointing the Domain to Public IP
After successfully purchasing the domain, the next step is to point it to your Public IP of the VPS. This allows users to access the website using an easy-to-remember domain name (e.g., www.example.com) instead of a long, hard-to-remember IP address.
Steps to Point the Domain to Public IP:
-
Log in
- Go to https://id.tenten.vn/ and log in.
-
Chọn theo các bước sau
- Go to Services in Use → Domains → Actions (click the gear icon) → DNS Settings.
-
Cài DNS
-
Click Add, and a table will appear:
![Screenshot 2024-12-04 101640.png]()
Notes when configuring DNS records:
- If you select A Record, the value must be the IP address, e.g., 209.85.5.35.
- If you select CNAME Record, the value must be the domain name, e.g., hostingtocdo2.top.
- If you select MX Record, the value must be the mail server name, e.g., mail.
- If you select REDIRECT Record, the value must be the domain name, e.g., hostingtocdo2.top.
- If you select FRAME Record, the value must be the domain name, e.g., hostingtocdo2.top.
To point your domain to your public IP, enter as follows:
- Name: @
- Type: A
- Value: Your public IP address and click Save.
The DNS record will take effect in about 3 hours, but may take up to 24 hours.
You can check it using the VPS terminal with the following command:
ping Domain

Example:
ping example.online
If you receive a response, the domain has been successfully pointed to your public IP. You can now access the website directly using your domain name.
![Screenshot 2024-12-04 104625.png]()
-
Now that you’ve successfully pointed the domain to your public IP, your website can be accessed from anywhere in the world via your personal domain. This is an important milestone, not only for sharing your product, service, or idea with the community but also for enhancing your professionalism and personal brand.
But that’s not the end! A professional website needs to ensure security and optimize the user experience.
Trong Phần 3, chúng ta sẽ khám phá sâu hơn về:
- Cách cấu hình Nginx để phục vụ nhiều subdomain trên cùng một VPS.
- Các bước cài đặt HTTPS (SSL/TLS) để bảo mật kết nối và tăng sự tin tưởng từ người dùng.
- Hãy sẵn sàng để website của bạn trở nên chuyên nghiệp hơn nữa!
In Part 3, we will explore deeper:
- How to configure Nginx to serve multiple subdomains on the same VPS.
- Steps to install HTTPS (SSL/TLS) to secure connections and build trust with users.
- Get ready to make your website even more professional!
7. Thank You
Thank you for taking the time to follow along with me on this journey of setting up a website on a VPS Ubuntu server. I hope this guide has provided useful information, helping you feel more confident in deploying and managing your website. I greatly appreciate your feedback, as it will help me improve and provide even better content in the future. Feel free to share any questions or experiences you have in the comments.
Wishing you success on your journey of building and developing your tech projects! See you in Part 3 (10/12/2024)! 🙌
All rights reserved


