Dependency Injection - Dagger2 - Koin
Bài đăng này đã không được cập nhật trong 6 năm
Dependency Injection
Dependency Injection là gì?
In software engineering, dependency injection is a technique whereby one object (or static method) supplies the dependencies of another object. A dependency is an object that can be used (a service).
Dependency Injection là một cách để thực hiện để thực hiện inversion of Control Pattern áp dụng nguyên lí Dependency Inversion trong S.O.L.I.D (Có thể coi nó là một design pattern riêng cũng được).
Định nghĩa trên cùng thì mình lấy trên wikipekia. Đọc xong định nghĩa này có dễ hiểu không ạ. Không hề =)) Đầu tiên nghe nó khá là hàn lâm.
Trong định nghĩa thì nó nhiều từ mới này: Dependency này rồi Dependency injection. Xong rồi gì mà supplies dependencies =)) Loằng ngoằng nhỉ  .
.
Để hiểu được dependency là gì trong programming thì cần phải hiểu được ý nghĩa chung của nó là gì trước.
Theo mình hiểu thì Dependency or Dependent đơn giản nghĩa là phụ thuộc vào cái gì đó.
Trong cuộc sống hiện tại ngày nay thì cái dễ nhìn ra nhất là smartphone. Hầu hết mọi người đều có smartphone đúng không ạ. Vậy nếu chúng ta không sử dụng smartphone được không ???? uhm khó nhỉ.
Nếu không smartphone phone thì sao nghe gọi được. Nhưng còn tin nhắn công việc rồi nhiều bạn bán hàng facebook thì k smartphone không làm việc được này. Rồi không smartphone thì sao mà chụp ảnh sống ảo được @@ ==> Phần lớn chúng ta đang phụ thuộc vào smartphone
Hơi lan man một chút để hiểu thực tế phụ thuộc là gì. Trong lập trình, sự phụ thuộc được định nghĩa đơn giản như sau:
In Programming: When class A uses some functionality of class B, then its said that class A has a dependency of class B.
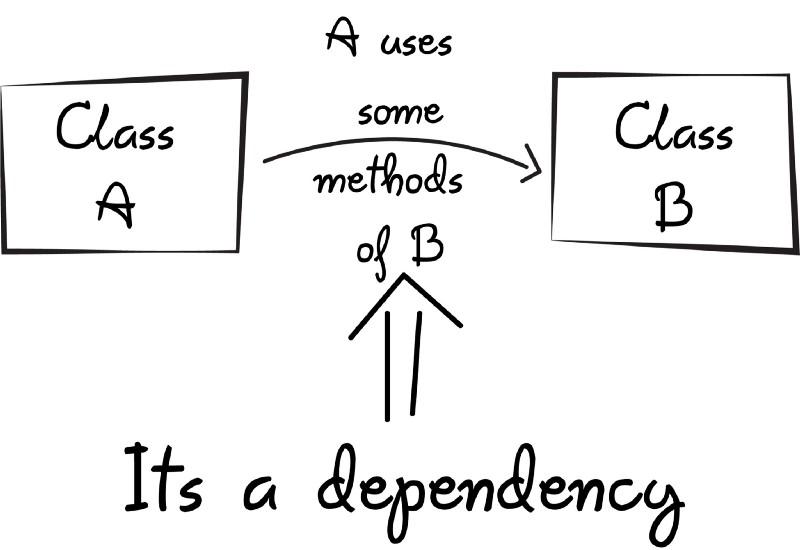
Trong Java hay Kotlin, để có thể sử dụng method của class khác, trước tiên cần phải tạo object của class đó
Class A{
	B b = new B()
	b.method1()
	b.method2()
}
Vậy để hiểu đơn giản thì:
So, transferring the task of creating the object to someone else and directly using the dependency is called Dependency injection.
Why Dependency Injection?
Mình có ví dụ như sau:
class Car{
    private Wheels wheel = new MRFWheels();
    private Battery battery = new ExcideBatttery();
    ...
Trong class Car vừa rồi tạo ra các dependency objects: wheel và battery Trông nó không có gì bất hợp lí ở thời điểm ban đầu cả. Nhưng nếu trong tương lai Car muốn sử dụng YokohamaWheels thay vì MRFWheels như hiện tại?
Nhiều bạn sẽ cho rằng chỉ cần xóa MRFWheels() thay bằng YokohamaWheels() là xong. Nếu làm như vậy mỗi lần thay đổi ta lại phải tạo lại đối tượng Car với thuộc tính mới như vậy.
Việc new một đối tượng mới trong một class khác tạo ra 1 hard dependency. Điều này làm cho code khó nâng cấp sửa đổi, cũng như khó testing.
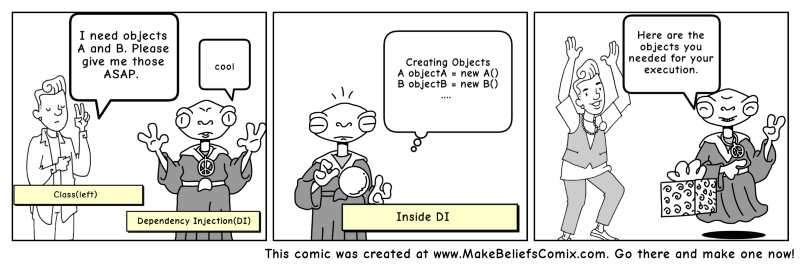
Cách xử lí có thể sử dụng DI. với DI sẽ đóng vai trò là middleman đứng trung gian tạo ra các object vào cung cấp cho Car class Nó làm class Car độc lập với việc tạo các objects of Wheels, Battery,
Vai trò của DI
- Create the objects
- Know which classes require those objects
- And provide them all those objects
Đặc điểm của DI
- Các class không giao tiếp trực tiếp với nhau, mà thông qua interface.
- Class cấp thấp sẽ implement interface, class cấp cao sẽ gọi class cấp thấp thông qua interface.
- Việc khởi tạo các class cấp thấp sẽ do DI Container
- DI được dùng để làm giảm sự phụ thuộc giữa các class, dễ dàng hơn trong việc thay đổi class, bảo trì code và testing.
Type of Dependency Injection
Có 3 dạng Dependency Injection:
- Constructor Injection: Các dependency sẽ được container truyền vào (inject vào) 1 class thông qua constructor của class đó. Đây là cách thông dụng nhất.
- Setter Injection: Các dependency sẽ được truyền vào 1 class thông qua các hàm Setter.
- Interface Injection: Class cần inject sẽ implement 1 interface. Interface này chứa 1 hàm Inject. Container sẽ injection dependency vào 1 class thông qua việc gọi hàm Inject của interface đó. Cách này thì hơi rườm rà ít được sử dụng
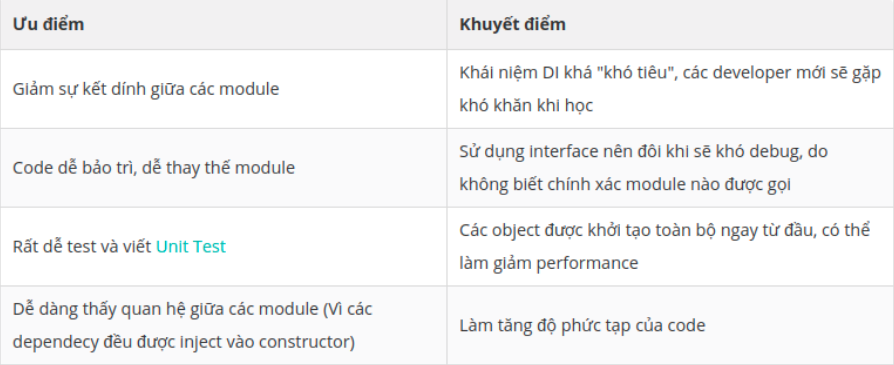
Ưu và khuyết điểm của Dependency Injection
Dagger 2
What is Dagger 2?
Dagger 2 - là một dependency injection framework. Nó được sử dụng để genaration code thông qua các base anotation, code được genartion ra rất dễ đọc và debug
Hầu hết các dependency injector sử dụng reflection để tạo ra và inject các module. Reflection nhanh và thích hợp cho các version Android cũ nhưng reflection gây ra khó khăn rất lớn trong việc debug hay tracking khi gặp lỗi.
Thay bằng việc sử dụng reflection Dagger sử dụng một trình biên dịch trước (pre-compiler), trình biên dịch này tạo ra tất cả các lớp, các module cần thiết để làm việc.
Dagger ít mạnh mẽ so với các dependency injector khác nhưng thay vào đó Dagger lại nhẹ nhàng và dễ dàng sử dụng cũng như gần như bỏ đi được điểm yếu của dependency injector là khả năng tracking bug
Annotation
Dagger 2 sử dụng một số annotations:
@Module: sử dụng cho những class cung cấp các method dependencies
@Provides: sử dụng cho methods nằm trong @Module class
@Inject: yêu cầu một dependency (constructor, thuộc tính, method)
@Component: một interface là cầu nối giữa Module và Injection
Settings
Các bước để thực hiện:
- Khảo sát sự phụ thuộc giữa các đối tượng
- Cài đặt Module: Cài đặt các hàm Provides để cung cấp các đối tượng phụ thuộc trong class Module
- Khai báo annotation @Inject tại nơi yêu cầu phụ thuộc
- Cài đặt Component: Tạo interface Component, khai báo Modules và đối tượng sử dụng phụ thuộc
- Khai báo Component vừa tạo tại điểm khởi đầu của chương trình (thường là 1 class kế thừa Application)
Ví dụ một component:
@Singleton
@Component(
        modules = [ApiModule::class, DbModule::class,
            ViewModelModule::class, AndroidSupportInjectionModule::class,
            ActivityModule::class, FragmentModule::class]
)
interface ApiComponent {

    @Component.Builder
    interface Builder {
        @BindsInstance
        fun application(application: Application): Builder

        @BindsInstance
        fun apiModule(apiModule: ApiModule): Builder

        @BindsInstance
        fun dbModule(dbModule: DbModule): Builder

        fun build(): ApiComponent
    }

    fun inject(appController: AppController)
}
Trong đoạn code trên: Module được khai báo gồm: [ApiModule::class, DbModule::class, ViewModelModule::class, AndroidSupportInjectionModule::class, ActivityModule::class, FragmentModule::class] và Đối tượng sử dụng phụ thuộc là AppController(Một class extend Application) Sau đó cần khai báo nó tại điểm khởi đầu của chương trình:
class AppController : Application(), HasActivityInjector {

    @Inject
    lateinit var dispatchingAndroidInjector: DispatchingAndroidInjector<Activity>

    override fun activityInjector(): DispatchingAndroidInjector<Activity>? {
        return dispatchingAndroidInjector
    }

    override fun onCreate() {
        super.onCreate()
        DaggerApiComponent.builder()
            .application(this)
            .apiModule(ApiModule())
            .dbModule(DbModule())
            .build()
            .inject(this)
    }
}
Ví dụ class ApiModule:
@Module
class ApiModule {

    @Provides
    @Singleton
    internal fun provideGson(): Gson {
        val gsonBuilder = GsonBuilder()
        return gsonBuilder.create()
    }

    @Provides
    @Singleton
    internal fun provideCache(application: Application): Cache {
        val cacheSize = (10 * 1024 * 1024).toLong() // 10 MB
        val httpCacheDirectory = File(application.cacheDir, "http-cache")
        return Cache(httpCacheDirectory, cacheSize)
    }


    @Provides
    @Singleton
    internal fun provideNetworkInterceptor(application: Application): NetworkInterceptor {
        return NetworkInterceptor(application.applicationContext)
    }

    @Provides
    @Singleton
    internal fun provideOkhttpClient(cache: Cache, networkInterceptor: NetworkInterceptor): OkHttpClient {
        val logging = HttpLoggingInterceptor()
        logging.level = HttpLoggingInterceptor.Level.BODY

        val httpClient = OkHttpClient.Builder()
        httpClient.cache(cache)
        httpClient.addInterceptor(networkInterceptor)
        httpClient.addInterceptor(logging)
        httpClient.addNetworkInterceptor(RequestInterceptor())
        httpClient.connectTimeout(30, TimeUnit.SECONDS)
        httpClient.readTimeout(30, TimeUnit.SECONDS)
        return httpClient.build()
    }

    @Provides
    @Singleton
    internal fun provideRetrofit(gson: Gson, okHttpClient: OkHttpClient): Retrofit {
        return Retrofit.Builder()
                .addConverterFactory(GsonConverterFactory.create(gson))
                .addCallAdapterFactory(RxJava2CallAdapterFactory.create())
                .baseUrl(AppConstants.BASE_URL)
                .client(okHttpClient)
                .build()
    }

    @Provides
    @Singleton
    internal fun provideMovieApiService(retrofit: Retrofit): MovieApiService {
        return retrofit.create(MovieApiService::class.java)
    }


    @Provides
    @Singleton
    internal fun provideTvApiService(retrofit: Retrofit): TvApiService {
        return retrofit.create(TvApiService::class.java)
    }
}
Class trên được khai báo @Module và định nghĩa các phương thức cung cấp phụ thuộc. Để sử dụng ta cần thêm @Inject vào thuộc tính hoặc constructor cần dependency
class MovieDetailActivity : BaseActivity() {

    @Inject
    internal lateinit var viewModelFactory: ViewModelFactory
    ...
}
Koin
What is Koin?
Koin is pragmatic lightweight dependency injection framework for Kotlin developers
Koin được viết hoàn toàn bằng Kotlin, sử dụng giải pháp funtional nên không sinh code không ánh xạ.
Core components của Koin
startKoin : Nó là điểm bắt đầu. Phương thức này nhận 1 list "modules" Koin DSL
module { } : Là một Koin Module (hoặc một Koin Submodule trong một module khác)
factory { } : Cung cấp một newInstance
single { } : Cung cấp một Singleton
get() : Yêu cầu component
Trên đây là 5 components hay sử dụng, các components khác các bạn có thể tìm hiểu thêm tại đây
How to use
Thêm vào file gradle
//koin
    implementation("org.koin:koin-core:2.0.1")
    implementation("org.koin:koin-android:2.0.1")
    implementation("org.koin:koin-androidx-viewmodel:2.0.1")
Để khai báo một module ta khai báo dạng như sau:
 Ví dụ:
val networkModule = module {
    single { createOkHttpCache(get()) }
    single(named("logging")) { createLoggingInterceptor() }
    single(named("header")) { createHeaderInterceptor() }
    single { createOkHttpClient(get(named("logging")), get(named("header"))) }
    single { createAppRetrofit(get()) }
    single { createApiService(get()) }
}

const val CACHE_SIZE = (10 * 1024 * 1024).toLong()

private fun createOkHttpCache(context: Context) =
    Cache(context.cacheDir, CACHE_SIZE)

private fun createLoggingInterceptor(): Interceptor =
    HttpLoggingInterceptor().apply {
        level = if (BuildConfig.DEBUG) HttpLoggingInterceptor.Level.BODY
        else HttpLoggingInterceptor.Level.NONE
    }

private fun createHeaderInterceptor() =
    Interceptor {
        val originRequest = it.request()
        val newRequest = originRequest.newBuilder()
//            .addHeader()
//            .addHeader()
            .method(originRequest.method(), originRequest.body())
            .build()
        it.proceed(newRequest)
    }

private fun createOkHttpClient(
//    cache: Cache,
    loggingInterceptor: Interceptor,
    headerInterceptor: Interceptor
) =
    OkHttpClient.Builder()
        .addInterceptor(loggingInterceptor)
        .addInterceptor(headerInterceptor)
        .build()

private fun createAppRetrofit(
    okHttpClient: OkHttpClient
) = Retrofit.Builder()
    .baseUrl(BASE_URL)
    .addConverterFactory(GsonConverterFactory.create())
    .addCallAdapterFactory(RxJava2CallAdapterFactory.create())
    .client(okHttpClient)
    .build()

private fun createApiService(
    retrofit: Retrofit
) = retrofit.create(ApiService::class.java)
Trong ví dụ trên có thêm từ khóa name, name được sủ dung khi hai 2 hàm cũng trả về 1 kiểu giá trị giúp phân biệt 2 kiểu này. Và khi createOkHttpClient sử dụng nó cũng cần chỉ ra dùng cái nào với từ khóa name
còn đây là ViewModelModule.kt
val viewModelModule = module {
    viewModel { MainViewModel(get(), get()) }
}
Để sử dụng được thì cần phải thêm các module như này vào trong một list và gọi nó với startKoin
class MyApplication :Application(){

    override fun onCreate() {
        super.onCreate()
        startKoin {
            androidLogger()

            androidContext(this@MyApplication)

            modules(listOf(appModule, networkModule, repositoryModule, viewModelModule))
        }
    }
}
startKoin chỉ được gọi một lần. Nên cầm đảm bảo rằng tất cả modules được gọi trong list.
Cách sử dụng . Để inject viewModel chỉ cần dùng từ khóa: by viewModel. MainViewModel sẽ được tạo cùng với cả các tham số của nó.
class MainActivity : BaseActivity<ActivityMainBinding, MainViewModel>() {
    override val viewModel: MainViewModel by viewModel()
    ...
}
Which one I should chose?
Koin:
- Sự phụ thuộc (Dependencies ) ít hơn
- Sử dụng tương tối dễ dàng, không phức tạp như Dagger2
- Ít code phát sinh hơn
- Dễ dàng hiểu và điều chỉnh
- Hỗ trợ cho properties
Dù thế nào thì Koin vẫn có những bất lợi so với Dagger như sau :
- Koin vẫn là Work-In-Progress vì thế chưa được sử dụng nhiều cho các project lớn.
- Dagger thực hiện tất cả các xử lý tại thời gian biên dịch và nếu có bất kì lỗi gì trong dependency graph, developer sẽ biết được nó sớm hơn.
- Chúng ta không thể inject bằng cách @Inject trong Dagger. Tất cả mọi thứ cần được xác định trong module list truyền vào trong startKoin
- Không có quá nhiều tài liệu về Koin bây giờ
Tài liệu tham khảo:
https://insert-koin.io/docs/2.0/documentation/reference/index.html
All rights reserved
